vue教程
vue教程
环境搭建
nodejs下载
已经"下一步式安装"过, 本地电脑历史版本
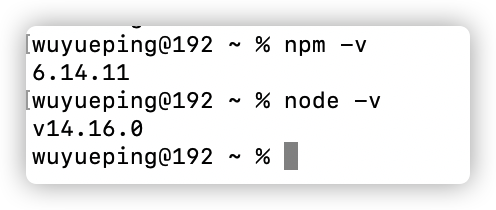
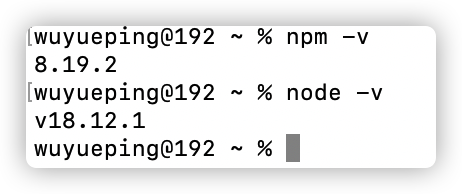
- Mac更新到官网最新版本
# 1.先查看本机node.js版本:

node -v

# 2.清除node.js的cache:

npm cache clean -f

# 3.安装 n 工具,这个工具是专门用来管理node.js版本的

npm install -g n

# 如果一直rollbackFailedOptional 可以设置 镜像服务器

npm config set registry http://registry.npm.taobao.org

# 4.安装最新版本的node.js

n stable

####

# n stable // 把当前系统的 Node 更新成最新的 “稳定版本”

# n lts // 长期支持版

# n latest // 最新版

# n 10.14.2 // 指定安装版本

# 5.再次查看本机的node.js版本: (这里可以直接查看npm 和node版本就已经完成更新)

node -v

npm -v

# 6.更新npm到最新版: -- 多余

# npm install npm@latest -g

# 如果出现权限问题 加sudo

# 查看npm默认安装路径

npm config ls

# 查看npm全部配置

npm config ls -l
配置node.js
配置npm阿壮全局模块路径与缓存路径

npm是随同nodejs一起安装的包管理工具

一般便于管理,自定义全局模块node_global和缓存路径node_cache
- 未定义前的默认配置
wuyueping@192 ~ % npm config ls -l

; cli configs

long = true

metrics-registry = "http://registry.npm.taobao.org/"

scope = ""

user-agent = "npm/6.14.11 node/v14.16.0 darwin x64"

; userconfig /Users/wuyueping/.npmrc

registry = "http://registry.npm.taobao.org/"

; default values

access = null

allow-same-version = false

also = null

always-auth = false

audit = true

audit-level = "low"

auth-type = "legacy"

before = null

bin-links = true

browser = null

ca = null

cache = "/Users/wuyueping/.npm"

cache-lock-retries = 10

cache-lock-stale = 60000

cache-lock-wait = 10000

cache-max = null

cache-min = 10

cafile = undefined

cert = null

cidr = null

color = true

commit-hooks = true

depth = null

description = true

dev = false

dry-run = false

editor = "vi"

engine-strict = false

fetch-retries = 2

fetch-retry-factor = 10

fetch-retry-maxtimeout = 60000

fetch-retry-mintimeout = 10000

force = false

format-package-lock = true

fund = true

git = "git"

git-tag-version = true

global = false

global-style = false

globalconfig = "/usr/local/etc/npmrc"

globalignorefile = "/usr/local/etc/npmignore"

group = 20

ham-it-up = false

heading = "npm"

https-proxy = null

if-present = false

ignore-prepublish = false

ignore-scripts = false

init-author-email = ""

init-author-name = ""

init-author-url = ""

init-license = "ISC"

init-module = "/Users/wuyueping/.npm-init.js"

init-version = "1.0.0"

json = false

key = null

legacy-bundling = false

link = false

local-address = undefined

loglevel = "notice"

logs-max = 10

; long = false (overridden)

maxsockets = 50

message = "%s"

; metrics-registry = null (overridden)

node-options = null

node-version = "14.16.0"

noproxy = null

offline = false

onload-script = null

only = null

optional = true

otp = null

package-lock = true

package-lock-only = false

parseable = false

prefer-offline = false

prefer-online = false

prefix = "/usr/local"

preid = ""

production = false

progress = true

proxy = null

read-only = false

rebuild-bundle = true

; registry = "https://registry.npmjs.org/" (overridden)

rollback = true

save = true

save-bundle = false

save-dev = false

save-exact = false

save-optional = false

save-prefix = "^"

save-prod = false

scope = ""

script-shell = null

scripts-prepend-node-path = "warn-only"

searchexclude = null

searchlimit = 20

searchopts = ""

searchstaleness = 900

send-metrics = false

shell = "/bin/zsh"

shrinkwrap = true

sign-git-commit = false

sign-git-tag = false

sso-poll-frequency = 500

sso-type = "oauth"

strict-ssl = true

tag = "latest"

tag-version-prefix = "v"

timing = false

tmp = "/var/folders/rg/zgjjfhgx29j3k4f1skxc9q9w0000gn/T"

umask = 18

unicode = true

unsafe-perm = true

update-notifier = true

usage = false

user = 0

; user-agent = "npm/{npm-version} node/{node-version} {platform} {arch} {ci}" (overridden)

userconfig = "/Users/wuyueping/.npmrc"

version = false

versions = false

viewer = "man"
- 配置全局模块安装路径和缓存路径
npm config set perfix "/Users/wuyueping/nodejs/node_global"

npm config set cache "/Users/wuyueping/nodejs/node_cache"

# 检查配置

npm config get perfix

npm config get cache
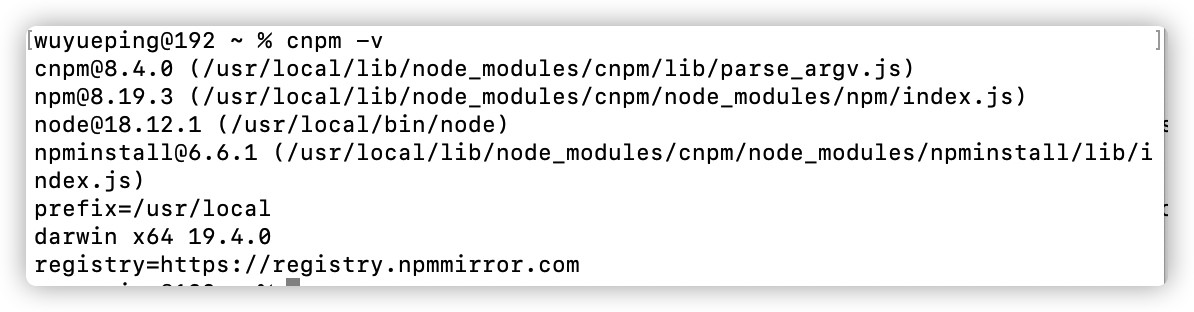
安装淘宝镜像cnpm
npm install -g cnpm --registry=https://registry.npm.taobao.org

# 检查安装cnpm安装版本

cnpm -v

# 检查一下镜像配置

npm config get registry
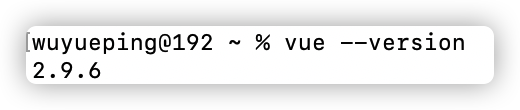
安装vue 和 vue-cli脚手架
cnpm install vue -g

cnpm install vue-cli -g

# 查看vue版本

vue --version

# 卸载vue参考:

cnpm uninstall vue-cli -g
VScode工具安装
无脑"下一步式安装"
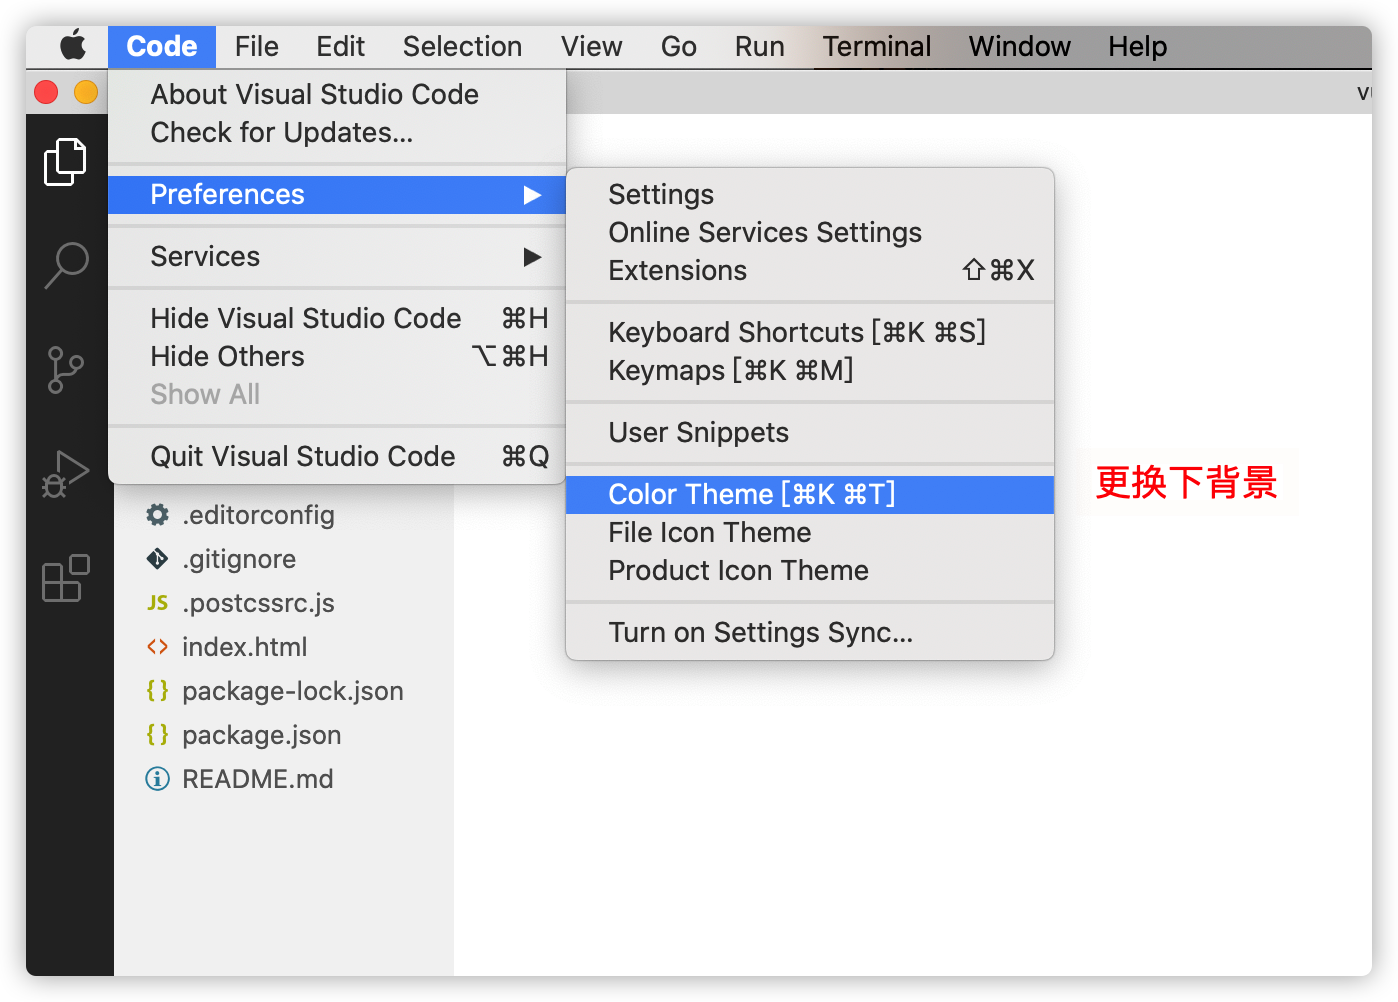
vscode更换背景
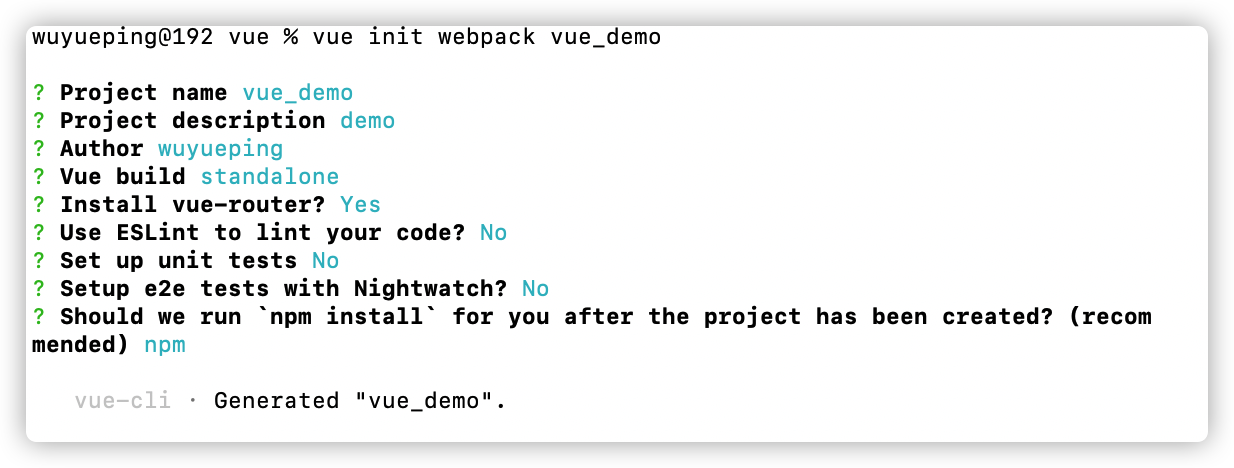
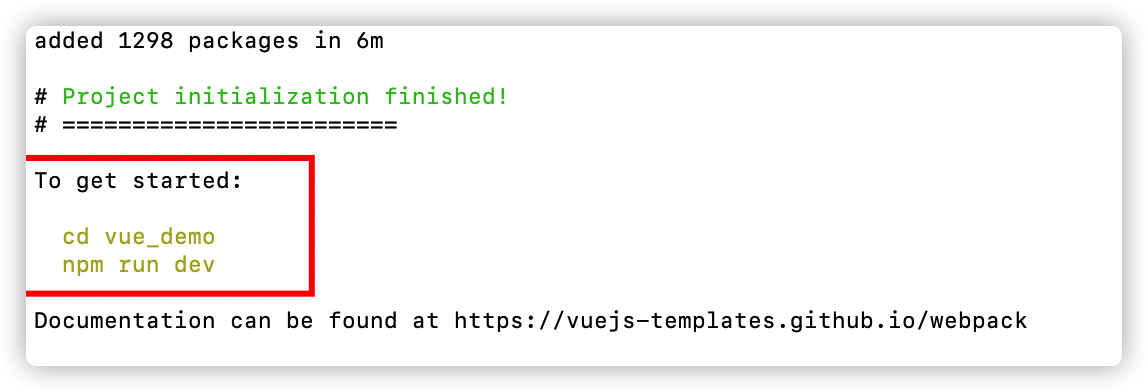
创建vue项目
vue init webpack vue_demo
- 安装问题详解
# 项目名称

? Project name my-project

# 项目描述

? Project description A Vue.js project

# 项目作者

? Author (xxx)

# 构建方式 一般默认运行+编译

? Vue build standalone

##################################################

vue build (Use arrow keys)

// 1. (译:运行+编译:被推荐给大多数用户)

> Runtime + Compiler:recommended for most users

// 2.(译:只运行大约6KB比较轻量的压缩文件,但只允许模板(或任何VUE特定HTML)。

//	VUE文件需要在其他地方呈现函数。翻译不精准,意思大概是选择该构建方式对文件大小有要求)

> Runtime-only:about 6KB lighter min+gzip,but templates (or any Vue-specific HTML) are ONLY

allowed in .vue files-render functions are required elsewhere

#################################################

# 安装vue路由

? Install vue-router? Yes

# 是否使用ESLint检测你的代码。如果不是专业前端, 对代码可读性要求不高 就选择no。

? Use ESLint to lint your code? No

# 是否安装单元测试 一般no

? Set up unit tests No

# 是否安装E2E测试框架NightWatch(E2E,也就是End To End,就是所谓的“用户真实场景”。) 一般no

? Setup e2e tests with Nightwatch? No

# 项目创建后是否要为你运行“npm install”?这里选择包管理工具 一般用npm

? Should we run `npm install` for you after the project has been created? (recommended) npm
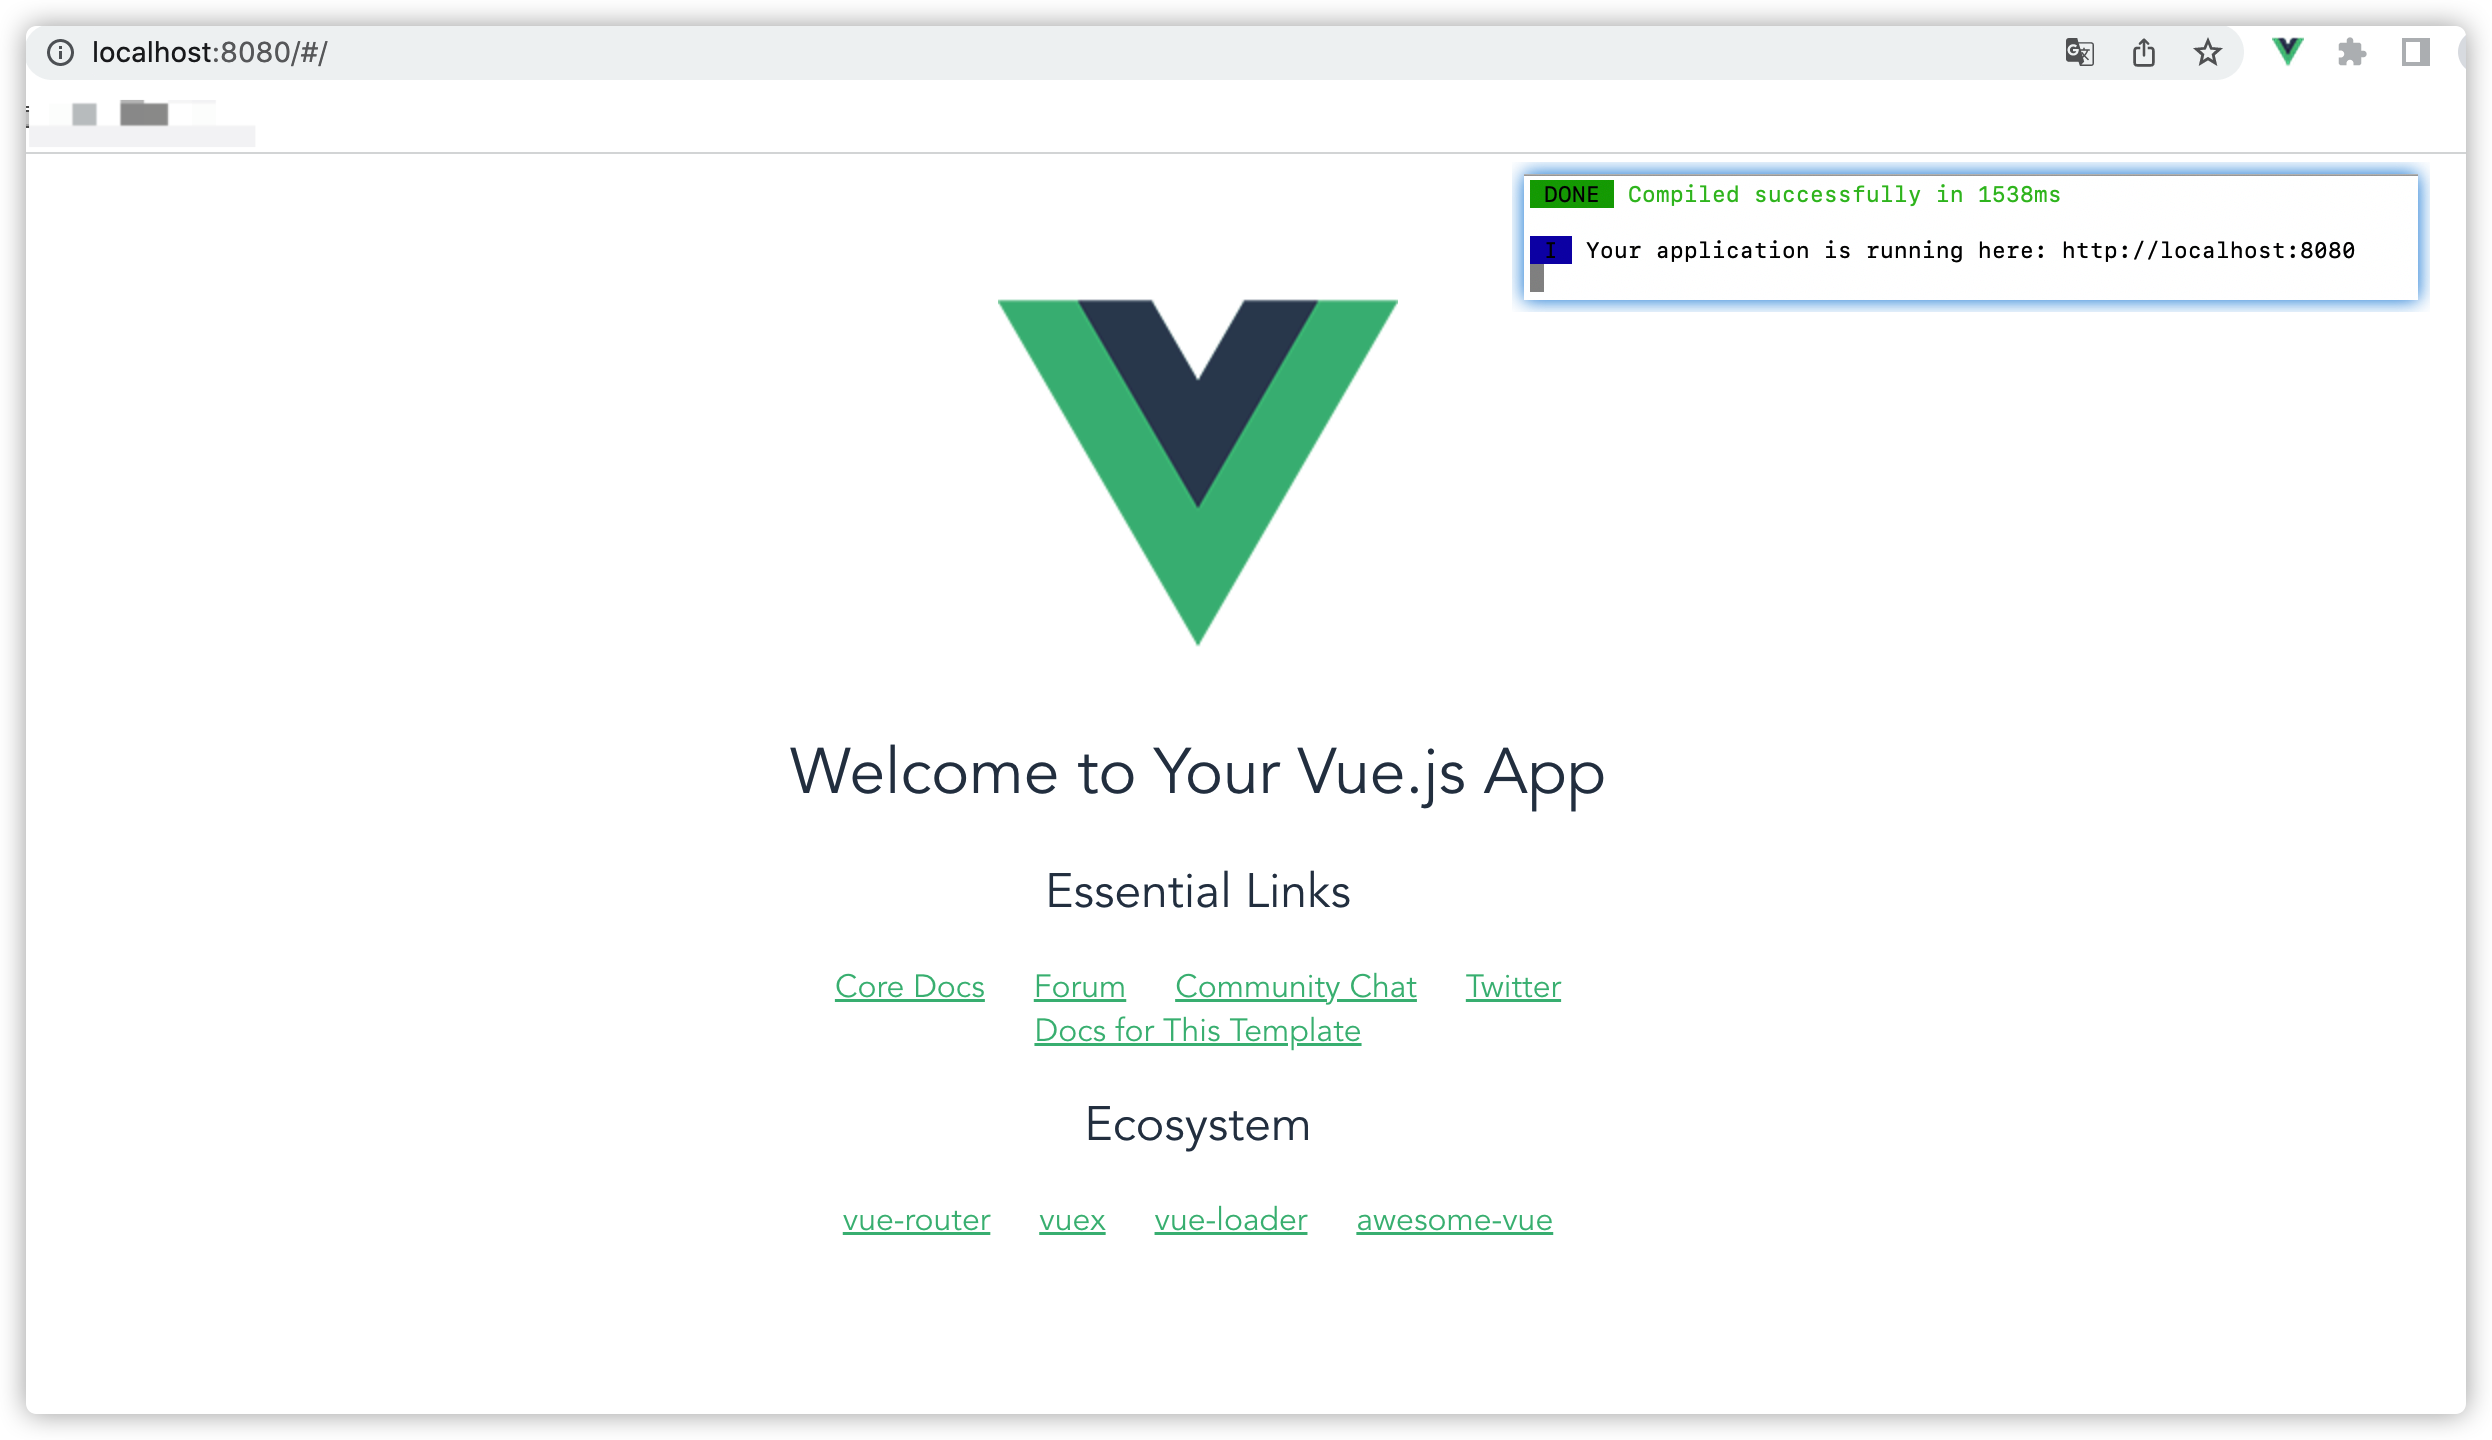
运行vue项目
# 执行

npm run dev

# 执行成功,浏览器地址栏输入如下url,能够打开并展示如下,说明vue项目创建完成,并能够成功启动

http://localhost:8080/#/

引入element-UI
# 全局引入

# 1.到web项目下,用npm安装Element-ui

npm i element-ui -S

# 2.在src下的main.js中引入Element-ui

import Vue from 'vue'

import ElementUI from 'element-ui';             //全局引入element

import 'element-ui/lib/theme-chalk/index.css';    //全局引入element的样式

import App from './App.vue'

Vue.config.productionTip = false

Vue.use(ElementUI);     //全局注入element

new Vue({

  render: h => h(App),

}).$mount('#app')

# 3.在main.js中加入如下注释,否则会进行字符校验,非标准写法下,会编译报错

# 如果在项目新建时同意了 eslint校验 需要去掉的话

/* eslint-disable */

# 4.在Helloword.vue中写入你想要的组件

<template>

  <div class="hello">

      <el-button type="success">成功按钮</el-button>

      <el-radio v-model="radio" label="1">备选项</el-radio>

  </div>

</template>
[备注:以上知识点均来源于网络]
vue教程的更多相关文章
- vue教程3-05 vue组件数据传递、父子组件数据获取,slot,router路由
vue教程3-05 vue组件数据传递 一.vue默认情况下,子组件也没法访问父组件数据 <!DOCTYPE html> <html lang="en"> ...
- vue教程3-04 vue.js vue-devtools 调试工具的下载安装和使用
vue教程3-04 vue.js vue-devtools vue调试工具的安装和使用 一.vue-devtools 下载与安装 1.需要 fan qiang 2.打开谷歌浏览器设置--->扩展 ...
- vue教程3-03 vue组件,定义全局、局部组件,配合模板,动态组件
vue教程3-03 vue组件,定义全局.局部组件,配合模板,动态组件 一.定义一个组件 定义一个组件: 1. 全局组件 var Aaa=Vue.extend({ template:'<h3&g ...
- vue教程3-02 vue动画
vue教程3-02 vue动画 以下代码,已经用包管理器下载好vue,animate <!DOCTYPE html> <html lang="en"> &l ...
- vue教程3-01 路由、组件、bower包管理器使用
vue教程3-01 路由.组件.包管理器 以下操作前提是 已经安装好node.js npm bower-> (前端)包管理器 下载: npm install bower -g 验证: bower ...
- vue教程2-08 自定义键盘信息、监听数据变化vm.$watch
vue教程2-08 自定义键盘信息 @keydown.up @keydown.enter @keydown.a/b/c.... 自定义键盘信息: Vue.directive('on').keyCode ...
- vue教程2-07 自定义指令
vue教程2-07 自定义指令 自定义指令: 一.属性: Vue.directive(指令名称,function(参数){ this.el -> 原生DOM元素 }); <div v-re ...
- vue教程2-07 微博评论功能
vue教程2-07 微博评论功能 <!doctype html> <html> <head> <meta charset="utf-8"& ...
- vue教程2-06 过滤器
vue教程2-06 过滤器 过滤器: vue提供过滤器: capitalize uppercase currency.... <div id="box"> {{msg| ...
- vue教程2-05 v-for循环 重复数据无法添加问题 加track-by='索引'
vue教程2-05 v-for循环 重复数据无法添加问题 加track-by='索引' 解决问题的代码示例: <!DOCTYPE html> <html lang="en ...
随机推荐
- C++_bind用法
1.bind函数 网络编程中, 经常要使用到回调函数. 当底层的网络框架有数据过来时,往往通过回调函数来通知业务层. 这样可以使网络层只专注于 数据的收发, 而不必关心业务 在c语言中, 回调函数的实 ...
- Excel操作技巧
命令 获取行号ROW(D2).COLOUM(D2) 快捷键 alt+=求和:alt+f1生成柱形图:alt+回车强制换行:alt+178输入平方:alt+179输入立方: shitf+大十字光标 换位 ...
- 跳板攻击之:Netsh端口代理转发
跳板攻击之:Netsh端口代理转发 目录 跳板攻击之:Netsh端口代理转发 1 命令解析 2 代理转发内网22端口 3 代理转发外网4444端口 4 注意 1 命令解析 netsh interfac ...
- 免杀之:C# XOR Shellcode
免杀之:C# XOR Shellcode 目录 免杀之:C# XOR Shellcode 1 环境准备 2 制作Shellcode后门文件 2.1 编译环境准备 2.2 生成XORKryptor程序 ...
- Visual Studio Code C / C++ 语言环境配置的历程
前言 从大一开始学习c++用的dev-c++,后来看到老师用的是vs code,实在是馋它的颜值便去下了vs 2017.至于为什么下载vs 2017呢?是因为下载的时候我以为他们是一样的,便下了v ...
- 解决用flex布局时内容溢出的问题
1,2正常现象如下: 2,点击折叠图标 再点折叠 无图标了 解决:flex:1,width:0 就可以了
- div溢出横向滚动
需求:div在一行内需要溢出滚动 方案: 1:父类元素需要设置 overflow-x: auto; //横向方向溢出元素 white-space: nowrap; //溢出的元素不换行 2:子元素需 ...
- html音乐播放器
<!DOCTYPE html><html lang="en"><head> <meta charset="UTF-8" ...
- 【补题】The 2022 SDUT Summer Trials
比赛链接 The 2022 SDUT Summer Trials A. Ginger's number 样例恶臭(恼) 签到题 简单分解因数就会发现要求的就是\(gcd\),直接算即可,时间复杂度\( ...
- Sublime Text3高效开发之编写代码块(snippet)
看到别人使用HBuilder X可以插入代码块,就想sublime text3有没有类似的功能呢,诶还真有.在sublime text3叫作snippet. -snippet是干什么的?:可以在你编写 ...