『德不孤』Pytest框架 — 9、Pytest测试报告
1、pytest-html插件
Pytest可以通过命令行方式,生成xml/html格式的测试报告,并存储于用户指定路径。
需要用到pytest-html插件。
安装方式:执行命令pip install pytest-html。
(1)插件使用方式:
命令格式:--html=用户路径/report.html
运行方式:
main()函数方式:
pytest.main(['--html=./report/report_01.html'])(不好使,可能配置了pytest.ini文件)- 命令行方式:
在report目录中生成report.html测试报告。
pytest ./pytest_demo/test_pytest_01.py --html=./report/report.html - 使用
pytest.ini文件方式:
在addopts属性后追加--html参数配置,在report目录中生成report.html测试报告。
addopts = -s --html=../report/report.html
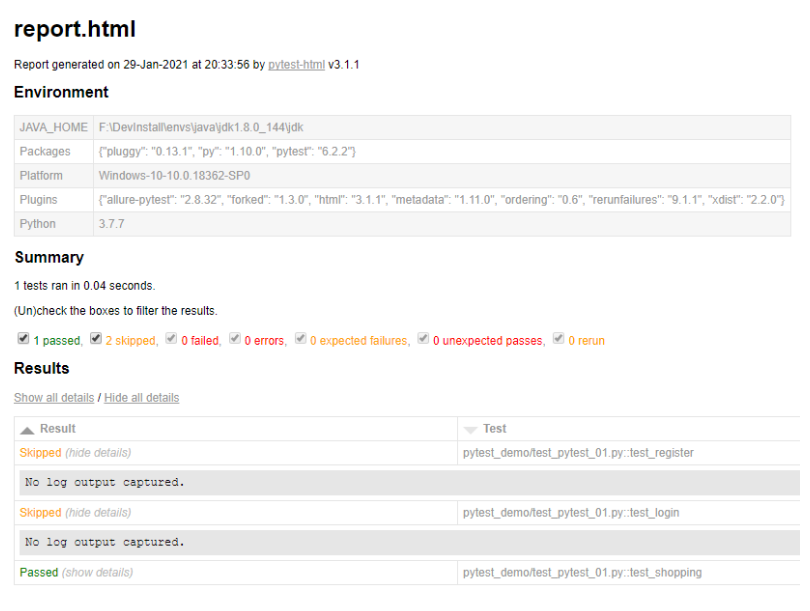
(2)执行结果:
在指定目录中会生成assets文件夹(css文件)和report.html文件。
如下图所示:
提示:若要生成
xml文件,可将--html=./report.html改成--junitxml= report/report.xml
2、Allure测试报告
(1)Allure框架说明
Allure生成的测试报告与上面pytest-html插件生成的测试报告对比,简直完美!
Allure是一个Report框架,是一种灵活的轻量级,支持多语言的测试报告工具,它不仅能够以简洁的WEB报告形式显示已测试的内容,并带有失败用例截图、测试步骤和测试说明信息,也可以集成到Jenkins上展示高大上的报告界面。
而且允许参与开发过程的每个人从测试的日常执行中提取最大限度的有用信息。
Allure框架支持的语言包括:
JavaPythonJavaScriptRubyGroovyPHP.NetScala
Allure帮助文档:
(2)Allure框架的使用
步骤1:下载Allure框架,并配置到环境变量中。
Allure框架下载地址:https://github.com/allure-framework/allure2/releases
点击下图位置,进行下载。
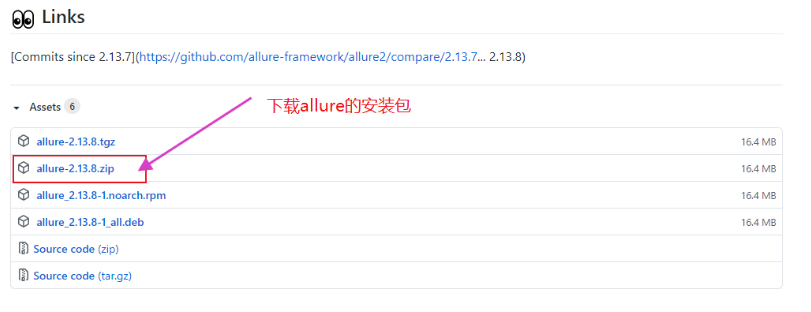
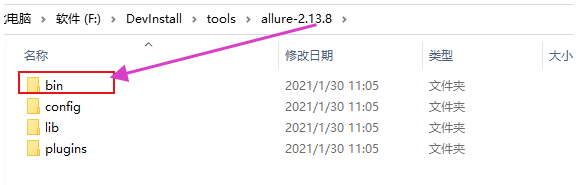
然后解压Allure框架文件,放到自己指定的目录中。
把Allure框架的bin目录配置到Path环境变量中。
步骤2:验证Allure框架是否安装成功。
使用命令:allure --version
需要在CMD命令行和PyCharm的Terminal中,都需要验证一下。
因为CMD可以验证通过,但是PyCharm中验证失败,如下:
J:\PyCharmWorkSpace\Pytest_d>allure --version

'allure' 不是内部或外部命令,也不是可运行的程序

或批处理文件。
解决方式:需要重启PyCharm。
步骤3:下载allure-pytest库(插件)。
执行安装命令:pip install allure-pytest
步骤4:设置生成的Json格式临时报告的存放位置。
配置pytest.ini文件,在pytest.ini全局配置文件中的addopts属性中添加:
--alluredir ../report/temp_jsonreport
例如:addopts = -vs --alluredir ../report/temp_jsonreport
然后我们执行测试用例就可以了,当然--alluredir参数也可以不配置在pytest.ini文件,比如在执行测试的命令行或者mian()函数中填写都可以。(主要是生成Json格式的测试报告,是多个Json文件)
提示:
- 命令行参数:
pytest --alluredir report,是在执行命令目录生成report文件夹,文件夹下包含xml文件。- 将
pytest.ini文件中的生成报告的命令替换成--alluredir report,在命令行中运行pytest即可生成报告格式为Json格式,保存在项目文件的report文件夹中。
步骤5:生成Allure测试报告。
原理是:使用第一步下载的Allure框架把Json格式的测试报告,转换成精美的HTML测试报告。
将上面/report/temp_jsonreport文件夹中的Json格式的测试报告转化为HTML格式的测试报告。
执行命令:allure generate ./report/temp_jsonreport -o ./report/html --clean
注意:以执行命令的目录为相对路径。
说明:
allure generate: 固定命令。./report/temp_jsonreport:生成的Json格式的临时报告的路径。-o:输出output。./report/html:生成的Allure报告的路径。--clean:清空./report/html路径中原来的Allure测试报告。
提示:main()函数中执行如上命令。
if __name__ == '__main__':

    pytest.main()

    os.system("allure generate ./report/temp_jsonreport -o ./report/html --clean")

# 或者直接用main函数调用,哪种方式都可以。

# (直接执行测试文件, 而不用pytest的方式执行,就可以执行)

pytest.main(["testCase_demo1.py","-sv","--alluredir","../report/temp_jsonreport"])

os.system("allure generate ./report/temp_jsonreport -o ./report/html --clean")
说明:找不到路径的话,可以在Python Console窗口调试。
最后,生成的Allure测试报告如下图:
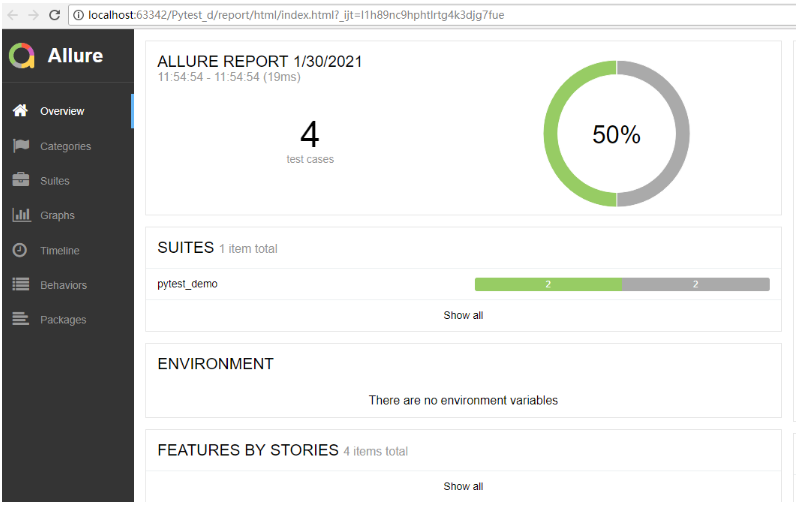
提示:
Allure测试报告支持自定义修改。
『德不孤』Pytest框架 — 9、Pytest测试报告的更多相关文章
- 『德不孤』Pytest框架 — 1、Pytest测试框架介绍
目录 1.什么是单元测试框架 2.单元测试框架主要做什么 3.单元测试框架和自动化测试框架有什么关系 4.Pytest测试框架说明 5.Pytest框架和Unittest框架区别 (1)Unittes ...
- 『德不孤』Pytest框架 — 2、Pytest的基本使用
目录 1.Pytest安装 2.Pytest常用插件 3.Pytest运行的第一个例子 4.Pytest框架的运行方式 5.在PyCharm中以Pytest的方式运行测试用例 1.Pytest安装 C ...
- 『德不孤』Pytest框架 — 3、Pytest的基础说明
目录 1.Pytest参数介绍 2.Pytest框架用例命名规则 3.Pytest Exit Code说明 4.pytest.ini全局配置文件 5.Pytest执行测试用例的顺序 1.Pytest参 ...
- 『德不孤』Pytest框架 — 10、setUp()和tearDown()函数
目录 1.setUp()和tearDown()函数介绍 2.setUp()和tearDown()函数作用 3.setUp()和tearDown()函数说明 4.示例 (1)方法级 (2)类级 (3)函 ...
- 『德不孤』Pytest框架 — 11、Pytest中Fixture装饰器(一)
目录 1.Fixture装饰器的用途 2.Fixture参数说明 3.Fixture装饰器简单应用 4.yield执行后置函数 1.Fixture装饰器的用途 做测试前后的初始化设置,如测试数据准备, ...
- 『德不孤』Pytest框架 — 14、Pytest中的conftest.py文件
目录 1.conftest.py文件介绍 2.conftest.py的注意事项 3.conftest.py的使用 4.不同位置conftest.py文件的优先级 5.conftest.py中Fixtu ...
- 『德不孤』Pytest框架 — 15、Pytest参数化
目录 1.Pytest参数化说明 2.Pytest参数化方式 3.parametrize装饰器参数说明 4.Pytest参数化(单个参数) 5.Pytest参数化(多个参数) 6.ids参数说明 1. ...
- 『德不孤』Pytest框架 — 6、Mark分组执行测试用例
目录 1.Pytest中的Mark介绍 2.Mark的使用 3.Mark的注册和使用 4.使用Mark完成失败重试 5.扩展 1.Pytest中的Mark介绍 Mark主要用于在测试用例/测试类中给用 ...
- 『德不孤』Pytest框架 — 12、Pytest中Fixture装饰器(二)
目录 5.addfinalizer关键字 6.带返回值的Fixture 7.Fixture实现参数化 (1)params参数的使用 (2)进阶使用 8.@pytest.mark.usefixtures ...
随机推荐
- 学习MyBatis必知必会(5)~了解myBatis的作用域和生命周期并抽取工具类MyBatisUtil、mybatis执行增删改查操作
一.了解myBatis的作用域和生命周期[错误的使用会导致非常严重的并发问题] (1)SqlSessionFactoryBuilder [ 作用:仅仅是用来创建SqlSessionFactory,作用 ...
- AT2650 [ARC077C] guruguru
可以发现,如果我们枚举每个理想亮度 \(X\) 然后再求在这个理想亮度情况下的答案是非常难维护的. 不妨反过来,考虑每个位置 \(i, i + 1\) 之间对每个理想亮度 \(X\) 减少次数的贡献. ...
- SpringBoot集成druid数据库连接池的简单使用
简介 Druid是阿里巴巴旗下Java语言中最好的数据库连接池.Druid能够提供强大的监控和扩展功能. 官网: https://github.com/alibaba/druid/wiki/常见问题 ...
- Android的基本资源引用(字符串、颜色、尺寸、数组)【转】
感谢大佬:https://blog.csdn.net/wenge1477/article/details/81295763 Android的基本资源引用(字符串.颜色.尺寸.数组)[转] 一.Andr ...
- Activity有多个启动图标
(1)如果你想让你的Activity有多个启动图标 需要这样配置 <intent-filter> <action android:name="android.intent. ...
- storyboard文件的认识
- 作用:描述软件界面 - 程序启动的简单过程 - 程序一启动,就会加载`Main.storyboard`文件 - 会创建箭头所指的控制器,并且显示控制器所管理的软件界面 - 配置程序 ...
- Java中的输入流与输出流
一.流的概念 在Java中,流是从源到目的地的字节的有序序列.Java中有两种基本的流--输入流(InputStream)和输出流(OutputStream). 根据流相对于程序的另一个端点的不同,分 ...
- SSH 远程访问及控制 ( 早上好,我是派大星,上帝派来爱你的那颗星)
远程访问及控制 1.SSH远程管理,TCP Wrappers访问控制 2.配置密钥对验证 1.SSH远程管理,TCP访问控制 SSH是一种安全通道协议,主要用来实现字符界面的远程登录.远程复制等功能: ...
- SpringBoot源码解读系列三——引导注解
我们再来看下SpringBoot应用的启动类: 查看代码 import org.springframework.boot.SpringApplication; import org.springfra ...
- linux_17
nginx负载均衡中常见的算法及原理有哪些? 用rewrite规则实现将所有到a域名的访问rewrite到b域名 实现反向代理客户端IP透传 利用LNMP实现wordpress站点搭建