spingBoot整合mybatis+generator+pageHelper
spingBoot整合mybatis+generator+pageHelper
环境/版本一览:
- 开发工具:Intellij IDEA 2018.1.4
- springboot: 2.0.4.RELEASE
- jdk:1.8.0_40
- maven:3.3.9
- alibaba Druid 数据库连接池:1.1.9
额外功能:
- PageHelper 分页插件
- mybatis generator 自动生成代码插件
开始搭建:
创建项目:
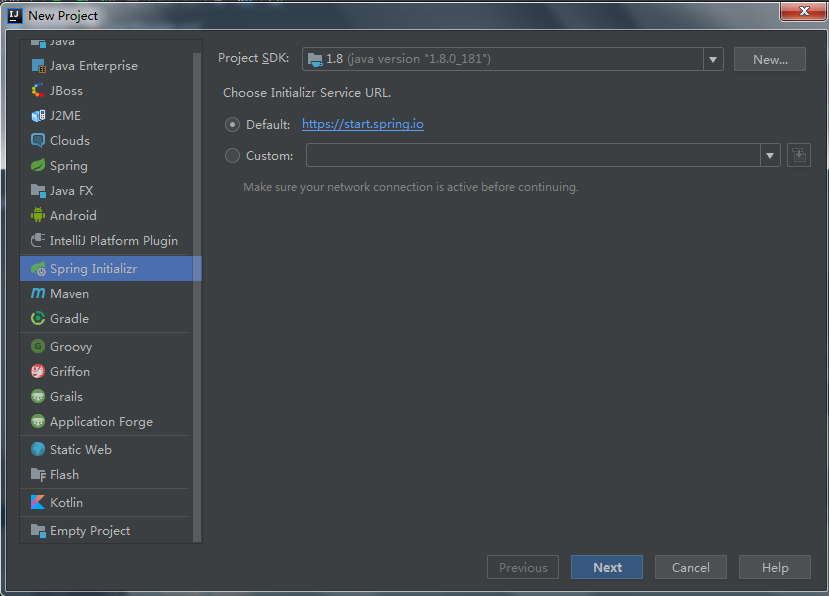
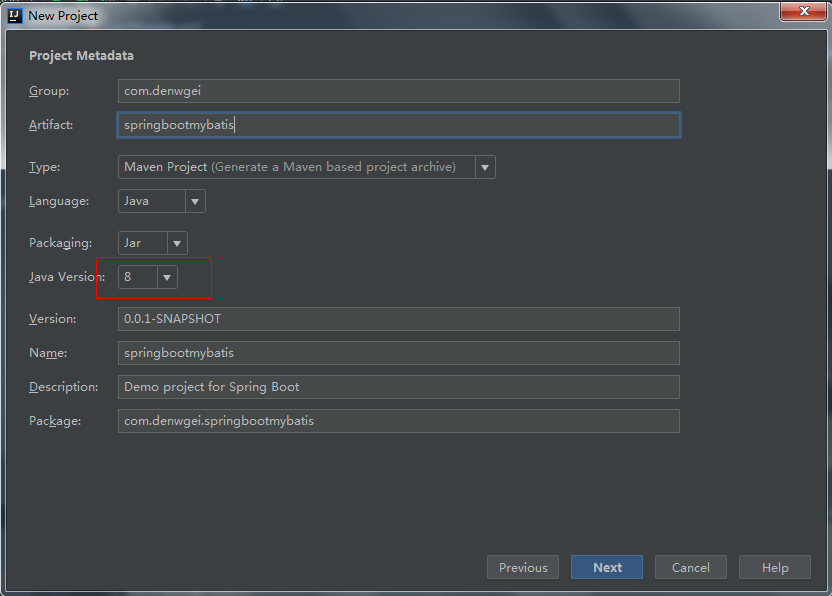
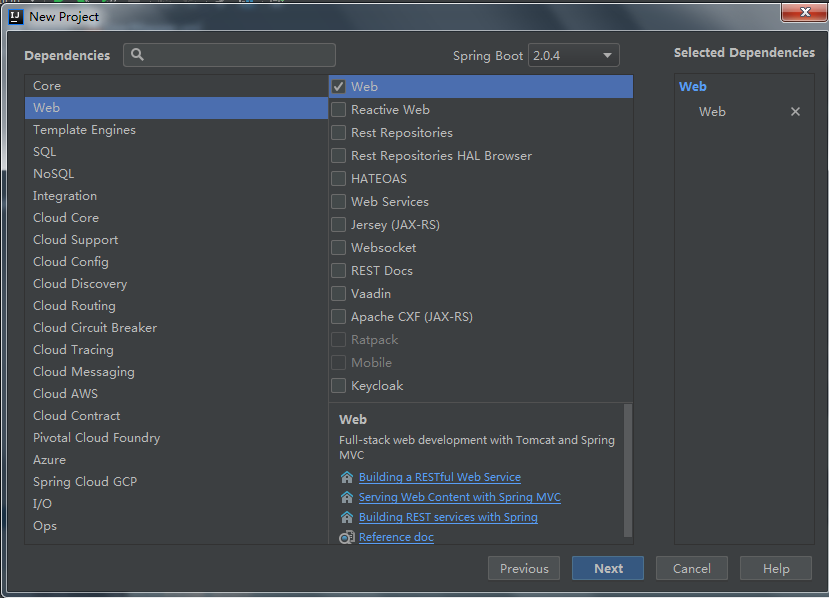
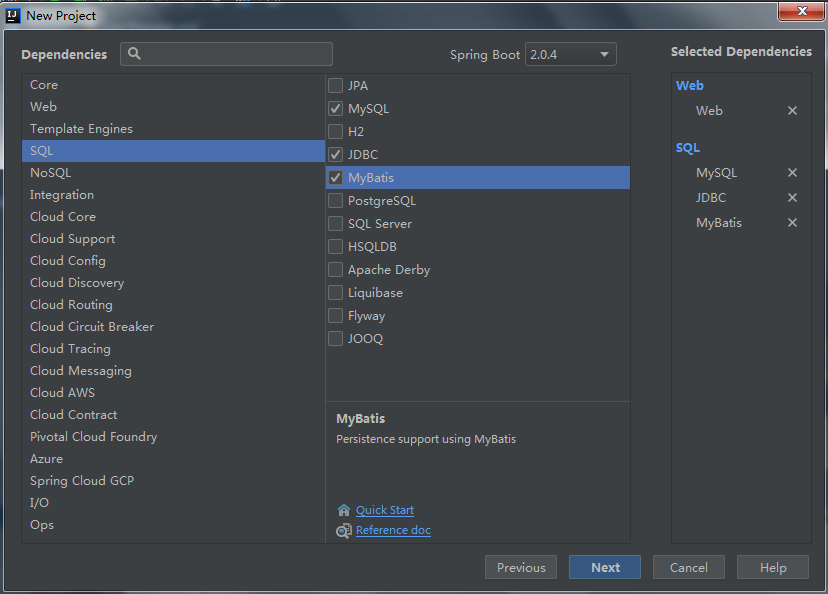
看一下文件结构:
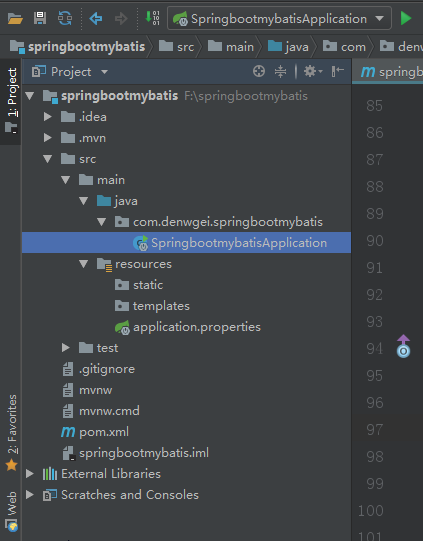
查看一下pom.xml:
补齐依赖:
<?xml version="1.0" encoding="UTF-8"?>

<project xmlns="http://maven.apache.org/POM/4.0.0" xmlns:xsi="http://www.w3.org/2001/XMLSchema-instance"

         xsi:schemaLocation="http://maven.apache.org/POM/4.0.0 http://maven.apache.org/xsd/maven-4.0.0.xsd">

    <modelVersion>4.0.0</modelVersion>

    <groupId>com.denwgei</groupId>

    <artifactId>springbootmybatis</artifactId>

    <version>0.0.1-SNAPSHOT</version>

    <packaging>jar</packaging>

    <name>springbootmybatis</name>

    <description>Demo project for Spring Boot</description>

    <parent>

        <groupId>org.springframework.boot</groupId>

        <artifactId>spring-boot-starter-parent</artifactId>

        <version>2.0.4.RELEASE</version>

        <relativePath/> <!-- lookup parent from repository -->

    </parent>

    <properties>

        <project.build.sourceEncoding>UTF-8</project.build.sourceEncoding>

        <project.reporting.outputEncoding>UTF-8</project.reporting.outputEncoding>

        <java.version>1.8</java.version>

    </properties>

    <dependencies>

        <dependency>

            <groupId>org.springframework.boot</groupId>

            <artifactId>spring-boot-starter-jdbc</artifactId>

        </dependency>

        <dependency>

            <groupId>org.springframework.boot</groupId>

            <artifactId>spring-boot-starter-web</artifactId>

        </dependency>

        <dependency>

            <groupId>org.mybatis.spring.boot</groupId>

            <artifactId>mybatis-spring-boot-starter</artifactId>

            <version>1.3.2</version>

        </dependency>

        <dependency>

            <groupId>mysql</groupId>

            <artifactId>mysql-connector-java</artifactId>

            <scope>runtime</scope>

        </dependency>

        <dependency>

            <groupId>org.springframework.boot</groupId>

            <artifactId>spring-boot-starter-test</artifactId>

            <scope>test</scope>

        </dependency>

        <dependency>

            <groupId>org.apache.commons</groupId>

            <artifactId>commons-lang3</artifactId>

            <version>3.4</version>

        </dependency>

        <dependency>

            <groupId>com.fasterxml.jackson.core</groupId>

            <artifactId>jackson-core</artifactId>

        </dependency>

        <dependency>

            <groupId>com.fasterxml.jackson.core</groupId>

            <artifactId>jackson-databind</artifactId>

        </dependency>

        <dependency>

            <groupId>com.fasterxml.jackson.datatype</groupId>

            <artifactId>jackson-datatype-joda</artifactId>

        </dependency>

        <dependency>

            <groupId>com.fasterxml.jackson.module</groupId>

            <artifactId>jackson-module-parameter-names</artifactId>

        </dependency>

        <!-- 分页插件 -->

        <dependency>

            <groupId>com.github.pagehelper</groupId>

            <artifactId>pagehelper-spring-boot-starter</artifactId>

            <version>1.2.5</version>

        </dependency>

        <!-- alibaba的druid数据库连接池 -->

        <dependency>

            <groupId>com.alibaba</groupId>

            <artifactId>druid-spring-boot-starter</artifactId>

            <version>1.1.9</version>

        </dependency>

    </dependencies>

    <build>

        <plugins>

            <plugin>

                <groupId>org.springframework.boot</groupId>

                <artifactId>spring-boot-maven-plugin</artifactId>

            </plugin>

            <!-- mybatis generator 自动生成代码插件 -->

            <plugin>

                <groupId>org.mybatis.generator</groupId>

                <artifactId>mybatis-generator-maven-plugin</artifactId>

                <version>1.3.2</version>

                <configuration>

                    <configurationFile>${basedir}/src/main/resources/generator/generatorConfig.xml</configurationFile>

                    <overwrite>true</overwrite>

                    <verbose>true</verbose>

                </configuration>

            </plugin>

        </plugins>

    </build>

</project>
项目不使用application.properties文件 而使用更加简洁的application.yml文件:
将原有的resource文件夹下的application.properties文件删除,创建一个新的application.yml配置文件,
文件的内容如下:
注意application.yml 要放在resource的一级目录下,否则会找不到,报错。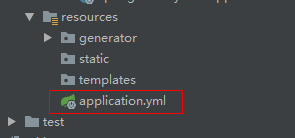
application.yml
server:

  port: 8080

spring:

    datasource:

        name: mysql_test

        type: com.alibaba.druid.pool.DruidDataSource

        #druid相关配置

        druid:

          #监控统计拦截的filters

          filters: stat

          driver-class-name: com.mysql.jdbc.Driver

          #基本属性

          url: jdbc:mysql://127.0.0.1:3306/floor_shop

          username: root

          password: admin

          #配置初始化大小/最小/最大

          initial-size: 1

          min-idle: 1

          max-active: 20

          #获取连接等待超时时间

          max-wait: 60000

          #间隔多久进行一次检测,检测需要关闭的空闲连接

          time-between-eviction-runs-millis: 60000

          #一个连接在池中最小生存的时间

          min-evictable-idle-time-millis: 300000

          validation-query: SELECT 'x'

          test-while-idle: true

          test-on-borrow: false

          test-on-return: false

          #打开PSCache,并指定每个连接上PSCache的大小。oracle设为true,mysql设为false。分库分表较多推荐设置为false

          pool-prepared-statements: false

          max-pool-prepared-statement-per-connection-size: 20

## 该配置节点为独立的节点,有很多同学容易将这个配置放在spring的节点下,导致配置无法被识别

mybatis:

  mapper-locations: classpath:mapper/*.xml #注意:一定要对应mapper映射xml文件的所在路径

  type-aliases-package: com.springbootdemo3.sbmybatis.model  # 注意:对应实体类的路径

#pagehelper

pagehelper:

    helperDialect: mysql

    reasonable: true

    supportMethodsArguments: true

    params: count=countSql

    returnPageInfo: check
使用mybatis generator 自动生成代码:
- 配置pom.xml中generator 插件所对应的配置文件 ${basedir}/src/main/resources/generator/generatorConfig.xml

generatorConfig.xml :
 <?xml version="1.0" encoding="UTF-8"?>

 <!DOCTYPE generatorConfiguration

         PUBLIC "-//mybatis.org//DTD MyBatis Generator Configuration 1.0//EN"

         "http://mybatis.org/dtd/mybatis-generator-config_1_0.dtd">

 <generatorConfiguration>

     <!-- 数据库驱动:选择你的本地硬盘上面的数据库驱动包-->

     <classPathEntry  location="F:\lib\mybatis\mysql-connector-java-5.1.11.jar"/>

     <context id="DB2Tables"  targetRuntime="MyBatis3">

         <commentGenerator>

             <property name="suppressDate" value="true"/>

             <!-- 是否去除自动生成的注释 true:是 : false:否 -->

             <property name="suppressAllComments" value="true"/>

         </commentGenerator>

         <!--数据库链接URL,用户名、密码 -->

         <jdbcConnection driverClass="com.mysql.jdbc.Driver" connectionURL="jdbc:mysql://127.0.0.1/floor_shop"

                         userId="root" password="admin">

         </jdbcConnection>

         <javaTypeResolver>

             <property name="forceBigDecimals" value="false"/>

         </javaTypeResolver>

         <!-- 生成模型的包名和位置-->

         <javaModelGenerator targetPackage="com.denwgei.springbootmybatis.model" targetProject="src/main/java">

             <property name="enableSubPackages" value="true"/>

             <property name="trimStrings" value="true"/>

         </javaModelGenerator>

         <!-- 生成映射文件的包名和位置-->

         <sqlMapGenerator targetPackage="mapper" targetProject="src/main/resources">

             <property name="enableSubPackages" value="true"/>

         </sqlMapGenerator>

         <!-- 生成DAO的包名和位置-->

         <javaClientGenerator type="XMLMAPPER" targetPackage="com.denwgei.springbootmybatis.Dao" targetProject="src/main/java">

             <property name="enableSubPackages" value="true"/>

         </javaClientGenerator>

         <!-- 要生成的表 tableName是数据库中的表名或视图名 domainObjectName是实体类名(model)-->

         <table tableName="user" domainObjectName="User" enableCountByExample="false" enableUpdateByExample="false"

                enableDeleteByExample="false" enableSelectByExample="false" selectByExampleQueryId="false"></table>

     </context>

 </generatorConfiguration>
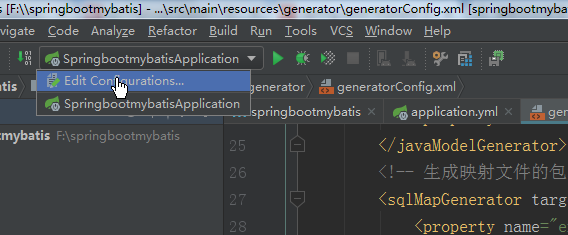
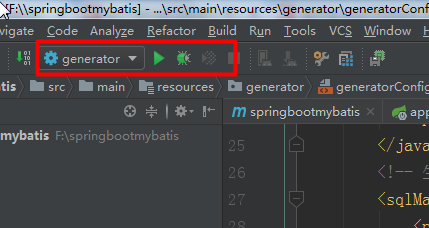
- 点击run-Edit Configurations
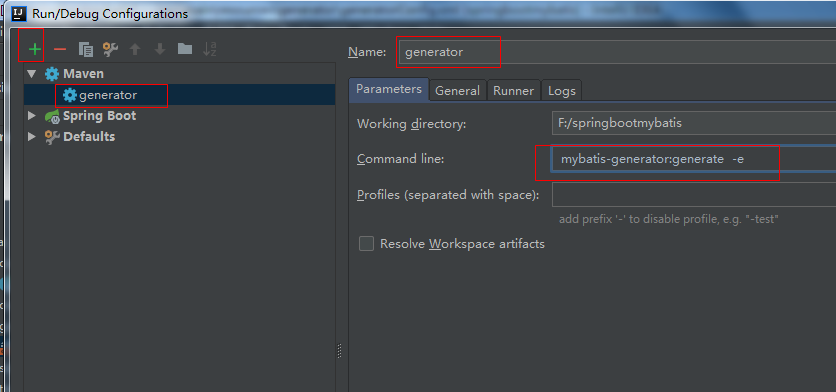
运行 :
注意!!!同一张表一定不要运行多次,因为mapper的映射文件中会生成多次的代码,导致报错,切记
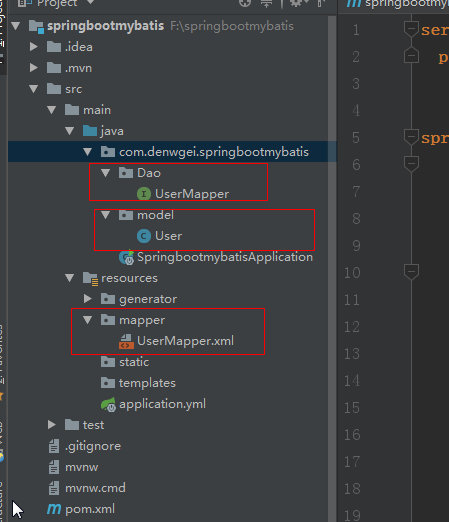
最后生成的文件及结构:
UserMapper:
 package com.denwgei.springbootmybatis.Dao;

 import com.denwgei.springbootmybatis.model.User;

 public interface UserMapper {

     int deleteByPrimaryKey(Integer id);

     int insert(User record);

     int insertSelective(User record);

     User selectByPrimaryKey(Integer id);

     int updateByPrimaryKeySelective(User record);

     int updateByPrimaryKey(User record);
//自己加的
    public List<User> queryAll();
}
User :
 package com.denwgei.springbootmybatis.model;

 import java.util.Date;

 public class User {

     private Integer id;

     private Integer userId;

     private String userName;

     private String passWord;

     private String state;

     private String type;

     private Date updateTime;

     private Date createTime;

     public Integer getId() {

         return id;

     }

     public void setId(Integer id) {

         this.id = id;

     }

     public Integer getUserId() {

         return userId;

     }

     public void setUserId(Integer userId) {

         this.userId = userId;

     }

     public String getUserName() {

         return userName;

     }

     public void setUserName(String userName) {

         this.userName = userName == null ? null : userName.trim();

     }

     public String getPassWord() {

         return passWord;

     }

     public void setPassWord(String passWord) {

         this.passWord = passWord == null ? null : passWord.trim();

     }

     public String getState() {

         return state;

     }

     public void setState(String state) {

         this.state = state == null ? null : state.trim();

     }

     public String getType() {

         return type;

     }

     public void setType(String type) {

         this.type = type == null ? null : type.trim();

     }

     public Date getUpdateTime() {

         return updateTime;

     }

     public void setUpdateTime(Date updateTime) {

         this.updateTime = updateTime;

     }

     public Date getCreateTime() {

         return createTime;

     }

     public void setCreateTime(Date createTime) {

         this.createTime = createTime;

     }

 }
UserMapper.xml :
<?xml version="1.0" encoding="UTF-8" ?>

<!DOCTYPE mapper PUBLIC "-//mybatis.org//DTD Mapper 3.0//EN" "http://mybatis.org/dtd/mybatis-3-mapper.dtd" >

<mapper namespace="com.dengwei.day01springboot.dao.UserMapper" >

  <resultMap id="BaseResultMap" type="com.dengwei.day01springboot.model.User" >

    <id column="id" property="id" jdbcType="INTEGER" />

    <result column="user_id" property="userId" jdbcType="INTEGER" />

    <result column="user_name" property="userName" jdbcType="VARCHAR" />

    <result column="pass_word" property="passWord" jdbcType="VARCHAR" />

    <result column="state" property="state" jdbcType="VARCHAR" />

    <result column="type" property="type" jdbcType="VARCHAR" />

    <result column="update_time" property="updateTime" jdbcType="TIMESTAMP" />

    <result column="create_time" property="createTime" jdbcType="TIMESTAMP" />

  </resultMap>

  <sql id="Base_Column_List" >

    id, user_id, user_name, pass_word, state, type, update_time, create_time

  </sql>

  <select id="selectByPrimaryKey" resultMap="BaseResultMap" parameterType="java.lang.Integer" >

    select

    <include refid="Base_Column_List" />

    from user

    where id = #{id,jdbcType=INTEGER}

  </select>

  <delete id="deleteByPrimaryKey" parameterType="java.lang.Integer" >

    delete from user

    where id = #{id,jdbcType=INTEGER}

  </delete>

  <insert id="insert" parameterType="com.dengwei.day01springboot.model.User" >

    insert into user (id, user_id, user_name,

      pass_word, state, type,

      update_time, create_time)

    values (#{id,jdbcType=INTEGER}, #{userId,jdbcType=INTEGER}, #{userName,jdbcType=VARCHAR},

      #{passWord,jdbcType=VARCHAR}, #{state,jdbcType=VARCHAR}, #{type,jdbcType=VARCHAR},

      #{updateTime,jdbcType=TIMESTAMP}, #{createTime,jdbcType=TIMESTAMP})

  </insert>

  <insert id="insertSelective" parameterType="com.dengwei.day01springboot.model.User" >

    insert into user

    <trim prefix="(" suffix=")" suffixOverrides="," >

      <if test="id != null" >

        id,

      </if>

      <if test="userId != null" >

        user_id,

      </if>

      <if test="userName != null" >

        user_name,

      </if>

      <if test="passWord != null" >

        pass_word,

      </if>

      <if test="state != null" >

        state,

      </if>

      <if test="type != null" >

        type,

      </if>

      <if test="updateTime != null" >

        update_time,

      </if>

      <if test="createTime != null" >

        create_time,

      </if>

    </trim>

    <trim prefix="values (" suffix=")" suffixOverrides="," >

      <if test="id != null" >

        #{id,jdbcType=INTEGER},

      </if>

      <if test="userId != null" >

        #{userId,jdbcType=INTEGER},

      </if>

      <if test="userName != null" >

        #{userName,jdbcType=VARCHAR},

      </if>

      <if test="passWord != null" >

        #{passWord,jdbcType=VARCHAR},

      </if>

      <if test="state != null" >

        #{state,jdbcType=VARCHAR},

      </if>

      <if test="type != null" >

        #{type,jdbcType=VARCHAR},

      </if>

      <if test="updateTime != null" >

        #{updateTime,jdbcType=TIMESTAMP},

      </if>

      <if test="createTime != null" >

        #{createTime,jdbcType=TIMESTAMP},

      </if>

    </trim>

  </insert>

  <update id="updateByPrimaryKeySelective" parameterType="com.dengwei.day01springboot.model.User" >

    update user

    <set >

      <if test="userId != null" >

        user_id = #{userId,jdbcType=INTEGER},

      </if>

      <if test="userName != null" >

        user_name = #{userName,jdbcType=VARCHAR},

      </if>

      <if test="passWord != null" >

        pass_word = #{passWord,jdbcType=VARCHAR},

      </if>

      <if test="state != null" >

        state = #{state,jdbcType=VARCHAR},

      </if>

      <if test="type != null" >

        type = #{type,jdbcType=VARCHAR},

      </if>

      <if test="updateTime != null" >

        update_time = #{updateTime,jdbcType=TIMESTAMP},

      </if>

      <if test="createTime != null" >

        create_time = #{createTime,jdbcType=TIMESTAMP},

      </if>

    </set>

    where id = #{id,jdbcType=INTEGER}

  </update>

  <update id="updateByPrimaryKey" parameterType="com.dengwei.day01springboot.model.User" >

    update user

    set user_id = #{userId,jdbcType=INTEGER},

      user_name = #{userName,jdbcType=VARCHAR},

      pass_word = #{passWord,jdbcType=VARCHAR},

      state = #{state,jdbcType=VARCHAR},

      type = #{type,jdbcType=VARCHAR},

      update_time = #{updateTime,jdbcType=TIMESTAMP},

      create_time = #{createTime,jdbcType=TIMESTAMP}

    where id = #{id,jdbcType=INTEGER}

  </update>

</mapper>
项目启动类:
package com.denwgei.springbootmybatis;

import org.mybatis.spring.annotation.MapperScan;

import org.springframework.boot.SpringApplication;

import org.springframework.boot.autoconfigure.SpringBootApplication;

@SpringBootApplication

@MapperScan("com.denwgei.springbootmybatis.Dao")

public class SpringbootmybatisApplication {

    public static void main(String[] args) {

        SpringApplication.run(SpringbootmybatisApplication.class, args);

    }

}
注意:@MapperScan("com.winter.mapper")这个注解非常的关键,这个对应了项目中mapper(dao)所对应的包路径,很多同学就是这里忘了加导致异常的
新建service层 :
IUserService :
 package com.denwgei.springbootmybatis.service;

 import com.denwgei.springbootmybatis.model.User;

 import com.github.pagehelper.PageInfo;

 public interface IUserService {

     public PageInfo<User> queryAll(int pageNum, int pageSize);

 }
impl :UserService :
 package com.denwgei.springbootmybatis.service.impl;

 import com.denwgei.springbootmybatis.Dao.IUserMapper;

 import com.denwgei.springbootmybatis.model.User;

 import com.denwgei.springbootmybatis.service.IUserService;

 import com.github.pagehelper.PageHelper;

 import com.github.pagehelper.PageInfo;

 import org.springframework.beans.factory.annotation.Autowired;

 import org.springframework.stereotype.Service;

 import java.util.List;

 @Service

 public class UserService implements IUserService {

     @Autowired  //或则@Resource

     private IUserMapper userMapper;  //这里报错是正常的

     /*

      * 这个方法中用到了我们开头配置依赖的分页插件pagehelper

      * 很简单,只需要在service层传入参数,然后将参数传递给一个插件的一个静态方法即可;

      * pageNum 开始页数

      * pageSize 每页显示的数据条数

      * */

     @Override

     public PageInfo<User> queryAll(int pageNum, int pageSize) {

         //将参数传给这个方法就可以实现物理分页了,非常简单。

         PageHelper.startPage(pageNum, pageSize);

         List<User> users = userMapper.queryAll();

         PageInfo result = new PageInfo(users);

         return result;

     }

 }
userController :
 package com.denwgei.springbootmybatis.Controller;

 import com.denwgei.springbootmybatis.model.User;

 import com.denwgei.springbootmybatis.service.impl.UserService;

 import com.github.pagehelper.PageInfo;

 import org.springframework.beans.factory.annotation.Autowired;

 import org.springframework.stereotype.Controller;

 import org.springframework.web.bind.annotation.RequestMapping;

 import org.springframework.web.bind.annotation.ResponseBody;

 @Controller

 @RequestMapping("/user")

 public class UserController {

     @Autowired

 //    @Resource

     private UserService userService;

     @RequestMapping("/allUser")

     @ResponseBody

     public PageInfo<User> queryAllUser(){

         PageInfo<User> userPageInfo = userService.queryAll(1, 3);

         return userPageInfo;

     }
启动springBoot的启动程序:

启动成功:

好的,试试吧!!!!
spingBoot整合mybatis+generator+pageHelper的更多相关文章
- SpringBoot入门篇--整合mybatis+generator自动生成代码+druid连接池+PageHelper分页插件
原文链接 我们这一篇博客讲的是如何整合Springboot和Mybatis框架,然后使用generator自动生成mapper,pojo等文件.然后再使用阿里巴巴提供的开源连接池druid,这个连接池 ...
- SpringBoot整合mybatis使用pageHelper插件进行分页操作
SpringBoot整合mybatis分页操作 SpringBoot整合Mybatis进行分页操作,这里需要使用Mybatis的分页插件:pageHelper, 关于pageHelper的介绍,请查看 ...
- springboot 整合mybatis,pagehelper。测试类。
报名立减200元.暑假直降6888. 遇到的异常. 1.这是在使用mybatis成功连接数据库后,通过service层调用dao层出现的异常. 异常原因:在启动类上面的注解@MapperScan没有指 ...
- springboot整合mybatis+generator
源码地址:springboot-integration 如果你觉得解决了你使用的需求,欢迎fork|star.
- springboot整合mybatis通用Mapper
参考: https://blog.csdn.net/x18707731829/article/details/82814095 https://www.jianshu.com/p/6d2103451d ...
- 项目脚手架 - 《Spring Boot + MyBatis + MyBatis Generator》
前言 最近启动了一个新的项目发现,每当一个新项目的启动往往需要从头搭建一个"框架",其中虽然很多基础代码可以Copy,但也会浪费不少时间. 基于这个情况,我打算在GitHub上创建 ...
- springboot学习随笔(四):Springboot整合mybatis(含generator自动生成代码)
这章我们将通过springboot整合mybatis来操作数据库 以下内容分为两部分,一部分主要介绍generator自动生成代码,生成model.dao层接口.dao接口对应的sql配置文件 第一部 ...
- Spring Boot整合tk.mybatis及pageHelper分页插件及mybatis逆向工程
Spring Boot整合druid数据源 1)引入依赖 <dependency> <groupId>com.alibaba</groupId> <artif ...
- springboot使用之二:整合mybatis(xml方式)并添加PageHelper插件
整合mybatis实在前面项目的基础上进行的,前面项目具体整合请参照springboot使用之一. 一.整合mybatis 整合mybatis的时候可以从mybatis官网下载mybatis官网整合的 ...
随机推荐
- sql里的正则表达式
SQL语句还可以搭配正则表达式作为查询条件,很是有用. REGEXP_LIKE(匹配)REGEXP_INSTR (包含)REGEXP_REPLACE(替换)REGEXP_SUBSTR(提取) 表 1: ...
- 聊聊openjdk的BufferPoolMXBean
本文主要研究一下openjdk的BufferPoolMXBean PlatformManagedObjectjava.management/java/lang/management/PlatformM ...
- 简单聊聊WebSocket
一.概述 上一篇文章<浅析一次HTTP请求>我们分析了简单的一次 HTTP 请求具体是怎么样完成的,分析了 HTTP 协议的数据结构,如何连接,如何断开,又是如何多路复用的,那么今天我们来 ...
- python3 hashlib模块
hashlib是一个加密模块,可以将明文加密为密文: md5,sha加密:过程不可逆转.
- zabbix监控概念
监控:数据采集 --> 数据存储 --> 数据展示 报警:采集到的数据超出阈值 SNMP:Simple Network Management Protocol(只能实现数据采集) NMS ...
- 【php】php实现数组分块
有时候需要将一个大数组按一定大小分块,那么可以实现这个功能,代码如下: /** * @param array $arr * @param int $size <p> * @param bo ...
- Mysql 从入门到遗忘
高级数据过滤: WHERE AND OR NOT 总是与其他操作符一起使用,用在要过滤的前面. 通配符过滤: LIKE: %相当于正则中的.*?,_相当于正则中的.. $ select id from ...
- redux源码解析-函数式编程
提到redux,会想到函数式编程.什么是函数式编程?是一种很奇妙的函数式的编程方法.你会感觉函数式编程这么简单,但是用起来却很方便很神奇. 在<functional javascript> ...
- js jquery 判断元素是否在数组内
js jquery 判断元素是否在数组内 一,js方法 var arr = ["a", "b", "c"]; // js arr.index ...
- Flask 应用上下文
应用上下文(application context) 它的字面意思是 应用上下文,但它不是一直存在的,它只是request context 中的一个对 app 的代理(人),所谓local proxy ...
