tf.nn.conv2d卷积函数之图片轮廓提取
一.tensorflow中二维卷积函数的参数含义:
def conv2d(input, filter, strides, padding, use_cudnn_on_gpu=True, data_format="NHWC", dilations=[1, 1, 1, 1], name=None)
卷积操作函数:
input:需要做卷积操作的图片;四维tensor张量,类型float32或float64;[batch,in_height,in_width,in_channels]形状(shape):batch训练时一个batch的图片数量,in_height图片高度,in_width图片宽度,in_channels图像通道数
filter:CNN中的卷积核(滤波器),四维tensor张张量,[filter_height,filter_width,in_channels,out_channels]形状(shape):卷积核高度,卷积核宽度,图像通道数,卷积核个数。
strides:卷积时图像每一维的步长。一维向量长度为4   如[1,1,1,1]
padding:决定是否补充0,SAME:填充到滤波器能够到达图像的边缘  VALID:边缘不填充
use_cudnn_on_gpu:bool类型,是否使用cudn加速,默认加速
返回值:featuremap特征图片(tensor张量)
input:输入的图片 如:[1,5,5,1]下图

filter:卷积核或滤波器

strides:步长(注意:图像每一维的步长,input是四维tensor,strides=[1,1,1,1]表示每一维的步长)
padding:padding=‘SAME’补0 当padding='VALID'不补充0
返回值:featuremap特征图片
二.卷积函数的简单实例
import tensorflow as tf
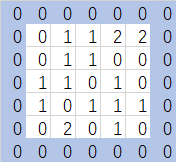
image = [0,1.0,1,2,2,0,1,1,0,0,1,1,0,1,0,1,0,1,1,1,0,2,0,1,0] ##注意:数据类型为float32或float64不能是int,其中需有一个1.0
input = tf.Variable(tf.constant(image,shape=[1,5,5,1])) ###输入一个5*5的图像矩阵
fil1 = [-1.0,0,1,-2,0,2,-1,0,1] ##注意:数据类型为float32或float64不能是int,其中需有一个1.0
filter = tf.Variable(tf.constant(fil1,shape=[3,3,1,1])) ###定义卷积核(滤波器) op = tf.nn.conv2d(input,filter,strides=[1,1,1,1],padding='SAME') ##一个通道输入,输出一个featuremap init = tf.global_variables_initializer() with tf.Session() as sess:
sess.run(init)
print('input:\n', sess.run(input))
print('op:\n',sess.run(op)) ##输出结果
'''
input:
[[[[ 0.]
[ 1.]
[ 1.]
[ 2.]
[ 2.]] [[ 0.]
[ 1.]
[ 1.]
[ 0.]
[ 0.]] [[ 1.]
[ 1.]
[ 0.]
[ 1.]
[ 0.]] [[ 1.]
[ 0.]
[ 1.]
[ 1.]
[ 1.]] [[ 0.]
[ 2.]
[ 0.]
[ 1.]
[ 0.]]]]
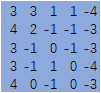
op:
[[[[ 3.]
[ 3.]
[ 1.]
[ 1.]
[-4.]] [[ 4.]
[ 2.]
[-1.]
[-1.]
[-3.]] [[ 3.]
[-1.]
[ 0.]
[-1.]
[-3.]] [[ 3.]
[-1.]
[ 1.]
[ 0.]
[-4.]] [[ 4.]
[ 0.]
[-1.]
[ 0.]
[-3.]]]]
'''
图示卷积过程tf实现

结果一致:
总结:
1.数据类型 input 和 filter的数据类型都只能是float32 或 float64
2.strides步长:是指输入数据的每一个维度的步长,输入数据是4维tensor 所以步长[1,1,1,1](一维tensor,长度4)才是和图示步长一致。
3.卷积的实现过程:
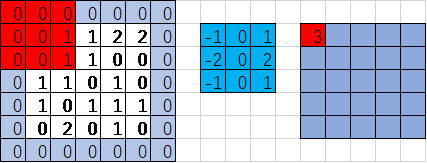
红色区域与蓝色区域对应位置的值相乘,之后所有乘积累加
0*(-1)+0*0+0*1+0*(-2)+0*0+1*2+0*(-1)+0*0+1*1=3
注意:对应位置相乘后累加(内积),而不是矩阵乘法
4.padding的规则:
padding=‘VALID’时,边缘不填充。输出的featuremap的高宽
output_width = (in_width-filter_width+1)/strides_width 输出featuremap对的宽度=(输入图片的宽度-卷积核的宽度)/步长宽度 【向上取整:当步长>1时,有可能取值不为整数】
output_height = (in_height-filter_height+1)/strides_height 输出featuremap对的高度=(输入图片的高度-卷积核的高度)/步长高度 【向上取整】 
padding=‘SAME’时的补0的规则。这个很容易理解:补了0的矩阵计算规则一样,用上面的公式(output_width = (in_width-filter_width+1)/strides_width)可以反推得到in_width这时得到的是补了0的矩阵宽度减去实际的输入矩阵宽度,就是多出来的(补0的宽度)。
pad_width = max((out_width-1)*trides_width+filter_width-in_width,0) ##为什么要和0比大小呢?因为小于等于0都是没有补0的情况。
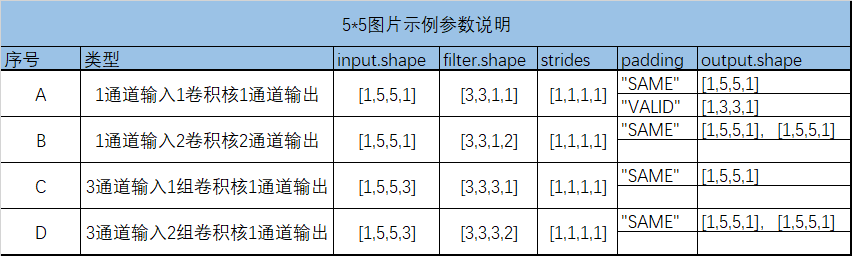
三.卷积操作的参数组合
输入图片:灰度图是1通道输出,彩色图片3通道(RGB 红绿蓝)
卷积核:A.1通道灰度图1个卷积核----1个featuremap输出
B.1通道灰度图2个卷积核----2个featuremap输出
C.3通道彩色图1组(3个卷积核)----1组(3个featuremap)----对应位置相加-----1个featuremap输出
D.3通道彩色图2组(6个卷积核)----2组(6个featuremap)----每组对应位置相加----2个featuremap输出
步长和补0:均适用于ABCD等情况
这里引用一张gif图片(来自博客:https://www.cnblogs.com/duanhx/p/9655223.html)

在tensorflow中实现ABCD四种情况的卷积操作:
import tensorflow as tf

image = [0,1.0,1,2,2,0,1,1,0,0,1,1,0,1,0,1,0,1,1,1,0,2,0,1,0]

input = tf.Variable(tf.constant(image,shape=[1,5,5,1]))  ##1通道输入

fil1 = [-1.0,0,1,-2,0,2,-1,0,1]

filter = tf.Variable(tf.constant(fil1,shape=[3,3,1,1]))  ##1个卷积核对应1个featuremap输出

op = tf.nn.conv2d(input,filter,strides=[1,1,1,1],padding='SAME')  ##SAME补0操作

init = tf.global_variables_initializer()

with tf.Session() as  sess:

    sess.run(init)

    print('input:\n', sess.run(input))

    print('filter:\n', sess.run(filter))

    print('op:\n',sess.run(op))

##输出结果

'''

input:

 [[[[ 0.]

   [ 1.]

   [ 1.]

   [ 2.]

   [ 2.]]

  [[ 0.]

   [ 1.]

   [ 1.]

   [ 0.]

   [ 0.]]

  [[ 1.]

   [ 1.]

   [ 0.]

   [ 1.]

   [ 0.]]

  [[ 1.]

   [ 0.]

   [ 1.]

   [ 1.]

   [ 1.]]

  [[ 0.]

   [ 2.]

   [ 0.]

   [ 1.]

   [ 0.]]]]

filter:

 [[[[-1.]]

  [[ 0.]]

  [[ 1.]]]

 [[[-2.]]

  [[ 0.]]

  [[ 2.]]]

 [[[-1.]]

  [[ 0.]]

  [[ 1.]]]]

op:

 [[[[ 3.]

   [ 3.]

   [ 1.]

   [ 1.]

   [-4.]]

  [[ 4.]

   [ 2.]

   [-1.]

   [-1.]

   [-3.]]

  [[ 3.]

   [-1.]

   [ 0.]

   [-1.]

   [-3.]]

  [[ 3.]

   [-1.]

   [ 1.]

   [ 0.]

   [-4.]]

  [[ 4.]

   [ 0.]

   [-1.]

   [ 0.]

   [-3.]]]]

'''
A.1通道输入1个卷积核1个featuremap输出
import tensorflow as tf

image = [0,1.0,1,2,2,0,1,1,0,0,1,1,0,1,0,1,0,1,1,1,0,2,0,1,0]

input = tf.Variable(tf.constant(image,shape=[1,5,5,1]))  ##1通道输入

fil1 = [-1.0,0,1,-2,0,2,-1,0,1,-1.0,0,1,-2,0,2,-1,0,1]

filter = tf.Variable(tf.constant(fil1,shape=[3,3,1,2]))  ##2个卷积核对应2个featuremap输出

op = tf.nn.conv2d(input,filter,strides=[1,1,1,1],padding='SAME')

init = tf.global_variables_initializer()

with tf.Session() as  sess:

    sess.run(init)

    print('input:\n', sess.run(input))

    print('filter:\n', sess.run(filter))

    print('op:\n',sess.run(op))

'''

输出:

input:

 [[[[ 0.]

   [ 1.]

   [ 1.]

   [ 2.]

   [ 2.]]

  [[ 0.]

   [ 1.]

   [ 1.]

   [ 0.]

   [ 0.]]

  [[ 1.]

   [ 1.]

   [ 0.]

   [ 1.]

   [ 0.]]

  [[ 1.]

   [ 0.]

   [ 1.]

   [ 1.]

   [ 1.]]

  [[ 0.]

   [ 2.]

   [ 0.]

   [ 1.]

   [ 0.]]]]

filter:

 [[[[-1.  0.]]

  [[ 1. -2.]]

  [[ 0.  2.]]]

 [[[-1.  0.]]

  [[ 1. -1.]]

  [[ 0.  1.]]]

 [[[-2.  0.]]

  [[ 2. -1.]]

  [[ 0.  1.]]]]

op:

 [[[[ 0.  2.]

   [ 3.  0.]

   [ 0.  0.]

   [-1.  0.]

   [ 0. -2.]]

  [[ 2.  3.]

   [ 2. -1.]

   [-2.  2.]

   [ 2. -1.]

   [-2. -4.]]

  [[ 3.  1.]

   [-1.  0.]

   [ 1. -1.]

   [ 0. -1.]

   [-1. -1.]]

  [[ 2.  1.]

   [ 3. -3.]

   [-4.  3.]

   [ 3. -3.]

   [-3. -1.]]

  [[ 1.  0.]

   [ 1.  0.]

   [-1.  1.]

   [ 1. -1.]

   [-1. -2.]]]]

'''
B.1通道输入2个卷积核2个featuremap输出
import tensorflow as tf

image_channel1 = [0,1.0,1,2,2,0,1,1,0,0,1,1,0,1,0,1,0,1,1,1,0,2,0,1,0]

image_channel2 = [1,1.0,1,1,1,1,1,1,1,1,1,1,1,1,1,1,1,1,1,1,1,1,1,1,1]

image_channel3 = [2,2.0,2,2,2,2,2,2,2,2,2,2,2,2,2,2,2,2,2,2,2,2,2,2,2]

image = [i for i in zip(image_channel1,image_channel2,image_channel3)] ##生成器表达是生成列表

input = tf.Variable(tf.constant(image,shape=[1,5,5,3]))  ##3通道输入

fil1 = [-1.0,0,1,-2,0,2,-1,0,1,-1.0,0,1,-2,0,2,-1,0,1,-1.0,0,1,-2,0,2,-1,0,1]

filter = tf.Variable(tf.constant(fil1,shape=[3,3,3,1]))  ##1组(3个)卷积核对应1个featuremap输出

op = tf.nn.conv2d(input,filter,strides=[1,1,1,1],padding='SAME')  ##SAME补0操作

init = tf.global_variables_initializer()

with tf.Session() as  sess:

    sess.run(init)

    print('input:\n', sess.run(input))

    print('filter:\n', sess.run(filter))

    print('op:\n',sess.run(op))

##输出结果

'''

input:

 [[[[ 0.  1.  2.]

   [ 1.  1.  2.]

   [ 1.  1.  2.]

   [ 2.  1.  2.]

   [ 2.  1.  2.]]

  [[ 0.  1.  2.]

   [ 1.  1.  2.]

   [ 1.  1.  2.]

   [ 0.  1.  2.]

   [ 0.  1.  2.]]

  [[ 1.  1.  2.]

   [ 1.  1.  2.]

   [ 0.  1.  2.]

   [ 1.  1.  2.]

   [ 0.  1.  2.]]

  [[ 1.  1.  2.]

   [ 0.  1.  2.]

   [ 1.  1.  2.]

   [ 1.  1.  2.]

   [ 1.  1.  2.]]

  [[ 0.  1.  2.]

   [ 2.  1.  2.]

   [ 0.  1.  2.]

   [ 1.  1.  2.]

   [ 0.  1.  2.]]]]

filter:

 [[[[-1.]

   [ 0.]

   [ 1.]]

  [[-2.]

   [ 0.]

   [ 2.]]

  [[-1.]

   [ 0.]

   [ 1.]]]

 [[[-1.]

   [ 0.]

   [ 1.]]

  [[-2.]

   [ 0.]

   [ 2.]]

  [[-1.]

   [ 0.]

   [ 1.]]]

 [[[-1.]

   [ 0.]

   [ 1.]]

  [[-2.]

   [ 0.]

   [ 2.]]

  [[-1.]

   [ 0.]

   [ 1.]]]]

op:

 [[[[ 10.]

   [ 10.]

   [  8.]

   [  8.]

   [  6.]]

  [[ 13.]

   [ 15.]

   [ 14.]

   [ 14.]

   [ 11.]]

  [[ 12.]

   [ 16.]

   [ 16.]

   [ 17.]

   [ 14.]]

  [[ 11.]

   [ 15.]

   [ 16.]

   [ 16.]

   [ 13.]]

  [[  8.]

   [ 10.]

   [ 10.]

   [ 10.]

   [  8.]]]]

'''
C.3通道输入1组(3个)卷积核1个featuremap输出
import tensorflow as tf

image_channel1 = [0,1.0,1,2,2,0,1,1,0,0,1,1,0,1,0,1,0,1,1,1,0,2,0,1,0]

image_channel2 = [1,1.0,1,1,1,1,1,1,1,1,1,1,1,1,1,1,1,1,1,1,1,1,1,1,1]

image_channel3 = [2,2.0,2,2,2,2,2,2,2,2,2,2,2,2,2,2,2,2,2,2,2,2,2,2,2]

image = [i for i in zip(image_channel1,image_channel2,image_channel3)] ##生成器表达是生成列表

input = tf.Variable(tf.constant(image,shape=[1,5,5,3]))  ##3通道输入

fil1 = [-1.0,0,1,-2,0,2,-1,0,1,-1.0,0,1,-2,0,2,-1,0,1,-1.0,0,1,-2,0,2,-1,0,1]

filter = tf.Variable(tf.constant(fil1,shape=[3,3,3,2]))  ##2组(6个)卷积核对应2个featuremap输出

op = tf.nn.conv2d(input,filter,strides=[1,1,1,1],padding='SAME')  ##SAME补0操作

init = tf.global_variables_initializer()

with tf.Session() as  sess:

    sess.run(init)

    print('input:\n', sess.run(input))

    print('filter:\n', sess.run(filter))

    print('op:\n',sess.run(op))

##输出结果

'''

input:

 [[[[ 0.  1.  2.]

   [ 1.  1.  2.]

   [ 1.  1.  2.]

   [ 2.  1.  2.]

   [ 2.  1.  2.]]

  [[ 0.  1.  2.]

   [ 1.  1.  2.]

   [ 1.  1.  2.]

   [ 0.  1.  2.]

   [ 0.  1.  2.]]

  [[ 1.  1.  2.]

   [ 1.  1.  2.]

   [ 0.  1.  2.]

   [ 1.  1.  2.]

   [ 0.  1.  2.]]

  [[ 1.  1.  2.]

   [ 0.  1.  2.]

   [ 1.  1.  2.]

   [ 1.  1.  2.]

   [ 1.  1.  2.]]

  [[ 0.  1.  2.]

   [ 2.  1.  2.]

   [ 0.  1.  2.]

   [ 1.  1.  2.]

   [ 0.  1.  2.]]]]

filter:

 [[[[-1.  0.]

   [ 1. -2.]

   [ 0.  2.]]

  [[-1.  0.]

   [ 1. -1.]

   [ 0.  1.]]

  [[-2.  0.]

   [ 2. -1.]

   [ 0.  1.]]]

 [[[-1.  0.]

   [ 1. -2.]

   [ 0.  2.]]

  [[-1.  0.]

   [ 1.  1.]

   [ 1.  1.]]

  [[ 1.  1.]

   [ 1.  1.]

   [ 1.  1.]]]

 [[[ 1.  1.]

   [ 1.  1.]

   [ 1.  1.]]

  [[ 1.  1.]

   [ 1.  1.]

   [ 1.  1.]]

  [[ 1.  1.]

   [ 1.  1.]

   [ 1.  1.]]]]

op:

 [[[[ 14.  14.]

   [ 18.  20.]

   [ 18.  21.]

   [ 16.  20.]

   [  6.  11.]]

  [[ 16.  17.]

   [ 19.  24.]

   [ 14.  23.]

   [ 13.  22.]

   [  9.  15.]]

  [[ 14.  16.]

   [ 17.  23.]

   [ 20.  24.]

   [ 21.  24.]

   [ 13.  16.]]

  [[ 13.  16.]

   [ 20.  24.]

   [ 20.  25.]

   [ 19.  23.]

   [ 10.  15.]]

  [[ 10.  10.]

   [  6.  12.]

   [  7.  13.]

   [  6.  12.]

   [  3.   8.]]]]

'''
D.3通道输入2组(6个)卷积核2个featuremap输出
四.对一张道路图片(3通道)进行卷积操作,并且将featuremap转化成灰度图片(1通道)显示出来

import matplotlib.pyplot as plt

import matplotlib.image as mpimg

import numpy as np

import tensorflow as tf

##读取图片

myimg = mpimg.imread('road.jpg')

plt.imshow(myimg)

plt.axis('off')

plt.show()

print(myimg.shape)

# print(myimg)

full = np.reshape(myimg,[1,800,1067,3])

# print(full)

inputfull = tf.Variable(tf.constant(1.0,shape=[1,800,1067,3]))    ##3通道输入

filter = tf.Variable(tf.constant([[-1.0,-1.0,-1.0],[0,0,0],[1.0,1.0,1.0],[-2.0,-2.0,-2.0],[0,0,0],

                                 [2.0,2.0,2.0],[-1.0,-1.0,-1.0],[0,0,0],[1.0,1.0,1.0]],shape=[3,3,3,1]

                                 ))   ##3*3卷积核,3个卷积核,一个featuremap输出

op = tf.nn.conv2d(inputfull,filter,strides=[1,1,1,1],padding="SAME")

##归一化操作数据类型转化成float32    x= 255*(x-min)/(max-min)

o = tf.cast(((op-tf.reduce_min(op))/(tf.reduce_max(op)-tf.reduce_min(op)))*255,tf.uint8)

with tf.Session() as sess:

    sess.run(tf.global_variables_initializer())

    t,f = sess.run([o,filter],feed_dict={inputfull:full})

    t = np.reshape(t,[800,1067])##还原图片矩阵

    plt.imshow(t,'Greys_r')     ###灰度图

    plt.axis('off')

    plt.show()

    print('t:\n', t)
使用卷积提取图片的轮廓

tf.nn.conv2d卷积函数之图片轮廓提取的更多相关文章
- 深度学习原理与框架-Tensorflow卷积神经网络-卷积神经网络mnist分类 1.tf.nn.conv2d(卷积操作) 2.tf.nn.max_pool(最大池化操作) 3.tf.nn.dropout(执行dropout操作) 4.tf.nn.softmax_cross_entropy_with_logits(交叉熵损失) 5.tf.truncated_normal(两个标准差内的正态分布)
1. tf.nn.conv2d(x, w, strides=[1, 1, 1, 1], padding='SAME') # 对数据进行卷积操作 参数说明:x表示输入数据,w表示卷积核, stride ...
- tf.nn.conv2d 卷积
tf.nn.conv2d(input, filter, strides, padding, use_cudnn_on_gpu=None, name=None) 第一个参数input:指需要做卷积的输入 ...
- tf.nn.conv2d。卷积函数
tf.nn.conv2d是TensorFlow里面实现卷积的函数,参考文档对它的介绍并不是很详细,实际上这是搭建卷积神经网络比较核心的一个方法,非常重要 tf.nn.conv2d(input, fil ...
- TF-卷积函数 tf.nn.conv2d 介绍
转自 http://www.cnblogs.com/welhzh/p/6607581.html 下面是这位博主自己的翻译加上测试心得 tf.nn.conv2d是TensorFlow里面实现卷积的函数, ...
- tf入门-tf.nn.conv2d是怎样实现卷积的?
转自:https://blog.csdn.net/mao_xiao_feng/article/details/78004522 实验环境:tensorflow版本1.2.0,python2.7 介绍 ...
- 【TensorFlow】tf.nn.conv2d是怎样实现卷积的?
tf.nn.conv2d是TensorFlow里面实现卷积的函数,参考文档对它的介绍并不是很详细,实际上这是搭建卷积神经网络比较核心的一个方法,非常重要 tf.nn.conv2d(input, fil ...
- 小记tensorflow-1:tf.nn.conv2d 函数介绍
tf.nn.conv2d函数介绍 Input: 输入的input必须为一个4d tensor,而且每个input的格式必须为float32 或者float64. Input=[batchsize,im ...
- tf.nn.conv2d函数和tf.nn.max_pool函数介绍
tf.nn.conv2d(input, filter, strides, padding, use_cudnn_on_gpu=None, name=None) 介绍参数: input:指卷积需要输入的 ...
- tf.nn.conv2d实现卷积的过程
#coding=utf-8 import tensorflow as tf #case 2 input = tf.Variable(tf.round(10 * tf.random_normal([1, ...
随机推荐
- 系统盘(c盘)空间清理方法总结(转)
我们一般会把系统安装在C盘,但是使用一段时间后会发现C盘的空间越来越少.尤其我们做开发的,会在电脑中装上很多软件的.比如我的机器上C盘空间15G,平时安装软件时只要可以选择我都会把它装到其他盘的, ...
- python数据结构:numpy
一. numpy概述 numpy(Numerical Python)提供了python对多维数组对象ndarray(应该是N-dimension array)的支持,具有矢量运算能力,快速.节省空间. ...
- break语句、continue语句、goto语句的用法辨析
1.break语句 break语句常使用在switch语句.循环体以及if语句中,它的作用是跳出循环,而且只能跳出一层循环. for (i = 0; i < 10; ++j) { for (j ...
- 13Ajax和JQuery
1.Ajax 1.1是什么? “Asynchronous Javascript And XML”(异步JavaScript和XML), 并不是新的技术,只是把原有的技术,整合到一起而已. 1.使用CS ...
- Windows Linux双系统 删除 Linux 系统
首先修复引导,之前是先安装Windows后安装Linux,所以引导是Linux的 先需要修复其引导为Windows, 先下载MbrFix,网上说64位需要下载4位,实测都可以. 下载好以后,就在C盘用 ...
- error: must use ‘class’ tag to refer to type ‘XXX’ in this scope
开发环境: Qt Creator 4.8.2 在写程序的时候,遇到了编译器报错 error: must use 'class' tag to refer to type 'XXX' in this s ...
- 实现memcpy()函数及过程总结
1.为什么会写memcpy 在之前的应聘笔试上遇到一道笔试题,题目要求实现一个my_memcpy函数.函数原型:void * my_memcpy(void *dst, const void *src, ...
- nginx安装配置_runoob_阅读笔记_20190917
Nginx 安装配置_runoob菜鸟教程 Nginx 安装配置 Nginx("engine x")是一款是由俄罗斯的程序设计师Igor Sysoev所开发高性能的 Web和 反向 ...
- bzoj4773 负环 倍增+矩阵
题目传送门 https://lydsy.com/JudgeOnline/problem.php?id=4773 题解 最小的负环的长度,等价于最小的 \(len\) 使得存在一条从点 \(i\) 到自 ...
- 对eventloop的研究
javasctipt是一门单线程的非阻塞的脚本语言,单线程意味着,JavaScript 单线程意味着,javascript代码在执行的任何时候,都只有一个主线程来处理所有的任务. JavaScript ...