emqtt emq 的用户密码认证
MQTT 认证设置
EMQ 消息服务器认证由一系列认证插件(Plugin)提供,系统支持按用户名密码、ClientID 或匿名认证。
系统默认开启匿名认证(anonymous),通过加载认证插件可开启的多个认证模块组成认证链:
           ----------------           ----------------           ------------

Client --> | Username认证 | -ignore-> | ClientID认证 | -ignore-> | 匿名认证 |

           ----------------           ----------------           ------------

                  |                         |                         |

                 \|/                       \|/                       \|/

            allow | deny              allow | deny              allow | deny
注解
EMQ 2.0 消息服务器还提供了 MySQL、PostgreSQL、Redis、MongoDB、HTTP、LDAP 认证插件。
开启匿名认证
etc/emq.conf 配置启用匿名认证:
## Allow Anonymous authentication

mqtt.allow_anonymous = true
EMQ 2.0 版本提供的认证插件包括:
| 插件 | 说明 |
|---|---|
| emq_auth_clientid | ClientId 认证/鉴权插件 |
| emq_auth_username | 用户名密码认证/鉴权插件 |
| emq_auth_ldap | LDAP 认证/鉴权插件 |
| emq_auth_http | HTTP 认证/鉴权插件 |
| emq_auth_mysql | MySQ L认证/鉴权插件 |
| emq_auth_pgsql | Postgre 认证/鉴权插件 |
| emq_auth_redis | Redis 认证/鉴权插件 |
| emq_auth_mongo | MongoDB 认证/鉴权插件 |
用户名密码认证
基于 MQTT 登录用户名(username)、密码(password)认证。
etc/plugins/emq_auth_username.conf 中配置默认用户:
auth.user.$N.username = admin

auth.user.$N.password = public
启用 emq_auth_username 插件:
./bin/emqttd_ctl plugins load emq_auth_username
使用 ./bin/emqttd_ctl users 命令添加用户:
$ ./bin/emqttd_ctl users add <Username> <Password>
ClientId 认证
基于 MQTT 客户端 ID 认证。
etc/plugins/emq_auth_clientid.conf:
auth.client.$N.clientid = clientid

auth.client.$N.password = passwd
启用 emq_auth_clientid 插件:
./bin/emqttd_ctl plugins load emq_auth_clientid
LDAP 插件认证
etc/plugins/emq_auth_ldap.conf 配置 LDAP 参数:
auth.ldap.servers = 127.0.0.1

auth.ldap.port = 389

auth.ldap.timeout = 30

auth.ldap.user_dn = uid=%u,ou=People,dc=example,dc=com

auth.ldap.ssl = false
启用 LDAP 认证插件:
./bin/emqttd_ctl plugins load emq_auth_ldap
HTTP 插件认证
注解
开启 HTTP 认证插件后,会终结认证链
etc/plugins/emq_auth_http.conf 配置 ‘super_req’, ‘auth_req’:
## Variables: %u = username, %c = clientid, %a = ipaddress, %P = password, %t = topic

auth.http.auth_req = http://127.0.0.1:8080/mqtt/auth

auth.http.auth_req.method = post

auth.http.auth_req.params = clientid=%c,username=%u,password=%P

auth.http.super_req = http://127.0.0.1:8080/mqtt/superuser

auth.http.super_req.method = post

auth.http.super_req.params = clientid=%c,username=%u
启用 HTTP 认证插件:
./bin/emqttd_ctl plugins load emq_auth_http
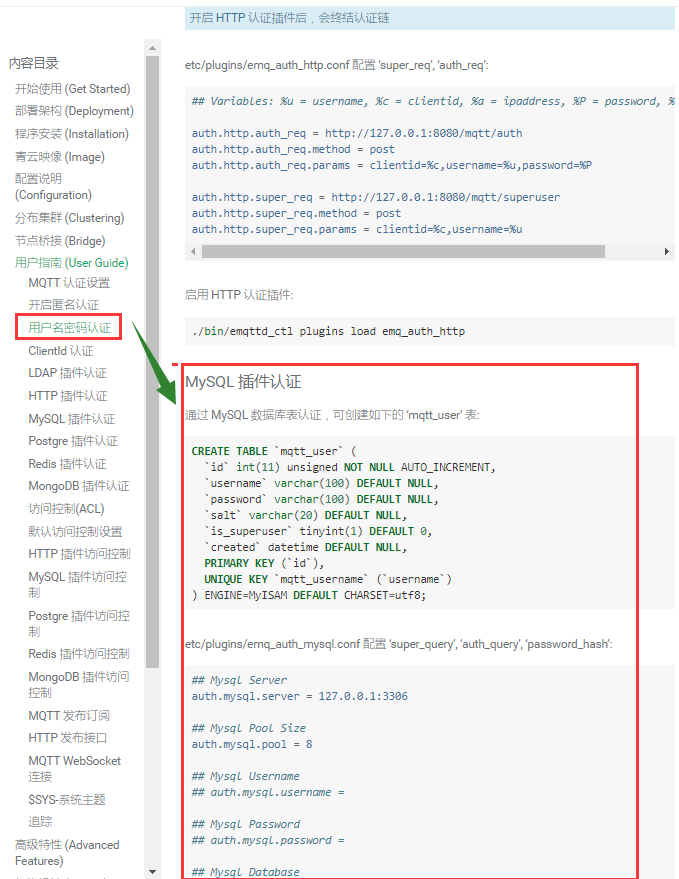
MySQL 插件认证
通过 MySQL 数据库表认证,可创建如下的 ‘mqtt_user’ 表:
CREATE TABLE `mqtt_user` (

  `id` int(11) unsigned NOT NULL AUTO_INCREMENT,

  `username` varchar(100) DEFAULT NULL,

  `password` varchar(100) DEFAULT NULL,

  `salt` varchar(20) DEFAULT NULL,

  `is_superuser` tinyint(1) DEFAULT 0,

  `created` datetime DEFAULT NULL,

  PRIMARY KEY (`id`),

  UNIQUE KEY `mqtt_username` (`username`)

) ENGINE=MyISAM DEFAULT CHARSET=utf8;
etc/plugins/emq_auth_mysql.conf 配置 ‘super_query’, ‘auth_query’, ‘password_hash’:
## Mysql Server

auth.mysql.server = 127.0.0.1:3306

## Mysql Pool Size

auth.mysql.pool = 8

## Mysql Username

## auth.mysql.username =

## Mysql Password

## auth.mysql.password =

## Mysql Database

auth.mysql.database = mqtt

## Variables: %u = username, %c = clientid

## Authentication Query: select password only

auth.mysql.auth_query = select password from mqtt_user where username = '%u' limit 1

## Password hash: plain, md5, sha, sha256, pbkdf2

auth.mysql.password_hash = sha256

## %% Superuser Query

auth.mysql.super_query = select is_superuser from mqtt_user where username = '%u' limit 1
注解
如果系统已有MQTT认证表,可通过配置’auth_query’查询语句集成。
启用 MySQL 认证插件:
./bin/emqttd_ctl plugins load emq_auth_mysql
Postgre 插件认证
通过 PostgreSQL 数据库表认证,可创建如下的 ‘mqtt_user’ 表:
CREATE TABLE mqtt_user (

  id SERIAL primary key,

  is_superuser boolean,

  username character varying(100),

  password character varying(100),

  salt character varying(40)

);
etc/plugins/emq_auth_pgsql.conf 配置 ‘auth_query’、’password_hash’:
## Postgre Server

auth.pgsql.server = 127.0.0.1:5432

auth.pgsql.pool = 8

auth.pgsql.username = root

#auth.pgsql.password =

auth.pgsql.database = mqtt

auth.pgsql.encoding = utf8

auth.pgsql.ssl = false

## Variables: %u = username, %c = clientid, %a = ipaddress

## Authentication Query: select password only

auth.pgsql.auth_query = select password from mqtt_user where username = '%u' limit 1

## Password hash: plain, md5, sha, sha256, pbkdf2

auth.pgsql.password_hash = sha256

## sha256 with salt prefix

## auth.pgsql.password_hash = salt sha256

## sha256 with salt suffix

## auth.pgsql.password_hash = sha256 salt

## Superuser Query

auth.pgsql.super_query = select is_superuser from mqtt_user where username = '%u' limit 1
启用 Postgre 认证插件:
./bin/emqttd_ctl plugins load emq_auth_pgsql
Redis 插件认证
Redis 认证。MQTT 用户记录存储在 Redis Hash, 键值: “mqtt_user:<Username>”
etc/plugins/emq_auth_redis.conf 设置 ‘super_cmd’、’auth_cmd’、’password_hash’:
## Redis Server

auth.redis.server = 127.0.0.1:6379

## Redis Pool Size

auth.redis.pool = 8

## Redis Database

auth.redis.database = 0

## Redis Password

## auth.redis.password =

## Variables: %u = username, %c = clientid

## Authentication Query Command

auth.redis.auth_cmd = HGET mqtt_user:%u password

## Password hash: plain, md5, sha, sha256, pbkdf2

auth.redis.password_hash = sha256

## Superuser Query Command

auth.redis.super_cmd = HGET mqtt_user:%u is_superuser
启用 Redis 认证插件:
./bin/emqttd_ctl plugins load emq_auth_redis
MongoDB 插件认证
按 MongoDB 用户集合认证,例如创建 ‘mqtt_user’ 集合:
{

    username: "user",

    password: "password hash",

    is_superuser: boolean (true, false),

    created: "datetime"

}
etc/plugins/emq_auth_mongo.conf 设置 ‘super_query’、’auth_query’:
## Mongo Server

auth.mongo.server = 127.0.0.1:27017

## Mongo Pool Size

auth.mongo.pool = 8

## Mongo User

## auth.mongo.user =

## Mongo Password

## auth.mongo.password =

## Mongo Database

auth.mongo.database = mqtt

## auth_query

auth.mongo.auth_query.collection = mqtt_user

auth.mongo.auth_query.password_field = password

auth.mongo.auth_query.password_hash = sha256

auth.mongo.auth_query.selector = username=%u

## super_query

auth.mongo.super_query.collection = mqtt_user

auth.mongo.super_query.super_field = is_superuser

auth.mongo.super_query.selector = username=%u
启用 MongoDB 认证插件:
./bin/emqttd_ctl plugins load emq_auth_mongo
emqtt emq 的用户密码认证的更多相关文章
- emqtt 试用(五)emq 的用户密码认证
MQTT 认证设置 EMQ 消息服务器认证由一系列认证插件(Plugin)提供,系统支持按用户名密码.ClientID 或匿名认证. 系统默认开启匿名认证(anonymous),通过加载认证插件可开启 ...
- EMQ -- 用户密码认证
emq 的用户密码认证 MQTT 认证设置 EMQ 消息服务器认证由一系列认证插件(Plugin)提供,系统支持按用户名密码.ClientID 或匿名认证. 系统默认开启匿名认证(anonymous) ...
- squid+stunnel+用户密码认证的三种玩法
没办法,应用越来越深入,就会越来越多要求. squid+stunnel+用户密码认证的场景至少以下三个,我会遇到. 1,标准玩法 在服务器上建一个SQUID,加密码认证,然后,其它人通过它上网.(不要 ...
- elasticsearch 6.2.4添加用户密码认证
elasticsearch 6.3版本之前的添加认证需安装x-pack插件,6.3之后貌似去掉了这个. 1.安装x-pack 先切换到elastic用户下,在执行以下命令 $cd /data/elas ...
- Oracle用户密码认证方式
oracle用户有两种认证方式: 操作系统认证(要求该用户属于本地DBA组,然后通过操作系统认证登录oracle,从而启动数据库) 密码文件认证 oracle使用哪种认证方式决定在于两个参数: 1.r ...
- scylladb docker-compose 用户密码认证配置
scylladb 对于用户的认证配置还是比较简单的,以下是一个docker-compose 配置的说明 环境准备 docker-compose 文件 version: "3" se ...
- python装饰器实现用户密码认证(简单初形)
import timecurrent_user={'user':None}def auth(engine = 'file'): def deco(func): #func=最初始的index和最初始的 ...
- 搭建Docker私有仓库&用户密码认证&web可视化界面
1.拉取镜像 docker pull hyper/docker-registry-web docker pull registry 2.安装 yum install docker-compose 3. ...
- ansible不配ssh连接,用户密码登录
ansible 不配ssh免密链接,直接用ssh用户密码连接,要先装sshpass. 否则会报错: sshpass安装 sshpass下载地址:http://sourceforge.net/proje ...
随机推荐
- PAT Basic 1009 说反话 (20 分)
给定一句英语,要求你编写程序,将句中所有单词的顺序颠倒输出. 输入格式: 测试输入包含一个测试用例,在一行内给出总长度不超过 80 的字符串.字符串由若干单词和若干空格组成,其中单词是由英文字母(大小 ...
- python-1.Centos7安装Python3.6和Scrapy的方法
由于centos7原本就安装了Python2,而且这个Python2不能被删除,因为有很多系统命令,比如yum都要用到 [root@iZm5efjrz9szlsq1a0ai3gZ ~]# python ...
- kotlin函数式编程入门及图片处理
函数式编程入门: 对于面向对象编程[OOP]和函数式编程[FP] 由于在JAVA8的学习中系统的学习过了,所以这里对其概念就不过多解释了,下面直接用代码来看下在kotlin中函数式编程是如何编写的: ...
- 【bzoj 4059】Non-boring sequences
这题的重点不在于代码,而在于复杂度分析…… 首先我们肯定会写 $n^2$ 暴力,就是每次暴力扫 $[l,r]$ 区间,找到任意一个在此区间中只出现过一次的数.设其下标为 $mid$,显然在这个区间中任 ...
- buuctf@easyre
- Python 面向对象Ⅲ
Python内置类属性 __dict__ : 类的属性(包含一个字典,由类的数据属性组成) __doc__ :类的文档字符串 __name__: 类名 __module__: 类定义所在的模块http ...
- 服务端获取参数(koa)
1.获取query(问号后面的内容) ctx.query 2.获取路由参数(如'/user/:id'的id) ctx.param 3.获取body请求体 koa不能直接获取请求体里的body,需要安装 ...
- Spring MVC遭遇checkbox的问题解决方案
转:http://lavasoft.blog.51cto.com/62575/1407213 Spring MVC遭遇checkbox的问题是:当checkbox全不选时候,则该checkbox域的变 ...
- Java多线程和并发(十),JMM(Java内存模型)
目录 1.什么是JMM 2.JMM的主内存和工作内存 3.JMM如何解决可见性问题-指令重排序 4.Volatile 十.JMM(Java内存模型)(暂时没有理解) 1.什么是JMM 2.JMM的主内 ...
- 51 nod 1127最短的包含字符串(尺取法)
1127 最短的包含字符串 收藏 关注 给出一个字符串,求该字符串的一个子串S,S包含A-Z中的全部字母,并且S是所有符合条件的子串中最短的,输出S的长度.如果给出的字符串中并不包括A-Z中的全 ...