《GPU高性能编程CUDA实战中文》中第四章的julia实验
在整个过程中出现了各种问题,我先将我调试好的真个项目打包,提供下载。
 /*

 * Copyright 1993-2010 NVIDIA Corporation.  All rights reserved.

 *

 * NVIDIA Corporation and its licensors retain all intellectual property and

 * proprietary rights in and to this software and related documentation.

 * Any use, reproduction, disclosure, or distribution of this software

 * and related documentation without an express license agreement from

 * NVIDIA Corporation is strictly prohibited.

 *

 * Please refer to the applicable NVIDIA end user license agreement (EULA)

 * associated with this source code for terms and conditions that govern

 * your use of this NVIDIA software.

 *

 */

 #include <GL\glut.h>

 #include "cuda.h"

 #include "cuda_runtime.h"

 #include "device_launch_parameters.h"

 #include "../common/book.h"

 #include "../common/cpu_bitmap.h"

 #define DIM 1000

 struct cuComplex {

     float   r;

     float   i;

     __device__ cuComplex(float a, float b) : r(a), i(b)  {}

     __device__ float magnitude2(void) {

         return r * r + i * i;

     }

     __device__ cuComplex operator*(const cuComplex& a) {

         return cuComplex(r*a.r - i*a.i, i*a.r + r*a.i);

     }

     __device__ cuComplex operator+(const cuComplex& a) {

         return cuComplex(r + a.r, i + a.i);

     }

 };

 __device__ int julia(int x, int y) {

     const float scale = 1.5;

     float jx = scale * (float)(DIM /  - x) / (DIM / );

     float jy = scale * (float)(DIM /  - y) / (DIM / );

     cuComplex c(-0.8, 0.156);

     cuComplex a(jx, jy);

     int i = ;

     for (i = ; i<; i++) {

         a = a * a + c;

         if (a.magnitude2() > )

             return ;

     }

     return ;

 }

 __global__ void kernel(unsigned char *ptr) {

     // map from blockIdx to pixel position

     int x = blockIdx.x;

     int y = blockIdx.y;

     int offset = x + y * gridDim.x;

     // now calculate the value at that position

     int juliaValue = julia(x, y);

     ptr[offset *  + ] =  * juliaValue;

     ptr[offset *  + ] = ;

     ptr[offset *  + ] = ;

     ptr[offset *  + ] = ;

 }

 // globals needed by the update routine

 struct DataBlock {

     unsigned char   *dev_bitmap;

 };

 int main(void) {

     DataBlock   data;

     CPUBitmap bitmap(DIM, DIM, &data);

     unsigned char    *dev_bitmap;

     HANDLE_ERROR(cudaMalloc((void**)&dev_bitmap, bitmap.image_size()));

     data.dev_bitmap = dev_bitmap;

     dim3    grid(DIM, DIM);

     kernel << <grid,  >> >(dev_bitmap);

     HANDLE_ERROR(cudaMemcpy(bitmap.get_ptr(), dev_bitmap,

         bitmap.image_size(),

         cudaMemcpyDeviceToHost));

     HANDLE_ERROR(cudaFree(dev_bitmap));

     bitmap.display_and_exit();

 }
期间出现的问题:
问题一
calling a host function("cuComplex::cuComplex") from a __device__/__global__ function("julia") is not allowed

calling a host function("cuComplex::cuComplex") from a __device__/__global__ function("julia") is not allowed

calling a host function("cuComplex::cuComplex") from a __device__/__global__ function("cuComplex::operator *") is not allowed

calling a host function("cuComplex::cuComplex") from a __device__/__global__ function("cuComplex::operator +") is not allowed
这个原因是在原著中提供的代码有问题,原著中结构体中的代码为
cuComplex(float a, float b) : r(a), i(b) {}
将其修改如下即可:
__device__ cuComplex(float a, float b) : r(a), i(b) {}
问题二
error LNK2019: 无法解析的外部符号 ___glutInitWithExit@12,该符号在函数 _glutInit_ATEXIT_HACK@8 中被引用 1>GEARS.obj : error LNK2019: 无法解析的外部符号 ___gl
这个原因是我的OpenGL文件没有引对
#include <GL\glut.h>
其中glut.h文件要在下面的路径下
C:\Program Files (x86)\Microsoft Visual Studio 12.0\VC\include\GL
如果GL文件夹不在,要手动创建,结构如下图所示:

注意:
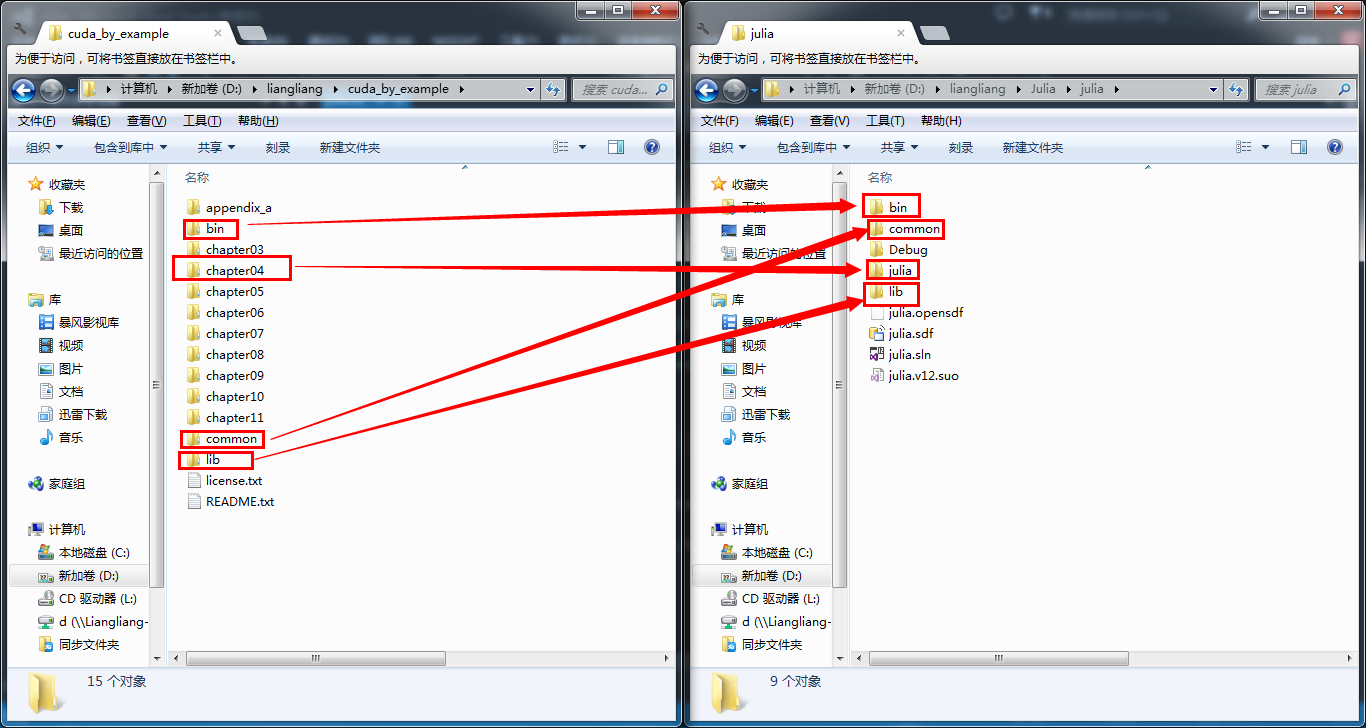
为了运行示例代码,需要抽取可运行的部分,同时为了减少手动修改的麻烦,也要注意各各个文件目录的层次关系,我的截图如下:
千辛万苦走下来就为了下面这张图:

确实挺好看的。赞一个!
《GPU高性能编程CUDA实战中文》中第四章的julia实验的更多相关文章
- [问题解决]《GPU高性能编程CUDA实战》中第4章Julia实例“显示器驱动已停止响应,并且已恢复”问题的解决方法
以下问题的出现及解决都基于"WIN7+CUDA7.5". 问题描述:当我编译运行<GPU高性能编程CUDA实战>中第4章所给Julia实例代码时,出现了显示器闪动的现象 ...
- 《GPU高性能编程CUDA实战》第五章 线程并行
▶ 本章介绍了线程并行,并给出四个例子.长向量加法.波纹效果.点积和显示位图. ● 长向量加法(线程块并行 + 线程并行) #include <stdio.h> #include &quo ...
- 《GPU高性能编程CUDA实战》第四章 简单的线程块并行
▶ 本章介绍了线程块并行,并给出两个例子:长向量加法和绘制julia集. ● 长向量加法,中规中矩的GPU加法,包含申请内存和显存,赋值,显存传入,计算,显存传出,处理结果,清理内存和显存.用到了 t ...
- 《GPU高性能编程CUDA实战》第十一章 多GPU系统的CUDA C
▶ 本章介绍了多设备胸膛下的 CUDA 编程,以及一些特殊存储类型对计算速度的影响 ● 显存和零拷贝内存的拷贝与计算对比 #include <stdio.h> #include " ...
- 《GPU高性能编程CUDA实战》附录二 散列表
▶ 使用CPU和GPU分别实现散列表 ● CPU方法 #include <stdio.h> #include <time.h> #include "cuda_runt ...
- 《GPU高性能编程CUDA实战》第七章 纹理内存
▶ 本章介绍了纹理内存的使用,并给出了热传导的两个个例子.分别使用了一维和二维纹理单元. ● 热传导(使用一维纹理) #include <stdio.h> #include "c ...
- 《GPU高性能编程CUDA实战》第六章 常量内存
▶ 本章介绍了常量内存的使用,并给光线追踪的一个例子.介绍了结构cudaEvent_t及其在计时方面的使用. ● 章节代码,大意是有SPHERES个球分布在原点附近,其球心坐标在每个坐标轴方向上分量绝 ...
- 《GPU高性能编程CUDA实战》第三章 CUDA设备相关
▶ 这章介绍了与CUDA设备相关的参数,并给出了了若干用于查询参数的函数. ● 代码(已合并) #include <stdio.h> #include "cuda_runtime ...
- 《GPU高性能编程CUDA实战》附录一 高级原子操作
▶ 本章介绍了手动实现原子操作.重构了第五章向量点积的过程.核心是通过定义结构Lock及其运算,实现锁定,读写,解锁的过程. ● 章节代码 #include <stdio.h> #incl ...
随机推荐
- [转]SE43 修改SAP标准菜单、登陆界面、背景图片
1.事务码se43 复制标准菜单S000 到 ZS000 2.按实际需要修改 ZS000 3.在事务码SSM2中用ZS000 代替 S000 4.注销后重新登陆 o 修改SAP登陆界面(在本博客 ...
- PHP-CGI远程任意代码执行漏洞(CVE-2012-1823)修复方案
首先介绍一下这个漏洞,其实是在apache调用php解释器解释.php文件时,会将url参数传我给php解释器,如果在url后加传命令行开关(例如-s.-d .-c或 -dauto_prepend_ ...
- input 上传文件的判断
<html> <head> <meta charset='utf-8'> <meta name="viewport" content=&q ...
- t.call is not a function
js 写错了... 代码: $("form").each({$(this).submit(function(){return false;})}); 丢了一个 function() ...
- OpenLayers v4.2.0 -----地图延迟加载;
官方:http://openlayers.org/en/latest/examples/lazy-source.html <!DOCTYPE html> <html> < ...
- Django---登录(含随机生成图片验证码)、注册示例讲解
登录(验证码).注册功能具体代码 # urls.py from django.contrib import admin from django.urls import path from app01 ...
- 3305: Hero In Maze II (优先队列+bfs)
Description 500年前,Jesse是我国最卓越的剑客.他英俊潇洒,而且机智过人^_^.突然有一天,Jesse心爱的公主被魔王困在了一个巨大的迷宫中.Jesse听说这个消息已经是两天以后了, ...
- Python package和folder
在Python项目里面的区分,按照如下规定进行: 1.严格区分包和文件夹.包的定义就是包含__init__.py的文件夹. 如果没有__init__.py,那么就是普通的文件夹. 2.导入packag ...
- C 碎片三 运算符与表达式
一.算术运算符 算术运算符:+. -. *. /. %等 加:+ 减: - 乘: * 除: / 除数不能为0 模:% 参与模运算的数据不能为小数 二.赋值运算符 赋值运算符:= 作用: ...
- A light-weight client-side OAuth library for Java
这个是一个Github上的开源项目-Signpost,主要封装了一些OAuth认证类的方法,项目地址:电极打开 Signpost 什么是Signpost Signpost是一种非常容易.直观的HTTP ...