2018-2019-2 20175211 实验四《Android程序设计》实验报告
一、实验内容及步骤
1、Android Studio的安装测试
- 要求:
- 参考http://www.cnblogs.com/rocedu/p/6371315.html#SECANDROID,安装 Android Stuidio
- 完成Hello World, 要求修改res目录中的内容,Hello World后要显示自己的学号,自己学号前后一名同学的学号,提交代码运行截图和码云Git链接,截图没有学号要扣分
- 学习Android Stuidio调试应用程序
安装Android Studio
- 从官网上下载,一步一步跟着安装就行了
- 点击下图标志配置虚拟手机来测试代码

Android基础知识(参考:Android Developer Docs)
应用组件是 Android 应用的基本构建基块。每个组件都是一个不同的点,系统可以通过它进入您的应用。共有四种不同的应用组件类型
- Activity 表示具有用户界面的单一屏幕
- Services 服务是一种在后台运行的组件,用于执行长时间运行的操作或为远程进程执行作业
- Broadcast receivers 内容提供程序管理一组共享的应用数据
- Content providers 广播接收器是一种用于响应系统范围广播通知的组件
启动组件
四种组件类型中的三种 — Activity、服务和广播接收器 — 通过名为 Intent 的异步消息进行启动。Intent 会在运行时将各个组件相互绑定(您可以将 Intent 视为从其他组件请求操作的信使),无论组件属于您的应用还是其他应用。清单文件
在 Android 系统启动应用组件之前,系统必须通过读取应用的 AndroidManifest.xml 文件(“清单”文件)确认组件存在。 您的应用必须在此文件中声明其所有组件,该文件必须位于应用项目目录的根目录中。
Android Studio基本使用(参考:项目概览)
Android Studio界面和Idea基本一致,左侧是项目的文件结构目录

我们主要使用的文件在app目录下
- manifests
存放清单文件 - java
存放java代码,我们编写的代码放在第一个文件夹下 - res
存放各种资源,基本上是xml文件
修改代码
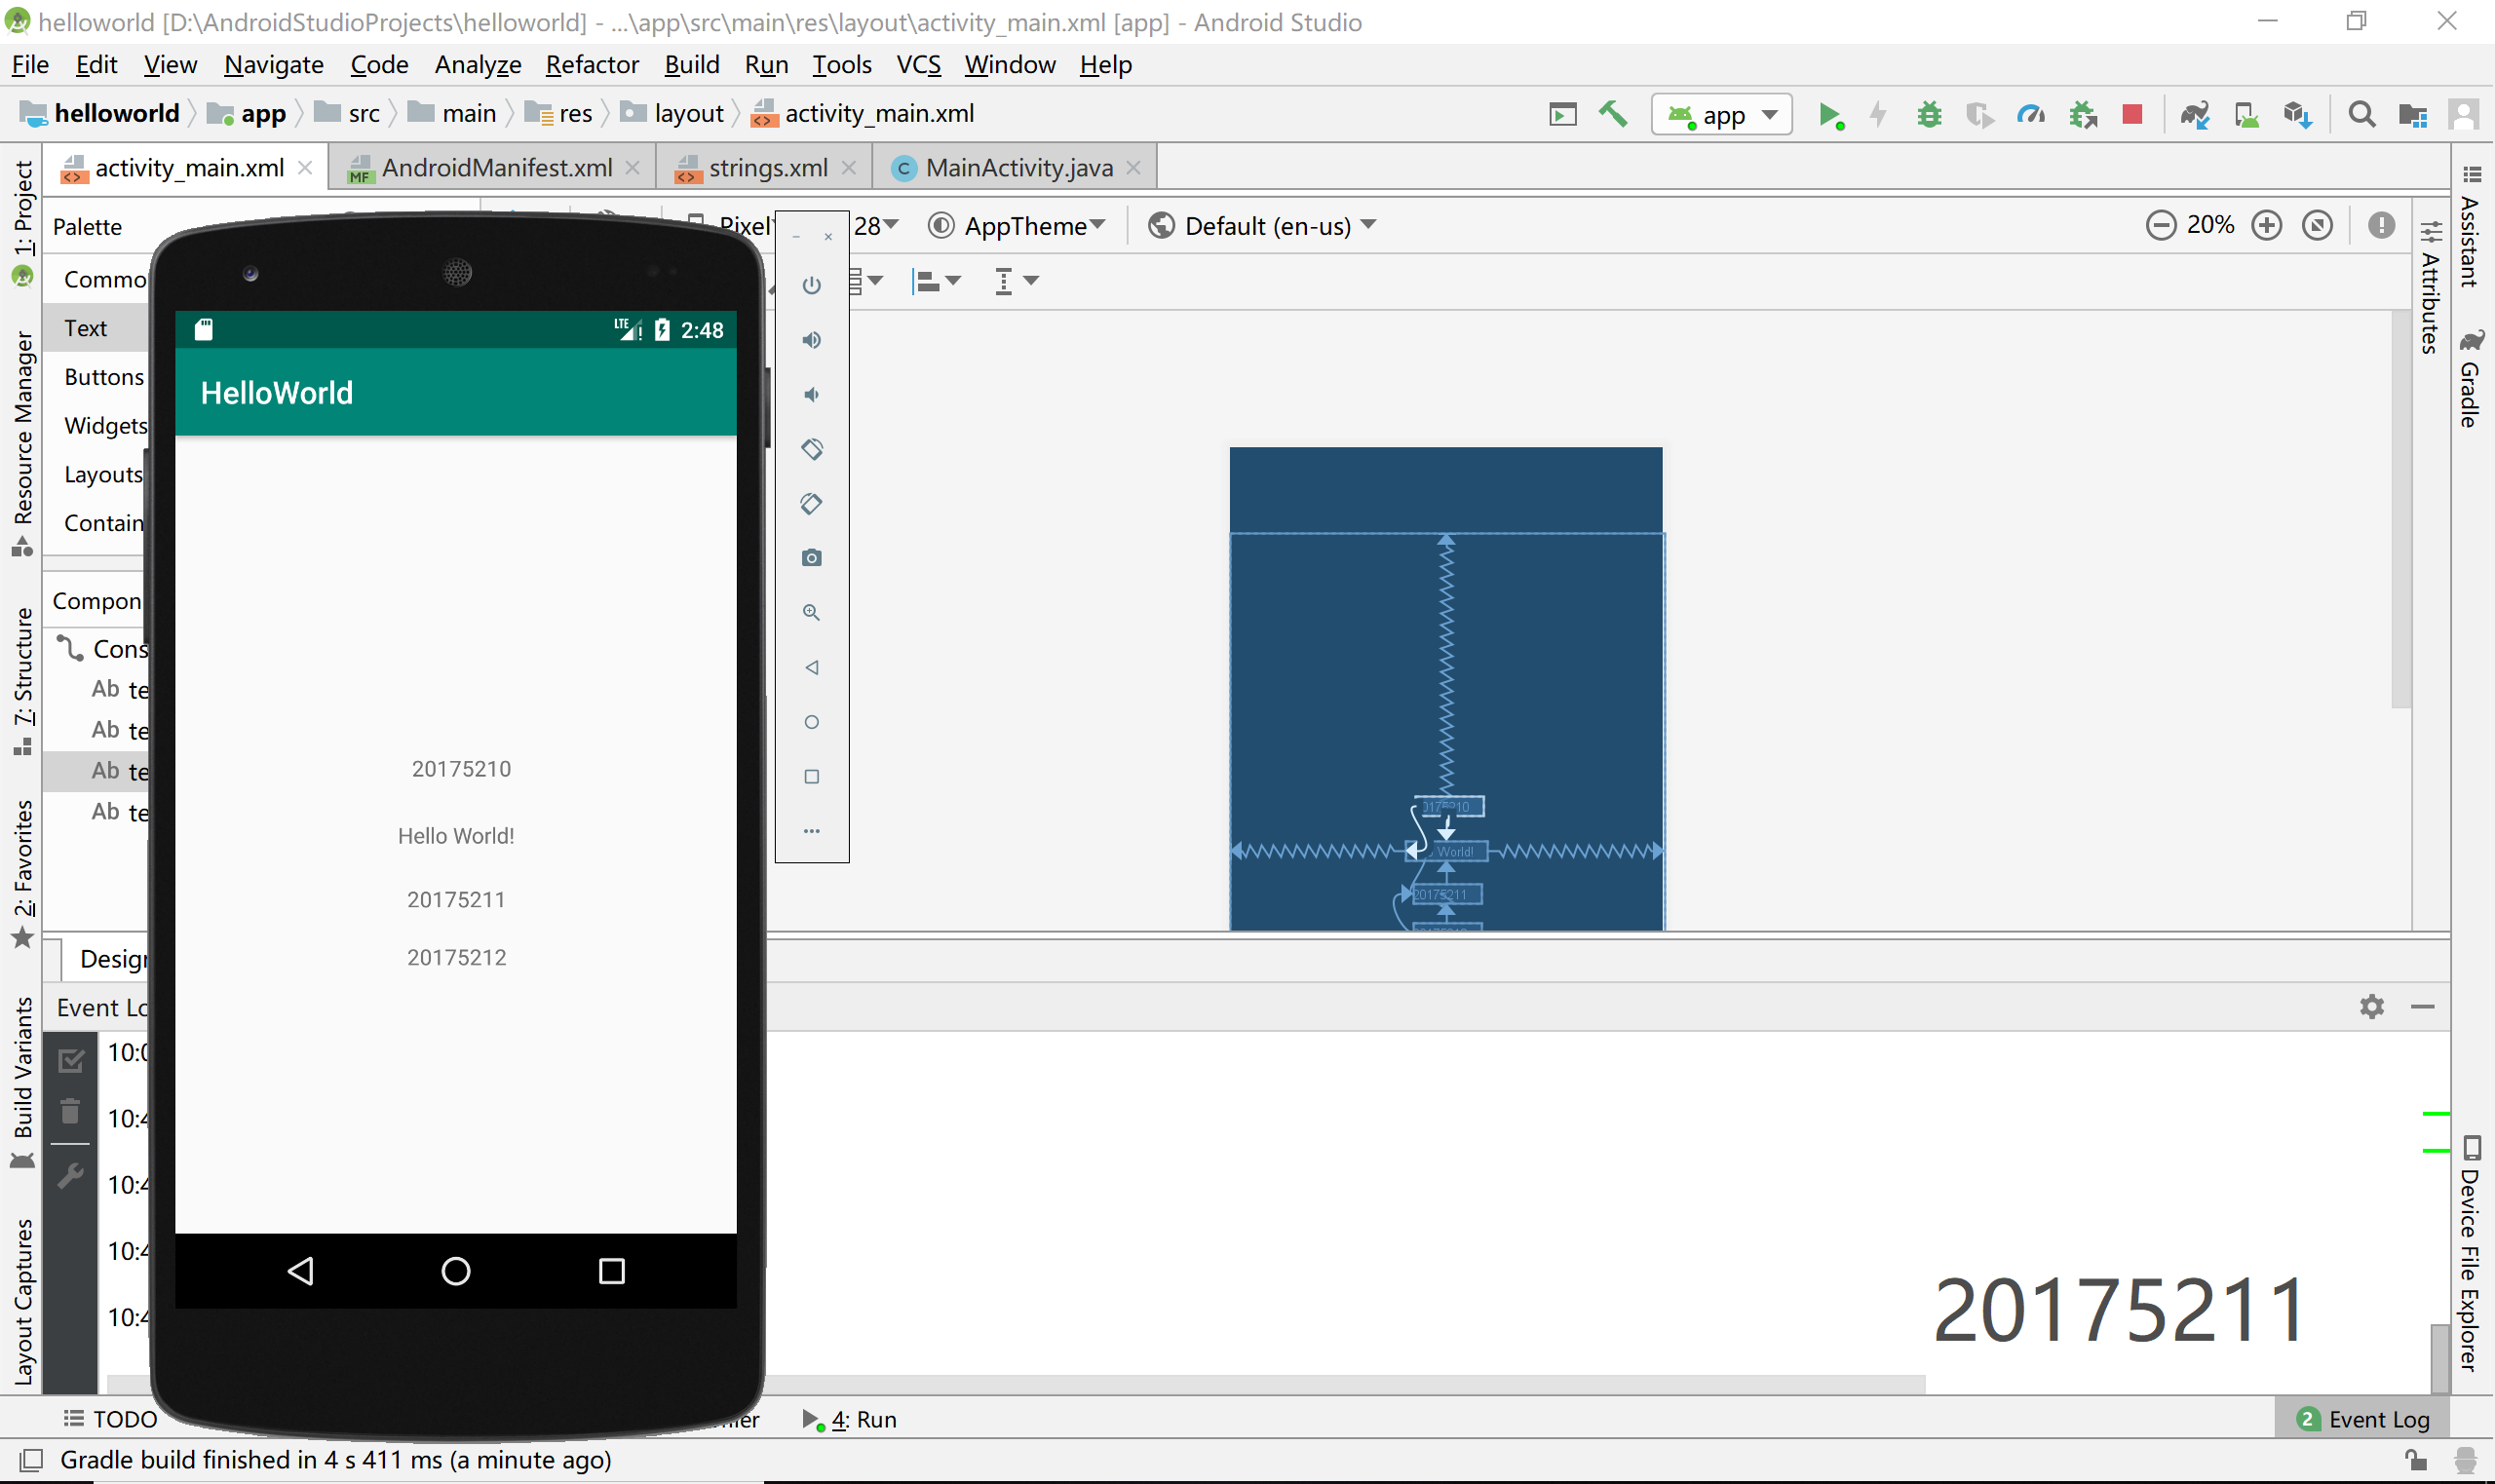
要输出我们自己的学号可以直接去res->layout->activity_main.xml修改。创建项目的时候,默认有一个居中的TextView组件,内容是helloworld,我们增加自己的文本,结果如下
运行截图
2、Activity测试
- 要求:
- 构建项目,运行教材相关代码
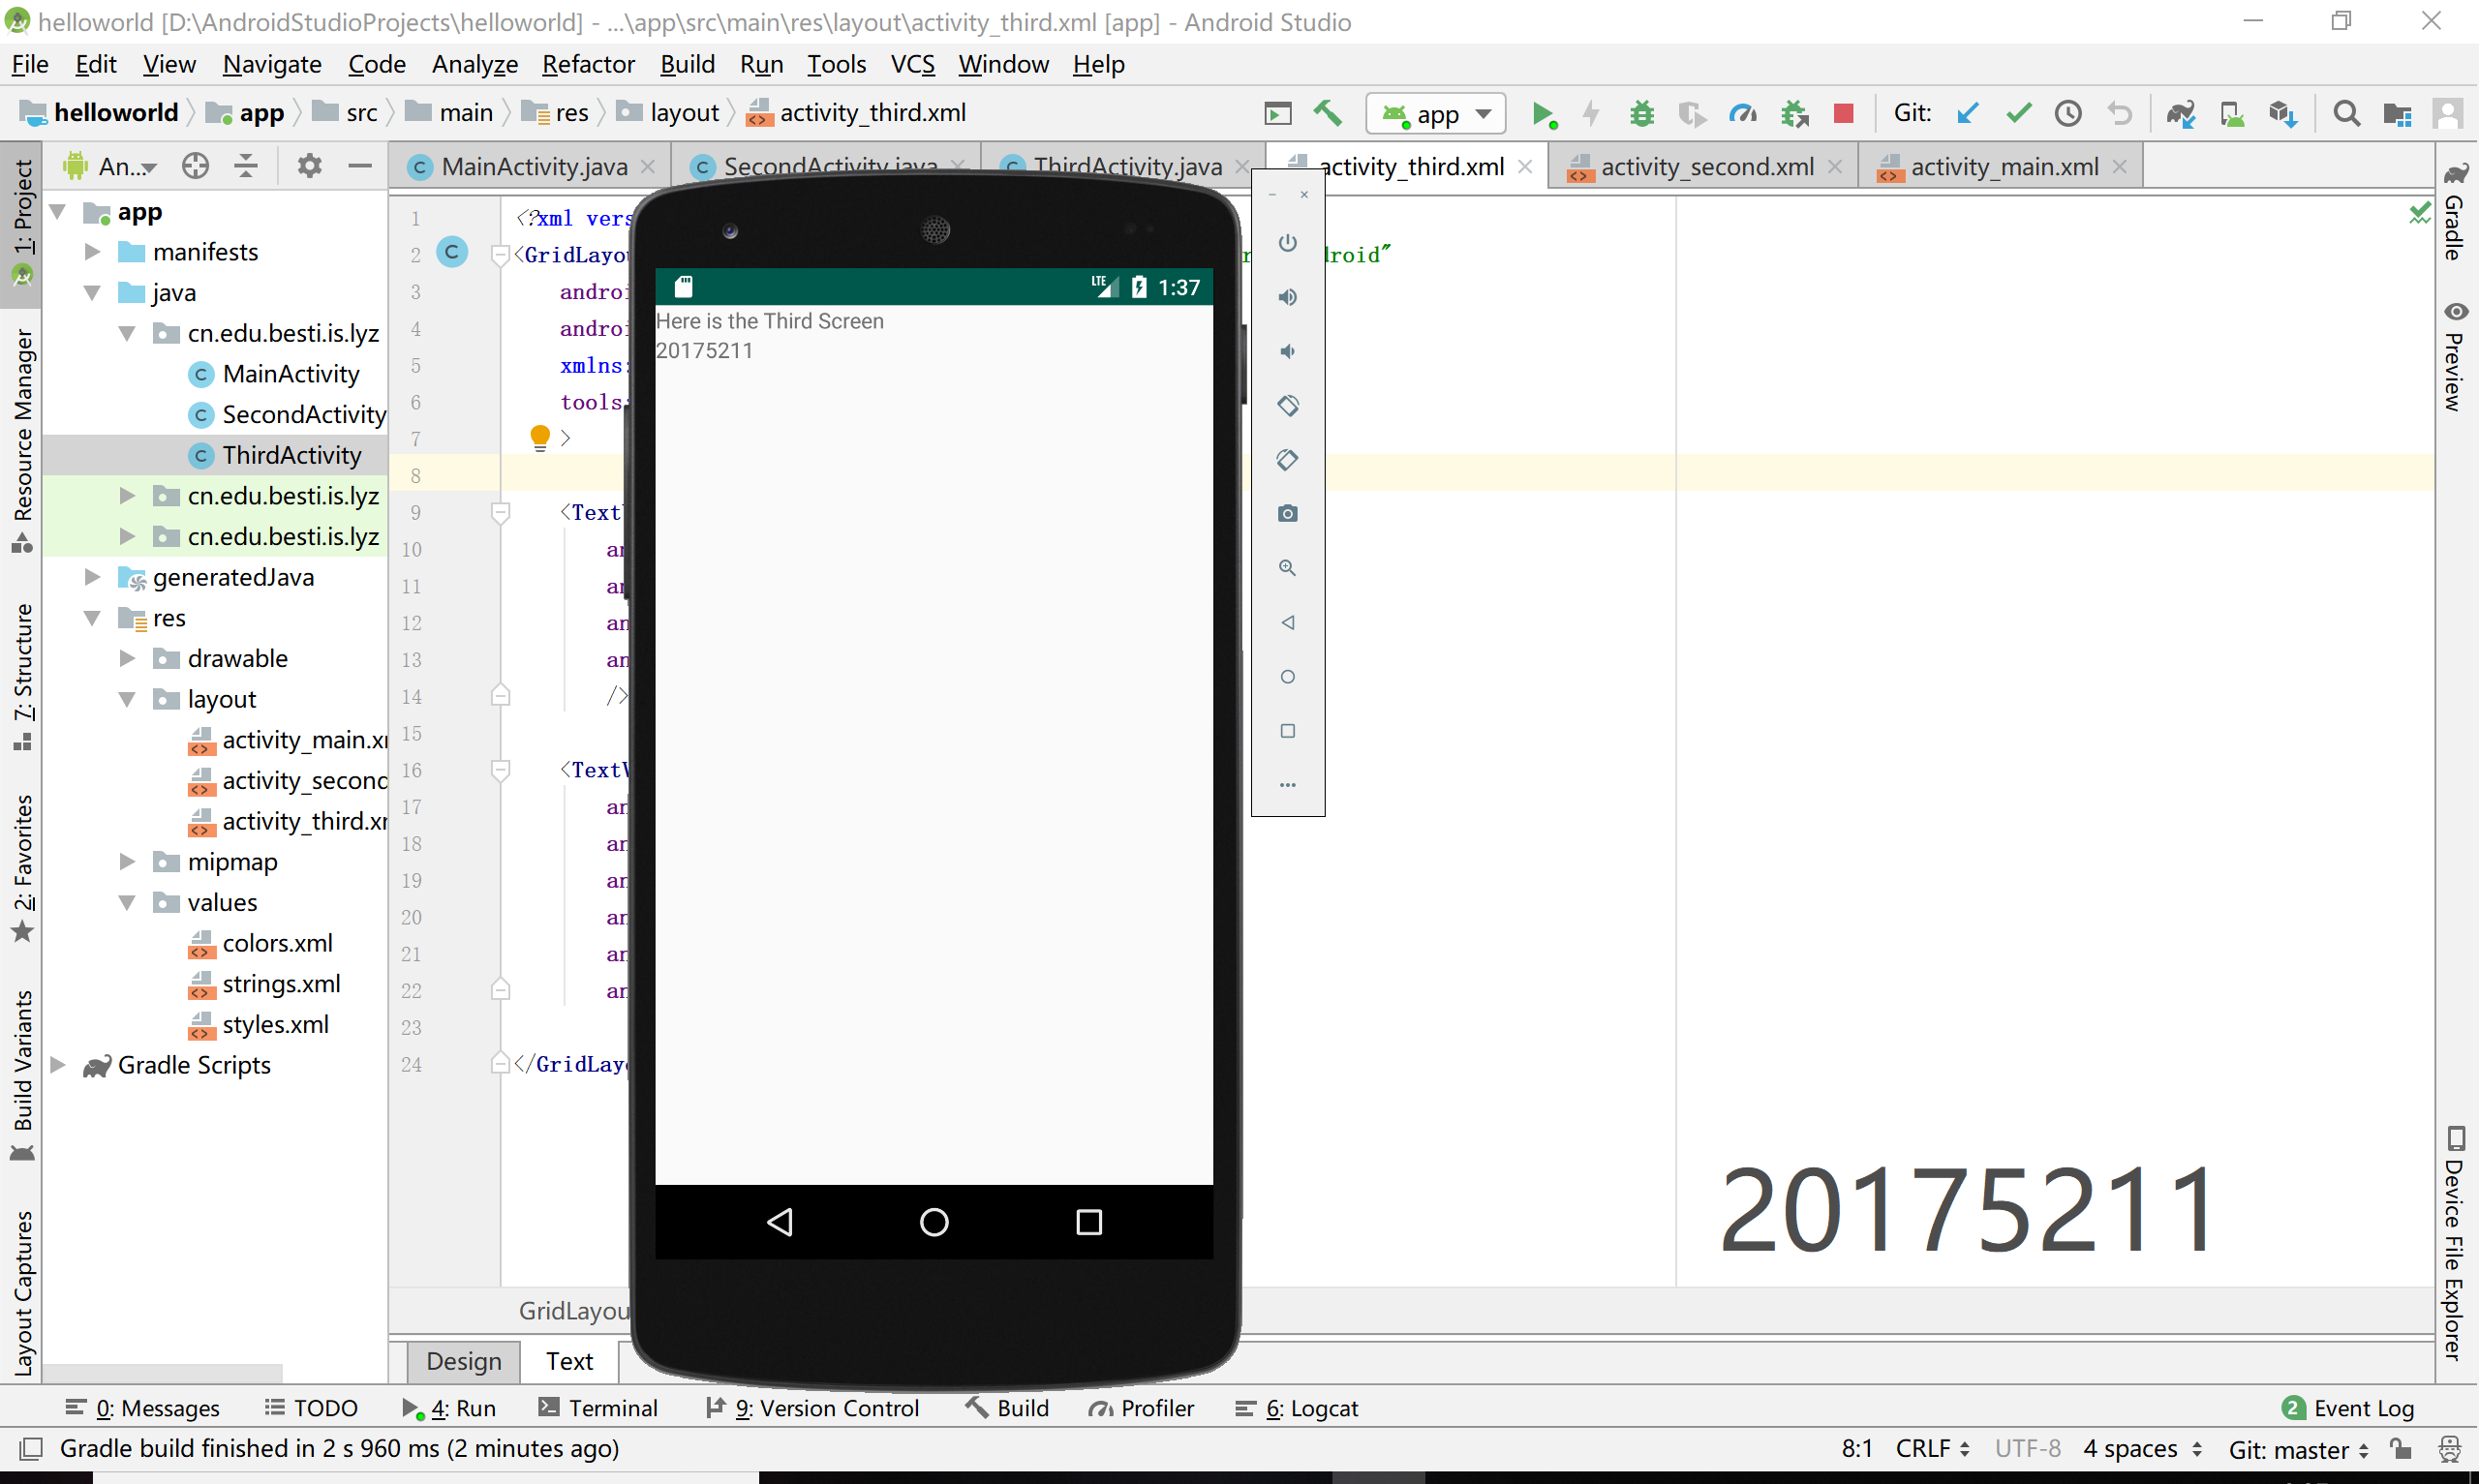
- 创建 ThirdActivity, 在ThirdActivity中显示自己的学号,修改代码让MainActivity启动ThirdActivity
- 提交代码运行截图和码云Git链接,截图要有学号水印,否则会扣分
Activity基本知识(参考:Introduction to Activities)
- Activity生命周期
onCreate()在系统创建活动时触发。必须在此处调用setContentView()以定义活动用户界面的布局。onCreate()完成后,接下来回调的永远是onStart()onStart()onCreate()退出时,活动进入开始状态onResume()系统在活动开始与用户交互之前调用此回调。应用程序的大多数核心功能都是在该onResume()方法中实现的。onPause()当活动失去焦点并进入暂停状态时, 系统会调用。例如,当用户点击“后退”或“最近”按钮时,会出现此状''态。onStop()当活动不再对用户可见时, 系统会调用。onRestart()当处于“已停止”状态的活动即将重新启动时,系统将调用此回调onDestroy()系统在销毁活动之前调用此回调

- 声明activity
在清单文件中如下声明
<manifest ... >

  <application ... >

      <activity android:name=".ExampleActivity" />

      ...

  </application ... >

  ...

</manifest >
MainActivity代码
public class MainActivity extends Activity implements View.OnTouchListener {

    @SuppressLint("ClickableViewAccessibility")

    @Override

    protected void onCreate(Bundle savedInstanceState) {

        super.onCreate(savedInstanceState);

        setContentView(R.layout.activity_main);

        TextView tv1 = findViewById(R.id.textView1);

        tv1.setOnTouchListener(this);

        TextView tv2 = findViewById(R.id.textView2);

        tv2.setOnTouchListener(this);

    }

    @SuppressLint("ClickableViewAccessibility")

    @Override

    public boolean onTouch(View arg0, MotionEvent event) {

        if (arg0.getId()==(R.id.textView1)){

            Intent intent = new Intent(this, SecondActivity.class);

            startActivity(intent);

        }

        if (arg0.getId()==(R.id.textView2)){

            Intent intent = new Intent(this, ThirdActivity.class);

            startActivity(intent);

        }

        return true;

    }

}
TextView对象可以调用setOnTouchListener方法开启监听,当用户按下该对象时触发onTouch事件。用if语句判断用户触发的是哪个事件,跳转到不同的页面。
运行截图


3、UI测试
- 要求:
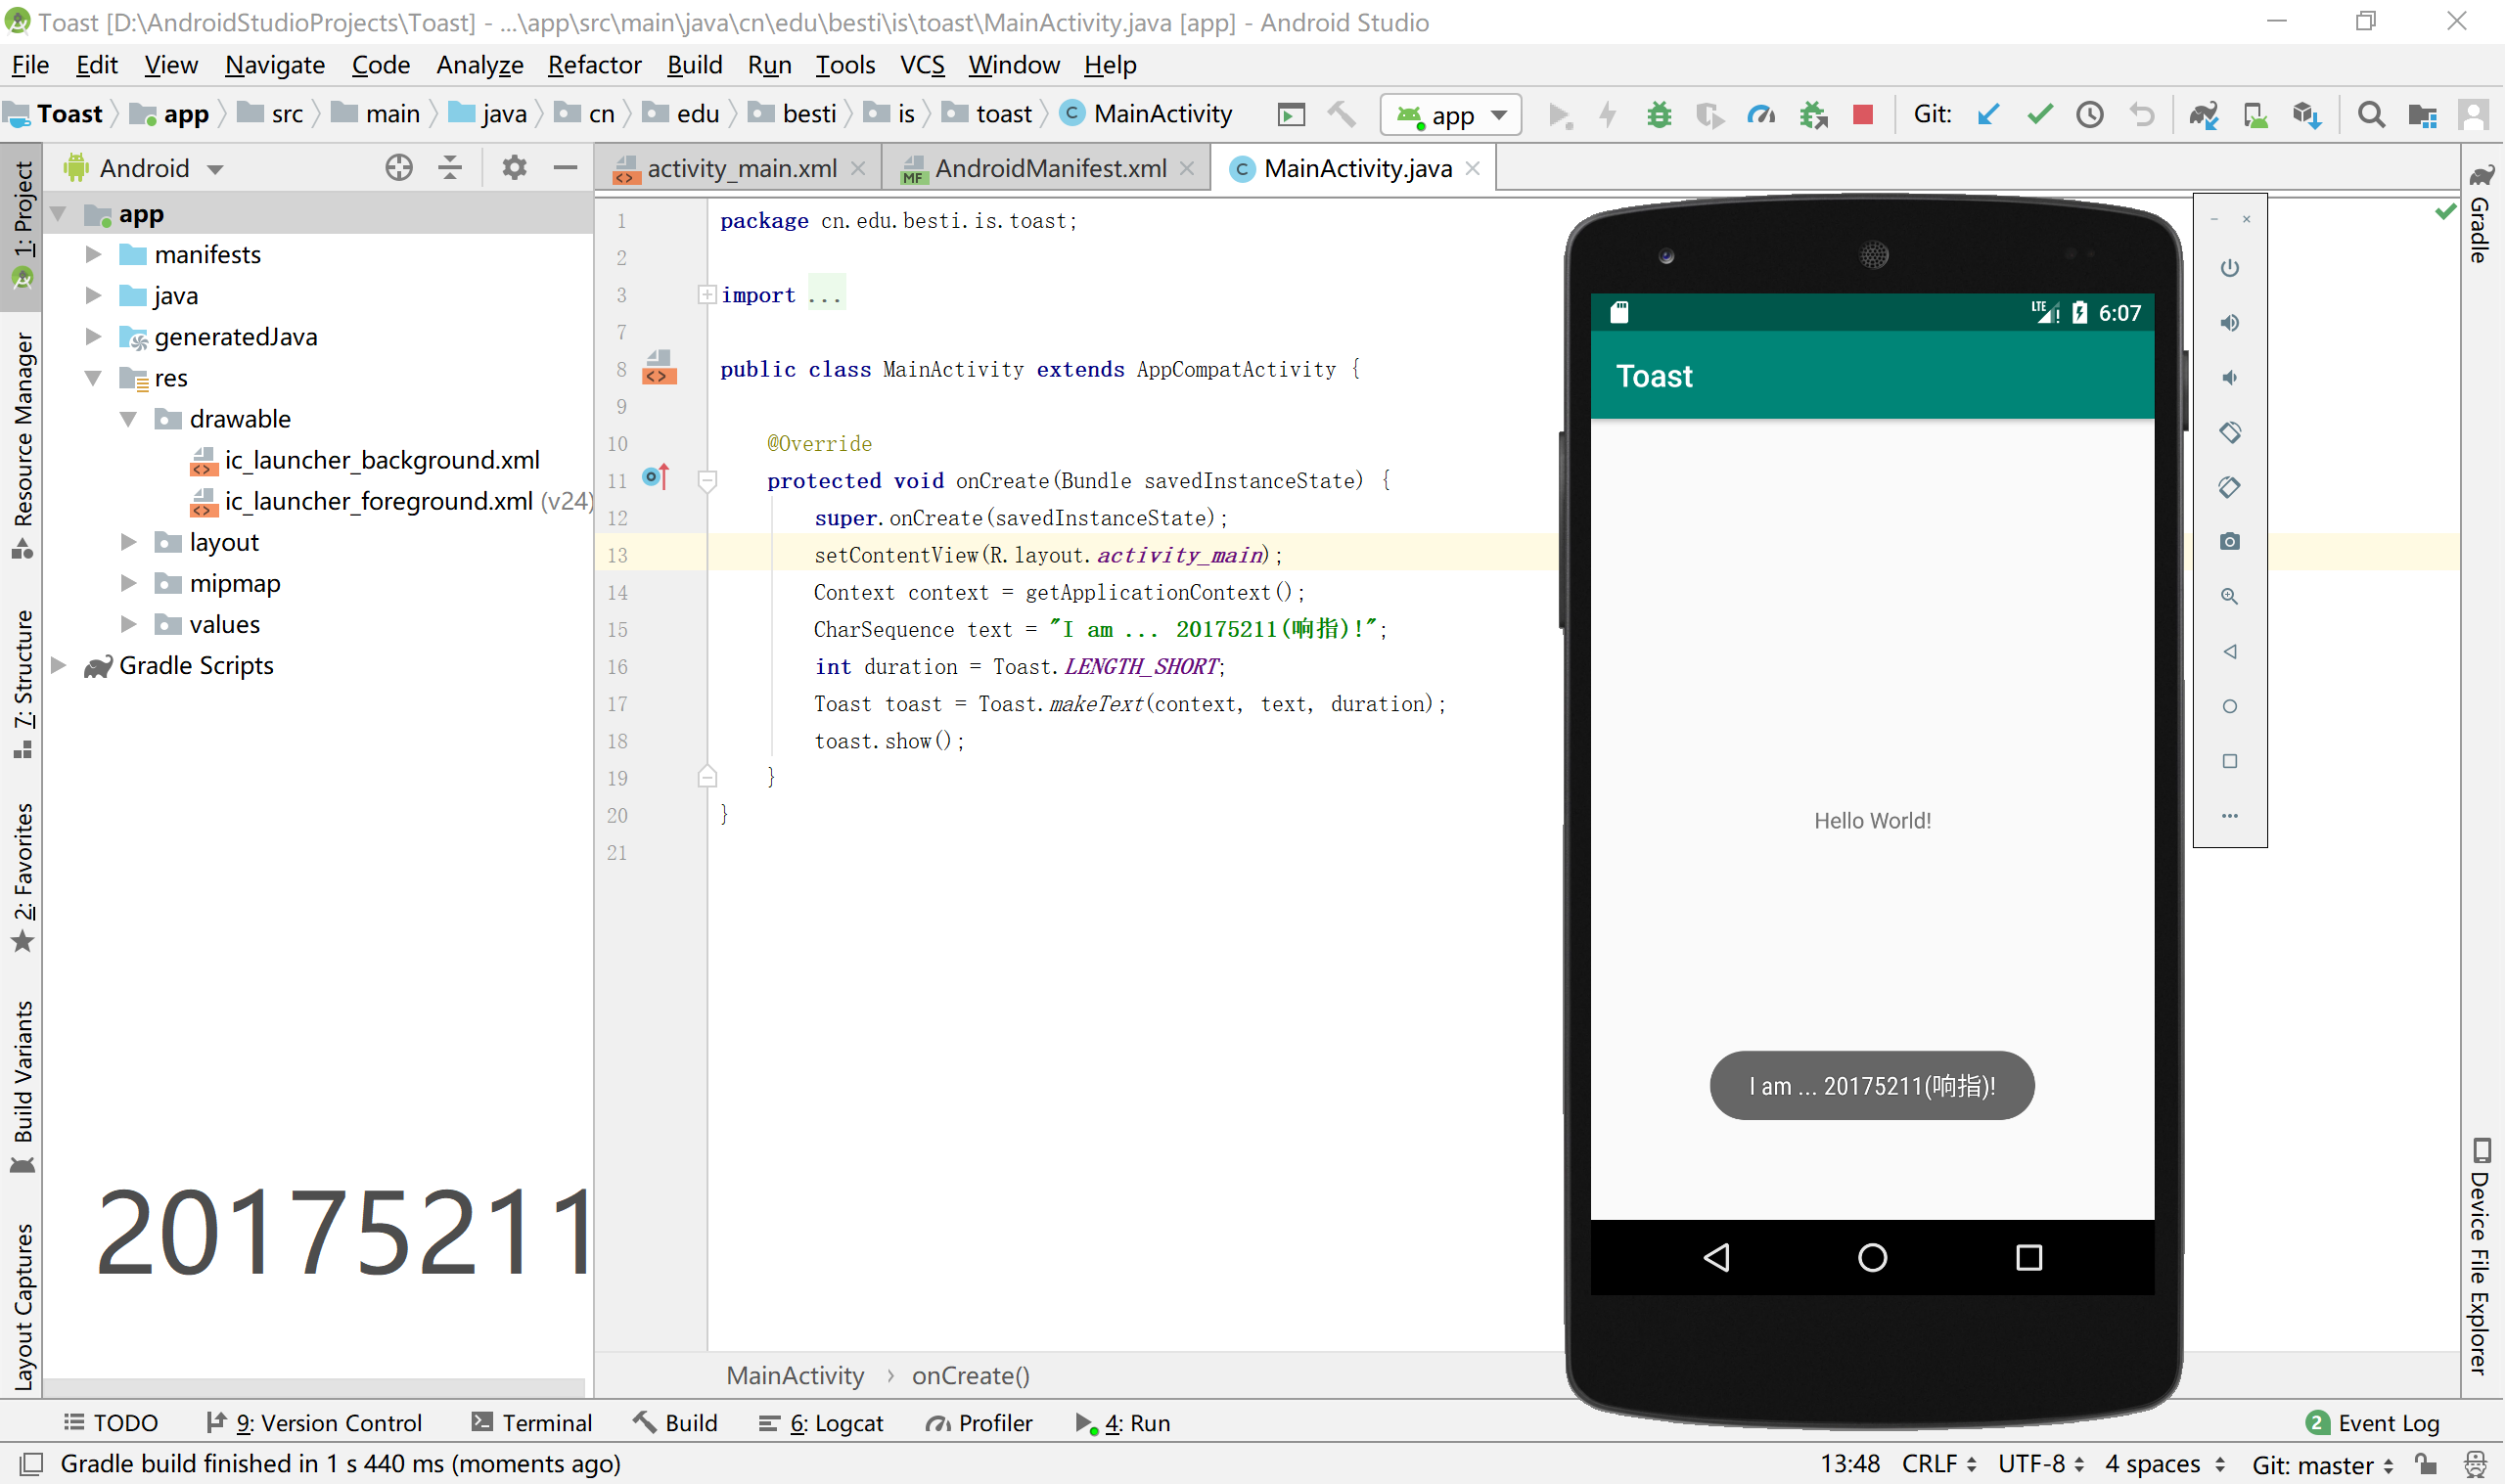
- 修改代码让Toast消息中显示自己的学号信息
- 提交代码运行截图和码云Git链接,截图要有学号水印,否则会扣分
Toast基本知识
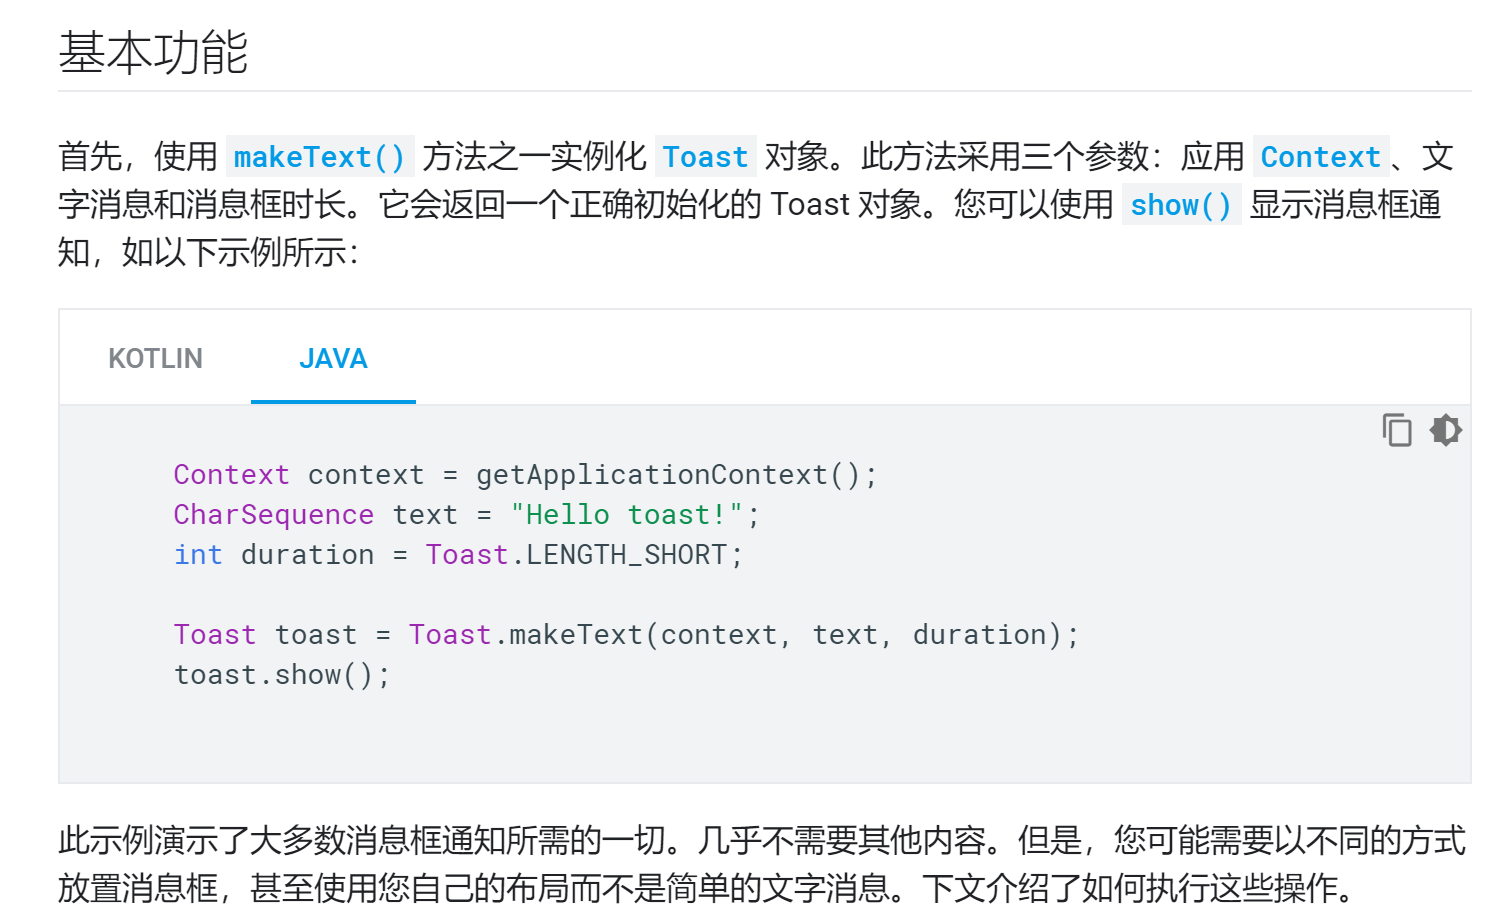
MainActivity代码
public class MainActivity extends AppCompatActivity {

    @Override

    protected void onCreate(Bundle savedInstanceState) {

        super.onCreate(savedInstanceState);

        setContentView(R.layout.activity_main);

        Context context = getApplicationContext();

        CharSequence text = "I am ... 20175211(响指)!";

        int duration = Toast.LENGTH_SHORT;

        Toast toast = Toast.makeText(context, text, duration);

        toast.show();

    }

}
运行截图
4、布局测试
- 要求
- 修改布局让P290页的界面与教材不同
- 提交代码运行截图和码云Git链接,截图要有学号水印,否则会扣分
Layout基本知识(参考:布局资源)
- 档案位置
res/layout/filename.xml
文件名将用作资源ID。 - 句法
<?xml version="1.0" encoding="utf-8"?>

<ViewGroup

    xmlns:android="http://schemas.android.com/apk/res/android"

    android:id="@[+][package:]id/resource_name"

    android:layout_height=["dimension" | "match_parent" | "wrap_content"]

    android:layout_width=["dimension" | "match_parent" | "wrap_content"]

    [ViewGroup-specific attributes] >

    <View

        android:id="@[+][package:]id/resource_name"

        android:layout_height=["dimension" | "match_parent" | "wrap_content"]

        android:layout_width=["dimension" | "match_parent" | "wrap_content"]

        [View-specific attributes] >

        <requestFocus/>

    </View>

    <ViewGroup >

        <View />

    </ViewGroup>

    <include layout="@layout/layout_resource"/>

</ViewGroup>
内容
ViewGroup
其他View元素的容器<View>
单个UI组件,通常称为“小部件”。不同种类的View对象包括TextView, Button,和CheckBox。- 属性:
- android:id
资源ID。元素的唯一资源名称,可用于View从应用程序获取对该元素的引用。详细了解下面的价值android:id。 - android:layout_height
维度或关键字。必填。元素的高度,作为维度值(或 维度资源)或关键字("match_parent"或"wrap_content")。请参阅下面的有效值。 - android:layout_width
维度或关键字。必填。元素的宽度,维度值(或 维度资源)或关键字("match_parent"或"wrap_content")。
- android:id
- 属性:
Value for android:id
对于ID值,通常应使用以下语法形式:"@+id/name",+表示这是一个新的资源ID。aapt工具将在R.java类中创建一个新的资源整数(如果它尚不存在)。例如
<TextView android:id="@+id/nameTextbox"/>
该nameTextbox名称现在是附加到此元素的资源ID。然后,您可以参考TextViewJava中与ID关联的内容:
TextView textView = findViewById(R.id.nameTextbox);
此代码返回TextView对象。Value for android:layout_height and android:layout_width
高度和宽度值可以使用Android支持的任何 维度单位(px,dp,sp,pt,in,mm)或以下关键字表示:

布局文件activity_main.xml
<?xml version="1.0" encoding="utf-8"?>

<RelativeLayout xmlns:android="http://schemas.android.com/apk/res/android"

    xmlns:tools="http://schemas.android.com/tools"

    android:layout_width="match_parent"

    android:layout_height="match_parent"

    android:paddingLeft="2dp"

    android:paddingRight="2dp"

    tools:context=".MainActivity">

    <LinearLayout

        android:id="@+id/choose"

        android:layout_width="match_parent"

        android:layout_height="wrap_content"

        android:layout_alignParentTop="true"

        android:gravity="center|top"

        android:background="@android:color/white"

        android:orientation="horizontal">

        <Button

            android:id="@+id/cancelButton"

            android:layout_width="wrap_content"

            android:layout_height="wrap_content"

            android:layout_marginRight="30dp"

            android:text="@string/cancel"

            android:layout_marginEnd="30dp" />

        <Button

            android:layout_width="wrap_content"

            android:layout_height="wrap_content"

            android:id="@+id/saveButton"

            android:layout_marginLeft="30dp"

            android:text="@string/save"

            android:layout_marginStart="30dp" />

    </LinearLayout>

    <ImageView

        android:id="@+id/image"

        android:layout_width="150dp"

        android:layout_height="150dp"

        android:layout_marginTop="150dp"

        android:padding="4dp"

        android:layout_below="@+id/choose"

        android:layout_centerHorizontal="true"

        android:src="@android:drawable/ic_btn_speak_now"

        />

    <LinearLayout

        android:id="@+id/filter_button_container"

        android:layout_width="match_parent"

        android:layout_height="wrap_content"

        android:layout_below="@+id/image"

        android:layout_marginTop="50dp"

        android:gravity="center"

        android:background="@android:color/white"

        android:orientation="horizontal">

        <Button

            android:id="@+id/filerButton"

            android:layout_width="wrap_content"

            android:layout_height="match_parent"

            android:layout_marginRight="20dp"

            android:text="@string/filter"/>

        <Button

            android:id="@+id/shareButton"

            android:layout_width="wrap_content"

            android:layout_height="match_parent"

            android:text="@string/share" />

        <Button

            android:id="@+id/deleteButton"

            android:layout_width="wrap_content"

            android:layout_height="match_parent"

            android:layout_marginLeft="20dp"

            android:text="@string/delete" />

    </LinearLayout>

</RelativeLayout>
运行截图

5、事件处理测试
- 要求
- 运行教材本章相关代码并截图
监听器
- Android是基于事件的。使用活动中的一个视图进行的用户交互,可能会触发一个事件,包括点击、长按、触碰和按键等等
- 要让程序响应某一个事件,需要为该事件编写一个监听器。也就是要实现嵌入在android.view.View类中的一个接口。比如OnClickListener接口的onClick()方法
MainActivity
package cn.edu.besti.is.multicolorclock;

import android.graphics.Color;

import android.support.v7.app.AppCompatActivity;

import android.os.Bundle;

import android.view.View;

public class MainActivity extends AppCompatActivity {

    int counter = 0;

    int [] colors = {Color.BLACK, Color.BLUE, Color.CYAN,

                Color.DKGRAY, Color.GRAY, Color.GREEN, Color.LTGRAY,

                Color.MAGENTA, Color.RED, Color.WHITE, Color.YELLOW };

    @Override

    protected void onCreate(Bundle savedInstanceState) {

        super.onCreate(savedInstanceState);

        setContentView(R.layout.activity_main);

    }

    public void changeColor(View view) {

        if (counter == colors.length) {

            counter = 0;

        }

        view.setBackgroundColor(colors[counter++]);

    }

}
activity_main.xml
<?xml version="1.0" encoding="utf-8"?>

<RelativeLayout xmlns:android="http://schemas.android.com/apk/res/android"

    xmlns:app="http://schemas.android.com/apk/res-auto"

    xmlns:tools="http://schemas.android.com/tools"

    android:layout_width="match_parent"

    android:layout_height="match_parent"

    tools:context=".MainActivity">

    <AnalogClock

        android:layout_width="wrap_content"

        android:layout_height="wrap_content"

        android:layout_alignParentTop="true"

        android:layout_centerHorizontal="true"

        android:layout_marginTop="90dp"

        android:onClick="changeColor"/>

</RelativeLayout>
运行截图

二、问题及解决方法
问题1:安装中一系列问题
(1)一开始我打算将Android Studio安装在虚拟机中,开启AVD时报错如下图
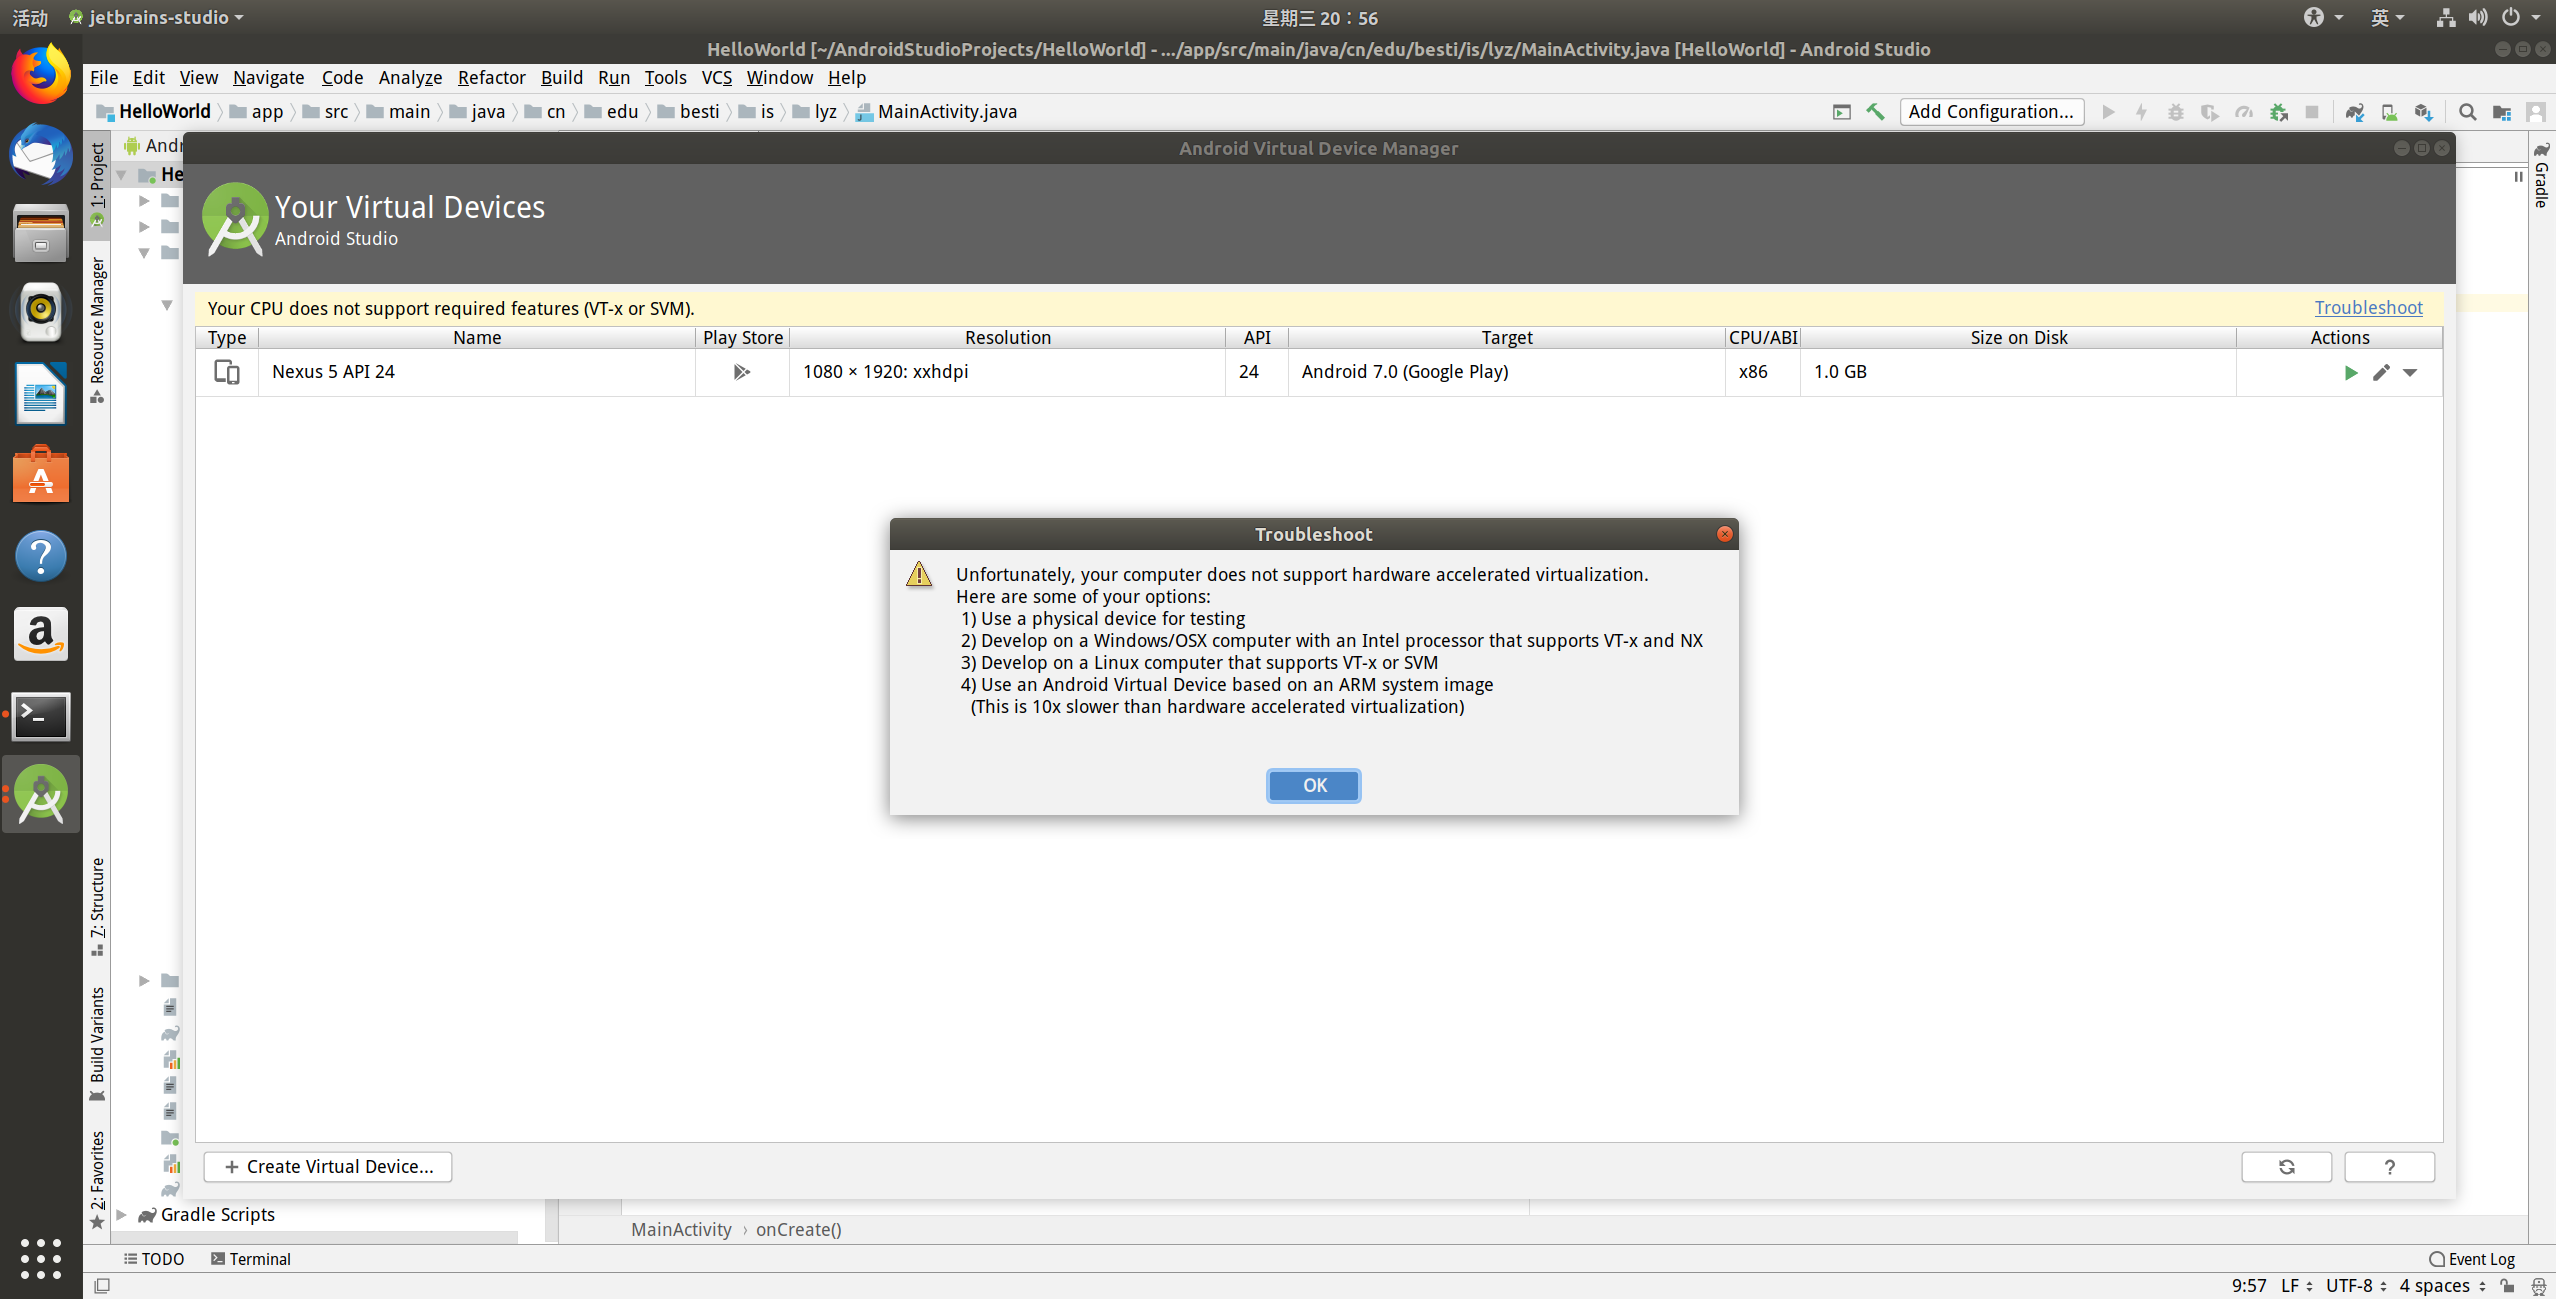
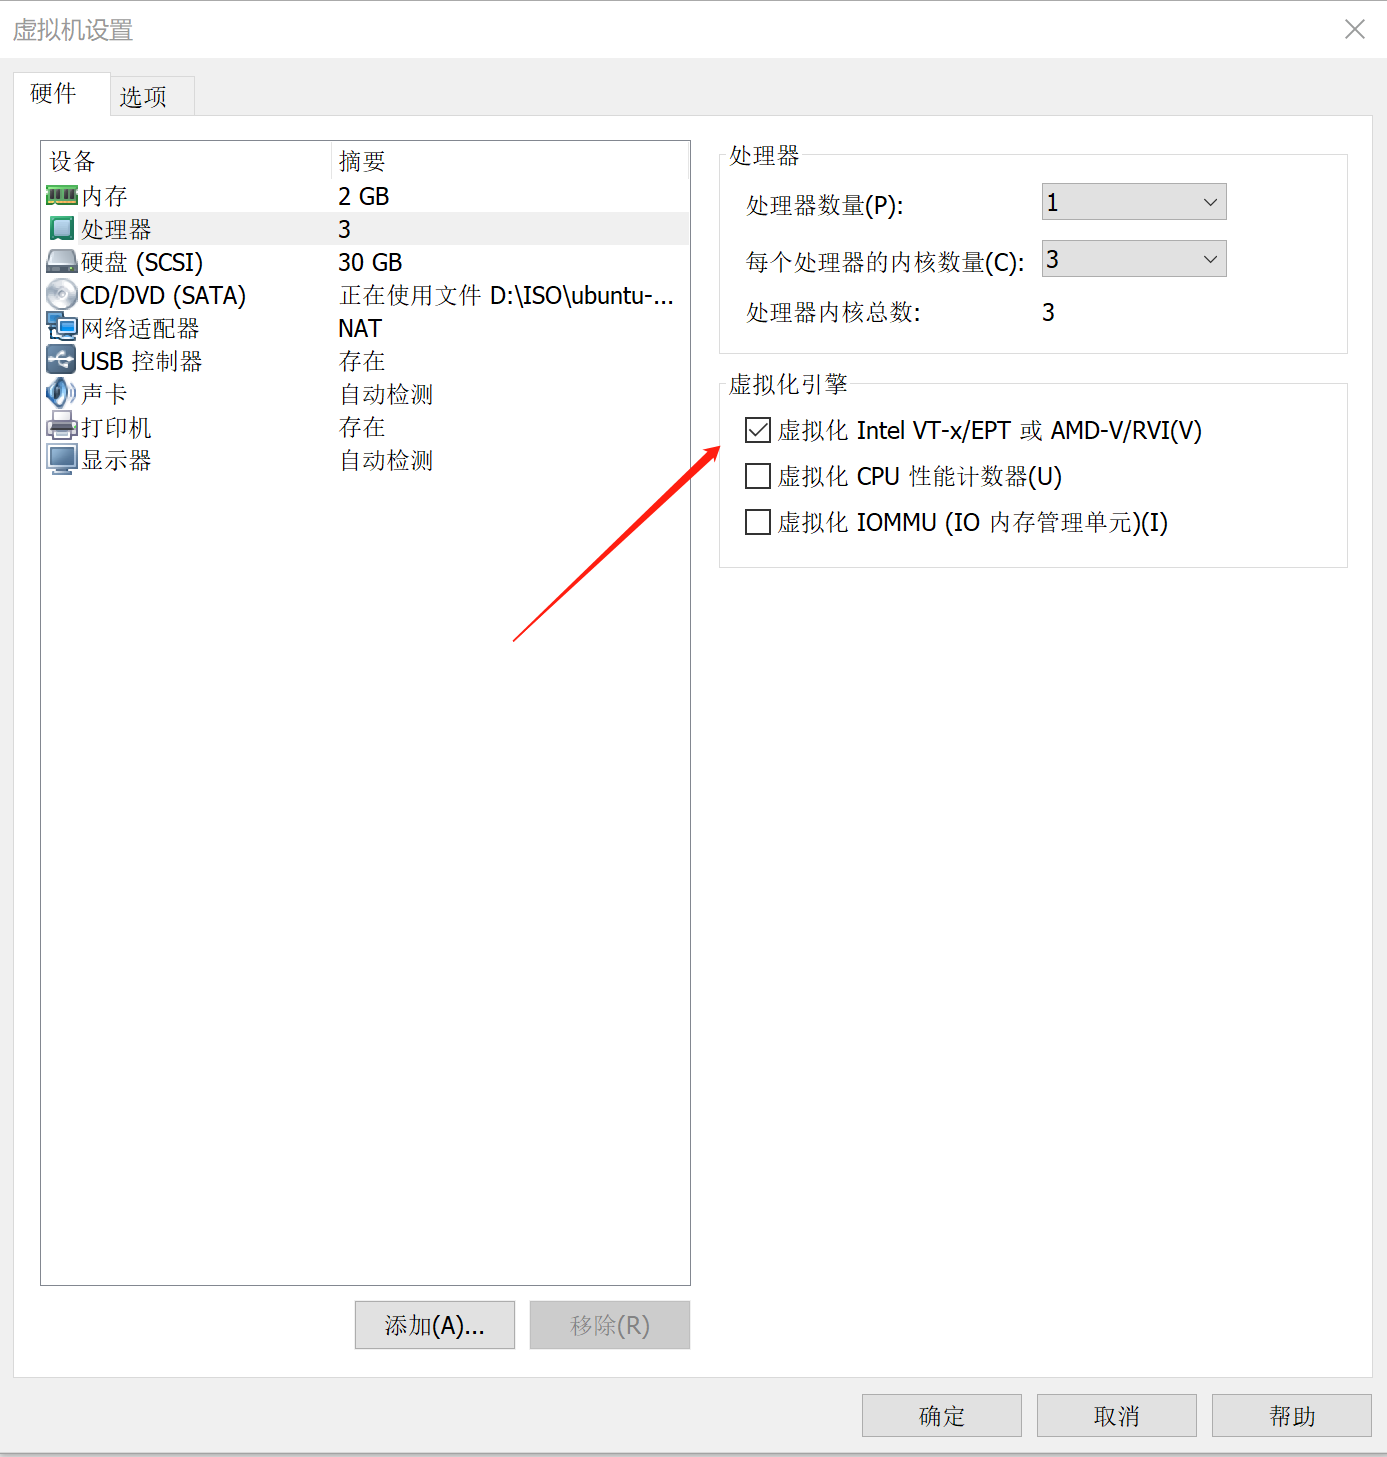
解决:问题出在虚拟机没有开启虚拟化。AVD本质上也是一个虚拟机,只有宿主机开启虚拟化技术才可以创建虚拟机,所以在VMware更改设置
(2)接下来报错如下
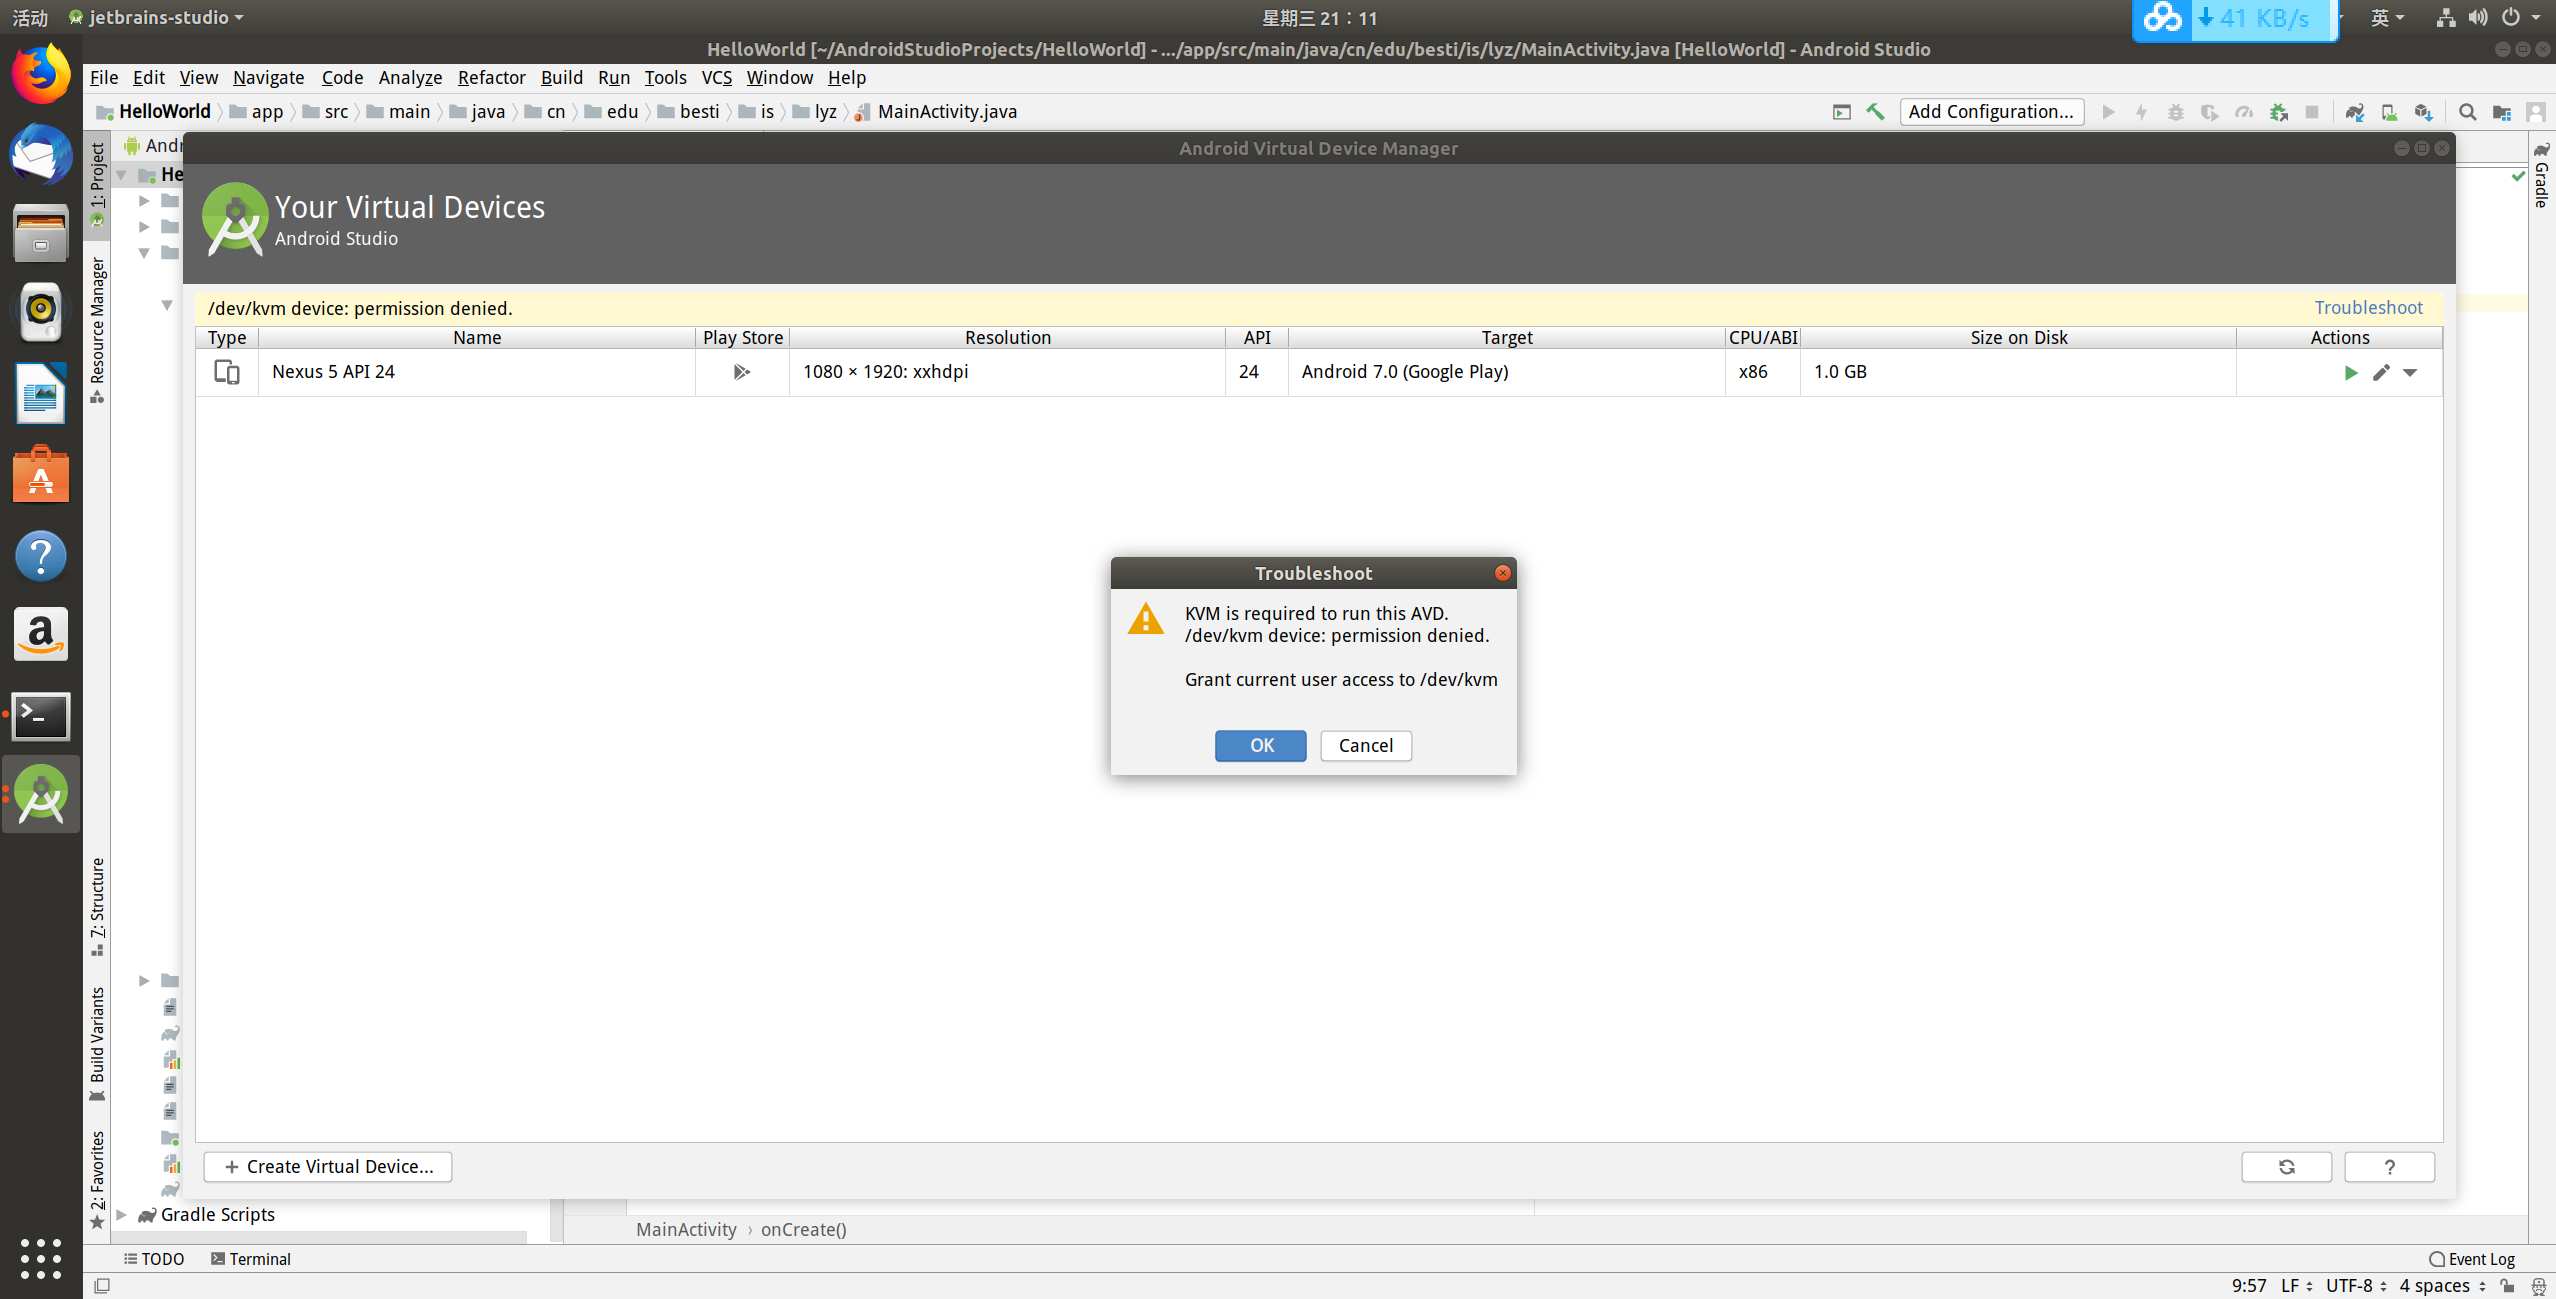
解决:问题出在当前用户权限不够,无法使用/dev/kvm目录,改权限就行了
(3)你以为这样就结束了吗?不,还有问题。创建虚拟机需要大概8个G的空间,我在虚拟机上做哪里给你找8个G?
解决(并没有):更改配置文件,将创建的虚拟手机内存改为2G。但是改完以后,点击运行,配置文件里那个数字又变成了默认的大小。我一气之下把配置文件改成了只读,Android Studio直接告诉我无法写入文件,报错。。。你运行个AVD为什么要改配置文件啊?在baidu、google均无果后,我屈服了,在主机里下了个Android Studio。然而此时距离提交还有24小时(* ̄︶ ̄)
问题2:书上讲的也太简要了吧。。就照着打,什么意思都不知道,这做实验有什么意义。。在有限的篇幅里想把什么东西都讲了,结果就是什么都讲不好。。
解决:老办法,看文档去吧,文档真的什么都有。。配合谷歌翻译,味道好极了o( ̄▽ ̄)d
链接:适用于应用开发者的文档
三、代码托管
- 码云链接
Android项目文件比较多,我也不确定什么该传什么不该传。。就把app下的东西都传上去了
四、实验心得体会
做实验、学知识、写代码都还好,做出东西的成就感足以支撑我继续肝下去,但是安装软件遇到问题带来的挫败感真的是。。。卡了我两天,心情奇差。还好最后是安好了。通过这次试验,我对Android开发有了大概的认识,并且有了基础的开发的能力,有点手痒痒想重拾团队项目了,看看时间吧。。2018-2019-2 20175211 实验四《Android程序设计》实验报告的更多相关文章
- 20165230 《Java程序设计》实验四 Android程序设计实验报告
20165230 <Java程序设计>实验四 Android程序设计实验报告 一.实验报告封面 课程:Java程序设计 班级:1652班 姓名:田坤烨 学号:20165230 成绩: 指导 ...
- 实验四 Android程序设计 实验报告
实验四 Android程序设计 实验报告 目录 代码托管地址 Android程序设计-1 Android程序设计-2 Android程序设计-3 Android程序设计-4 Android程序设计-5 ...
- 20155326 实验四 Android程序设计实验报告
20155326 实验四 Android程序设计实验报告 实验内容 1.基于Android Studio开发简单的Android应用并部署测试; 2.了解Android.组件.布局管理器的使用: 3. ...
- 20162325金立清 实验四 Android程序设计 实验报告
实验四 Android程序设计 实验报告 代码托管地址 码云链接 实验内容 安装使用Android Stuidio Activity测试 UI测试 布局测试 事件处理测试 Android程序设计-1 ...
- 实验四 Android程序设计 实验报告 20162305李昱兴
实验四 Android程序设计 实验报告 20162305李昱兴 一.Android Studio的安装测试 1.有关该软件 Android Studio,是基于Itellij IDEA的一款流行的I ...
- 20172302《程序设计与数据结构》实验四Android程序设计实验报告
课程:<程序设计与数据结构> 班级: 1723 姓名: 侯泽洋 学号:20172302 实验教师:王志强老师 实验日期:2018年5月30日 必修/选修: 必修 1.实验内容 (1)And ...
- 20155328 实验四 Android程序设计 实验报告
20155328 实验四 Android程序设计 第24章 初识Android 提交点1:完成HelloWorld并显示自己的学号 安装Android Studio后,创建了属于自己的Project( ...
- 2016-2017-2 20155312 实验四Android程序设计实验报告
遇到的问题及解决过程 「问题1」Android Studio-R文件出错 解决:参考Android Studio-R文件错误的解决办法步骤如下: 第一步:检查xml文件,R文件错误通常是由于我们的xm ...
- 20165235实验四 Android程序设计
20165235实验四 Android程序设计 实验课程:JAVA编程设计 实验名称:Android开发 姓名:祁瑛 学号:20165235 实验时间:2018.05.16 指导老师:娄家鹏 Andr ...
- 实验四 Android程序设计
20155224 实验四 Android程序设计 实验报告 实验报告封面: 课程:Java程序设计 班级:1652班 姓名:王高源 学号:20165225 指导教师:娄嘉鹏 实验日期:2018年5月1 ...
随机推荐
- Js中级复习
JS中级复习—— 1,this 就是js的关键字 用途:指向某一个对象 如何判断this指向: 函数(方法)内—— 一种以函数的方式调用(不带.)this指向window 一种以方法的形式调用(函 ...
- Vue事件修饰符,.capture关键字详解
.prevent 用于阻止默认事件,点击a标签href可以打开相应的链接,那么给事件加 上此关键字,click.prevent .capture 冒泡顺序 例如 div1中嵌套div2中嵌 ...
- 英语SouthRedAgate南红玛瑙
南红玛瑙(SouthRedAgate)是玛瑙的一个种类,古称”赤玉”,质地细腻油润,是中国独有的品种.由于产量稀少,老南红玛瑙价格急剧上升.南红玛瑙曾被古人用之入药,养心养血. 现在的南红玛瑙已经和和 ...
- i18n,国际化翻译,excel与js互转
背景 公司开发新产品时,要求适配多国语言,采用i18n国际化工具,但翻译字典(js的json)还是需要前端自己写的.字典最终需要转换成excel给专业人员翻译,翻译完成后再转换成js字典文件. 如果手 ...
- Intel网卡的漫游主动性
- 最长上生子序列LIS
学习动态规划问题(DP问题)中,其中有一个知识点叫最长上升子序列(longest increasing subsequence),也可以叫最长非降序子序列,简称LIS.简单说一下自己的心得. 我们都 ...
- ANDROID - 打包和引用本地的AAR
打包方法: 打开Gradle面板 Gradle Projects: 选择Library对应的Gradle Task,比如:":testsdk": 依次 Tasks > ...
- django云端留言板
1.创建应用 django-admin startproject cloudms cd cloudms python manage.py startapp msgapp 2.创建模板文件 在cloud ...
- 缺jar包异常:java.lang.NoClassDefFoundError: org/springframework/core/convert/support/PropertyTypeDescriptor
严重: StandardWrapper.Throwable java.lang.NoClassDefFoundError: org/springframework/core/convert/suppo ...
- 文件夹备份tar脚本
#! /bin/sh SOURCEDIR=/data/OA DESTDIR=/data/OAbackup TARDIR=/data/gz #拷贝源文件夹至目标文件夹 cp -r $SOURCEDIR ...