基于Github搭建SrpingCloudConfig详解
最近在看SpringCloud,为了帮助自己学习和记忆,所以写下这篇文章。
从SpringCloud官方文档上看SpringCloudConfig其实为我们提供配置外部化的一个服务,可以理解成就是个web服务,我们通过请求到web服务上获取我们所需要的配置文件。
我们首先在github上创建一个项目,然后创建几个配置文件
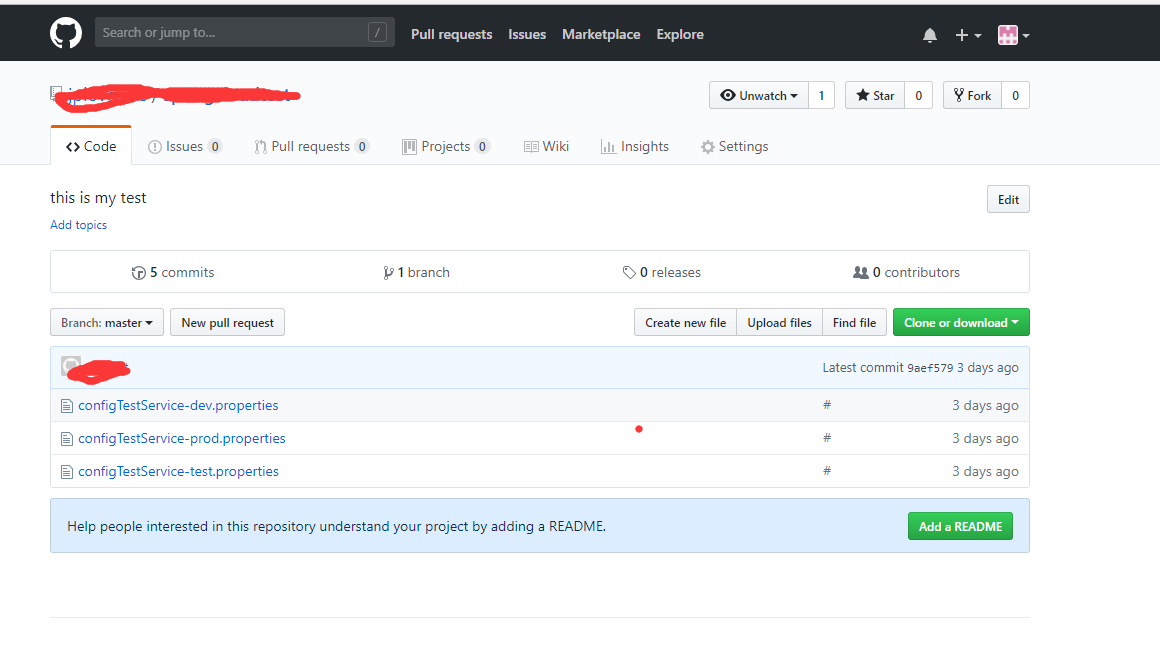
我创建了3个配置文件,分别对应开发,测试和生产三个环境,
我们配置文件建好之后,开始创建SpringCloudConfig服务
我先放一下我的项目结构,不然pom.xml有些小伙伴可能不理解
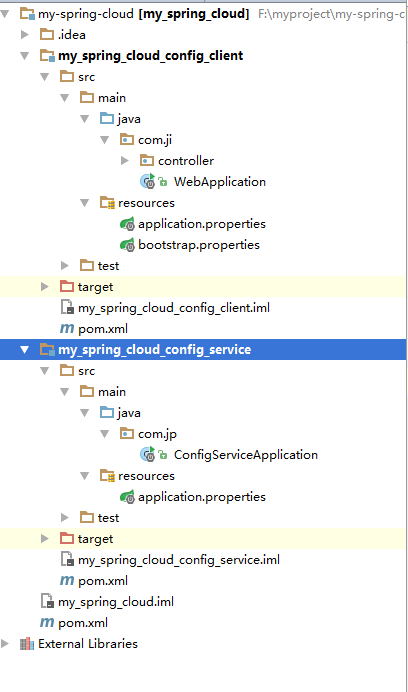
my-spring-cloud就是最外层项目的pom.xml
<?xml version="1.0" encoding="UTF-8"?>

<project xmlns="http://maven.apache.org/POM/4.0.0"

         xmlns:xsi="http://www.w3.org/2001/XMLSchema-instance"

         xsi:schemaLocation="http://maven.apache.org/POM/4.0.0 http://maven.apache.org/xsd/maven-4.0.0.xsd">

    <modelVersion>4.0.0</modelVersion>

    <groupId>jipeng.com</groupId>

    <artifactId>my_spring_cloud</artifactId>

    <packaging>pom</packaging>

    <version>1.0-SNAPSHOT</version>

    <modules>

        <module>my_spring_cloud_config_service</module>

        <module>my_spring_cloud_config_client</module>

    </modules>

    <parent>

        <groupId>org.springframework.boot</groupId>

        <artifactId>spring-boot-starter-parent</artifactId>

        <version>1.5.13.RELEASE</version>

    </parent>

    <build>

        <plugins>

            <plugin>

                <groupId>org.springframework.boot</groupId>

                <artifactId>spring-boot-maven-plugin</artifactId>

            </plugin>

        </plugins>

    </build>

    <properties>

        <project.build.sourceEncoding>UTF-8</project.build.sourceEncoding>

        <project.reporting.outputEncoding>UTF-8</project.reporting.outputEncoding>

        <java.version>1.8</java.version>

        <spring-cloud.version>Edgware.SR3</spring-cloud.version>

    </properties>

    <dependencyManagement>

        <dependencies>

            <dependency>

                <groupId>org.springframework.cloud</groupId>

                <artifactId>spring-cloud-dependencies</artifactId>

                <version>${spring-cloud.version}</version>

                <type>pom</type>

                <scope>import</scope>

            </dependency>

        </dependencies>

    </dependencyManagement>

    <repositories>

        <repository>

            <id>spring-snapshots</id>

            <url>http://repo.spring.io/snapshot</url>

            <snapshots><enabled>true</enabled></snapshots>

        </repository>

        <repository>

            <id>spring-milestones</id>

            <url>http://repo.spring.io/milestone</url>

        </repository>

    </repositories>

    <pluginRepositories>

        <pluginRepository>

            <id>spring-snapshots</id>

            <url>http://repo.spring.io/snapshot</url>

        </pluginRepository>

        <pluginRepository>

            <id>spring-milestones</id>

            <url>http://repo.spring.io/milestone</url>

        </pluginRepository>

    </pluginRepositories>

    <name>my_spring_cloud</name>

</project>
这里我们比正常的springboot项目多了一个 spring-cloud-dependencies
这是SpringCloud主包,后面我们SpringCloudConfig的包需要依赖这个,所以版本问题大家需要注意。

下面看下我们my_spring_cloud_config_service项目的pom.xml
<?xml version="1.0" encoding="UTF-8"?>

<project xmlns="http://maven.apache.org/POM/4.0.0"

         xmlns:xsi="http://www.w3.org/2001/XMLSchema-instance"

         xsi:schemaLocation="http://maven.apache.org/POM/4.0.0 http://maven.apache.org/xsd/maven-4.0.0.xsd">

    <parent>

        <artifactId>my_spring_cloud</artifactId>

        <groupId>jipeng.com</groupId>

        <version>1.0-SNAPSHOT</version>

    </parent>

    <modelVersion>4.0.0</modelVersion>

    <artifactId>my_spring_cloud_config_service</artifactId>

    <dependencies>

        <dependency>

            <groupId>org.springframework.boot</groupId>

            <artifactId>spring-boot-starter-web</artifactId>

        </dependency>

        <dependency>

            <groupId>org.springframework.cloud</groupId>

            <artifactId>spring-cloud-config-server</artifactId>

        </dependency>

    </dependencies>

</project>
很简单比我们正常的web项目多了一个 spring-cloud-config-server
下面再看下我们 spring-cloud-config-server 的application.properties 文件
#服务端口

server.port=8091

#服务名称

spring.application.name=configService

#服务对应的git地址,就是你git项目地址,你clone的那个地址

spring.cloud.config.server.git.uri=https://github.com/xxx/xxx.git

#git仓库地址下的相对地址,可以配置多个,用,分割。

spring.cloud.config.server.git.search-paths=/**

#配置文件所在的分支

spring.cloud.config.label=master

#git仓库用户名

spring.cloud.config.username=xxx

#git仓库密码

spring.cloud.config.password=xxx
我们创建一个 ConfigServiceApplication 代码如下
import org.springframework.boot.SpringApplication;

import org.springframework.boot.autoconfigure.SpringBootApplication;

import org.springframework.cloud.config.server.EnableConfigServer;

/**

 * @Author: jipeng

 * @Description:

 * @Date: Created in 2018/6/7 7:54

 */

@EnableConfigServer

@SpringBootApplication

public class ConfigServiceApplication {

    public static void main(String[] args){

        SpringApplication.run(ConfigServiceApplication.class,args);

    }

}
比正常的web项目多了一个 EnableConfigServer 注解,这是一个SpringCloud注解,有了这个注解及时告诉项目这是一个配置服务。好了,到此我们的配置服务已经好了,我们可以启动项目通过postman来检验下我们的成果
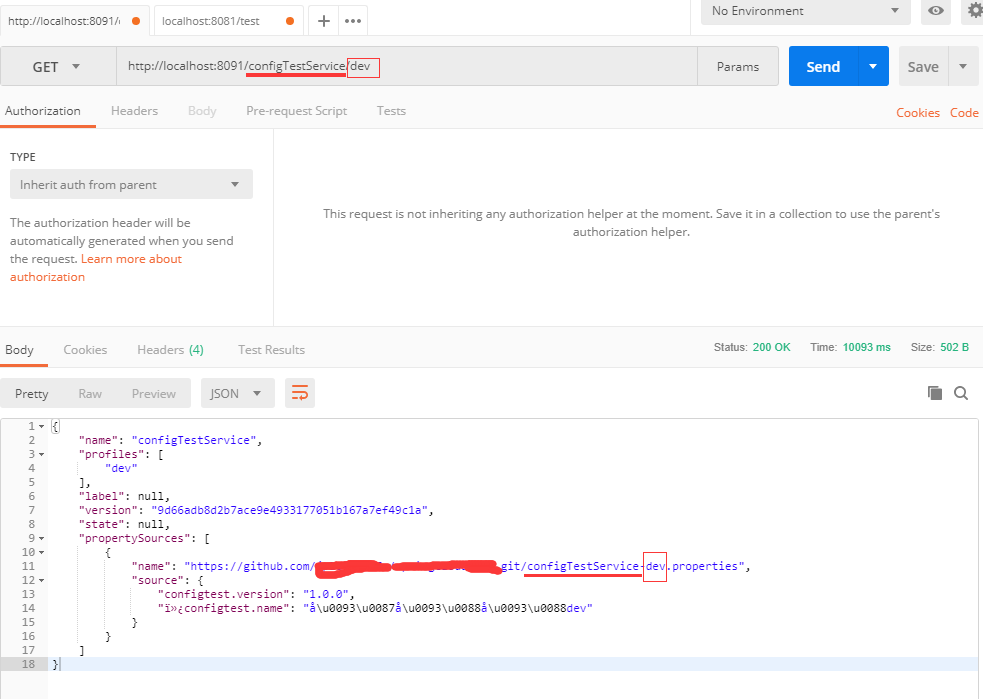
看下我们的请求地址 http://localhost:8091/configTestService/dev
再看下github中的配置文件

大家是不是发现了什么
/configTestService/dev 就是根据我们github中的配置文件名来的 configTestService 为我们的应用名称 dev 为 环境
现在config服务端搭好了,我们搭建客户端
客户端的pom
<?xml version="1.0" encoding="UTF-8"?>

<project xmlns="http://maven.apache.org/POM/4.0.0"

         xmlns:xsi="http://www.w3.org/2001/XMLSchema-instance"

         xsi:schemaLocation="http://maven.apache.org/POM/4.0.0 http://maven.apache.org/xsd/maven-4.0.0.xsd">

    <parent>

        <artifactId>my_spring_cloud</artifactId>

        <groupId>jipeng.com</groupId>

        <version>1.0-SNAPSHOT</version>

    </parent>

    <modelVersion>4.0.0</modelVersion>

    <artifactId>my_spring_cloud_config_client</artifactId>

    <dependencies>

        <dependency>

            <groupId>org.springframework.boot</groupId>

            <artifactId>spring-boot-starter-web</artifactId>

        </dependency>

        <dependency>

            <groupId>org.springframework.cloud</groupId>

            <artifactId>spring-cloud-starter-config</artifactId>

        </dependency>

    </dependencies>

    <build>

        <finalName>my_spring_cloud_config_client</finalName>

    </build>

</project>
比正常的web多了一个 spring-cloud-starter-config
客户端的application.properties 就两个配置
server.port:8081

spring.applicaton.name=configclient
客户端多了一个bootstrap的配置文件,里面配置的是SpringCloudConfig的相关配置
#配置应用名称
spring.cloud.config.name=configTestService
#配置文件的版本
spring.cloud.config.profile=test
#配置服务的地址
spring.cloud.config.uri=http://localhost:8091/
#配置文件所在的分支
spring.cloud.config.label=master
创建一个 WebApplication ,代码如下
import org.springframework.boot.SpringApplication;

import org.springframework.boot.autoconfigure.SpringBootApplication;

/**

 * @Author: jipeng

 * @Description:

 * @Date: Created in 2018/6/8 7:03

 */

@SpringBootApplication

public class WebApplication {

    public static void main(String[] args){

        SpringApplication.run(WebApplication.class,args);

    }

}
我们创建一个 TestController
import org.springframework.beans.factory.annotation.Value;

import org.springframework.web.bind.annotation.RequestMapping;

import org.springframework.web.bind.annotation.RestController;

/**

 * @Author: jipeng

 * @Description:

 * @Date: Created in 2018/6/8 7:52

 */

@RestController

public class TestController {

    @Value("${configtest.version}")

    private String version;

    @RequestMapping("/test")

    public String from() {

        return this.version;

    }

}
都加好了我们启动项目,留意下启动日记,就是启动日记刚开始打印的时候
2018-06-10 21:45:07.420  INFO 8376 --- [           main] c.c.c.ConfigServicePropertySourceLocator : Fetching config from server at: http://localhost:8091/

2018-06-10 21:45:11.347  INFO 8376 --- [           main] c.c.c.ConfigServicePropertySourceLocator : Located environment: name=configTestService, profiles=[dev], label=master, version=9d66adb8d2b7ace9e4933177051b167a7ef49c1a, state=null

2018-06-10 21:45:11.348  INFO 8376 --- [           main] b.c.PropertySourceBootstrapConfiguration : Located property source: CompositePropertySource [name='configService', propertySources=[MapPropertySource {name='configClient'}, MapPropertySource {name='https://github.com/jploveslife/springcloudtest.git/configTestService-dev.properties'}]]

2018-06-10 21:45:11.352  INFO 8376 --- [           main] com.ji.WebApplication                    : No active profile set, falling back to default profiles: default

2018-06-10 21:45:11.369  INFO 8376 --- [           main] ationConfigEmbeddedWebApplicationContext : Refreshing org.springframework.boot.context.embedded.AnnotationConfigEmbeddedWebApplicationContext@3a5ecce3: startup date [Sun Jun 10 21:45:11 CST 2018]; parent: org.springframework.context.annotation.AnnotationConfigApplicationContext@10db82ae

2018-06-10 21:45:11.855  INFO 8376 --- [           main] o.s.cloud.context.scope.GenericScope     : BeanFactory id=0537ae00-a03a-35d0-830a-1277fd4d74d0

2018-06-10 21:45:11.913  INFO 8376 --- [           main] trationDelegate$BeanPostProcessorChecker : Bean 'org.springframework.cloud.autoconfigure.ConfigurationPropertiesRebinderAutoConfiguration' of type [org.springframework.cloud.autoconfigure.ConfigurationPropertiesRebinderAutoConfiguration$$EnhancerBySpringCGLIB$$4fec7b02] is not eligible for getting processed by all BeanPostProcessors (for example: not eligible for auto-proxying)
我会发现刚启动的时候是使用我们的配置服务去获取的配置文件,这里面的原理下次讲
我们来通过postman验证下,看配置有没有过来,我们请求test接口
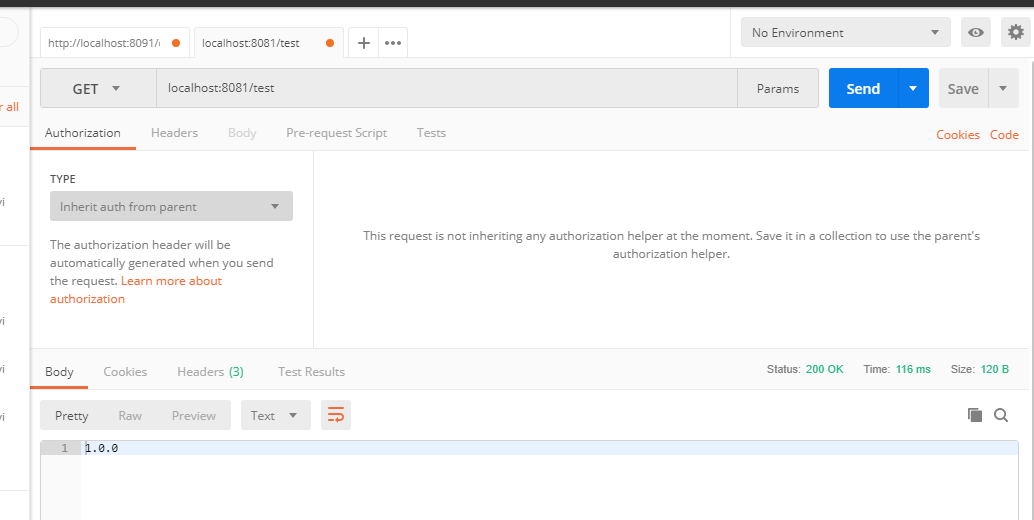
返回1.0.0 和我们配置文件中一直,说明配置生效了。
到此就结束了,没讲多少,都是直接上的代码,希望这个文章对大家了解SpringCloudConfig有所帮助。实际生产中比这个复杂,大家可以通过不同的场景搭建不同的配置服务。
基于Github搭建SrpingCloudConfig详解的更多相关文章
- 大数据学习系列之七 ----- Hadoop+Spark+Zookeeper+HBase+Hive集群搭建 图文详解
引言 在之前的大数据学习系列中,搭建了Hadoop+Spark+HBase+Hive 环境以及一些测试.其实要说的话,我开始学习大数据的时候,搭建的就是集群,并不是单机模式和伪分布式.至于为什么先写单 ...
- 基于模型的特征选择详解 (Embedded & Wrapper)
目录 基于模型的特征选择详解 (Embedded & Wrapper) 1. 线性模型和正则化(Embedded方式) 2. 基于树模型的特征选择(Embedded方式) 3. 顶层特征选择算 ...
- spring mvc 框架搭建及详解
现 在主流的Web MVC框架除了Struts这个主力 外,其次就是Spring MVC了,因此这也是作为一名程序员需要掌握的主流框架,框架选择多了,应对多变的需求和业务时,可实行的方案自然就多了.不 ...
- Mybatis简介、环境搭建和详解
简介: 1.Mybatis 开源免费框架,原名叫iBatis,2010在google code,2013年迁移到github 2.作用: 数据访问层框架 2.1 底层是对JDBC的封装 3.myb ...
- Spring MVC框架搭建及其详解
现在主流的Web MVC框架除了Struts这个主力 外,其次就是Spring MVC了,因此这也是作为一名程序员需要掌握的主流框架,框架选择多了,应对多变的需求和业务时,可实行的方案自然就多了.不过 ...
- Memcached集群/分布式/高可用 及 Magent缓存代理搭建过程 详解
当网站访问量达到一定时,如何做Memcached集群,又如何高可用,是接下来要讨论的问题. 有这么一段文字来描述“Memcached集群” Memcached如何处理容错的? 不处理!:) 在memc ...
- Git学习系列之如何正确且高效地将本地项目上传到Github(图文详解)
不多说,直接上干货! 首先你需要一个Github账号,所以还没有的话先去注册吧! https://github.com/ 见 如何走上更高平台分享传递干货知识:(开通个人Github面向开源及私有软件 ...
- 实战!基于lamp安装wordpress详解-技术流ken
简介 LAMP 是Linux Apache MySQL PHP的简写,其实就是把Apache, MySQL以及PHP安装在Linux系统上,组成一个环境来运行动态的脚本文件.现在基于lamp搭建wor ...
- Java基于回调的观察者模式详解
本文由“言念小文”原创,转载请说明文章出处 一.前言 什么是回调?回调如何使用?如何优雅的使用?本文将首先详解回调的原理,然后介绍回调的基本使用方法,最后介绍基于回调的“观察者模式”实现,演示如何优化 ...
随机推荐
- “全栈2019”Java第一百一十二章:什么是闭包?
难度 初级 学习时间 10分钟 适合人群 零基础 开发语言 Java 开发环境 JDK v11 IntelliJ IDEA v2018.3 文章原文链接 "全栈2019"Java第 ...
- JS 返回上一页并刷新,但不用重新加载整个页面(ajax实现)
需求 有三个页面A.B.C,点击A=>B,点击B=>C,在C中添加内容,点击确定返回到B,此时B页面需重新加载新的内容.再次点击B的返回按钮,希望返回到A而不是C. ===== 2017/ ...
- 「工具」三分钟了解一款在线流程绘制工具:Whimsical
Whimsical 是一款在线流程绘制工具,只需要一个浏览器就随时随地绘制精美的流程图.除了流程图(Flowcharts)功能,官方还推出了线框图(Wireframes).便利贴(Sticky Not ...
- iOS中生成随机的UUID
+ (NSString *)uuidString { CFUUIDRef uuid_ref = CFUUIDCreate(NULL); CFStringRef uuid_string_ref= CFU ...
- Spark构成
RDD Spark基本的数据结构叫弹性分布式数据集(Resilient Distributed Datasets,简称RDD). 概念: 一个分布于集群节点的只读数据集合,并以容错的.并行的方式进行维 ...
- JS实现表格列宽拖动
在数据表格中,有时候需要拖动表格宽度,查看完整的数据,是很常用的功能. 1 效果 可以用纯JS就可以实现,如下,是正常情况下的表格: 拖动表格标题中间线,拖动后效果如下: 查看DEMO 2 代码 HT ...
- Python抓取远程文件获取真实文件名
用urllib下载远程文件并转存到hdfs服务器,在下载时,下载地址中不一定包含文件名,需要从连接信息中获取. 1 file_url = request.form.get('file_url') 2 ...
- 【Alpha】任务分解与分配
Alpha阶段总体任务规划 Alpha阶段我们的任务主要是恢复原先项目的代码运行,并增加一部分物理实验(二)的内容以及完善之前项目未完成的功能,例如后台管理及用户管理界面.在恢复项目部分的主要工作是将 ...
- 关于ubuntu环境下gcc使用的几点说明
sudo apt-get build-dep gcc //安装gcc编译器 /* 假设已经创建hello.c文件 */ //方法一 $gcc hello.c //将源文件直接编译成文件名为a.out的 ...
- Flutter视图基础简介--Widget、Element、RenderObject
前言:Flutter官方文档里的一句话:you build your UI out of widgets(使用Flutter开发UI界面时,都是使用Widget),然而,Widget并不是我们真正看到 ...