Spark Worker启动Driver和Executor工作流程
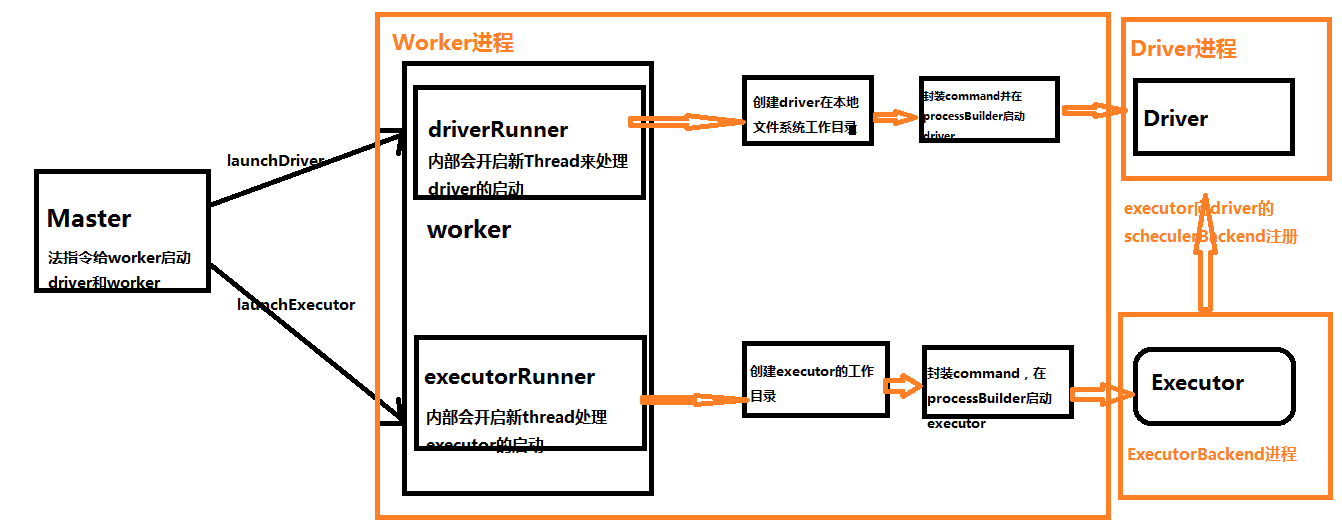
二:Spark Worker启动Driver源码解析
- case LaunchDriver(driverId, driverDesc) => {
- logInfo(s"Asked to launch driver $driverId")
- val driver = new DriverRunner(//代理模式启动Driver
- conf,
- driverId,
- workDir,
- sparkHome,
- driverDesc.copy(command = Worker.maybeUpdateSSLSettings(driverDesc.command, conf)),
- self,
- workerUri,
- securityMgr)
- drivers(driverId) = driver//将生成的DriverRunner对象按照driverId放到drivers数组中,这里面存放的HashMap的键值对,键为driverId,值为DriverRunner对象,用来标识当前的DriverRunner对象
- driver.start()
- //driver启动之后,将使用的cores和内存记录起来。
- coresUsed += driverDesc.cores
- memoryUsed += driverDesc.mem
- }
补充说明:如果Cluster上的driver启动失败或者崩溃的时候,如果driverDescription的supervise设置的为true的时候,会自动重启,由worker负责它的重新启动。
DriverRunner对象
- private[deploy] class DriverRunner(
- conf: SparkConf,
- val driverId: String,
- val workDir: File,
- val sparkHome: File,
- val driverDesc: DriverDescription,
- val worker: RpcEndpointRef,
- val workerUrl: String,
- val securityManager: SecurityManager)
- extends Logging {
DriverRunner的构造方法,包括driver启动时的一些配置信息。这个类中封装了一个start方法,开启新的线程来启动driver
- /** Starts a thread to run and manage the driver. */
- private[worker] def start() = {
- new Thread("DriverRunner for " + driverId) {//使用java的线程代码开启新线程来启动driver
- override def run() {
- try {
- val driverDir = createWorkingDirectory()//创建driver工作目录
- val localJarFilename = downloadUserJar(driverDir)//从hdfs上下载用户的jar包依赖(用户把jar提交给集群,会存储在hdfs上)
- def substituteVariables(argument: String): String = argument match {
- case "{{WORKER_URL}}" => workerUrl
- case "{{USER_JAR}}" => localJarFilename
- case other => other
- }
- // TODO: If we add ability to submit multiple jars they should also be added here
- val builder = CommandUtils.buildProcessBuilder(driverDesc.command, securityManager,//如通过processBuilder来launchDriver
- driverDesc.mem, sparkHome.getAbsolutePath, substituteVariables)
- launchDriver(builder, driverDir, driverDesc.supervise)
- }
- catch {
- case e: Exception => finalException = Some(e)
- }
- val state =
- if (killed) {
- DriverState.KILLED
- } else if (finalException.isDefined) {
- DriverState.ERROR
- } else {
- finalExitCode match {
- case Some() => DriverState.FINISHED
- case _ => DriverState.FAILED
- }
- }
- finalState = Some(state)
- worker.send(DriverStateChanged(driverId, state, finalException))//启动发生异常会向worker发消息。
- }
- }.start()
- }
可以看出在run方法中会创建driver的工作目录
- /**
- * Creates the working directory for this driver.
- * Will throw an exception if there are errors preparing the directory.
- */
- private def createWorkingDirectory(): File = {
- val driverDir = new File(workDir, driverId)
- if (!driverDir.exists() && !driverDir.mkdirs()) {
- throw new IOException("Failed to create directory " + driverDir)
- }
- driverDir
- }
接下来会通过processBuilder来launchDriver
- def buildProcessBuilder(
- command: Command,
- securityMgr: SecurityManager,
- memory: Int,
- sparkHome: String,
- substituteArguments: String => String,
- classPaths: Seq[String] = Seq[String](),
- env: Map[String, String] = sys.env): ProcessBuilder = {
- val localCommand = buildLocalCommand(
- command, securityMgr, substituteArguments, classPaths, env)
- val commandSeq = buildCommandSeq(localCommand, memory, sparkHome)
- val builder = new ProcessBuilder(commandSeq: _*)
- val environment = builder.environment()
- for ((key, value) <- localCommand.environment) {
- environment.put(key, value)
- }
- builder
- }
剩下的就是异常处理了,这部分就是java的异常处理机制。需要说明的是如果启动失败,会发消息给worker和master。通知driver状态发生了改变。
- case class DriverStateChanged(
- driverId: String,
- state: DriverState,
- exception: Option[Exception])
- extends DeployMessage
三:Worker启动Executor源码解析
Worker启动Executor的过程跟启动Driver基本一致,从本质上来说,Driver就是Worker上的一个Executor(当然是指Cluster模式)。这里就附上源码,不在展开了
- case LaunchExecutor(masterUrl, appId, execId, appDesc, cores_, memory_) =>
- if (masterUrl != activeMasterUrl) {
- logWarning("Invalid Master (" + masterUrl + ") attempted to launch executor.")
- } else {
- try {
- logInfo("Asked to launch executor %s/%d for %s".format(appId, execId, appDesc.name))
- // Create the executor's working directory
- val executorDir = new File(workDir, appId + "/" + execId)
- if (!executorDir.mkdirs()) {
- throw new IOException("Failed to create directory " + executorDir)
- }
- // Create local dirs for the executor. These are passed to the executor via the
- // SPARK_EXECUTOR_DIRS environment variable, and deleted by the Worker when the
- // application finishes.
- val appLocalDirs = appDirectories.get(appId).getOrElse {
- Utils.getOrCreateLocalRootDirs(conf).map { dir =>
- val appDir = Utils.createDirectory(dir, namePrefix = "executor")
- Utils.chmod700(appDir)
- appDir.getAbsolutePath()
- }.toSeq
- }
- appDirectories(appId) = appLocalDirs
- val manager = new ExecutorRunner(
- appId,
- execId,
- appDesc.copy(command = Worker.maybeUpdateSSLSettings(appDesc.command, conf)),
- cores_,
- memory_,
- self,
- workerId,
- host,
- webUi.boundPort,
- publicAddress,
- sparkHome,
- executorDir,
- workerUri,
- conf,
- appLocalDirs, ExecutorState.RUNNING)
- executors(appId + "/" + execId) = manager
- manager.start()
- coresUsed += cores_
- memoryUsed += memory_
- sendToMaster(ExecutorStateChanged(appId, execId, manager.state, None, None))
- } catch {
- case e: Exception => {
- logError(s"Failed to launch executor $appId/$execId for ${appDesc.name}.", e)
- if (executors.contains(appId + "/" + execId)) {
- executors(appId + "/" + execId).kill()
- executors -= appId + "/" + execId
- }
- sendToMaster(ExecutorStateChanged(appId, execId, ExecutorState.FAILED,
- Some(e.toString), None))
- }
- }
- }
Spark Worker启动Driver和Executor工作流程的更多相关文章
- [Spark内核] 第32课:Spark Worker原理和源码剖析解密:Worker工作流程图、Worker启动Driver源码解密、Worker启动Executor源码解密等
本課主題 Spark Worker 原理 Worker 启动 Driver 源码鉴赏 Worker 启动 Executor 源码鉴赏 Worker 与 Master 的交互关系 [引言部份:你希望读者 ...
- Spark Worker原理和源码剖析解密:Worker工作流程图、Worker启动Driver源码解密、Worker启动Executor源码解密等
本课主题 Spark Worker 原理 Worker 启动 Driver 源码鉴赏 Worker 启动 Executor 源码鉴赏 Worker 与 Master 的交互关系 Spark Worke ...
- Spark基本工作流程及YARN cluster模式原理(读书笔记)
Spark基本工作流程及YARN cluster模式原理 转载请注明出处:http://www.cnblogs.com/BYRans/ Spark基本工作流程 相关术语解释 Spark应用程序相关的几 ...
- Spark Client和Cluster两种运行模式的工作流程
1.client mode: In client mode, the driver is launched in the same process as the client that submits ...
- [Spark内核] 第33课:Spark Executor内幕彻底解密:Executor工作原理图、ExecutorBackend注册源码解密、Executor实例化内幕、Executor具体工作内幕
本課主題 Spark Executor 工作原理图 ExecutorBackend 注册源码鉴赏和 Executor 实例化内幕 Executor 具体是如何工作的 [引言部份:你希望读者看完这篇博客 ...
- Spark Executor内幕彻底解密:Executor工作原理图、ExecutorBackend注册源码解密、Executor实例化内幕、Executor具体工作内幕
本课主题 Spark Executor 工作原理图 ExecutorBackend 注册源码鉴赏和 Executor 实例化内幕 Executor 具体是如何工作的 Spark Executor 工作 ...
- spark standalone模式单节点启动多个executor
以前为了在一台机器上启动多个executor都是通过instance多个worker来实现的,因为standalone模式默认在一台worker上启动一个executor,造成了很大的不便利,并且会造 ...
- worker启动executor源码分析-executor.clj
在"supervisor启动worker源码分析-worker.clj"一文中,我们详细讲解了worker是如何初始化的.主要通过调用mk-worker函数实现的.在启动worke ...
- 【嵌入式开发】 Bootloader 详解 ( 代码环境 | ARM 启动流程 | uboot 工作流程 | 架构设计)
作者 : 韩曙亮 博客地址 : http://blog.csdn.net/shulianghan/article/details/42462795 转载请著名出处 相关资源下载 : -- u-boo ...
随机推荐
- LeetCode - 872. Leaf-Similar Trees
Consider all the leaves of a binary tree. From left to right order, the values of those leaves form ...
- iPhone 上你可能还不知道的小技巧
用了这么久的 iPhone,这些技巧你可能都还不知道哦. 1.怎么用耳机切歌? 将耳机的话筒部位的中间(平时暂停用的,按一下)连按两下 即可. 连按两下,下一首. 连按三下,上一首. 2.摇一摇,相当 ...
- web站点健康检测和告警小脚本
#!/bin/sh web01="http://172.18.52.xx:8080/web/api/getTime" web02="http://172.18.52.xx ...
- Oracle数据库入门——体系结构
1.oracle内存由SGA+PGA所构成 2.oracle数据库体系结构数据库的体系结构是指数据库的组成.工作过程与原理,以及数据在数据库中的组织与管理机制. oracle工作原理: 1).在数据库 ...
- scala breeze使用替换底层线性库
scala -J-Dcom.github.fommil.netlib.NativeSystemBLAS.natives=mkl_rt.dll -cp "D:\betn\Scala\Scala ...
- tomcat启动项目报错:The specified JRE installation does not exist
在Build Path里设置好jre和各Library的顺序,代码无报错,启动时弹框,里面的信息是:The specified JRE installation does not exist. 后来想 ...
- yum install 下载后保存rpm包
keepcache=0 更改为1下载RPM包 不会自动删除 vi /etc/yum.conf [main] cachedir=/var/cache/yum/$basearch/$releasever ...
- [No0000146]深入浅出图解C#堆与栈 C# Heap(ing) VS Stack(ing)理解堆与栈3/4
前言 虽然在.Net Framework 中我们不必考虑内在管理和垃圾回收(GC),但是为了优化应用程序性能我们始终需要了解内存管理和垃圾回收(GC).另外,了解内存管理可以帮助我们理解在每一个程 ...
- [No0000D7]img生成器.bat合并所有图片到html网页中
@ECHO OFF IF EXIST %~nx0.html DEL /F /Q %~nx0.html ECHO ^<html^>^<head^>^<title^>% ...
- linux:基本指令ls、cd
cd 指令 使用 cd 指令, 我们能在 Terminal 中轻松切换到不同的文件夹. 想从 Home 去 Documents 这个文件夹? 输入下面的命令就可以了. ~$ cd Documents ...