golang学习笔记5 用bee工具创建项目 bee工具简介
golang学习笔记5 用bee工具创建项目 bee工具简介
Bee 工具的使用 - beego: 简约 & 强大并存的 Go 应用框架
https://beego.me/docs/install/bee.md
bee 工具简介
bee 工具是一个为了协助快速开发 beego 项目而创建的项目,通过 bee 您可以很容易的进行 beego 项目的创建、热编译、开发、测试、和部署。
bee 工具的安装
您可以通过如下的方式安装 bee 工具:
go get github.com/beego/bee
使用数据库的需要先安装插件,执行下面命令:
go get github.com/Go-SQL-Driver/MySQL
执行后会在 $GOPATH/pkg 里面生成对应的文件

安装完之后,bee 可执行文件默认存放在 $GOPATH/bin 里面,所以您需要把 $GOPATH/bin 添加到您的环境变量中,才可以进行下一步。
如何添加环境变量,请看上一篇笔记:http://www.cnblogs.com/zdz8207/p/golang-learn-3.html
如果你本机设置了 GOBIN,那么上面的命令就会安装到 GOBIN 下,请添加 GOBIN 到你的环境变量中
bee 工具命令详解
我们在命令行输入 bee,可以看到如下的信息:
Bee is a tool for managing beego framework.

Usage:

    bee command [arguments]

The commands are:

    new         create an application base on beego framework

    run         run the app which can hot compile

    pack        compress an beego project

    api         create an api application base on beego framework

    bale        packs non-Go files to Go source files

    version     show the bee & beego version

    generate    source code generator

    migrate     run database migrations
new 命令
new 命令是新建一个 Web 项目,我们在命令行下执行 bee new <项目名> 就可以创建一个新的项目。但是注意该命令必须在 $GOPATH/src 下执行。最后会在 $GOPATH/src 相应目录下生成如下目录结构的项目:
bee new myproject

[INFO] Creating application...

/gopath/src/myproject/

/gopath/src/myproject/conf/

/gopath/src/myproject/controllers/

/gopath/src/myproject/models/

/gopath/src/myproject/static/

/gopath/src/myproject/static/js/

/gopath/src/myproject/static/css/

/gopath/src/myproject/static/img/

/gopath/src/myproject/views/

/gopath/src/myproject/conf/app.conf

/gopath/src/myproject/controllers/default.go

/gopath/src/myproject/views/index.tpl

/gopath/src/myproject/main.go

13-11-25 09:50:39 [SUCC] New application successfully created!
myproject
├── conf
│ └── app.conf
├── controllers
│ └── default.go
├── main.go
├── models
├── routers
│ └── router.go
├── static
│ ├── css
│ ├── img
│ └── js
├── tests
│ └── default_test.go
└── views
└── index.tpl
8 directories, 4 files
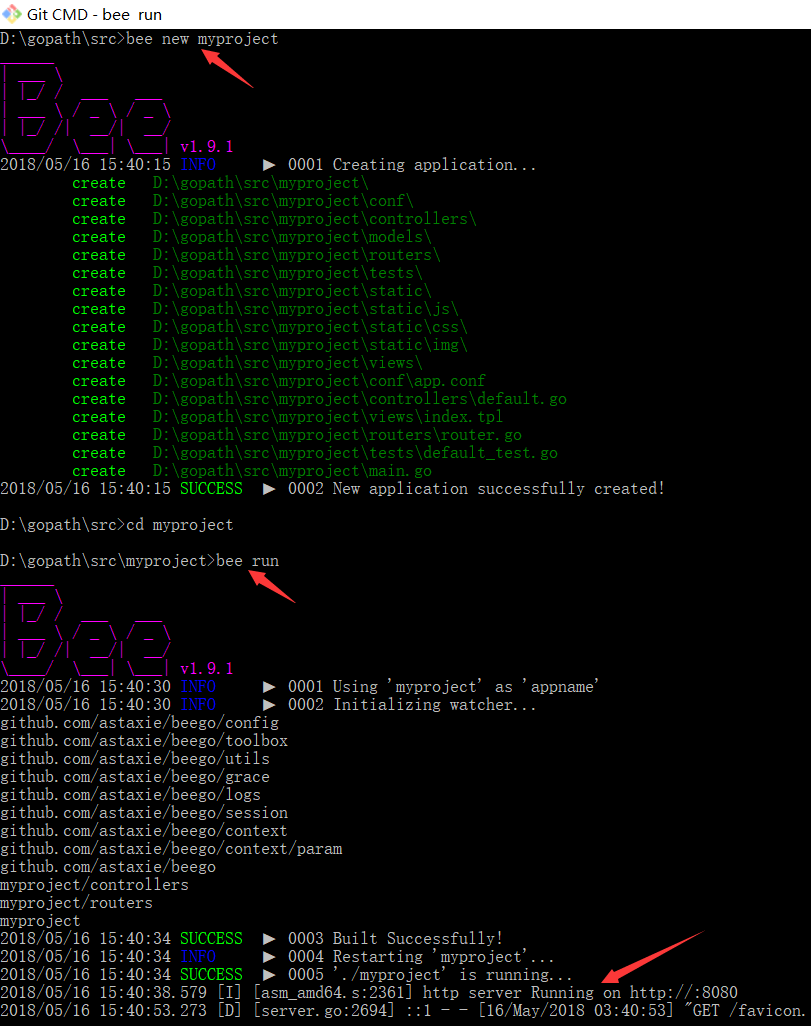
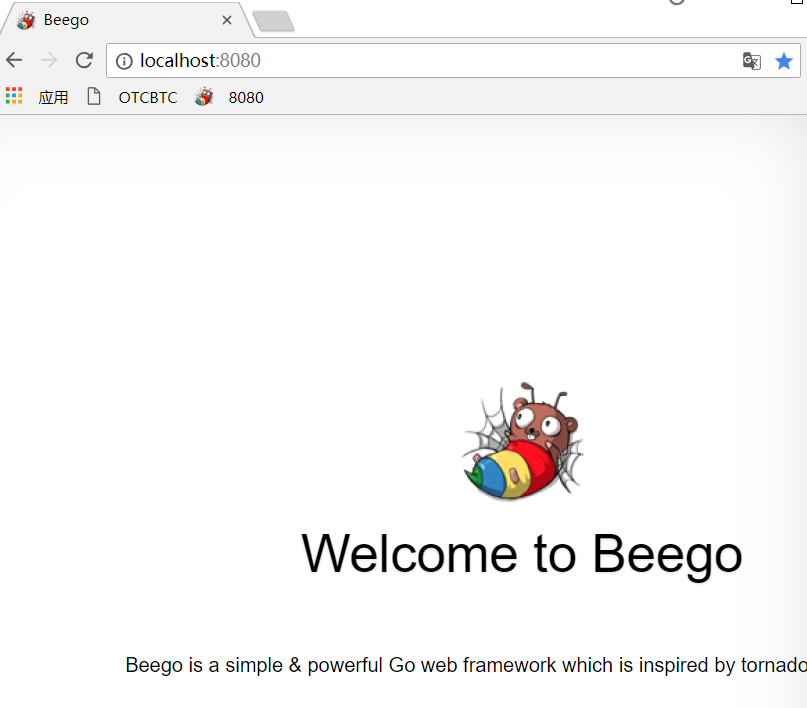
打开浏览器就可以看到效果 http://localhost:8080
api 命令
上面的 new 命令是用来新建 Web 项目,不过很多用户使用 beego 来开发 API 应用。所以这个 api 命令就是用来创建 API 应用的,执行命令之后如下所示:
bee api apiproject
create app folder: /gopath/src/apiproject
create conf: /gopath/src/apiproject/conf
create controllers: /gopath/src/apiproject/controllers
create models: /gopath/src/apiproject/models
create tests: /gopath/src/apiproject/tests
create conf app.conf: /gopath/src/apiproject/conf/app.conf
create controllers default.go: /gopath/src/apiproject/controllers/default.go
create tests default.go: /gopath/src/apiproject/tests/default_test.go
create models object.go: /gopath/src/apiproject/models/object.go
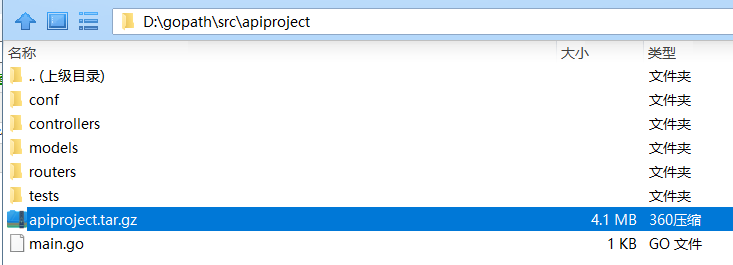
create main.go: /gopath/src/apiproject/main.go这个项目的目录结构如下:
apiproject

├── conf

│   └── app.conf

├── controllers

│   └── object.go

│   └── user.go

├── docs

│   └── doc.go

├── main.go

├── models

│   └── object.go

│   └── user.go

├── routers

│   └── router.go

└── tests

    └── default_test.go
从上面的目录我们可以看到和 Web 项目相比,少了 static 和 views 目录,多了一个 test 模块,用来做单元测试的。
同时,该命令还支持一些自定义参数自动连接数据库创建相关 model 和 controller:bee api [appname] [-tables=""] [-driver=mysql] [-conn="root:<password>@tcp(127.0.0.1:3306)/test"]
如果 conn 参数为空则创建一个示例项目,否则将基于链接信息链接数据库创建项目。
使用数据库的需要先安装插件,执行下面命令:
go get github.com/Go-SQL-Driver/MySQL
否则会报错如下:
cannot find package "github.com/go-sql-driver/mysql" in any of:
run 命令
我们在开发 Go 项目的时候最大的问题是经常需要自己手动去编译再运行,bee run 命令是监控 beego 的项目,通过 fsnotify监控文件系统。但是注意该命令必须在 $GOPATH/src/appname 下执行。
这样我们在开发过程中就可以实时的看到项目修改之后的效果:
bee run
13-11-25 09:53:04 [INFO] Uses 'myproject' as 'appname'
13-11-25 09:53:04 [INFO] Initializing watcher...
13-11-25 09:53:04 [TRAC] Directory(/gopath/src/myproject/controllers)
13-11-25 09:53:04 [TRAC] Directory(/gopath/src/myproject/models)
13-11-25 09:53:04 [TRAC] Directory(/gopath/src/myproject)
13-11-25 09:53:04 [INFO] Start building...
13-11-25 09:53:16 [SUCC] Build was successful
13-11-25 09:53:16 [INFO] Restarting myproject ...
13-11-25 09:53:16 [INFO] ./myproject is running...
如果我们修改了Controller下面的default.go文件,我们就可以看到命令行输出:
13-11-25 10:11:20 [EVEN] "/gopath/src/myproject/controllers/default.go": DELETE|MODIFY

13-11-25 10:11:20 [INFO] Start building...

13-11-25 10:11:20 [SKIP] "/gopath/src/myproject/controllers/default.go": CREATE

13-11-25 10:11:23 [SKIP] "/gopath/src/myproject/controllers/default.go": MODIFY

13-11-25 10:11:23 [SUCC] Build was successful

13-11-25 10:11:23 [INFO] Restarting myproject ...

13-11-25 10:11:23 [INFO] ./myproject is running...
刷新浏览器我们看到新的修改内容已经输出。
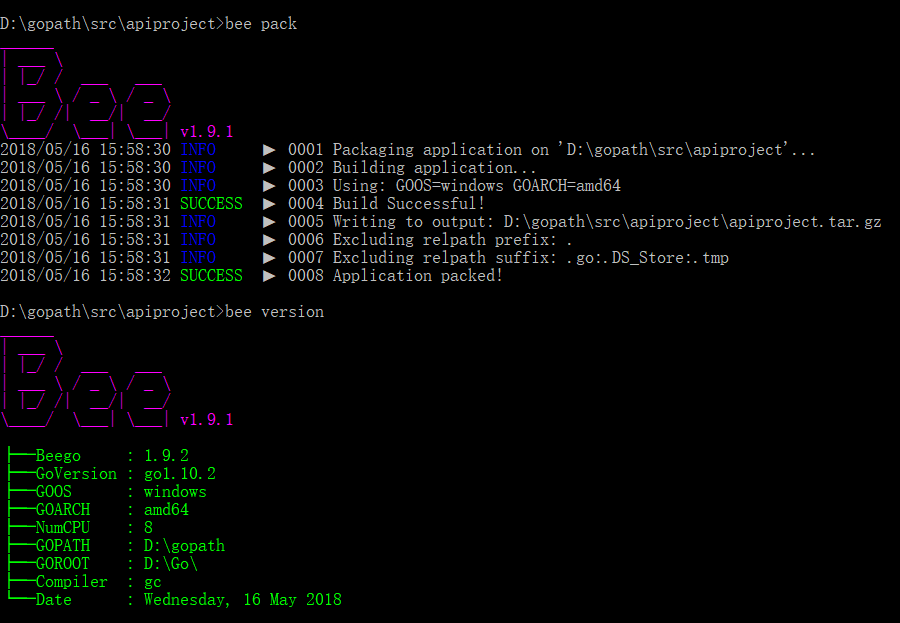
pack 命令
pack 目录用来发布应用的时候打包,会把项目打包成 zip 包,这样我们部署的时候直接把打包之后的项目上传,解压就可以部署了:
bee pack

app path: /gopath/src/apiproject

GOOS darwin GOARCH amd64

build apiproject

build success

exclude prefix:

exclude suffix: .go:.DS_Store:.tmp

file write to `/gopath/src/apiproject/apiproject.tar.gz`
我们可以看到目录下有如下的压缩文件:
rwxr-xr-x  1 astaxie  staff  8995376 11 25 22:46 apiproject

-rw-r--r--  1 astaxie  staff  2240288 11 25 22:58 apiproject.tar.gz

drwxr-xr-x  3 astaxie  staff      102 11 25 22:31 conf

drwxr-xr-x  3 astaxie  staff      102 11 25 22:31 controllers

-rw-r--r--  1 astaxie  staff      509 11 25 22:31 main.go

drwxr-xr-x  3 astaxie  staff      102 11 25 22:31 models

drwxr-xr-x  3 astaxie  staff      102 11 25 22:31 tests
bale 命令
这个命令目前仅限内部使用,具体实现方案未完善,主要用来压缩所有的静态文件变成一个变量申明文件,全部编译到二进制文件里面,用户发布的时候携带静态文件,包括 js、css、img 和 views。最后在启动运行时进行非覆盖式的自解压。
version 命令
这个命令是动态获取 bee、beego 和 Go 的版本,这样一旦用户出现错误,可以通过该命令来查看当前的版本
$ bee version

bee   :1.2.2

beego :1.4.2

Go    :go version go1.3.3 darwin/amd64
generate 命令
这个命令是用来自动化的生成代码的,包含了从数据库一键生成 model,还包含了 scaffold 的,通过这个命令,让大家开发代码不再慢
bee generate scaffold [scaffoldname] [-fields=""] [-driver=mysql] [-conn="root:@tcp(127.0.0.1:3306)/test"]

    The generate scaffold command will do a number of things for you.

    -fields: a list of table fields. Format: field:type, ...

    -driver: [mysql | postgres | sqlite], the default is mysql

    -conn:   the connection string used by the driver, the default is root:@tcp(127.0.0.1:3306)/test

    example: bee generate scaffold post -fields="title:string,body:text"

bee generate model [modelname] [-fields=""]

    generate RESTful model based on fields

    -fields: a list of table fields. Format: field:type, ...

bee generate controller [controllerfile]

    generate RESTful controllers

bee generate view [viewpath]

    generate CRUD view in viewpath

bee generate migration [migrationfile] [-fields=""]

    generate migration file for making database schema update

    -fields: a list of table fields. Format: field:type, ...

bee generate docs

    generate swagger doc file

bee generate test [routerfile]

    generate testcase

bee generate appcode [-tables=""] [-driver=mysql] [-conn="root:@tcp(127.0.0.1:3306)/test"] [-level=3]

    generate appcode based on an existing database

    -tables: a list of table names separated by ',', default is empty, indicating all tables

    -driver: [mysql | postgres | sqlite], the default is mysql

    -conn:   the connection string used by the driver.

             default for mysql:    root:@tcp(127.0.0.1:3306)/test

             default for postgres: postgres://postgres:postgres@127.0.0.1:5432/postgres

    -level:  [1 | 2 | 3], 1 = models; 2 = models,controllers; 3 = models,controllers,router
migrate 命令
这个命令是应用的数据库迁移命令,主要是用来每次应用升级,降级的SQL管理。
bee migrate [-driver=mysql] [-conn="root:@tcp(127.0.0.1:3306)/test"]

    run all outstanding migrations

    -driver: [mysql | postgresql | sqlite], the default is mysql

    -conn:   the connection string used by the driver, the default is root:@tcp(127.0.0.1:3306)/test

bee migrate rollback [-driver=mysql] [-conn="root:@tcp(127.0.0.1:3306)/test"]

    rollback the last migration operation

    -driver: [mysql | postgresql | sqlite], the default is mysql

    -conn:   the connection string used by the driver, the default is root:@tcp(127.0.0.1:3306)/test

bee migrate reset [-driver=mysql] [-conn="root:@tcp(127.0.0.1:3306)/test"]

    rollback all migrations

    -driver: [mysql | postgresql | sqlite], the default is mysql

    -conn:   the connection string used by the driver, the default is root:@tcp(127.0.0.1:3306)/test

bee migrate refresh [-driver=mysql] [-conn="root:@tcp(127.0.0.1:3306)/test"]

    rollback all migrations and run them all again

    -driver: [mysql | postgresql | sqlite], the default is mysql

    -conn:   the connection string used by the driver, the default is root:@tcp(127.0.0.1:3306)/test
bee 工具配置文件
您可能已经注意到,在 bee 工具的源码目录下有一个 bee.json 文件,这个文件是针对 bee 工具的一些行为进行配置。该功能还未完全开发完成,不过其中的一些选项已经可以使用:
"version": 0:配置文件版本,用于对比是否发生不兼容的配置格式版本。"go_install": false:如果您的包均使用完整的导入路径(例如:github.com/user/repo/subpkg),则可以启用该选项来进行go install操作,加快构建操作。"watch_ext": []:用于监控其它类型的文件(默认只监控后缀为.go的文件)。"dir_structure":{}:如果您的目录名与默认的 MVC 架构的不同,则可以使用该选项进行修改。"cmd_args": []:如果您需要在每次启动时加入启动参数,则可以使用该选项。"envs": []:如果您需要在每次启动时设置临时环境变量参数,则可以使用该选项。
---------------------------

golang学习笔记5 用bee工具创建项目 bee工具简介的更多相关文章
- go语言,golang学习笔记1 官网下载安装,中文社区,开发工具LiteIDE
go语言,golang学习笔记1 官网下载安装,中文社区,开发工具LiteIDE Go语言是谷歌2009发布的专门针对多处理器系统应用程序的编程进行了优化,使用Go编译的程序可以媲美C或C++代码的速 ...
- golang学习笔记11 golang要用jetbrain的golang这个IDE工具开发才好
golang学习笔记11 golang要用jetbrain的golang这个IDE工具开发才好 jetbrain家的全套ide都很好用,一定要dark背景风格才装B 从File-->s ...
- golang学习笔记8 beego参数配置 打包linux命令
golang学习笔记8 beego参数配置 打包linux命令 参数配置 - beego: 简约 & 强大并存的 Go 应用框架https://beego.me/docs/mvc/contro ...
- go语言,golang学习笔记4 用beego跑一个web应用
go语言,golang学习笔记4 用beego跑一个web应用 首页 - beego: 简约 & 强大并存的 Go 应用框架https://beego.me/ 更新的命令是加个 -u 参数,g ...
- go语言,golang学习笔记2 web框架选择
go语言,golang学习笔记2 web框架选择 用什么go web框架比较好呢?能不能推荐个中文资料多的web框架呢? beego框架用的人最多,中文资料最多 首页 - beego: 简约 & ...
- golang学习笔记19 用Golang实现以太坊代币转账
golang学习笔记19 用Golang实现以太坊代币转账 在以太坊区块链中,我们称代币为Token,是以太坊区块链中每个人都可以任意发行的数字资产.并且它必须是遵循erc20标准的,至于erc20标 ...
- golang学习笔记7 使用beego swagger 实现API自动化文档
golang学习笔记7 使用beego swagger 实现API自动化文档 API 自动化文档 - beego: 简约 & 强大并存的 Go 应用框架https://beego.me/doc ...
- golang学习笔记6 beego项目路由设置
golang学习笔记5 beego项目路由设置 前面我们已经创建了 beego 项目,而且我们也看到它已经运行起来了,那么是如何运行起来的呢?让我们从入口文件先分析起来吧: package main ...
- Android学习笔记——Activity的启动和创建
http://www.cnblogs.com/bastard/archive/2012/04/07/2436262.html Android Activity学习笔记——Activity的启动和创建 ...
随机推荐
- MongoDB的客户端管理工具--nosqlbooster 查询工具使用
连接我的MongoDB 看到这样 打开db1数据库里面user集合,看到user集合里面的数据,他会自带查询语句 看这里以tree方式显示 可以以table方式显示 还可以json方式显示 按照自己的 ...
- 浅谈IM软件client的断线重连、心跳和长在线
版权声明:原创文章,未经博主同意禁止转载.欢迎点击头像上方"郭晓东的专栏"查看专栏 https://blog.csdn.net/hherima/article/details/27 ...
- Java的transient关键字(转)
Volatile修饰的成员变量在每次被线程访问时,都强迫从主内存中重读该成员变量的值.而且,当成员变量发生变化时,强迫线程将变化值回写到主内存.这样在任何时刻,两个不同的线程总是看到某个成员变量的同一 ...
- JavaScript 全栈工程师培训教程 - 阮一峰
http://www.ruanyifeng.com/blog/2016/11/javascript.html https://github.com/ruanyf/jstraining 我现在的技术方向 ...
- 阿里云ECS利用密钥对ssh登录服务器
https://blog.csdn.net/u012865381/article/details/78521087/ 1.在服务机上操作创建要远程登录的用户和密码 [root@izwz97s23bov ...
- NeuroNER+brat工具学习
1.Brat:http://brat.nlplab.org/ 能够进行直觉标注.命名实体识别.关系标注.分块.共存标注.二元关系标注等(药物与药物).时间标注. 但是这个安装好麻烦啊... 2.
- jenkins 邮箱配置---腾讯企业邮箱
一,简单设置 1.登陆jenkins--> 系统管理 ---> 系统设置 2.邮箱就是发送者的邮箱,密码是登陆邮箱的密码 3.设置完以后,可以点击‘test configuration’, ...
- MongoDB--搭建mongodb服务器
此为手动搭建: 可以看到初始化data时所有的数据,和log里已经有日志文件
- Roslyn编译器
概要 微软官方开源的C#/VB编译器.作为.net 2015的重要名角,负责将代码编译成IL,另外提供丰富的API用于代码分析,vs2015的实时代码分析就是使用的Roslyn提供的API. C#6. ...
- 如何提取cocos iOS应用程序APP与游戏安装包里的资源与文件
平时玩手机,看到iOS app中许多不错的图片素材的时候,有木有很心动,是不是想把其中的图片资源导出来使用,即可以练手,又可以提高自己的审美观0-0,增加app的颜值.当然,请不要作为商业用途.开发软 ...