怎样在UICollectionView中添加Header和footer
---恢复内容开始---
怎样在UICollectionView中添加Header和footer
在前面我们已经学过,每个collection view都必须有数据源为其提供内容。它的责任是为collection views完成以下的事情:
控制collection view的section数目
每个section中的item的个数
为特定的数据项提供cell view
显然,简单的Recipe app,我们在前面的教程中包含了其中一个部分,在这里我们将继续讲讲collection view并且告诉你如何利用不同的section组织items,你将会学到怎样为collection view添加header视图和footer视图。
如果你没有看过前面的教程,建议你去看一看前面的教程,或者你可以到这里下载here。
Split Recipes into Two Sections in UICollectionView
在这个简单的程序中,RecipeCollectionViewController是集合视图的数据源对象,为了把视图分成两个部分,我们需要有一些变化,接下来我们完成:
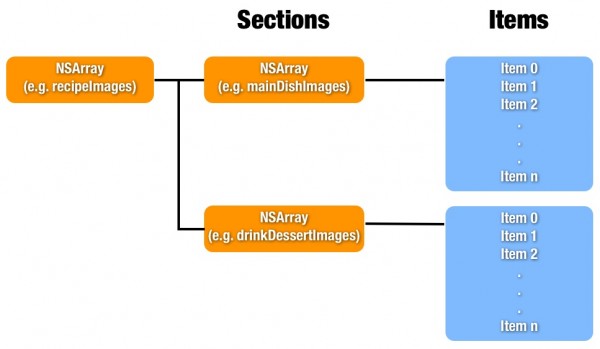
起先,recipeImages数组是存储所有recipes的名称,因为我们想把recipes分成两组,我们要修改我们 的代码,并使用签到数组来存储不同的recipe,也许你还不明白啥是嵌入的数组,下面的图片会让你明白的。第一组包含主要的图像,而另一个为drink 和dessert。顶级数组(即recipeImages)包含两个数组,每个数组部分的特定区域包含特定的data items。
让我们开始编写代码,在RecipeCollectionViewController.m中初始化"recipeImages"数组,并在viewDidload方法中写下面的方法:
- (void)viewDidLoad
{
[super viewDidLoad];
//Initialize recipe image array
NSArray *mainDishImages = [NSArray arrryWithObjects:@"egg_benedict.jpg", @"full_breakfast.jpg", @"ham_and_cheese_panini.jpg", @"ham_and_egg_sandwich.jpg", @"hamburger.jpg", @"instant_noodle_with_egg.jpg", @"japanese_noodle_with_pork.jpg", @"mushroom_risotto.jpg", @"noodle_with_bbq_pork.jpg", @"thai_shrimp_cake.jpg", @"vegetable_curry.jpg", nil];
NSArray *drinkDessertImages = [NSArray arrayWithObjects:@"angry_birds_cake.jpg", @"creme_brelee.jpg", @"green_tea.jpg", @"starbucks_coffee.jpg", @"white_chocolate_donut.jpg", nil];
recipeImages = [NSArray arrayWithObjects:mainDishImages,drinkDesserImages,nil];
}
上面的代码将recipes images分成两组。接下来,修改"numberOfIntemsInSecion:"方法来返回,每个secions中的items数目:
- (NSInteger)collectionView:(UICollectionView*)collectionView numberOfItemsInSecion:(NSInteger)section
{
return [[recipeImages objectAtIndex:sectin]count];
}
接下来我们按照下面的方法修改"cellForItemAtIndexPath:"方法
- (UICollectionVIewCell *)collectionView:(UICollectionView*)collectionView cellForItemAtIndexPath:(NSIndexPath *)indexPath
{
static NSString *identifier = @"Cell";
RecipeViewCell *cell = (RecipeViewCell *)[collectionView dequeueReuseIdentifier:identifier forIndexPath:indexPath];
UIImageView *recipeImageView = (UIImageView *)[cell viewWithTag:100];
recipeImageView.image = [UIImage imagedNamed:[recipeImages[indexPath.section] objectAtIndex:indexPath.row]];
cell.backgroundView = [[UIImageView alloc] initWithImage:[UIImage imageNamed:@"photo-frame-2.png"]];
return cell;
}
你可以和以前的代码比较以下,你就会知道只有一样是唯一的变化。我们首先检索该数组的section number然后从section中获取具体的items。
最后,怎样给collection view实现两个section,这个可以通过方法调用下面的方法来完成即:在RecipeCollectionViewController.m中的 numberOfSectionsInCollectionView方法,在collectin View中返回section中的数量。
- (NSInteger)numberOfSectionsInCollectionVIew:(UICollectionView *)collectionView
{
return [recipeImages count];
}
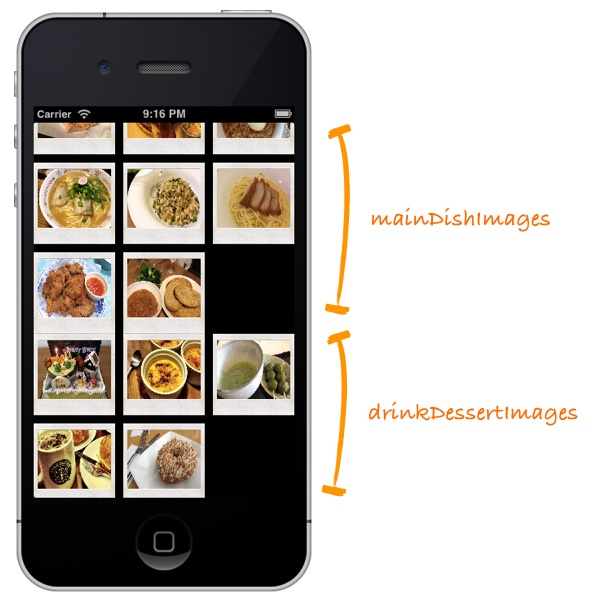
现在运行你的app,你会在屏幕上看到下面的显示
Tweak the Margin of Your Content using Section Insets
(利用Section Insets)
程序是完成了,但是你是否觉得看起来并不怎么顺眼呢?图像的第一部分的最后一行和第二部分的第一样靠的太近。我们可以使用插入图到内容周围的空间中来改变一些格局,通过下图你可以比较直观 的看到影响:
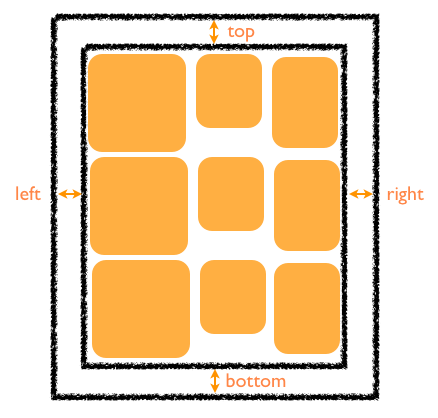
你可以利用UIEdgeInsetsMake来完成插入:
insert = UIEdgeInsetsMake(top,left,botton,right);
在我们的Recipe app中我们只能在两个section之间添加空间。在RecipeCollectionViewController.m文件中的ViewDidLoad方法中,添加下面的方法:
UICollectionViewFlowLayout *collectionViewLayout = (UICollectionViewFlowLayout *)self.collectionViewFlowLayout;
collectionViewLayout.sectionInset = UIEdegeInsetsMake(20,0,0,0);
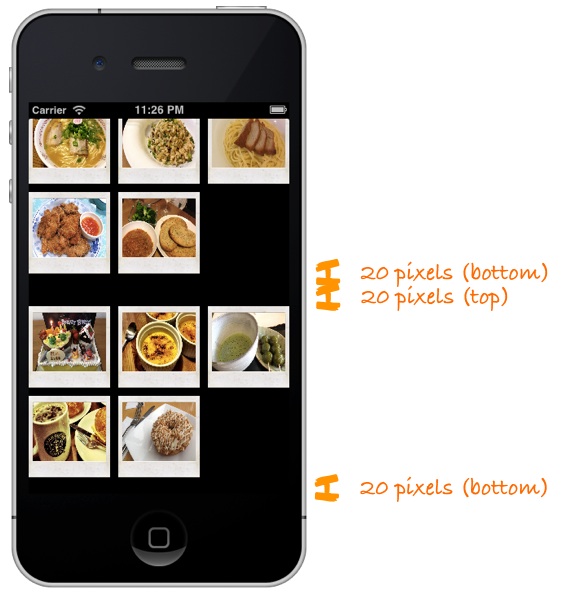
上面的代码实现了在collection view中创建和添加插入。现在我们运行程序,你将会看到下面的 图像显示,我们在两个section之间增加了一些空间。
添加头部和底部视图
现在我们进一步调整应用程序,让其更酷。让我们来给应用程序添加头部和底部视图,我们利用UICollectionViewFlowLayout来实现
这一点。这里的header和footer视图可以被称为流布局的补充。在默认情况下,这些视图是在流布局中禁用的。但可以通过下面几件事情来配置
header和footer视图:
为了尽量保持简单,所以我们可以选择storyboard来实现(当然这不是必须的,你同样可以使用代码来实现这一点)
实现 UICollectionViewDataSource协议的 collectionView:viewForSupplementaryElementOfKind 方法,并通过这个方法来实现补充试图在collection view中显示。
在Storyboard中设计Header和Footer
首先download the header/footer background images并且添加到Xcode工程中。
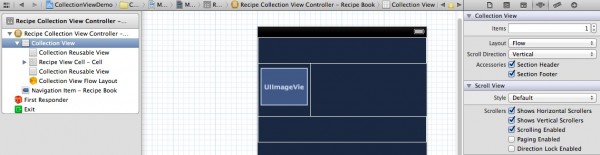
到Storyboard中,选择collection view controller中的"Collection
View"。在Attributes inspector中,选择"Section Header"和"Section
Footer",一旦选中你就会在屏幕中看到下面的的显示:
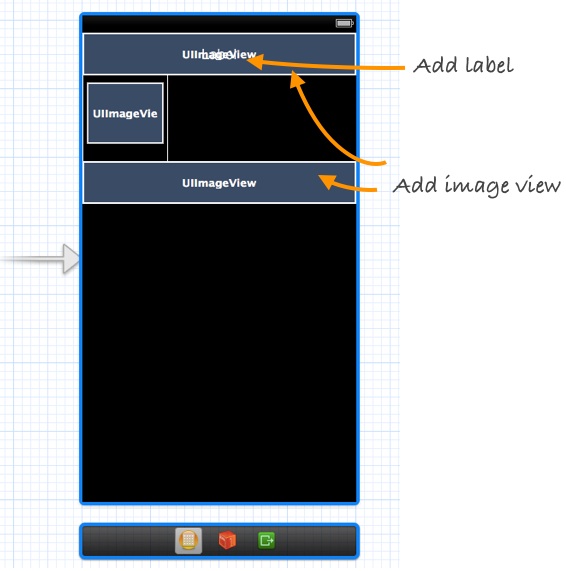
在header和footer之间默认为空,我们会用storyboard来设计视图。header
view是专门用来显示一个部分的标题,而底部视图只显示静态横幅图片。利用storyboard,从对象库中拖出image
view并在其上面添加一个标签。设置字体颜色为白色,底部视图只需添加一个image view。如图:
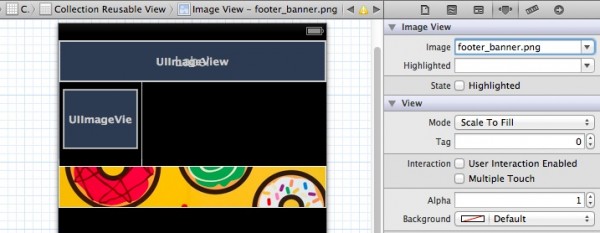
选中footer view中的image view,在Attributes inspector中命名背景图片为"footer_banner.png"
最重要的是,我们必须为header和footer
view指定一个标识符。这个标示符将会被用于代码识别图片名称。在Atteributes inspector中设置header
view的identifier为“HeaderView”,同样的把footer view的identifier设置为“FooterView”。

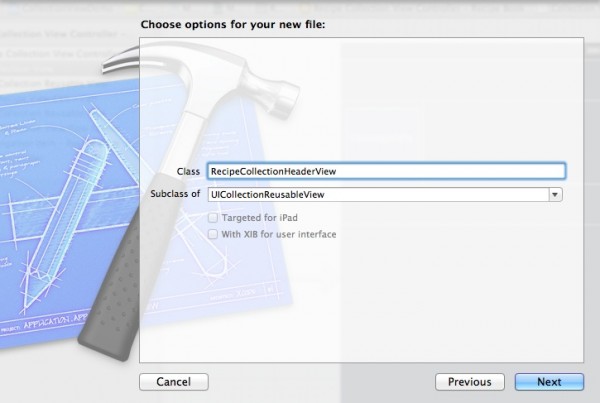
为Header View添加新类
在默认情况下,header和footer view和UICollectionResuable类相关联。为了在header
view中显示我们需要的背景和标题,我们必须创建一个新的继承自UICollectionResuableView的类,我们可以命名为
RecipeCollectionHeaderView。
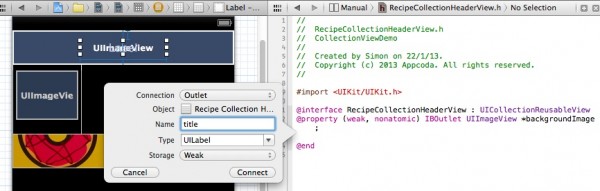
在storyboard的Identifier inspector中的sustom
class设置为“RecipeCollectionHeaderView”。按住Ctrl键,单机header中的image
view,并拖向RecipeCollectionHeaderView.h中插入一个Outlet
变量。命名变量为"backgroundImage"。重复同样的步骤对UILabel实现,然后命名为"title"。
实现viewForSupplementaryElementOfKind方法
如果你尝试运行应用程序,你可能不会看到header和footer,这是因为我们还没有实现"viewFOrSupplementaryElementOfKind:"方法。选择“RecipeCollectionViewController”,并添加import语句。
#import "RecipeCollectionHeaderView.h"
下面就是实现viewforSupplementaryElementOfKind方法的代码:
- (UICollectionReusableView *)collectionView:(UICollectionView
*)collectionView viewForSupplementaryElementOfKind:(NSString *)kind
atIndexPath:(NSIndexPath *)indexPath
{
UICollectionReusableView *reusableview = nil;
if (kind == UICollectionElementKindSectionHeader){
RecipeCollectionHeaderView *headerView = [collectionView
dequeueReusableSupplementaryViewOfKind:UICollectionElementKindSectionHeader
withReuseIdentifier:@"HeaderView" forIndexPath:indexPath];
NSString *title = [[NSString alloc] initWithFormat:@"Recipe Group #%i",indexPath.section +1];
headerView.title.text = title;
UIImage *headerImage = [UIImage imageNamed:@"header_banner.png"];
headerView.backgroundImage.image = headerImage;
reusableView = headerView;
}
if (kind == UICollectionElementKindSectionFooter){
UICollectionReusableView *footerview = [collectionView
dequeueResuableSupplementaryViewOfKind:UICollectionElementKindSectionFooter
withReuseIdentifier:@"FooterView" forIndexPath:indexPath];
reusableview = footerview;
}
return reusableview;
}
上
面的代码告诉它页眉/页脚视图应该在每个部分中使用collect view。我们首先确定该集合视图要求header或footer
view。这可以通过使用一种变量来完成。对于头来看,我们出列header
view(使用dequeueReusableSupplementaryViewOfKind
:方法),并设置适当的标题和图像。正如你可以从两个if之间的代码,我们使用我们之前分配给获得header/footer view标识符。
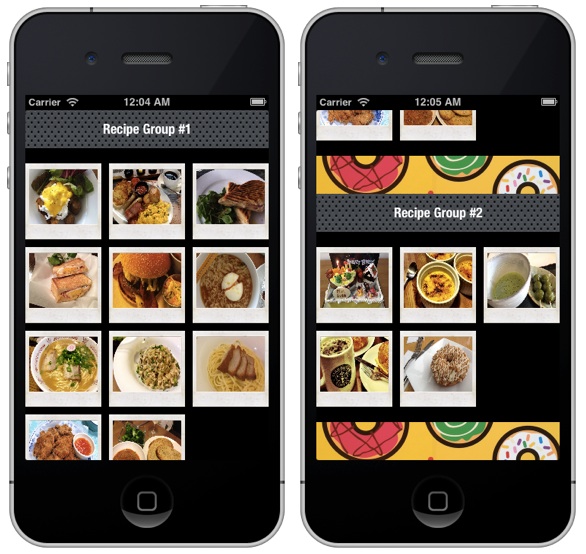
现在运行代码,我们可以看到运行的结果:
---恢复内容结束---
怎样在UICollectionView中添加Header和footer的更多相关文章
- StroyBoard中UICollectionView中添加Header和footer
到Storyboard中,选择collection view controller中的"Collection View".在Attributes inspector中,选择&quo ...
- 在Storyboard中为UITableView添加Header和Footer
我在这里所说的Header和Footer并不是sectionHeader和sectionFooter,而是指UITableView的tableHeaderView和tableFooterView,这两 ...
- ## GridView 布局:item设置的高度和宽度不起作用、自动适配列数、添加Header和Footer ##
一.item设置的高度和宽度不起作用 转自:http://www.cnblogs.com/0616--ataozhijia/p/6031875.html [Android Pro] listView和 ...
- RecyclerView添加Header和Footer
使用过RecyclerView的同学就知道它并没有添加header和footer的方法,而ListView和GirdView都有,但是开发过程中难免有需求需要添加一个自定义的header或者foote ...
- 你必须了解的RecyclerView的五大开源项目-解决上拉加载、下拉刷新和添加Header、Footer等问题
前段时间做项目由于采用的MD设计,所以必须要使用RecyclerView全面代替ListView.但是开发中遇到了需要实现RecyclerView上拉加载.下拉刷新和添加Header以及Footer等 ...
- 在fetch方法中添加header后遇到的预检请求问题
今天在使用fetch方法 fetch('xxx.com',{header:{bbbbbbb:111}}) 浏览器返回的请求信息中,header变成了 :authority:koss.nocorp.me ...
- postman 模拟请求中添加 header,post请求中传json参数
1. GET 请求 2.Post 请求 (请求参数为Json,header中带有参数) 问题延伸 GET请求不能够 添加 Body 吗?[答案]
- HTML中--定义header和footer高度中间自适应
<html> <head> <meta charset="utf-8" /> <title></title> <s ...
- 如何在html文件中导入header、footer等
1.include是php函数,所以确实需要转化成.php文件--(其实除了用php,html都有自带的引入方法)2.html转化为php文件很简单,直接改一下后缀名就可以了--(如:index.ht ...
随机推荐
- oj 小黑华丽的逆袭机会
Problem H: 小黑华丽的逆袭机会 Time Limit: 1 Sec Memory Limit: 128 MB Submit: 79 Solved: 7 [Submit][Status][ ...
- 批处理就是windows的杰作啊
今天要为了解决vs不能同时开启调试和编写的问题,我就上网查找了一些批处理的命令,用批处理调用exe,和打开txt,虽然一行代码就解决了但是我没用过啊,很陌生. call 路径\a.exe 就相当于 ...
- 简单的CSS网页布局--一二列布局
1.一列布局 (一)一列自适应 自适应浏览器,随着浏览器的拉伸而变化,一般宽度采用百分比的写法,很简<!DOCTYPE html> <html> <head lang=& ...
- html系列教程--embed fieldset legend figure figurecaption
<embed> 标签:定义嵌入的内容 <embed src="" type="" /> embed属性: 1.src:嵌入内容地址 2. ...
- Caused by: java.lang.ClassNotFoundException: org.apache.commons.pool.impl.GenericObjectPool
原因:缺少commons-pool-X.jar包,到http://commons.apache.org/proper/commons-pool/download_pool.cgi下载后引入即可(地址可 ...
- 通过一个正则表达式,让SQL Server数据库的带参sql也支持位置参数语法!
.NET Framework 2.0 中,Microsoft 在 System.Data.Common 名称空间下定义了一组类用来让程序员编写适用于不同数据库的数据访问代码,而且还在 Enterpri ...
- 内存管理——Cocos2d-x学习历程(五)
Cocos2d-x采用了引用计数与自动回收的内存管理机制. 1.每个对象包含一个用来控制生命周期的引用计数器,它就是CCObject的成员变量m_u- Reference.我们可以通过retainCo ...
- QF——iOS第三方登录和社会化分享
QQ登录的流程: 1.下载SDK,并添加到项目中: 2.添加SDK需要的依赖库,以及配置文件: 3.重写APPDelegate的方法handleOpenURL和openURL: 4.实现Tencent ...
- Android 通过HTTPCLINET POST请求互联网数据
private EditText et; private TextView tv; HttpClient client; @Override protected void onCreate(Bundl ...
- placeholder颜色
::-moz-placeholder{color:#b9bfc1;} // Firefox::-webkit-input-placeholder{color:#b9bfc1;} // Chrome, ...