eclipse 使用maven 创建springmvc + mybatis
接着eclipse 使用maven 创建纯spring mvc项目
毕竟项目都要访问数据库的, 所以加上mybatis的支持也就是网上大多时候说的 SSM框架的搭建(Spring + Spring MVC + Mybatis)
这个项目就叫createssm
还是从pom.xml文件开始
 <!-- mybatis start -->

         <dependency>

             <groupId>org.mybatis</groupId>

             <artifactId>mybatis</artifactId>

             <version>${mybatis.version}</version>

         </dependency>

         <!-- mybatis-spring -->

         <dependency>

             <groupId>org.mybatis</groupId>

             <artifactId>mybatis-spring</artifactId>

             <version>1.3.0</version>

         </dependency>

         <!-- commons-dbcp 数据源 -->

         <dependency>

             <groupId>commons-dbcp</groupId>

             <artifactId>commons-dbcp</artifactId>

             <version>1.4</version>

         </dependency>

         <!-- mybatis end -->
 <!-- jdbc driver start -->

         <!-- oracle/ojdbc14 -->

         <dependency>

             <groupId>oracle</groupId>

             <artifactId>ojdbc14</artifactId>

             <version>10.2.0.4</version>

         </dependency>

         <!-- jdbc driver end -->
ojdbc14 的包一般比较难下, 从maven仓库手动下载到自己的maven本地仓库的oracle\ojdbc14\10.2.0.4\ojdbc14-10.2.0.4.jar
其实也可以用别得ojdbc, 但是貌似没有哪个比较好下载, 反正我的感觉是这样, 或者这里你用mysql来做测试也是一样的
先说个题外话如果使用 update project 的话按照现在的pom.xml文件 会报错
如下
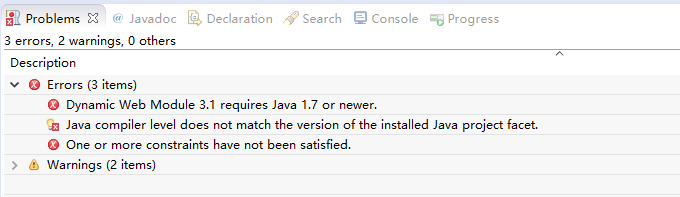
如果出现类似的错误在pom文件中这样修改
 <build>

         <finalName>createssm</finalName>

         <plugins>

             <plugin>

                 <groupId>org.apache.maven.plugins</groupId>

                 <artifactId>maven-compiler-plugin</artifactId>

                 <version>3.1</version>

                 <configuration>

                     <source>1.8</source>

                     <target>1.8</target>

                     <encoding>UTF-8</encoding>

                 </configuration>

             </plugin>

             <plugin>

                 <groupId>org.apache.maven.plugins</groupId>

                 <artifactId>maven-war-plugin</artifactId>

                 <version>2.1.1</version>

                 <configuration>

                     <encoding>UTF-8</encoding>

                 </configuration>

             </plugin>

         </plugins>

     </build>
然后再次update project 就好了
目前来说pom.xml文件为
<project xmlns="http://maven.apache.org/POM/4.0.0" xmlns:xsi="http://www.w3.org/2001/XMLSchema-instance"

    xsi:schemaLocation="http://maven.apache.org/POM/4.0.0 http://maven.apache.org/maven-v4_0_0.xsd">

    <modelVersion>4.0.0</modelVersion>

    <groupId>com.learn.javaee</groupId>

    <artifactId>createssm</artifactId>

    <packaging>war</packaging>

    <version>0.0.1-SNAPSHOT</version>

    <name>createssm Maven Webapp</name>

    <url>http://maven.apache.org</url>

    <properties>

        <spring.version>4.3.2.RELEASE</spring.version>

    </properties>

    <dependencies>

        <dependency>

            <groupId>junit</groupId>

            <artifactId>junit</artifactId>

            <version>3.8.1</version>

            <scope>test</scope>

        </dependency>

        <!-- servlet api -->

        <dependency>

            <groupId>javax.servlet.jsp</groupId>

            <artifactId>jsp-api</artifactId>

            <version>2.2</version>

            <scope>provided</scope>

        </dependency>

        <dependency>

            <groupId>javax.servlet</groupId>

            <artifactId>servlet-api</artifactId>

            <version>2.5</version>

        </dependency>

        <!-- Spring -->

        <dependency>

            <groupId>org.springframework</groupId>

            <artifactId>spring-core</artifactId>

            <version>${spring.version}</version>

        </dependency>

        <dependency>

            <groupId>org.springframework</groupId>

            <artifactId>spring-context</artifactId>

            <version>${spring.version}</version>

        </dependency>

        <dependency>

            <groupId>org.springframework</groupId>

            <artifactId>spring-beans</artifactId>

            <version>${spring.version}</version>

        </dependency>

        <dependency>

            <groupId>org.springframework</groupId>

            <artifactId>spring-aop</artifactId>

            <version>${spring.version}</version>

        </dependency>

        <dependency>

            <groupId>org.springframework</groupId>

            <artifactId>spring-jdbc</artifactId>

            <version>${spring.version}</version>

        </dependency>

        <dependency>

            <groupId>org.springframework</groupId>

            <artifactId>spring-web</artifactId>

            <version>${spring.version}</version>

        </dependency>

        <dependency>

            <groupId>org.springframework</groupId>

            <artifactId>spring-webmvc</artifactId>

            <version>${spring.version}</version>

        </dependency>

        <dependency>

            <groupId>org.springframework</groupId>

            <artifactId>spring-tx</artifactId>

            <version>${spring.version}</version>

        </dependency>

        <dependency>

            <groupId>org.springframework</groupId>

            <artifactId>spring-context-support</artifactId>

            <version>${spring.version}</version>

        </dependency>

        <dependency>

            <groupId>org.springframework</groupId>

            <artifactId>spring-orm</artifactId>

            <version>${spring.version}</version>

        </dependency>

        <dependency>

            <groupId>org.springframework</groupId>

            <artifactId>spring-test</artifactId>

            <version>${spring.version}</version>

        </dependency>

        <dependency>

            <groupId>org.springframework</groupId>

            <artifactId>spring-websocket</artifactId>

            <version>${spring.version}</version>

        </dependency>

        <!-- Spring -->

        <!-- mybatis start -->

        <dependency>

            <groupId>org.mybatis</groupId>

            <artifactId>mybatis</artifactId>

            <version>3.4.1</version>

        </dependency>

        <!-- mybatis-spring -->

        <dependency>

            <groupId>org.mybatis</groupId>

            <artifactId>mybatis-spring</artifactId>

            <version>1.3.0</version>

        </dependency>

        <!-- commons-dbcp 数据源 -->

        <dependency>

            <groupId>commons-dbcp</groupId>

            <artifactId>commons-dbcp</artifactId>

            <version>1.4</version>

        </dependency>

        <!-- mybatis end -->

        <!-- jdbc driver start -->

        <!-- oracle/ojdbc14 -->

        <dependency>

            <groupId>oracle</groupId>

            <artifactId>ojdbc14</artifactId>

            <version>10.2.0.4</version>

        </dependency>

        <!-- jdbc driver end -->

    </dependencies>

    <build>

        <finalName>createssm</finalName>

        <plugins>

            <plugin>

                <groupId>org.apache.maven.plugins</groupId>

                <artifactId>maven-compiler-plugin</artifactId>

                <version>3.1</version>

                <configuration>

                    <source>1.8</source>

                    <target>1.8</target>

                    <encoding>UTF-8</encoding>

                </configuration>

            </plugin>

            <plugin>

                <groupId>org.apache.maven.plugins</groupId>

                <artifactId>maven-war-plugin</artifactId>

                <version>2.1.1</version>

                <configuration>

                    <encoding>UTF-8</encoding>

                </configuration>

            </plugin>

        </plugins>

    </build>

</project>
在applicationcontext.xml中最后插入一行
<import resource="classpath:spring-mybatis.xml"/>
<?xml version="1.0" encoding="UTF-8"?>

<beans xmlns="http://www.springframework.org/schema/beans"

    xmlns:xsi="http://www.w3.org/2001/XMLSchema-instance" xmlns:context="http://www.springframework.org/schema/context"

    xmlns:mvc="http://www.springframework.org/schema/mvc"

    xsi:schemaLocation="http://www.springframework.org/schema/beans http://www.springframework.org/schema/beans/spring-beans.xsd

        http://www.springframework.org/schema/context http://www.springframework.org/schema/context/spring-context.xsd

        http://www.springframework.org/schema/mvc http://www.springframework.org/schema/mvc/spring-mvc.xsd">

    <!-- 设置自动扫描的包 -->

    <context:component-scan base-package="cn.learn.*"></context:component-scan>

    <!-- 开启自动注解支持 -->

    <mvc:annotation-driven />

    <!-- 定义静态资源位置 -->

    <mvc:resources location="/WEB-INF/static/" mapping="/static/**"></mvc:resources>

    <!-- jsp视图处理 start -->

    <bean

        class="org.springframework.web.servlet.view.InternalResourceViewResolver">

        <!-- 视图前缀 -->

        <property name="prefix" value="/WEB-INF/view/"></property>

        <!-- 视图后缀 -->

        <property name="suffix" value=".jsp"></property>

        <property name="viewClass"

            value="org.springframework.web.servlet.view.InternalResourceView" />

        <property name="order" value="1" />

    </bean>

    <!-- jsp视图处理 end -->

    <!-- 引入mybatis配置 -->

    <import resource="classpath:spring-mybatis.xml"/>

</beans>
与applicationcontext.xml文件同目录新建spring-mybatis.xml
内容
<?xml version="1.0" encoding="UTF-8"?>

<beans xmlns="http://www.springframework.org/schema/beans"

    xmlns:xsi="http://www.w3.org/2001/XMLSchema-instance"

    xsi:schemaLocation="http://www.springframework.org/schema/beans http://www.springframework.org/schema/beans/spring-beans.xsd">

<!-- 引入配置文件 -->

    <bean id="propertyConfigurer"

        class="org.springframework.beans.factory.config.PropertyPlaceholderConfigurer">

        <property name="location" value="classpath:jdbc.properties" />

    </bean>

    <bean id="dataSource" class="org.apache.commons.dbcp.BasicDataSource"

        destroy-method="close">

        <property name="driverClassName" value="${driver}" />

        <property name="url" value="${url}" />

        <property name="username" value="${username}" />

        <property name="password" value="${password}" />

        <!-- 初始化连接大小 -->

        <property name="initialSize" value="${initialSize}"></property>

        <!-- 连接池最大数量 -->

        <property name="maxActive" value="${maxActive}"></property>

        <!-- 连接池最大空闲 -->

        <property name="maxIdle" value="${maxIdle}"></property>

        <!-- 连接池最小空闲 -->

        <property name="minIdle" value="${minIdle}"></property>

        <!-- 获取连接最大等待时间 -->

        <property name="maxWait" value="${maxWait}"></property>

    </bean>

    <!-- spring和MyBatis完美整合,不需要mybatis的配置映射文件 -->

    <bean id="sqlSessionFactory" class="org.mybatis.spring.SqlSessionFactoryBean">

        <property name="dataSource" ref="dataSource" />

        <!-- 自动扫描mapping.xml文件 -->

        <property name="mapperLocations" value="classpath:cn/learn/mapping/*.xml"></property>

    </bean>

    <!-- DAO接口所在包名,Spring会自动查找其下的类 -->

    <bean class="org.mybatis.spring.mapper.MapperScannerConfigurer">

        <property name="basePackage" value="cn.learn.dao" />

        <property name="sqlSessionFactoryBeanName" value="sqlSessionFactory"></property>

    </bean>

    <!-- (事务管理)transaction manager, use JtaTransactionManager for global tx -->

    <bean id="transactionManager"

        class="org.springframework.jdbc.datasource.DataSourceTransactionManager">

        <property name="dataSource" ref="dataSource" />

    </bean>

</beans>
接下来的工作就是写各种类,
有如下图目录结构
按照spring-mybatis.xml文件
需要创建dao层和mapping层
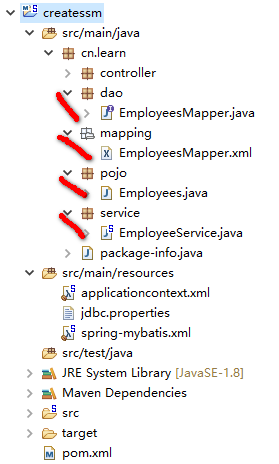
先写mapping层的内容, 也就是EmployeesMapper.xml文件
<?xml version="1.0" encoding="UTF-8" ?>

<!DOCTYPE mapper PUBLIC "-//mybatis.org//DTD Mapper 3.0//EN" "http://mybatis.org/dtd/mybatis-3-mapper.dtd" >

<mapper namespace="cn.learn.dao.EmployeesMapper" >    -- 下面会写这个类

  <resultMap id="BaseResultMap" type="cn.learn.pojo.Employees" >  -- 实体类的全类名, 可以任意, 不顾一般都是按照表名写

    <id column="EMPLOYEE_ID" property="employeeId" jdbcType="DECIMAL" />

    <result column="FIRST_NAME" property="firstName" jdbcType="VARCHAR" />

    <result column="LAST_NAME" property="lastName" jdbcType="VARCHAR" />

    <result column="EMAIL" property="email" jdbcType="VARCHAR" />

    <result column="PHONE_NUMBER" property="phoneNumber" jdbcType="VARCHAR" />

    <result column="HIRE_DATE" property="hireDate" jdbcType="DATE" />

    <result column="JOB_ID" property="jobId" jdbcType="VARCHAR" />

    <result column="SALARY" property="salary" jdbcType="DECIMAL" />

    <result column="COMMISSION_PCT" property="commissionPct" jdbcType="DECIMAL" />

    <result column="MANAGER_ID" property="managerId" jdbcType="DECIMAL" />

    <result column="DEPARTMENT_ID" property="departmentId" jdbcType="DECIMAL" />

  </resultMap>

  <sql id="Base_Column_List" >

    EMPLOYEE_ID, FIRST_NAME, LAST_NAME, EMAIL, PHONE_NUMBER, HIRE_DATE, JOB_ID, SALARY,

    COMMISSION_PCT, MANAGER_ID, DEPARTMENT_ID

  </sql>

  <select id="selectByPrimaryKey" resultMap="BaseResultMap" parameterType="java.lang.Integer" >

    select

    <include refid="Base_Column_List" />

    from EMPLOYEES

    where EMPLOYEE_ID = #{employeeId,jdbcType=DECIMAL}

  </select>

  <delete id="deleteByPrimaryKey" parameterType="java.lang.Integer" >

    delete from EMPLOYEES

    where EMPLOYEE_ID = #{employeeId,jdbcType=DECIMAL}

  </delete>

  <insert id="insert" parameterType="cn.learn.pojo.Employees" >

    insert into EMPLOYEES (EMPLOYEE_ID, FIRST_NAME, LAST_NAME,

      EMAIL, PHONE_NUMBER, HIRE_DATE,

      JOB_ID, SALARY, COMMISSION_PCT,

      MANAGER_ID, DEPARTMENT_ID)

    values (#{employeeId,jdbcType=DECIMAL}, #{firstName,jdbcType=VARCHAR}, #{lastName,jdbcType=VARCHAR},

      #{email,jdbcType=VARCHAR}, #{phoneNumber,jdbcType=VARCHAR}, #{hireDate,jdbcType=DATE},

      #{jobId,jdbcType=VARCHAR}, #{salary,jdbcType=DECIMAL}, #{commissionPct,jdbcType=DECIMAL},

      #{managerId,jdbcType=DECIMAL}, #{departmentId,jdbcType=DECIMAL})

  </insert>

  <insert id="insertSelective" parameterType="cn.learn.pojo.Employees" >

    insert into EMPLOYEES

    <trim prefix="(" suffix=")" suffixOverrides="," >

      <if test="employeeId != null" >

        EMPLOYEE_ID,

      </if>

      <if test="firstName != null" >

        FIRST_NAME,

      </if>

      <if test="lastName != null" >

        LAST_NAME,

      </if>

      <if test="email != null" >

        EMAIL,

      </if>

      <if test="phoneNumber != null" >

        PHONE_NUMBER,

      </if>

      <if test="hireDate != null" >

        HIRE_DATE,

      </if>

      <if test="jobId != null" >

        JOB_ID,

      </if>

      <if test="salary != null" >

        SALARY,

      </if>

      <if test="commissionPct != null" >

        COMMISSION_PCT,

      </if>

      <if test="managerId != null" >

        MANAGER_ID,

      </if>

      <if test="departmentId != null" >

        DEPARTMENT_ID,

      </if>

    </trim>

    <trim prefix="values (" suffix=")" suffixOverrides="," >

      <if test="employeeId != null" >

        #{employeeId,jdbcType=DECIMAL},

      </if>

      <if test="firstName != null" >

        #{firstName,jdbcType=VARCHAR},

      </if>

      <if test="lastName != null" >

        #{lastName,jdbcType=VARCHAR},

      </if>

      <if test="email != null" >

        #{email,jdbcType=VARCHAR},

      </if>

      <if test="phoneNumber != null" >

        #{phoneNumber,jdbcType=VARCHAR},

      </if>

      <if test="hireDate != null" >

        #{hireDate,jdbcType=DATE},

      </if>

      <if test="jobId != null" >

        #{jobId,jdbcType=VARCHAR},

      </if>

      <if test="salary != null" >

        #{salary,jdbcType=DECIMAL},

      </if>

      <if test="commissionPct != null" >

        #{commissionPct,jdbcType=DECIMAL},

      </if>

      <if test="managerId != null" >

        #{managerId,jdbcType=DECIMAL},

      </if>

      <if test="departmentId != null" >

        #{departmentId,jdbcType=DECIMAL},

      </if>

    </trim>

  </insert>

  <update id="updateByPrimaryKeySelective" parameterType="cn.learn.pojo.Employees" >

    update EMPLOYEES

    <set >

      <if test="firstName != null" >

        FIRST_NAME = #{firstName,jdbcType=VARCHAR},

      </if>

      <if test="lastName != null" >

        LAST_NAME = #{lastName,jdbcType=VARCHAR},

      </if>

      <if test="email != null" >

        EMAIL = #{email,jdbcType=VARCHAR},

      </if>

      <if test="phoneNumber != null" >

        PHONE_NUMBER = #{phoneNumber,jdbcType=VARCHAR},

      </if>

      <if test="hireDate != null" >

        HIRE_DATE = #{hireDate,jdbcType=DATE},

      </if>

      <if test="jobId != null" >

        JOB_ID = #{jobId,jdbcType=VARCHAR},

      </if>

      <if test="salary != null" >

        SALARY = #{salary,jdbcType=DECIMAL},

      </if>

      <if test="commissionPct != null" >

        COMMISSION_PCT = #{commissionPct,jdbcType=DECIMAL},

      </if>

      <if test="managerId != null" >

        MANAGER_ID = #{managerId,jdbcType=DECIMAL},

      </if>

      <if test="departmentId != null" >

        DEPARTMENT_ID = #{departmentId,jdbcType=DECIMAL},

      </if>

    </set>

    where EMPLOYEE_ID = #{employeeId,jdbcType=DECIMAL}

  </update>

  <update id="updateByPrimaryKey" parameterType="cn.learn.pojo.Employees" >

    update EMPLOYEES

    set FIRST_NAME = #{firstName,jdbcType=VARCHAR},

      LAST_NAME = #{lastName,jdbcType=VARCHAR},

      EMAIL = #{email,jdbcType=VARCHAR},

      PHONE_NUMBER = #{phoneNumber,jdbcType=VARCHAR},

      HIRE_DATE = #{hireDate,jdbcType=DATE},

      JOB_ID = #{jobId,jdbcType=VARCHAR},

      SALARY = #{salary,jdbcType=DECIMAL},

      COMMISSION_PCT = #{commissionPct,jdbcType=DECIMAL},

      MANAGER_ID = #{managerId,jdbcType=DECIMAL},

      DEPARTMENT_ID = #{departmentId,jdbcType=DECIMAL}

    where EMPLOYEE_ID = #{employeeId,jdbcType=DECIMAL}

  </update>

</mapper>
然后根据这文件写dao层的EmployeesMapping.java文件 也就是上面说的
cn.learn.dao.EmployeesMapper
, 注意代码中灰色背景部分的文
package cn.learn.dao;

import cn.learn.pojo.Employees;

public interface EmployeesMapper {

    int deleteByPrimaryKey(Integer employeeId);

    int insert(Employees record);

    int insertSelective(Employees record);

    Employees selectByPrimaryKey(Integer employeeId);

    int updateByPrimaryKeySelective(Employees record);

    int updateByPrimaryKey(Employees record);

}
其中没个方法对应xml文件中的一个id
然后写
cn.learn.pojo.Employees
package cn.learn.pojo;

import java.math.BigDecimal;

import java.util.Date;

public class Employees {

    private Integer employeeId;

    private String firstName;

    private String lastName;

    private String email;

    private String phoneNumber;

    private Date hireDate;

    private String jobId;

    private BigDecimal salary;

    private BigDecimal commissionPct;

    private Integer managerId;

    private Short departmentId;

    public Integer getEmployeeId() {

        return employeeId;

    }

    public void setEmployeeId(Integer employeeId) {

        this.employeeId = employeeId;

    }

    public String getFirstName() {

        return firstName;

    }

    public void setFirstName(String firstName) {

        this.firstName = firstName == null ? null : firstName.trim();

    }

    public String getLastName() {

        return lastName;

    }

    public void setLastName(String lastName) {

        this.lastName = lastName == null ? null : lastName.trim();

    }

    public String getEmail() {

        return email;

    }

    public void setEmail(String email) {

        this.email = email == null ? null : email.trim();

    }

    public String getPhoneNumber() {

        return phoneNumber;

    }

    public void setPhoneNumber(String phoneNumber) {

        this.phoneNumber = phoneNumber == null ? null : phoneNumber.trim();

    }

    public Date getHireDate() {

        return hireDate;

    }

    public void setHireDate(Date hireDate) {

        this.hireDate = hireDate;

    }

    public String getJobId() {

        return jobId;

    }

    public void setJobId(String jobId) {

        this.jobId = jobId == null ? null : jobId.trim();

    }

    public BigDecimal getSalary() {

        return salary;

    }

    public void setSalary(BigDecimal salary) {

        this.salary = salary;

    }

    public BigDecimal getCommissionPct() {

        return commissionPct;

    }

    public void setCommissionPct(BigDecimal commissionPct) {

        this.commissionPct = commissionPct;

    }

    public Integer getManagerId() {

        return managerId;

    }

    public void setManagerId(Integer managerId) {

        this.managerId = managerId;

    }

    public Short getDepartmentId() {

        return departmentId;

    }

    public void setDepartmentId(Short departmentId) {

        this.departmentId = departmentId;

    }

}
其实这三个文件可以自动生成, 回头在写一个怎么自动生成这三个文件的记录
最后写一个service, 用来处理业务层内容. 一般在项目中, controller层是用来处理逻辑层的东西
package cn.learn.service;

import org.springframework.beans.factory.annotation.Autowired;

import org.springframework.stereotype.Service;

import cn.learn.dao.EmployeesMapper;

import cn.learn.pojo.Employees;

@Service

public class EmployeeService {

    @Autowired

    private EmployeesMapper employeesMapper;

    public void pringEmployee(Integer employeeId){

        Employees employees = employeesMapper.selectByPrimaryKey(employeeId);

        System.out.println(employees.getEmail());

    }

}
注解不能被忽略, 要不然不好用, 这里简单的输出了一下被查询员工的email
最后改写一下
package cn.learn.controller;

import org.springframework.beans.factory.annotation.Autowired;

import org.springframework.stereotype.Controller;

import org.springframework.web.bind.annotation.RequestMapping;

import org.springframework.web.servlet.ModelAndView;

import cn.learn.service.EmployeeService;

@Controller

@RequestMapping("/index")

public class IndexController {

    @Autowired

    private EmployeeService employeesService;

    @RequestMapping("/helloword")

    public ModelAndView hellowordAction(){

        employeesService.pringEmployee();

        //直接返回到view目录下的 index目录下的helloword.jsp

        return new ModelAndView("index/helloword");

    }

}
红色的100是我自己数据库里面一个员工的id
到这里为止, 启动服务器, 访问http://localhost:8080/createssm/index/helloword 就会在控制台数据对应员工的邮箱地址了
最后附上用plsql导出的employees表的数据结构, 这里有个别字段可能由于有外键, 导致导入失败, 自己写的时候, 可以去掉这些约束
-----------------------------------------------------

-- Export file for user C##AZHW@ORCL               --

-- Created by Administrator on 2016/11/12, 1:51:37 --

-----------------------------------------------------

set define off

spool sql.log

prompt

prompt Creating table EMPLOYEES

prompt ========================

prompt

create table EMPLOYEES

(

  employee_id    NUMBER(6) not null,

  first_name     VARCHAR2(20),

  last_name      VARCHAR2(25),

  email          VARCHAR2(25),

  phone_number   VARCHAR2(20),

  hire_date      DATE,

  job_id         VARCHAR2(10),

  salary         NUMBER(8,2),

  commission_pct NUMBER(2,2),

  manager_id     NUMBER(6),

  department_id  NUMBER(4)

)

;

comment on column EMPLOYEES.employee_id

  is '员工id';

comment on column EMPLOYEES.first_name

  is '姓';

comment on column EMPLOYEES.last_name

  is '名字';

comment on column EMPLOYEES.email

  is '邮箱';

comment on column EMPLOYEES.phone_number

  is '电话';

comment on column EMPLOYEES.hire_date

  is '入职日期';

comment on column EMPLOYEES.job_id

  is '工号';

comment on column EMPLOYEES.salary

  is '工资';

comment on column EMPLOYEES.commission_pct

  is '职务';

comment on column EMPLOYEES.manager_id

  is '直属领导id';

comment on column EMPLOYEES.department_id

  is '部门id';

alter table EMPLOYEES

  add constraint EMP_EMP_ID_PK primary key (EMPLOYEE_ID);

alter table EMPLOYEES

  add constraint EMP_EMAIL_UK unique (EMAIL);

alter table EMPLOYEES
--这几个字段有外键约束, 可以去掉不用

  add constraint EMP_DEPT_FK foreign key (DEPARTMENT_ID)

  references DEPARTMENTS (DEPARTMENT_ID);

alter table EMPLOYEES

  add constraint EMP_JOB_FK foreign key (JOB_ID)

  references JOBS (JOB_ID);

alter table EMPLOYEES

  add constraint EMP_MANAGER_FK foreign key (MANAGER_ID)

  references EMPLOYEES (EMPLOYEE_ID);

alter table EMPLOYEES

  add constraint EMP_EMAIL_NN

  check ("EMAIL" IS NOT NULL);

alter table EMPLOYEES

  add constraint EMP_HIRE_DATE_NN

  check ("HIRE_DATE" IS NOT NULL);

alter table EMPLOYEES

  add constraint EMP_JOB_NN

  check ("JOB_ID" IS NOT NULL);

alter table EMPLOYEES

  add constraint EMP_LAST_NAME_NN

  check ("LAST_NAME" IS NOT NULL);

alter table EMPLOYEES

  add constraint EMP_SALARY_MIN

  check (salary > 0);

spool off
eclipse 使用maven 创建springmvc + mybatis的更多相关文章
- 【Maven】Eclipse 使用Maven创建SpringMVC Web项目
创建环境 系统:win 10 软件:eclipse,maven. 创建步骤 创建一个Maven Web项目,可以参照:[Maven]Eclipse 使用Maven创建Java Web项目 添加spri ...
- eclipse中用maven创建web项目
上一节中完成了本地的maven环境搭建,在eclipse中怎么创建一个maven项目呢 一.eclipse中配置maven环境 eclipse版本4.3 1.打开菜单Help->Eclipse ...
- eclipse 使用maven 创建纯spring mvc项目
接着eclipse 使用maven 创建web3.1项目 创建完成后, 讲spring mvc加入到项目中 先修改pom.xml文件 注意红色字部分 <project xmlns="h ...
- Eclipse使用maven创建SSM-web项目
1.环境准备 (1)maven:apache-maven-3.5.2,我的maven安装在D:\apache-maven-3.5.2,eclipse中maven配置如下: 先add ,添加好自己的ma ...
- 【Maven】Eclipse 使用Maven创建Java Web项目
创建环境 系统:win 10 软件:eclipse,maven 创建步骤 需求创建一个Servlet版本是3.0,Java版本是1.7的项目Maven web项目 使用eclipse工具创建maven ...
- 【项目管理和构建】十分钟教程,eclipse配置maven + 创建maven项目(三)
[项目管理和构建]十分钟教程,eclipse配置maven + 创建maven项目(三) 上篇博文中我们介绍了maven下载.安装和配置(二),这篇博文我们配置一下eclipse,将它和maven结合 ...
- 【Maven】 Eclipse使用Maven创建Java Web 项目(一)
需求:创建一个Servlet版本3.0,Java版本是1.7的Maven Web项目 创建环境: 系统:window 7 软件:Eclipse.Maven 创建步骤: 1.使用eclipse工具创建m ...
- 工具idea 基于maven 创建springMVC项目
SpringMVC Spring MVC是Spring提供的一个强大而灵活的web框架.借助于注解,Spring MVC提供了几乎是POJO的开发模式,使得控制器的开发和测试更加简单.这些控制器一般不 ...
- 在eclipse中使用maven创建springMVC项目
一.在eclipse中创建maven-archetype-webapp项目: 1.新建项目选择maven项目 2.默认,下一步 3.选择maven-archetype-webapp,其他保持默认即可 ...
随机推荐
- AppSettings
1.winform中读写配置文件appSettings 一节中的配置. #region 读写配置文件 /// <summary> /// 修改配置文件中某项的值 /// </summ ...
- <audio> 标签简介
定义和用法 <audio> 标签定义声音,比如音乐或其他音频流. 实例 一段简单的 HTML 5 音频: <audio src="someaudio.wav"&g ...
- 详解AJAX核心 —— XMLHttpRequest 对象 (下)
继续上一篇的内容上一篇关于XMLHttpRequest 对象发送对服务器的请求只说到了用Get方式,没有说Post方式的.那是因为要说Post方式就需要先说另外一个东西,那就是DOM(Document ...
- Emmet 语法探析
Emmet 语法探析 Emmet(Zen Coding)是一个能大幅度提高前端开发效率的一个工具. 大多数编辑器都支持Snippet,即存储和重用一些代码块.但是前提是:你必须先定义 这些代码块. E ...
- es3中使用es6/7的字符串扩展
最近在看阮一峰的<ES6标准入门>,在字符串扩展一节中有提到几个新的扩展,觉得挺有意思,想在ES3里面使用,于是就有下面的兼容性写法. repeat 将一个字符串重复n次 String.p ...
- 从汇编看c++中的虚拟继承及内存布局(二)
下面是c++源码: class Top {//虚基类 public: int i; Top(int ii) { i = ii; } virtual int getTop() { cout <&l ...
- HttpClient---------demo
public class aa { public static void main(String[] args) { // 创建HttpClient实例 HttpClient httpclient = ...
- Nginx学习之二-配置项解析及编程实现
在开发功能灵活的Nginx模块时,需要从配置文件中获取特定的信息.不过,我们并不需要再编写一套读取配置的系统,Nginx已经为用户提供了强大的配置项解析机制,同时还支持“-s reload”命令,可以 ...
- ASP.NET Request.QueryString 出现乱码问题
前台: var txing = $("#txing").combobox("getValues"); .......... &tixing=" ...
- (八)boost库之异常处理
(八)boost库之异常处理 当你面对上千万行的项目时,当看到系统输出了异常信息时,你是否想过,如果它能将文件名.行号等信息输出,该多好啊,曾经为此绞尽脑汁. 今天使用boost库,将轻松的解决这个问 ...