Spring-AOP实践 - 统计访问时间--StopWatch
本文将介绍使用注解+AOP(面向切面编程)的方式实现其功能,一来可以快速使用StopWatch功能,二来让大家熟悉一下如何使用注解进行切面编程_
1. 自定义一个注解 StopWatchTime
@Retention(RetentionPolicy.RUNTIME)

@Target({METHOD})

public @interface StopWatchTime {

    String value() default "";

}
本注解主要用在方法上,故target为METHOD,并设定一个value,可用于定义此次观察的名称。
2. 创建切面类
- 引用AOP支持包
<dependency>

    <groupId>org.springframework.boot</groupId>

    <artifactId>spring-boot-starter-aop</artifactId>

</dependency>
- 创建切面类
@Aspect   // 1

@Component  // 2

public class StopWatchTimeAdvice {

    @Around("@annotation(stopWatchTime)")  // 3

    public Object invoke(ProceedingJoinPoint thisJoinPoint, StopWatchTime stopWatchTime) throws Throwable {

        MethodSignature methodSignature = (MethodSignature) thisJoinPoint.getSignature();

        String name = StringUtils.isEmpty(stopWatchTime.value()) ? methodSignature.getName() : stopWatchTime.value();  // 4

        StopWatch stopWatch = new StopWatch(name);

        stopWatch.start("00");

        Object object = thisJoinPoint.proceed();  // 5

        stopWatch.stop();

        System.err.println(stopWatch.prettyPrint());  // 6

        return object;

    }

}
代码解释
- 通过@Aspect 注解声明一个切面
- 通过@Component 让此切面成为Spring容器管理的Bean
- 通过@Around注解声明一个建言,并使用定义了自定义注解@StopWatchTime的方法作为切入点
- 获取注解上的属性,如果无就默认当前的方法名“ methodSignature.getName() ”
- 作好StopWatch的前期准备后,执行切入点的方法体
- 执行完成后打印执行结果
3. 注解被观察方法
    @StopWatchTime

    public void run(String... strings) throws Exception {

        step1();

        step2();

        step3();

    }

    private void step1() throws InterruptedException {

        Thread.sleep(100L);

    }

    private void step2() throws InterruptedException {

        Thread.sleep(850L);

    }

    private void step3() throws InterruptedException {

        Thread.sleep(2000L);

    }
只要@StopWatchTime写在哪个方法上就能监控得出哪个方法的执行时间,但且限于public非静态方法
输出结果
StopWatch 'run': running time (millis) = 2985

-----------------------------------------

ms     %     Task name

-----------------------------------------

02985  100%  00
大家可能会看出来,此方法虽然使用起来方便,但只能显示单个方法的执行时间,下一篇将告诉大家如何使用AOP的方法扩展出可同时观察一个代码段里多个方法的执行情况,敬请期待。
http://www.spring4all.com/article/176
公司的项目有的页面超级慢,20s以上,不知道用户会不会疯掉,于是老大说这个页面要性能优化。于是,首先就要搞清楚究竟是哪一步耗时太多。
我采用spring aop来统计各个阶段的用时,其中计时器工具为StopWatch。
文章结构:
其中,遇到的问题:
1.少包aspectjweaver
添加依赖后才可以使用@Aspect
2.环绕通知加入多个point
刚开使用&&连接多个point,傻傻的看不到调用,忽然看到要用||才对
3.监听时间工具StopWatch每次只能启动一个,一定要关闭后才能启动下一个。
而我想要测试controller->service->repository各个阶段用时显然很不适应。因为使用同一个stopwatch对象来保存时间,而stopwatch每次只能记录一个时间段作为总时间的一部分,不存在时间嵌套关系(这个以后可以考虑想想别的方案)。controller开始后执行部分验证逻辑或是其他,然后调用service,这时候service启动定时会失败,因为controller的计时器还没关,因此需要先关掉controller的计时器。这样会导致controller的计时部分仅仅是调用service之前的时间,service返回值之后,controller再进行某些处理的时间并没有统计。显然,我需要一个卡表的时间统计设计,即进入controller开始计时,调用service后开始service计时,以此类推,最后获得controller总时间Tc,service总时间Ts,repository总时间Tr.所以时间统计应该如图1:


图一 图二
这样的话,我应该分别获得Tc,Ts,Tr的时间,然后计算百分比或者别的统计工作。也就是说,log仅仅是log,记录而已,想要得到一个统计结果还需要针对数据二次开发,这就需要将时间存储起来或者进行日志挖掘,然而这统计的工作会越来越复杂,最终我都不知会加多少任务进去。
事实上,我们这个页面耗费时间主要是多个webservice调用产生的io耗时,也就是说其实统计一个层面的时间就差不多了。那么,忽略service返回后controller的其他时间,仅仅计算controller开始到调用service的时间为Tc,service开始到调用repository的时间为Ts,如图2,这样利用StopWatch就很容获取时间统计结果。
4.线程不安全
我居然使用单例的一个成员变量做状态存储,真是。待改进
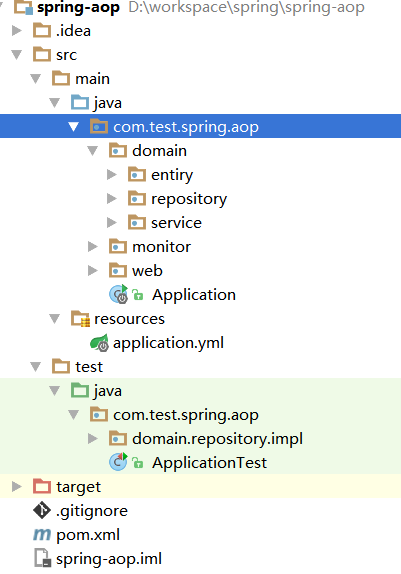
1.搭建项目
采用spring-boot-aop的框架来搭建。最终结构图如下:
1.1在idea中,new project-》maven
1.2初始化pom,添加aop,web,test依赖:
|
1
2
3
4
5
6
7
8
9
10
11
12
13
14
15
16
17
18
19
20
21
22
23
24
25
26
27
28
29
30
31
32
33
34
35
36
37
38
39
40
41
42
43
44
45
46
47
48
49
50
51
52
|
<?xml version="1.0" encoding="UTF-8"?><project xmlns="http://maven.apache.org/POM/4.0.0" xmlns:xsi="http://www.w3.org/2001/XMLSchema-instance" xsi:schemaLocation="http://maven.apache.org/POM/4.0.0 http://maven.apache.org/xsd/maven-4.0.0.xsd"> <modelVersion>4.0.0</modelVersion> <groupId>com.test</groupId> <artifactId>spring-aop</artifactId> <version>1.0-SNAPSHOT</version> <dependencyManagement> <dependencies> <dependency> <!-- Import dependency management from Spring Boot --> <groupId>org.springframework.boot</groupId> <artifactId>spring-boot-dependencies</artifactId> <version>1.3.5.RELEASE</version> <type>pom</type> <scope>import</scope> </dependency> </dependencies> </dependencyManagement> <dependencies> <dependency> <groupId>org.springframework.boot</groupId> <artifactId>spring-boot-starter-aop</artifactId> </dependency> <dependency> <groupId>org.springframework.boot</groupId> <artifactId>spring-boot-starter-web</artifactId> </dependency> <dependency> <groupId>org.springframework.boot</groupId> <artifactId>spring-boot-starter-test</artifactId> <scope>test</scope> </dependency> <dependency> <groupId>org.assertj</groupId> <artifactId>assertj-core-java8</artifactId> <version>1.0.0m1</version> </dependency> </dependencies> <build> <plugins> <plugin> <groupId>org.springframework.boot</groupId> <artifactId>spring-boot-maven-plugin</artifactId> </plugin> </plugins> </build></project> |
1.3创建启动入口:com.test.spring.aop.Application.java
|
1
2
3
4
5
6
7
8
9
10
11
12
13
14
15
16
17
18
19
20
21
22
23
24
25
26
|
package com.test.spring.aop;import com.test.spring.aop.domain.service.IHelloService;import org.springframework.beans.factory.annotation.Autowired;import org.springframework.boot.CommandLineRunner;import org.springframework.boot.SpringApplication;import org.springframework.boot.autoconfigure.SpringBootApplication;/** * Created by miaorf on 2016/7/16. */@SpringBootApplicationpublic class Application implements CommandLineRunner{ @Autowired IHelloService helloService; public void run(String... strings) throws Exception { System.out.println("start application by CommandLineRunner, the args:"+strings.length); helloService.sayHi(); } public static void main(String[] args) throws Exception { SpringApplication.run(Application.class, args); }} |
1.4发现我们需要一个service:
创建com.test.spring.aop.domain.service.IHelloService
创建com.test.spring.aop.domain.service.impl.HelloService
|
1
2
3
4
5
6
7
8
9
10
11
12
13
14
15
16
17
18
19
20
21
22
23
|
package com.test.spring.aop.domain.service.impl;import com.test.spring.aop.domain.service.IHelloService;import org.springframework.beans.factory.annotation.Value;import org.springframework.stereotype.Service;/** * Created by miaorf on 2016/7/16. */@Servicepublic class HelloService implements IHelloService { @Value("${name}") private String name; public void sayHi() { for (int i = 0; i < 100000; i++) { } System.out.println("Hi "+name); System.out.println("I'm running."); }} |
1.5发现我们需要一个属性配置文件:
创建application.yml
1 name: Ryan
1.6这时候可以测试一下启动看看了
直接启动:运行com.test.spring.aop.Application#main()即可。
命令行启动:mvn spring-boot:run,
命令行bug启动:mvn spring-boot:run -Drun.jvmArguments="-Xdebug -Xrunjdwp:transport=dt_socket,server=y,suspend=y,address=5005"
1.7创建测试com.test.spring.aop.ApplicationTest

package com.test.spring.aop;

import org.junit.After;

import org.junit.Before;

import org.junit.Rule;

import org.junit.Test;

import org.springframework.boot.test.OutputCapture;

import static org.assertj.core.api.Assertions.assertThat;

/**

 * Created by miaorf on 2016/7/16.

 */

public class ApplicationTest {

    @Rule

    public OutputCapture outputCapture = new OutputCapture();

    private String profiles;

    @Before

    public void init() throws Exception {

        this.profiles = System.getProperty("spring.profiles.active");

    }

    @After

    public void tearDown() throws Exception {

        if (this.profiles != null){

            System.setProperty("spring.profiles.active",this.profiles);

        }else{

            System.out.println("spring.profiles.active");

        }

    }

    @Test

    public void testDefaultSettings() throws Exception{

        Application.main(new String[0]);

        String s = this.outputCapture.toString();

        assertThat(s).contains("Hi Ryan");

    }

    @Test

    public void testCommandLineOverrides() throws Exception {

        Application.main(new String[] {"--name=Leslie"});

        String s = this.outputCapture.toString();

        assertThat(s).contains("Hi Leslie");

    }

}
2.AOP - HelloWorld
2.1创建com.test.spring.aop.monitor.ServiceMonitor
package com.test.spring.aop.monitor;

import org.aspectj.lang.ProceedingJoinPoint;

import org.aspectj.lang.annotation.*;

import org.slf4j.Logger;

import org.slf4j.LoggerFactory;

import org.springframework.stereotype.Component;

import org.springframework.util.StopWatch;

/**

 * Created by miaorf on 2016/7/16.

 */

@Aspect

@Component

public class ServiceMonitor {

    private static Logger logger = LoggerFactory.getLogger(ServiceMonitor.class);

    StopWatch stopWatch = new StopWatch("performance");

    /**

     * define point

     */

    @Pointcut("execution(* com.test.spring.aop..*Service.*(..))")

    public void performance(){}

//    @Before("performance()")

//    public void startService(){

//        System.out.println("-----------service start-------");

//    }

//    @After("performance()")

//    public void endService(){

//        System.out.println("-----------service end neither success or failed -------");

//    }

//

//    @AfterReturning("performance()")

//    public void logServiceAccess(JoinPoint joinPoint) {

//        System.out.println("service completed:"+joinPoint);

//    }

    /**

     * 必须要返回,不然后面收不到

     * @param point

     * @return

     */

    @Around("performance()")

    public Object watchPerformance(ProceedingJoinPoint point){

        System.out.println("The service start:");

        stopWatch.start(point.getSignature().toString());

        try {

            return point.proceed();

        } catch (Throwable throwable) {

            logger.error("The service not work!",throwable);

            throwable.printStackTrace();

        }finally {

            stopWatch.stop();

            stopWatch.start("b");

            for (int i = 0; i < 12345; i++) {

            }

            stopWatch.stop();

            StopWatch.TaskInfo[] taskInfo = stopWatch.getTaskInfo();

            for (StopWatch.TaskInfo info : taskInfo) {

                System.out.println(info.getTaskName());

                System.out.println(info.getTimeMillis());

            }

            logger.info("The {} run time:{}",point.getSignature().toString(),stopWatch.prettyPrint());

        }

        return null;

    }

}
2.2测试
测试水平还没开始,所以只能手动测试了,运行com.test.spring.aop.ApplicationTest可以看到在HelloService调用前后插入了日志。
3.时间统计
最终,生成类图如下:

最终获得的时间统计如下:
2016-07-16 21:25:09.361  INFO 16824 --- [nio-8080-exec-4] com.test.spring.aop.monitor.UserMonitor  : StopWatch 'controller': running time (millis) = 3218

-----------------------------------------

ms     %     Task name

-----------------------------------------

01001  031%  List com.test.spring.aop.domain.service.IUserService.getAll()

02000  062%  Object com.test.spring.aop.domain.repository.IConnector.getSthFromRemote()

00217  007%  List com.test.spring.aop.domain.repository.IUserDao.getAll()
3.1需要设计一个controller
创建com.test.spring.aop.web.UserController:
package com.test.spring.aop.web;

import com.test.spring.aop.domain.entiry.User;

import com.test.spring.aop.domain.service.IUserService;

import org.springframework.beans.factory.annotation.Autowired;

import org.springframework.stereotype.Controller;

import org.springframework.web.bind.annotation.RequestMapping;

import org.springframework.web.bind.annotation.ResponseBody;

import java.util.List;

/**

 * Created by miaorf on 2016/7/16.

 */

@Controller

@RequestMapping("/user")

public class UserController {

    @Autowired

    private IUserService userService;

    @ResponseBody

    @RequestMapping("/all")

    public List<User> users(){

        try {Thread.sleep(1000);} catch (InterruptedException e) {e.printStackTrace();}

        List<User> all = userService.getAll();

        return all;

    }

}
3.2发现需要一个service
创建com.test.spring.aop.domain.service.IUserService
package com.test.spring.aop.domain.service;

import com.test.spring.aop.domain.entiry.User;

import java.util.List;

/**

 * Created by miaorf on 2016/7/16.

 */

public interface IUserService {

    List<User> getAll();

}
创建com.test.spring.aop.domain.service.impl.UserService
package com.test.spring.aop.domain.service.impl;

import com.test.spring.aop.domain.entiry.User;

import com.test.spring.aop.domain.repository.IConnector;

import com.test.spring.aop.domain.repository.IUserDao;

import com.test.spring.aop.domain.service.IUserService;

import org.springframework.beans.factory.annotation.Autowired;

import org.springframework.stereotype.Service;

import java.util.List;

/**

 * Created by miaorf on 2016/7/16.

 */

@Service

public class UserService implements IUserService {

    @Autowired

    private IUserDao userDao;

    @Autowired

    private IConnector connector;

    public List<User> getAll() {

        try {Thread.sleep(1000);} catch (InterruptedException e) {e.printStackTrace();}

        connector.getSthFromRemote();

        return userDao.getAll();

    }

}
3.3发现需要一个repository
创建com.test.spring.aop.domain.repository.IUserDao
package com.test.spring.aop.domain.repository;

import com.test.spring.aop.domain.entiry.User;

import java.util.List;

/**

 * Created by miaorf on 2016/7/16.

 */

public interface IUserDao {

    List<User> getAll();

}
创建com.test.spring.aop.domain.repository.impl.UserDao
package com.test.spring.aop.domain.repository.impl;

import com.test.spring.aop.domain.entiry.User;

import com.test.spring.aop.domain.repository.IUserDao;

import org.springframework.stereotype.Repository;

import java.util.ArrayList;

import java.util.List;

/**

 * Created by miaorf on 2016/7/16.

 */

@Repository

public class UserDao implements IUserDao {

    public List<User> getAll() {

        //mock data

        List<User> list = new ArrayList<User>(10000);

        for (int i = 0; i < 10000; i++) {

            list.add(new User(i,"name_"+i,getRondomString(6),i,i%2,getRondomString(100)));

        }

        return list;

    }

    private String getRondomString(int length){

        StringBuffer buf = new StringBuffer("a,b,c,d,e,f,g,h,i,g,k,l,m,n,o,p,q,r,s,t,u,v,w,x,y,z");

        buf.append(",A,B,C,D,E,F,G,H,I,G,K,L,M,N,O,P,Q,R,S,T,U,V,W,X,Y,Z");

        buf.append(",~,@,#,$,%,^,&,*,(,),_,+,|,`,.");

        buf.append(",1,2,3,4,5,6,7,8,9,0");

        String[] arr = buf.toString().split(",");

        StringBuffer result = new StringBuffer();

        for (int i = 0; i < length; i++) {

            int random = (int) (Math.random() * 10000 + 1);

            result.append(arr[random % arr.length]);

        }

        return result.toString();

    }

}
3.3.1临时添加一个远程调用
创建com.test.spring.aop.domain.repository.IConnector
package com.test.spring.aop.domain.repository;

/**

 * Created by miaorf on 2016/7/16.

 */

public interface IConnector {

    Object getSthFromRemote();

}
创建com.test.spring.aop.domain.repository.impl.Connector
package com.test.spring.aop.domain.repository.impl;

import com.test.spring.aop.domain.repository.IConnector;

import org.springframework.stereotype.Component;

/**

 * Created by miaorf on 2016/7/16.

 */

@Component

public class Connector implements IConnector {

    public Object getSthFromRemote() {

        //mock time

        try {Thread.sleep(2000);} catch (InterruptedException e) {e.printStackTrace();}

        return null;

    }

}
3.4发现需要一个实体类
创建com.test.spring.aop.domain.entiry.User
package com.test.spring.aop.domain.entiry;

/**

 * Created by miaorf on 2016/7/16.

 */

public class User {

    Integer id;

    String username;

    String password;

    Integer age;

    Integer sex;

    String info;

    public User() {

    }

    public User(Integer id, String username, String password, Integer age, Integer sex, String info) {

        this.id = id;

        this.username = username;

        this.password = password;

        this.age = age;

        this.sex = sex;

        this.info = info;

    }

    public Integer getId() {

        return id;

    }

    public void setId(Integer id) {

        this.id = id;

    }

    public String getUsername() {

        return username;

    }

    public void setUsername(String username) {

        this.username = username;

    }

    public String getPassword() {

        return password;

    }

    public void setPassword(String password) {

        this.password = password;

    }

    public Integer getAge() {

        return age;

    }

    public void setAge(Integer age) {

        this.age = age;

    }

    public Integer getSex() {

        return sex;

    }

    public void setSex(Integer sex) {

        this.sex = sex;

    }

    public String getInfo() {

        return info;

    }

    public void setInfo(String info) {

        this.info = info;

    }

    @Override

    public String toString() {

        return "User{" +

                "id=" + id +

                ", username='" + username + '\'' +

                ", password='" + password + '\'' +

                ", age=" + age +

                ", sex=" + sex +

                ", info='" + info + '\'' +

                '}';

    }

}
3.5完成
以上就基本把一个web接口搞定了,可以运行测试一下,使用浏览器或者postman访问localhost:8080/user/all就可以获得user列表了。
3.6加入user时间统计
创建com.test.spring.aop.monitor.UserMonitor
package com.test.spring.aop.monitor;

import org.aspectj.lang.ProceedingJoinPoint;

import org.aspectj.lang.annotation.*;

import org.slf4j.Logger;

import org.slf4j.LoggerFactory;

import org.springframework.stereotype.Component;

import org.springframework.util.StopWatch;

/**

 * Created by miaorf on 2016/7/16.

 */

@Aspect

@Component

public class UserMonitor {

    private static Logger logger = LoggerFactory.getLogger(UserMonitor.class);

    StopWatch stopWatch;

    @Pointcut("execution(* com.test.spring.aop.web.UserController.users())")

    public void controllerPerformance() {

    }

    @Pointcut("execution(* com.test.spring.aop.domain.service.impl.UserService.getAll())")

    public void servicePerformance() {

    }

    @Pointcut("execution(* com.test.spring.aop.domain.repository.impl.UserDao.getAll())")

    public void repositoryPerformance() {

    }

    @Pointcut("execution(* com.test.spring.aop.domain.repository.impl.Connector.getSthFromRemote())")

    public void connectorPerformance() {

    }

    @Before("controllerPerformance()")

    public void startWatch() {

        stopWatch = new StopWatch("controller");

    }

    @After("controllerPerformance()")

    public void endWatch() {

        logger.info(stopWatch.prettyPrint());

        stopWatch = null;

    }

    @Around("servicePerformance() || repositoryPerformance() || connectorPerformance()")

    public Object watchPerformance(ProceedingJoinPoint joinPoint) throws Throwable {

        System.out.println("---------------------------");

        try {

            //如果是一层一层的,这里只能统计到到下一层需要的时间,因为返回值后没有统计,也就是说只能统计平行的调用

            if (stopWatch.isRunning()){

                stopWatch.stop();

            }

            stopWatch.start(joinPoint.getSignature().toString());

        } catch (IllegalStateException e) {

            logger.error("watch start error:",e);

        }

        Object proceed = joinPoint.proceed();

        try {

            if (stopWatch.isRunning()){

                stopWatch.stop();

            }

        } catch (IllegalStateException e) {

            logger.error("watch end error:",e);

        }

        return proceed;

    }

}
这里有几点问题:
1.StopWatch不能重复创建,如果想统计每次controller访问时间,必须在访问前初始化,访问后废除。
2.这里的时间统计仅仅针对controller入口的统计,也就是说,如果别的调用了service,这个时间是不统计的,因为StopWatch没有初始化。
3.StopWatch的prettyPrint是一个很好的东东
4.如果想要向开始那样,完全统计每层耗时,这个设计需要重新设计。当前有这样的想法。controller切点初始化三个或者多个StopWatch;service、repository等分别建立切点并计时;controller执行完毕之后的切点汇总统计数据,销毁各个StopWatch。这样就做到了每个层都统计了。然而问题来了,如果一个controller调用了多个service,显然需要统计所有service耗时和单个service耗时。


Boo! Big Bug!!!
今早起来接着看,忽然想起spring bean管理是单例的,而且必须是单例的才可以使用共同的成员变量,但问题来了,spring的controller是多线程的。也就是说,这个切面进入不是排队的,第一个请求过程中第二个请求也是可以进来的。那么,共享成员变量实在是愚蠢的决定。然而选择创建一个类来管理对应一个请求的计时器也不好的,如果并发量超级大岂不是每个人都会产生一个类?
因此,这个计时器必须是一个过程量,可以在指定区间(即controller执行期间)生存,而后销毁。对应的,显然是每个并发请求会至少产生一个类。也就是说,我需要在controller请求的时候new 一个StopWatch的id,然后在接下来的一系列调用中都使用这个id对应的计时器,最后销毁。如果几百万个并发量,那么就会产生几百万个类实例。懵逼。
最终选择
通过一个实例来保存一次请求状态太消耗性能,而如果不通过一个类实例保存状态就无法汇总所有的时间。所以这个方案不合适。那么,剩下日志和传入数据库。当下就先记录日志好了。记录想要记录的节点的时间:
package com.test.spring.aop.monitor;

import org.aspectj.lang.ProceedingJoinPoint;

import org.aspectj.lang.Signature;

import org.aspectj.lang.annotation.Around;

import org.aspectj.lang.annotation.Aspect;

import org.aspectj.lang.annotation.Pointcut;

import org.slf4j.Logger;

import org.slf4j.LoggerFactory;

import org.springframework.stereotype.Component;

import org.springframework.util.StopWatch;

/**

 * Created by miaorf on 2016/7/16.

 */

@Aspect

@Component

public class UserMonitor {

    private static Logger logger = LoggerFactory.getLogger(UserMonitor.class);

    @Pointcut("execution(* com.test.spring.aop.web.UserController.users())")

    public void controllerPerformance() {

    }

    @Pointcut("execution(* com.test.spring.aop.domain.service.impl.UserService.getAll())")

    public void servicePerformance() {

    }

    @Pointcut("execution(* com.test.spring.aop.domain.repository.impl.UserDao.getAll())")

    public void repositoryPerformance() {

    }

    @Pointcut("execution(* com.test.spring.aop.domain.repository.impl.Connector.getSthFromRemote())")

    public void connectorPerformance() {

    }

    @Around("controllerPerformance() || servicePerformance() || repositoryPerformance() || connectorPerformance()")

    public Object watchPerformance(ProceedingJoinPoint joinPoint) throws Throwable {

        Signature signature = joinPoint.getSignature();

        logger.info("=================start {}=====================",signature.getName());

        StopWatch stopWatch = new StopWatch("controller");

        try {

            if (stopWatch.isRunning()) {

                stopWatch.stop();

            }

            stopWatch.start(signature.toString());

        } catch (IllegalStateException e) {

            logger.error("watch start error:", e);

        }

        Object proceed = joinPoint.proceed();

        try {

            if (stopWatch.isRunning()) {

                stopWatch.stop();

                logger.info(stopWatch.prettyPrint()+"\n================= end {}=====================",signature.getName());

            }

        } catch (IllegalStateException e) {

            logger.error("watch end error:", e);

        }

        return proceed;

    }

}
压力测试
1.建立test case
首先,测试controller:创建com.test.spring.aop.web.UserControllerTest
package com.test.spring.aop.web;

import com.test.spring.aop.Application;

import org.junit.Assert;

import org.junit.Before;

import org.junit.Test;

import org.junit.runner.RunWith;

import org.springframework.beans.factory.annotation.Autowired;

import org.springframework.boot.test.SpringApplicationConfiguration;

import org.springframework.test.context.junit4.SpringJUnit4ClassRunner;

import org.springframework.test.context.web.WebAppConfiguration;

import org.springframework.test.web.servlet.MockMvc;

import org.springframework.test.web.servlet.MvcResult;

import org.springframework.test.web.servlet.request.MockMvcRequestBuilders;

import org.springframework.test.web.servlet.result.MockMvcResultHandlers;

import org.springframework.test.web.servlet.result.MockMvcResultMatchers;

import org.springframework.test.web.servlet.setup.MockMvcBuilders;

import org.springframework.web.context.WebApplicationContext;

import static org.junit.Assert.*;

/**

 * Created by miaorf on 2016/7/17.

 */

@RunWith(SpringJUnit4ClassRunner.class)

@SpringApplicationConfiguration(Application.class)

@WebAppConfiguration

public class UserControllerTest {

    @Autowired

    private WebApplicationContext wac;

    private MockMvc mockMvc;

    @Before

    public void setUp() {

        mockMvc = MockMvcBuilders.webAppContextSetup(wac).build();

    }

    @Test

    public void testUsers() throws Exception {

        MvcResult result = mockMvc.perform(MockMvcRequestBuilders.get("/user/all"))

                .andExpect(MockMvcResultMatchers.status().isOk())

                .andExpect(MockMvcResultMatchers.jsonPath("$[0].id").value(0))

//                .andDo(MockMvcResultHandlers.print())

                .andReturn();

    }

    @Test

    public void testUsersConcurrent() throws  Exception{

        for (int i = 0; i < 10; i++) {

            new Thread(() -> {

                try {

                    mockMvc.perform(MockMvcRequestBuilders.get("/user/all")).andExpect(MockMvcResultMatchers.status().isOk());

                } catch (Exception e) {

                    e.printStackTrace();

                }

            }).run();

        }

    }

}
不知道为啥,我的new Thread并没有并发执行,而是按顺序执行的。也就是说,虽然我new 10 个Thread,但还是一个接一个的运行。
改进
于是,我想采用线程池:
|
1
2
3
4
5
6
7
8
9
10
11
12
13
14
15
16
17
18
|
@Test public void testUsersConcurrent() throws Exception{ ThreadPoolExecutor executor = new ThreadPoolExecutor(5,10,200, TimeUnit.MILLISECONDS,new ArrayBlockingQueue<Runnable>(5)); //不能超过15 for (int i = 0; i < 15; i++) { executor.execute(()->{ try { mockMvc.perform(MockMvcRequestBuilders.get("/user/all")).andExpect(MockMvcResultMatchers.status().isOk()); } catch (Exception e) { e.printStackTrace(); } }); } //等待其他线程执行,方便查看控制台打印结果 Thread.sleep(100000); } |
这下就可以看到controller是多线程并发的了,因为瞬间就打印了10条controller访问日志,正好是线程池的最大容量:
016-07-17 12:20:10.336  INFO 12792 --- [           main] o.s.t.web.servlet.TestDispatcherServlet  : FrameworkServlet '': initialization completed in 24 ms

2016-07-17 12:20:10.431  INFO 12792 --- [pool-1-thread-8] com.test.spring.aop.monitor.UserMonitor  : =================start UserController.users()=====================

2016-07-17 12:20:10.431  INFO 12792 --- [pool-1-thread-6] com.test.spring.aop.monitor.UserMonitor  : =================start UserController.users()=====================

2016-07-17 12:20:10.431  INFO 12792 --- [pool-1-thread-4] com.test.spring.aop.monitor.UserMonitor  : =================start UserController.users()=====================

2016-07-17 12:20:10.431  INFO 12792 --- [pool-1-thread-2] com.test.spring.aop.monitor.UserMonitor  : =================start UserController.users()=====================

2016-07-17 12:20:10.432  INFO 12792 --- [ool-1-thread-10] com.test.spring.aop.monitor.UserMonitor  : =================start UserController.users()=====================

2016-07-17 12:20:10.432  INFO 12792 --- [pool-1-thread-3] com.test.spring.aop.monitor.UserMonitor  : =================start UserController.users()=====================

2016-07-17 12:20:10.432  INFO 12792 --- [pool-1-thread-7] com.test.spring.aop.monitor.UserMonitor  : =================start UserController.users()=====================

2016-07-17 12:20:10.432  INFO 12792 --- [pool-1-thread-5] com.test.spring.aop.monitor.UserMonitor  : =================start UserController.users()=====================

2016-07-17 12:20:10.432  INFO 12792 --- [pool-1-thread-1] com.test.spring.aop.monitor.UserMonitor  : =================start UserController.users()=====================

2016-07-17 12:20:10.432  INFO 12792 --- [pool-1-thread-9] com.test.spring.aop.monitor.UserMonitor  : =================start UserController.users()=====================
2.采用Apache 的ab进行并发访问
2.1下载Apache
参考:使用Apache Server 的ab进行web请求压力测试
2.2测试
D:\Java\httpd-2.4.23-x64-vc14\Apache24\bin>ab -n 20 -c 10 localhost:8080/user/all

This is ApacheBench, Version 2.3 <$Revision: 1748469 $>

Copyright 1996 Adam Twiss, Zeus Technology Ltd, http://www.zeustech.net/

Licensed to The Apache Software Foundation, http://www.apache.org/

Benchmarking localhost (be patient).....done

Server Software:        Apache-Coyote/1.1

Server Hostname:        localhost

Server Port:            8080

Document Path:          /user/all

Document Length:        1836671 bytes

Concurrency Level:      10

Time taken for tests:   31.199 seconds

Complete requests:      20

Failed requests:        0

Total transferred:      36736380 bytes

HTML transferred:       36733420 bytes

Requests per second:    0.64 [#/sec] (mean)

Time per request:       15599.677 [ms] (mean)

Time per request:       1559.968 [ms] (mean, across all concurrent requests)

Transfer rate:          1149.88 [Kbytes/sec] received

Connection Times (ms)

              min  mean[+/-sd] median   max

Connect:        0    0   0.4      0       1

Processing: 14785 15524 600.3  16085   16148

Waiting:    14593 15310 505.1  15781   15831

Total:      14785 15524 600.3  16085   16148

Percentage of the requests served within a certain time (ms)

  50%  16085

  66%  16090

  75%  16099

  80%  16114

  90%  16140

  95%  16148

  98%  16148

  99%  16148

 100%  16148 (longest request)
可以看到服务端是多线程的:
2016-07-17 12:26:28.455  INFO 18580 --- [           main] com.test.spring.aop.Application          : Started Application in 8.37 seconds (JVM running for 9.23)

2016-07-17 12:26:40.966  INFO 18580 --- [nio-8080-exec-9] o.a.c.c.C.[Tomcat].[localhost].[/]       : Initializing Spring FrameworkServlet 'dispatcherServlet'

2016-07-17 12:26:40.966  INFO 18580 --- [nio-8080-exec-9] o.s.web.servlet.DispatcherServlet        : FrameworkServlet 'dispatcherServlet': initialization started

2016-07-17 12:26:40.992  INFO 18580 --- [nio-8080-exec-9] o.s.web.servlet.DispatcherServlet        : FrameworkServlet 'dispatcherServlet': initialization completed in 25 ms

2016-07-17 12:26:41.049  INFO 18580 --- [nio-8080-exec-5] com.test.spring.aop.monitor.UserMonitor  : =================start UserController.users()=====================

2016-07-17 12:26:41.049  INFO 18580 --- [io-8080-exec-10] com.test.spring.aop.monitor.UserMonitor  : =================start UserController.users()=====================

2016-07-17 12:26:41.049  INFO 18580 --- [nio-8080-exec-8] com.test.spring.aop.monitor.UserMonitor  : =================start UserController.users()=====================

2016-07-17 12:26:41.050  INFO 18580 --- [nio-8080-exec-7] com.test.spring.aop.monitor.UserMonitor  : =================start UserController.users()=====================

2016-07-17 12:26:41.050  INFO 18580 --- [nio-8080-exec-2] com.test.spring.aop.monitor.UserMonitor  : =================start UserController.users()=====================

2016-07-17 12:26:41.050  INFO 18580 --- [nio-8080-exec-1] com.test.spring.aop.monitor.UserMonitor  : =================start UserController.users()=====================

2016-07-17 12:26:41.050  INFO 18580 --- [nio-8080-exec-3] com.test.spring.aop.monitor.UserMonitor  : =================start UserController.users()=====================

2016-07-17 12:26:41.050  INFO 18580 --- [nio-8080-exec-4] com.test.spring.aop.monitor.UserMonitor  : =================start UserController.users()=====================

2016-07-17 12:26:41.051  INFO 18580 --- [nio-8080-exec-6] com.test.spring.aop.monitor.UserMonitor  : =================start UserController.users()=====================

2016-07-17 12:26:41.051  INFO 18580 --- [nio-8080-exec-9] com.test.spring.aop.monitor.UserMonitor  : =================start UserController.users()=====================

2016-07-17 12:26:51.061  INFO 18580 --- [nio-8080-exec-1] com.test.spring.aop.monitor.UserMonitor  : =================start IUserService.getAll()=====================

2016-07-17 12:26:51.061  INFO 18580 --- [nio-8080-exec-6] com.test.spring.aop.monitor.UserMonitor  : =================start IUserService.getAll()=====================

2016-07-17 12:26:51.061  INFO 18580 --- [nio-8080-exec-9] com.test.spring.aop.monitor.UserMonitor  : =================start IUserService.getAll()=====================

2016-07-17 12:26:51.061  INFO 18580 --- [io-8080-exec-10] com.test.spring.aop.monitor.UserMonitor  : =================start IUserService.getAll()=====================

2016-07-17 12:26:51.061  INFO 18580 --- [nio-8080-exec-3] com.test.spring.aop.monitor.UserMonitor  : =================start IUserService.getAll()=====================

2016-07-17 12:26:51.061  INFO 18580 --- [nio-8080-exec-2] com.test.spring.aop.monitor.UserMonitor  : =================start IUserService.getAll()=====================

2016-07-17 12:26:51.061  INFO 18580 --- [nio-8080-exec-4] com.test.spring.aop.monitor.UserMonitor  : =================start IUserService.getAll()=====================

2016-07-17 12:26:51.061  INFO 18580 --- [nio-8080-exec-8] com.test.spring.aop.monitor.UserMonitor  : =================start IUserService.getAll()=====================

2016-07-17 12:26:51.062  INFO 18580 --- [nio-8080-exec-5] com.test.spring.aop.monitor.UserMonitor  : =================start IUserService.getAll()=====================

2016-07-17 12:26:51.062  INFO 18580 --- [nio-8080-exec-7] com.test.spring.aop.monitor.UserMonitor  : =================start IUserService.getAll()=====================

2016-07-17 12:26:52.062  INFO 18580 --- [nio-8080-exec-9] com.test.spring.aop.monitor.UserMonitor  : =================start IConnector.getSthFromRemote()=====================

2016-07-17 12:26:52.062  INFO 18580 --- [nio-8080-exec-6] com.test.spring.aop.monitor.UserMonitor  : =================start IConnector.getSthFromRemote()=====================

2016-07-17 12:26:52.062  INFO 18580 --- [nio-8080-exec-1] com.test.spring.aop.monitor.UserMonitor  : =================start IConnector.getSthFromRemote()=====================

2016-07-17 12:26:52.063  INFO 18580 --- [io-8080-exec-10] com.test.spring.aop.monitor.UserMonitor  : =================start IConnector.getSthFromRemote()=====================

2016-07-17 12:26:52.063  INFO 18580 --- [nio-8080-exec-3] com.test.spring.aop.monitor.UserMonitor  : =================start IConnector.getSthFromRemote()=====================

2016-07-17 12:26:52.063  INFO 18580 --- [nio-8080-exec-2] com.test.spring.aop.monitor.UserMonitor  : =================start IConnector.getSthFromRemote()=====================

2016-07-17 12:26:52.063  INFO 18580 --- [nio-8080-exec-8] com.test.spring.aop.monitor.UserMonitor  : =================start IConnector.getSthFromRemote()=====================

2016-07-17 12:26:52.063  INFO 18580 --- [nio-8080-exec-4] com.test.spring.aop.monitor.UserMonitor  : =================start IConnector.getSthFromRemote()=====================

2016-07-17 12:26:52.063  INFO 18580 --- [nio-8080-exec-5] com.test.spring.aop.monitor.UserMonitor  : =================start IConnector.getSthFromRemote()=====================

2016-07-17 12:26:52.063  INFO 18580 --- [nio-8080-exec-7] com.test.spring.aop.monitor.UserMonitor  : =================start IConnector.getSthFromRemote()=====================

2016-07-17 12:26:54.063  INFO 18580 --- [nio-8080-exec-6] com.test.spring.aop.monitor.UserMonitor  : StopWatch 'controller': running time (millis) = 2000

-----------------------------------------

ms     %     Task name

-----------------------------------------

02000  100%  Object com.test.spring.aop.domain.repository.IConnector.getSthFromRemote()

================= end IConnector.getSthFromRemote()=====================

2016-07-17 12:26:54.063  INFO 18580 --- [nio-8080-exec-9] com.test.spring.aop.monitor.UserMonitor  : StopWatch 'controller': running time (millis) = 2001

-----------------------------------------

ms     %     Task name

-----------------------------------------

02001  100%  Object com.test.spring.aop.domain.repository.IConnector.getSthFromRemote()

================= end IConnector.getSthFromRemote()=====================

2016-07-17 12:26:54.063  INFO 18580 --- [nio-8080-exec-3] com.test.spring.aop.monitor.UserMonitor  : StopWatch 'controller': running time (millis) = 2000

-----------------------------------------

ms     %     Task name

-----------------------------------------

02000  100%  Object com.test.spring.aop.domain.repository.IConnector.getSthFromRemote()

================= end IConnector.getSthFromRemote()=====================

2016-07-17 12:26:54.063  INFO 18580 --- [nio-8080-exec-1] com.test.spring.aop.monitor.UserMonitor  : StopWatch 'controller': running time (millis) = 2000

-----------------------------------------

ms     %     Task name

-----------------------------------------

02000  100%  Object com.test.spring.aop.domain.repository.IConnector.getSthFromRemote()

================= end IConnector.getSthFromRemote()=====================

2016-07-17 12:26:54.063  INFO 18580 --- [io-8080-exec-10] com.test.spring.aop.monitor.UserMonitor  : StopWatch 'controller': running time (millis) = 2000

-----------------------------------------

ms     %     Task name

-----------------------------------------

02000  100%  Object com.test.spring.aop.domain.repository.IConnector.getSthFromRemote()

================= end IConnector.getSthFromRemote()=====================

2016-07-17 12:26:54.064  INFO 18580 --- [nio-8080-exec-4] com.test.spring.aop.monitor.UserMonitor  : StopWatch 'controller': running time (millis) = 2001

-----------------------------------------

ms     %     Task name

-----------------------------------------

02001  100%  Object com.test.spring.aop.domain.repository.IConnector.getSthFromRemote()
项目源码:https://github.com/chenxing12/spring-aop
http://www.cnblogs.com/woshimrf/p/5677337.html
Spring-AOP实践 - 统计访问时间--StopWatch的更多相关文章
- Spring-AOP实践 - 统计访问时间
公司的项目有的页面超级慢,20s以上,不知道用户会不会疯掉,于是老大说这个页面要性能优化.于是,首先就要搞清楚究竟是哪一步耗时太多. 我采用spring aop来统计各个阶段的用时,其中计时器工具为S ...
- spring aop 实践
之前用的ssm框架,大部分只是利用spring的IOC特性,很明显这能够为我们开发人员在对象的创建上面节省大部分时间.当相似得到业务越来越多,很多代码也是越来越重复,轮子是越来越重复,比如验证用户登录 ...
- Spring AOP基于配置文件的面向方法的切面
Spring AOP基于配置文件的面向方法的切面 Spring AOP根据执行的时间点可以分为around.before和after几种方式. around为方法前后均执行 before为方法前执行 ...
- Spring(十七):Spring AOP(一):简介
背景: 需求: 给一个计算器计算函数执行前后添加日志. 实现: 1)直接在函数中修改代码: IArithmeticCalculator.java接口类 package com.dx.spring.be ...
- Spring AOP中使用args表达式访问目标方法的参数
Spring AOP 的使用过程理解 首先,aop的使用场景介绍: 1.处理一些通用的非功能性的需求,不影响业务流程,比如说打印日志.性能统计.推送消息等: 2.aop无法拦截static.final ...
- Spring Boot实践——Spring AOP实现之动态代理
Spring AOP 介绍 AOP的介绍可以查看 Spring Boot实践——AOP实现 与AspectJ的静态代理不同,Spring AOP使用的动态代理,所谓的动态代理就是说AOP框架不会去修改 ...
- 利用Spring AOP切面对用户访问进行监控
开发系统时往往需要考虑记录用户访问系统查询了那些数据.进行了什么操作,尤其是访问重要的数据和执行重要的操作的时候将数记录下来尤显的有意义.有了这些用户行为数据,事后可以以用户为条件对用户在系统的访问和 ...
- Spring+MyBatis实践—MyBatis数据库访问
关于spring整合mybatis的工程配置,已经在Spring+MyBatis实践—工程配置中全部详细列出.在此,记录一下几种通过MyBatis访问数据库的方式. 通过sqlSessionTempl ...
- Spring提供的用于访问Rest服务的客户端:RestTemplate实践
什么是RestTemplate? RestTemplate是Spring提供的用于访问Rest服务的客户端,RestTemplate提供了多种便捷访问远程Http服务的方法,能够大大提高客户端的编写效 ...
随机推荐
- Teach Yourself Scheme in Fixnum Days 13 Jump跳转
Jumps One of the signal features of Scheme is its support for jumps or nonlocal control. Specificall ...
- openwrt l7过滤qos配置
openwrt l7过滤qos配置 电梯直达 1# 本帖最后由 木鸟 于 2010-7-27 10:22 编辑 openwrt的qos基于hsfc.提供了分类标记,流量控制等功能,可能还有整形 ...
- netstat命令, netstat指令在windows和linux有什么不同
查看当前tcp监听端口[op@TIM html]$ netstat -nltp(Not all processes could be identified, non-owned process inf ...
- C语言中所有变量和常量所使用的内存总结
(1)相同点:三种获取内存的方法,都可以给程序提供可用内存,都可以用来定义变量给程序用.(2)不同点:栈内存对应C中的普通局部变量(别的变量还用不了栈,而且栈是自动的,由编译器和运行时环境共同来提供服 ...
- Spark Yarn-cluster与Yarn-client
摘要 在Spark中,有Yarn-Client和Yarn-Cluster两种模式可以运行在Yarn上,通常Yarn-cluster适用于生产环境,而Yarn-Cluster更适用于交互,调试模式,以下 ...
- 《31天成为IT服务达人》之技能篇硬件维护技能概要
server维护技能 server硬件作为应用软件部署的基础平台,是基础架构中最为核心的设备.一旦server出现问题就会影响业务的正常开展.因此,server的运维管理对于企业整个IT运维管理 ...
- HTTP协议具体解释
HTTP是一个属于应用层的面向对象的协议.因为其简捷.高速的方式.适用于分布式超媒体信息系统. 它于1990年提出,经过几年的使用与发展,得到不断地完好和扩展.眼下在WWW中使用的是HTTP/1.0的 ...
- [Redux] Passing the Store Down Implicitly via Context
We have to write a lot of boiler plate code to pass this chore down as a prop. But there is another ...
- NSLog用法,打印日志
要输出的格式化占位: %@ 对象 %d, %i 整数 %u 无符整形 %f 浮点/双字 %x, %X 二进制整数 %o 八进制整数 %zu size_t %p 指针 %e 浮点/双字 (科 ...
- java实验7-多线程编程
1 利用Thread和Runnable创建线程 [实验目的] (1)理解用实现Runnable接口的方法实现多线程. (2)掌握线程优先级的设置. (3)加深对线程状态转换的理解. [实验要求] 要求 ...