初探物联网 - 基于Arduino的气象站和View and Data API的结合实例
如果你参加了上个月在北京的Autodesk 开发者日,你应该看到了我做的关于Arduino的物联网实例演示,如果你没看到,欢迎参加14号在上海的开发者日,到时候我会再演(xian)示(bai)一下。
这是个基于这样一个场景的简单演示。我的一个建筑物上面安装了这样一个温度传感器,随时把当前环境温度上传到云端,在浏览器端可以显示这个建筑物的三维模型和温度变化曲线图。如果温度到达一定的高温,比如大于40度,那可能是起火了,就需要发出高温报警,在三维模型中定位出报警的温度传感器的位置,并发出火警警报。
演示地址 : http://arduiview.herokuapp.com/
继续之前你可能需要阅读一下我前面的两篇文章:
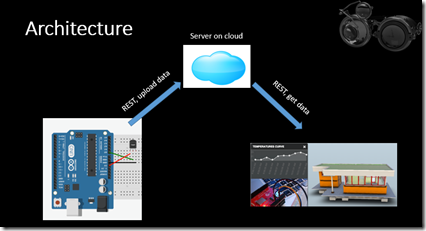
下面简单介绍一下这个实例系统的实现。下图为系统的架构图, Arduino 和 Viewer都通过REST 的方式和云端的服务器进行通信。Arduino 定时把当前温度通过REST的方式上传,Viewer定时取得温度信息并绘制曲线图,如遇高温则报警。貌似相当简单,这种基于HTTP的REST API方式的一个缺点就是实时性不好,需要进行轮询。后面我做了改进,通过WebSocket和MQTT协议,可以实现更好的实时传输,这个我们后面再说。

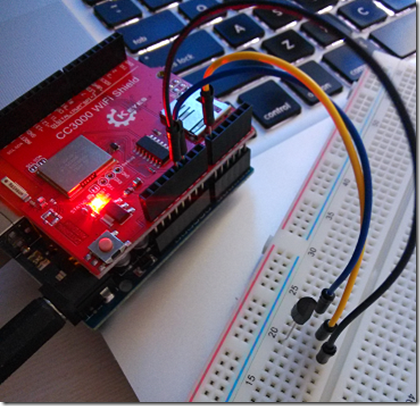
下图就是Arduino 和LM 35温度传感器的链接情况。Arduino 本身并没有联网功能,所以还需要一个额外的设备,我采用了CC3000 WiFi Shield模块,在淘宝上也可以买到。把Arduino 和CC3000两个套在一起,然后按照前面文章中提到的方式把温度传感器连接起来即可。

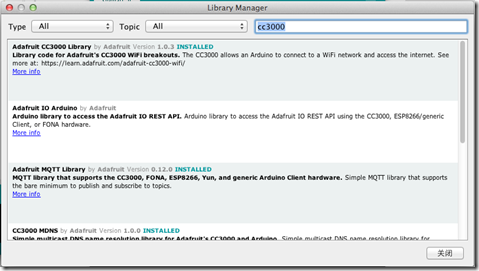
然后我们需要写些代码驱动CC3300 WiFi模块联网。我们可以使用Adafruite CC3000 Library 。 在Arduino IDE里面,“Project” –> “Include Libraries” –> “Manage Libraries”, 搜索“CC3000”,找到这个类库安装。然后你可以阅读一下自带的例子。这一点Arduino 做的非常好,每个类库都有完备的实例,拿过来改一下就可以了。

下面我们需要创建云端的服务器,我用node.js来创建并且暴露了一些REST API。其中一个就是用来解释Arduino上传的温度数据的REST API。如下所示:
PUT /sensors/somesensorId/values
body:
{
value : 22
}
node.js中路由部分的代码实现为:
router.route('/sensors/:sensorId/values')

  .get(sensorController.getSensorValues)

  .put(sensorController.appendSensorValues);
.csharpcode, .csharpcode pre
{
font-size: small;
color: black;
font-family: consolas, "Courier New", courier, monospace;
background-color: #ffffff;
/*white-space: pre;*/
}
.csharpcode pre { margin: 0em; }
.csharpcode .rem { color: #008000; }
.csharpcode .kwrd { color: #0000ff; }
.csharpcode .str { color: #006080; }
.csharpcode .op { color: #0000c0; }
.csharpcode .preproc { color: #cc6633; }
.csharpcode .asp { background-color: #ffff00; }
.csharpcode .html { color: #800000; }
.csharpcode .attr { color: #ff0000; }
.csharpcode .alt
{
background-color: #f4f4f4;
width: 100%;
margin: 0em;
}
.csharpcode .lnum { color: #606060; }
下面是sensorController控制器的实现代码。这里没有列出的是,其实后端我还使用的mongoose和mongoDb以便把上传的温度数据保存起来,这样以后就可以做大数据分析了。不过这个例子只是为了演示,我也没保存全部数据,只是保存了最近50多个。
exports.appendSensorValues = function(req,res){  //append

    //we just save 50 + 1 values items to save db spaces

    var MAX_VAULE_ITEM_COUNT = 50;

    var sensorId = req.params.sensorId;

    Sensor.findById(sensorId, function(err, sensor){

      if(err)

        res.json(err);

      var sensorValueItem = {};

      sensorValueItem.timestamp = new Date().getTime();

      sensorValueItem.value = req.body.value;

      //console.log(sensorValueItem);

      var len = sensor.values.length;

      sensor.values = sensor.values.slice(len - MAX_VAULE_ITEM_COUNT );

      sensor.values = sensor.values.concat(sensorValueItem);

      sensor.save(function(err){

        if(err)

          res.send(err);

        res.json(sensorValueItem);

      })

    });

}
.csharpcode, .csharpcode pre
{
font-size: small;
color: black;
font-family: consolas, "Courier New", courier, monospace;
background-color: #ffffff;
/*white-space: pre;*/
}
.csharpcode pre { margin: 0em; }
.csharpcode .rem { color: #008000; }
.csharpcode .kwrd { color: #0000ff; }
.csharpcode .str { color: #006080; }
.csharpcode .op { color: #0000c0; }
.csharpcode .preproc { color: #cc6633; }
.csharpcode .asp { background-color: #ffff00; }
.csharpcode .html { color: #800000; }
.csharpcode .attr { color: #ff0000; }
.csharpcode .alt
{
background-color: #f4f4f4;
width: 100%;
margin: 0em;
}
.csharpcode .lnum { color: #606060; }
这里的代码还是挂一漏万,如果大家感兴趣还是在github上看完整代码.https://github.com/duchangyu/project-arduivew/tree/v0.1,
下面来实现Arduino的部分,获取温度并通过REST的方式上传。前面提到的CC3000提供的实例已经演示了怎么连接到WiFi并上网,这里略过,如果你感兴趣可以看我的完整代码。这里我们只说说Arduino怎么发送REST请求的部分。在Arduino里面,我没有找到好的REST 的client库,不过说起来也不复杂,就是按照HTTP的协议发送原生字符串即可。按照我们的REST接口的定义,上传的REST协议应该是这样的:
PUT /api/sensors/somesensorid/value HTTP/1.1
HOST: arduiview.heroku.com
content-type : application/json
Content-Length : 19
{
value : 22
}
下面就是构建这样的字符串,然后通过CC3000客户端发送出去即可,代码片段如下:
void postTemperatureToCloudServer() {

  //connectToCloudServer

  Serial.println(F("trying to connect to cloud server....."));

  //client.close();

  client = cc3000.connectTCP(ip, 80);

  Serial.println(F("connected to cloud server - "));

  Serial.println(WEBSITE );

  Serial.println(F("begin uploading..."));

  float temp = 0.0;

  // get the current temperature from sensor

  int reading = analogRead(0);

  temp = reading * 0.0048828125 * 100;

  Serial.print(F("Current temp"));

  Serial.println(temp);

  int length;

  char sTemp[5] = "";

  //convert float to char*,

  dtostrf(temp, 2, 2, sTemp); //val, integer part width, precise, result char array

  //itoa(temp, sTemp,10);

  Serial.println(sTemp);

  char sLength[3];

  //prepare the http body

  //

  //{

  //  "value" : 55.23

  //}

  //

  char httpPackage[20] = "";

  strcat(httpPackage, "{\"value\": \"");

  strcat(httpPackage, sTemp);

  strcat(httpPackage, "\" }");

  // get the length of data package

  length = strlen(httpPackage);

  // convert int to char array for posting

  itoa(length, sLength, 10);

  Serial.print(F("body lenght="));

  Serial.println(sLength);

  //prepare the http header

  Serial.println(F("Sending headers..."));

  client.fastrprint(F("PUT /api/sensors/"));

  char *sensorId = SENSOR_ID;

  client.fastrprint(sensorId);

  //client.fastrprint(SENSOR_ID);

  client.fastrprint(F("/values"));

  client.fastrprintln(F(" HTTP/1.1"));

  Serial.print(F("."));

  client.fastrprint(F("Host: "));

  client.fastrprintln(WEBSITE);

  Serial.print(F("."));

  client.fastrprint(F("content-type: "));

  client.fastrprintln(F("application/json"));

  Serial.print(F("."));

  client.fastrprint(F("Content-Length: "));

  client.fastrprintln(sLength);

  client.fastrprintln(F(""));

  Serial.print(F("."));

  Serial.println(F("header done."));

  //send data

  Serial.println(F("Sending data"));

  client.fastrprintln(httpPackage);

  Serial.println(F("===upload completed."));

  // Get the http page feedback

  unsigned long rTimer = millis();

  Serial.println(F("Reading Cloud Response!!!\r\n"));

  while (millis() - rTimer < 2000) {

    while (client.connected() && client.available()) {

      char c = client.read();

      Serial.print(c);

    }

  }

  delay(1000);             // Wait for 1s to finish posting the data stream

  client.close();      // Close the service connection

  Serial.println(F("upload completed\n"));

}
.csharpcode, .csharpcode pre
{
font-size: small;
color: black;
font-family: consolas, "Courier New", courier, monospace;
background-color: #ffffff;
/*white-space: pre;*/
}
.csharpcode pre { margin: 0em; }
.csharpcode .rem { color: #008000; }
.csharpcode .kwrd { color: #0000ff; }
.csharpcode .str { color: #006080; }
.csharpcode .op { color: #0000c0; }
.csharpcode .preproc { color: #cc6633; }
.csharpcode .asp { background-color: #ffff00; }
.csharpcode .html { color: #800000; }
.csharpcode .attr { color: #ff0000; }
.csharpcode .alt
{
background-color: #f4f4f4;
width: 100%;
margin: 0em;
}
.csharpcode .lnum { color: #606060; }
感兴趣还是看一下完整代码,在这里:
https://github.com/duchangyu/project-arduivew/blob/v0.1/arduino/arduiview-lm35-2/arduiview-lm35-2.ino
初探物联网 - 基于Arduino的气象站和View and Data API的结合实例的更多相关文章
- Autodesk View and Data API二次开发学习指南
什么是View and Data API? 使用View and Data API,你可以轻松的在网页上显示大型三维模型或者二维图纸而不需要安装任何插件.通过View and Data API,你可以 ...
- Using View and Data API with Meteor
By Daniel Du I have been studying Meteor these days, and find that Meteor is really a mind-blowing f ...
- View and Data API Tips: Constrain Viewer Within a div Container
By Daniel Du When working with View and Data API, you probably want to contain viewer into a <div ...
- View and Data API Tips: Hide elements in viewer completely
By Daniel Du With View and Data API, you can hide some elements in viewer by calling "viewer.hi ...
- 使用AxisHelper帮助理解View and Data API中的坐标系统
大家使用View and Data API做三维模型开发,必然首先要理解View and Data API的坐标系统,即XYZ三个轴向分别是怎么定义的.Three.js里面提供了一个AxisHelpe ...
- 在View and Data API中更改指定元素的颜色
大家在使用View and Data API开发过程中,经常会用到的就是改变某些元素的颜色已区别显示.比如根据某些属性做不同颜色的专题显示,或者用不同颜色表示施工进度,或者只是简单的以颜色变化来提醒用 ...
- 特大喜讯,View and Data API 现在支持中文界面了
大家经常会问到,使用View and Data API怎么做界面的本地化,来显示中文,现在好消息来了,从v1.2.19起,View and Data API开始支持多国语言界面了.你需要制定版本号为v ...
- View and Data API 现在支持IE11了
By Daniel Du After a long time waiting, IE11 finally supports WebGL, which enables us viewing our 3D ...
- View and Data API tips: 缓存Access Token
对于云API服务,常见的方式就是按照API调用次数收费,某些API调用也就有某些限制,比如在特定时间内只允许调用指定的次数以免造成滥用.虽然Autodesk的view and Data API目前还没 ...
随机推荐
- OpenWrt中开启usb存储和samba服务
在从官网安装的WNDR3800 15.05.1版本OpenWrt中, 不带usb存储支持以及samba, 需要另外安装 1. 启用usb支持 USB Basic Support https://wik ...
- 作为前端应当了解的Web缓存知识
缓存优点 通常所说的Web缓存指的是可以自动保存常见http请求副本的http设备.对于前端开发者来说,浏览器充当了重要角色.除此外常见的还有各种各样的代理服务器也可以做缓存.当Web请求到达缓存时, ...
- asp.net pipeline完整图
- 如何用 MEF 扩展应用程序
最近在写一篇关于如何扩展 Visual Studio 编辑器的文章时,用到了 MEF,因此打算写一篇文章提一下这个技术点.本篇文章并不打算详细介绍 MEF,只是一个最简单的入门,相信您在阅读本篇文章后 ...
- Entity Framework 6 Recipes 2nd Edition(12-1)译 -> 当SaveChanges( ) 被调用时执行你的代码
第12章定制EF 在本章的小节里,定制实体对象和EF处理的一些功能.这些小节将涵盖很多”幕后”的事情,能让你的代码更加统一解决一些事情,比如用一个业务规则中心统一地为实体执行验证. 本章开始的小节,将 ...
- Atitit 数据存储视图的最佳实际best practice attilax总结
Atitit 数据存储视图的最佳实际best practice attilax总结 1.1. 视图优点:可读性的提升1 1.2. 结论 本着可读性优先于性能的原则,面向人类编程优先于面向机器编程,应 ...
- 巧用javascript对象属性,向事件绑定的匿名函数内传递循环控制变量的值
遇到一个需要向匿名函数传递循环控制变量的问题,我受到园子里这篇文章的启发[笔记]js获取当前点击元素的索引,解决了这个问题.现在把代码贴出来,以防止自己忘记. if ($('#labModal').l ...
- Bootstrap3系列:输入框组
1. 基本实例 通过在文本输入框 <input> 前面.后面或是两边加上文字或按钮,实现对表单控件的扩展. .input-group包含.input-group-addon给 .form- ...
- ROC曲线、PR曲线
在论文的结果分析中,ROC和PR曲线是经常用到的两个有力的展示图. 1.ROC曲线 ROC曲线(receiver operating characteristic)是一种对于灵敏度进行描述的功能图像. ...
- SQL Server-聚焦LEFT JOIN...IS NULL AND NOT EXISTS性能分析(十七)
前言 本节我们来分析LEFT JOIN和NOT EXISTS,简短的内容,深入的理解,Always to review the basics. LEFT JOIN...IS NULL和NOT EXIS ...
