IntelliJ IDEA:Getting Started with Spring MVC, Hibernate and JSON实践
原文:IntelliJ IDEA:Getting Started with Spring MVC, Hibernate and JSON实践
最近把编辑器换成IntelliJ IDEA,主要是Eclipse中处理Maven项目很不方便,很早就听说IntelliJ IDEA的大名了,但是一直没机会试试。最近终于下载安装了,由于是新手,决定尝试个Tutorials,最终找了个熟悉点的项目,就是Getting Started with Spring MVC, Hibernate and JSON(http://confluence.jetbrains.com/display/IntelliJIDEA/Getting+Started+with+Spring+MVC%2C+Hibernate+and+JSON)。废话不多说了, 下面是我的实践过程:
在实践之前,有个问题首先要明确下,在IntelliJ IDEA中project相当于Eclipse中的workspace,module相当于Eclipse中的project。
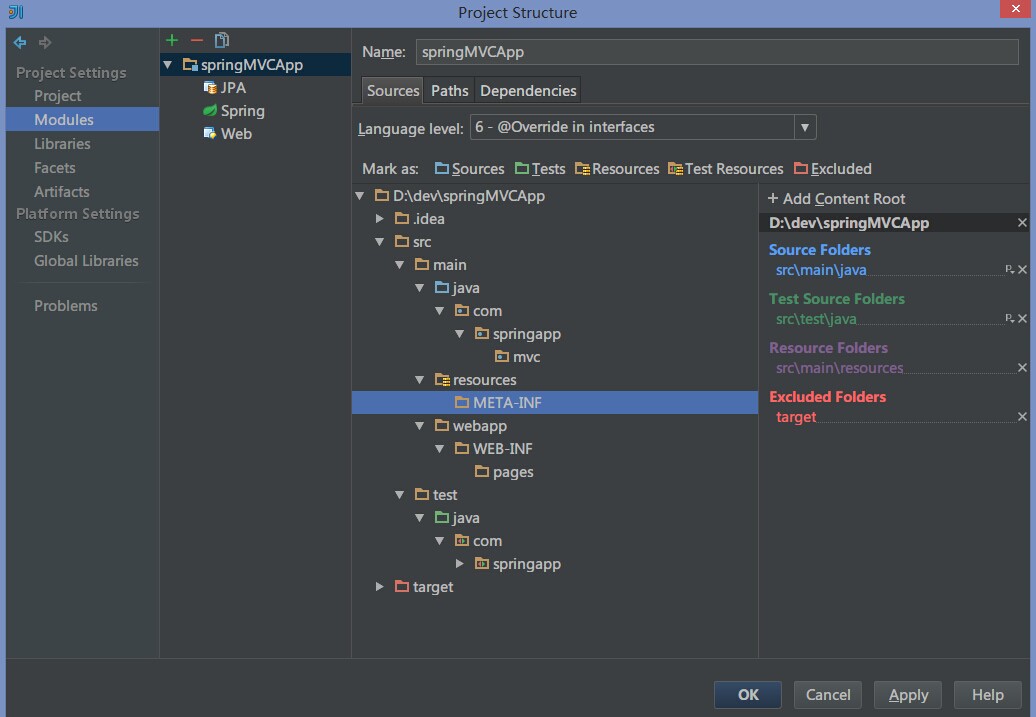
1.创建Project。具体的过程我就不详述了,可以在官方的Tutorials中查看。下面是我的project structure截图

2.配置Tomcat,这步很简单,没什么可说的。配置完成后,将步骤1中建立的项目deployed到Tomcat上运行,等Tomcat启动完成后,就会启动你默认的浏览器,如果上面的步骤没什么错误的话,你就可以在你的浏览器中看到Hello World!了。
3.添加依赖。因为要使用数据库,Hibernate,JPA等。所以需要在pom文件中添加对应的依赖。等你添加完成后,IntelliJ IDEA会自动引入或下载所需的包。
4.接下来是创建持久化的配置文件。这个地方需要注意路径的问题。具体的路径可以查看project structure截图。这个配置文件中都是数据库的配置信息。数据库使用的是hsqldb,如果不想使用,可以改成自己想用的数据库,但是要注意修改相应的jar包。
<?xml version="1.0" encoding="UTF-8"?>

<persistence version="2.0" xmlns="http://java.sun.com/xml/ns/persistence" xmlns:xsi="http://www.w3.org/2001/XMLSchema-instance" xsi:schemaLocation="http://java.sun.com/xml/ns/persistence http://java.sun.com/xml/ns/persistence/persistence_2_0.xsd">

    <persistence-unit name="defaultPersistenceUnit" transaction-type="RESOURCE_LOCAL">

        <provider>org.hibernate.ejb.HibernatePersistence</provider>

        <properties>

            <property name="hibernate.dialect" value="org.hibernate.dialect.HSQLDialect" />

            <property name="hibernate.connection.url" value="jdbc:hsqldb:mem:spring" />

            <property name="hibernate.connection.driver_class" value="org.hsqldb.jdbcDriver" />

            <property name="hibernate.connection.username" value="sa" />

            <property name="hibernate.connection.password" value="" />

            <property name="hibernate.hbm2ddl.auto" value="create-drop" />

        </properties>

    </persistence-unit>

</persistence>
5.配置Model类,使用的技术为JPA。
package com.springapp.mvc;

import javax.persistence.*;

/**

 * Created by yul on 2014/12/18.

 */

@Entity(name = "account")

public class User {

    @Id

    @GeneratedValue(strategy = GenerationType.AUTO)

    private Long id;

    @Basic

    private String firstName;

    @Basic

    private String lastName;

    @Basic

    private String email;

    public Long getId() {

        return id;

    }

    public String getFirstName() {

        return firstName;

    }

    public String getLastName() {

        return lastName;

    }

    public String getEmail() {

        return email;

    }

    public void setId(Long id) {

        this.id = id;

    }

    public void setFirstName(String firstName) {

        this.firstName = firstName;

    }

    public void setLastName(String lastName) {

        this.lastName = lastName;

    }

    public void setEmail(String email) {

        this.email = email;

    }

}
定义service,这里官方的示例代码中没有@Repository注解,需要添加上
package com.springapp.mvc;

import org.springframework.data.jpa.repository.JpaRepository;

import org.springframework.stereotype.Repository;

/**

 * Created by yul on 2014/12/18.

 */

@Repository

public interface UserRepository extends JpaRepository<User, Long> {

}
6.注册bean。包括repository, entity manager factory and transaction manager
<beans xmlns="http://www.springframework.org/schema/beans"

       xmlns:xsi="http://www.w3.org/2001/XMLSchema-instance"

       xmlns:context="http://www.springframework.org/schema/context"

       xmlns:jpa="http://www.springframework.org/schema/data/jpa" xmlns:tx="http://www.springframework.org/schema/tx"

       xsi:schemaLocation="http://www.springframework.org/schema/beans

        http://www.springframework.org/schema/beans/spring-beans.xsd

        http://www.springframework.org/schema/context http://www.springframework.org/schema/context/spring-context.xsd http://www.springframework.org/schema/data/jpa http://www.springframework.org/schema/data/jpa/spring-jpa.xsd http://www.springframework.org/schema/tx http://www.springframework.org/schema/tx/spring-tx.xsd">

    <context:component-scan base-package="com.springapp.mvc"/>

    <jpa:repositories base-package="com.springapp.mvc" />

    <bean id="entityManagerFactory" class="org.springframework.orm.jpa.LocalEntityManagerFactoryBean">

        <property name="persistenceUnitName" value="defaultPersistenceUnit" />

    </bean>

    <bean id="transactionManager" class="org.springframework.orm.jpa.JpaTransactionManager">

        <property name="entityManagerFactory" ref="entityManagerFactory"/>

    </bean>

    <tx:annotation-driven transaction-manager="transactionManager"/>

    <bean class="org.springframework.web.servlet.view.InternalResourceViewResolver">

        <property name="prefix" value="/WEB-INF/pages/"/>

        <property name="suffix" value=".jsp"/>

    </bean>

</beans>
7.定义Controller。
package com.springapp.mvc;

import org.json.JSONArray;

import org.json.JSONException;

import org.json.JSONObject;

import org.springframework.beans.factory.annotation.Autowired;

import org.springframework.stereotype.Controller;

import org.springframework.ui.ModelMap;

import org.springframework.validation.BindingResult;

import org.springframework.web.bind.annotation.*;

/**

 * Created by yul on 2014/12/18.

 */

@Controller

public class UserController {

    @Autowired

    private UserRepository userRepository;

    @RequestMapping(value = "/", method = RequestMethod.GET)

    public String listUsers(ModelMap model) {

        model.addAttribute("user", new User());

        model.addAttribute("users", userRepository.findAll());

        return "users";

    }

    @RequestMapping(value = "/add", method = RequestMethod.POST)

    public String addUser(@ModelAttribute("user")User user, BindingResult result) {

        userRepository.save(user);

        return "redirect:/";

    }

    @RequestMapping(value = "/delete/{userId}")

    public String deleteUser(@PathVariable("userId") Long userId) {

        userRepository.delete(userRepository.findOne(userId));

        return "redirect:/";

    }

    @RequestMapping(value = "/api/users", method = RequestMethod.GET)

    public

    @ResponseBody

    String listUsersJson(ModelMap model) throws JSONException {

        JSONArray userArray = new JSONArray();

        for (User user : userRepository.findAll()) {

            JSONObject userJSON = new JSONObject();

            userJSON.put("id", user.getId());

            userJSON.put("firstName", user.getFirstName());

            userJSON.put("lastName", user.getLastName());

            userJSON.put("email", user.getEmail());

            userArray.put(userJSON);

        }

        return userArray.toString();

    }

}
我把后面返回JSON数据的方法也加上了。
8.定义view。官方提供的Bootstrap的CDN不好用,估计是GFW的问题,可以换成国内的。如果对于Bootstrap有兴趣,可以去这个网址http://www.bootcss.com/看看
<!doctype html>
<%@taglib prefix="spring" uri="http://www.springframework.org/tags" %>
<%@taglib prefix="form" uri="http://www.springframework.org/tags/form" %>
<%@taglib prefix="c" uri="http://java.sun.com/jsp/jstl/core" %> <html>
<head>
<meta charset="utf-8">
<title>Spring MVC Application</title> <meta content="IE=edge, chrome=1" http-equiv="X-UA-COMPATIBLE">
<meta name="viewport" content="width=device-width, initial-scale=1.0"> <!-- 新 Bootstrap 核心 CSS 文件 -->
<link rel="stylesheet" href="http://cdn.bootcss.com/bootstrap/3.3.0/css/bootstrap.min.css">
<%--<link href="http://twitter.github.io/bootstrap/assets/css/bootstrap.css" rel="stylesheet">--%>
<%--<link href="http://twitter.github.io/bootstrap/assets/css/bootstrap-responsive.css" rel="stylesheet">--%>
</head>
<body> <div class="container">
<div class="row">
<div class="span8 offset2">
<h1>User</h1>
<form:form method="post" action="add" commandName="user" class="form-horizontal">
<div class="control-group">
<form:label cssClass="control-label" path="firstName">First Name:</form:label>
<div class="controls">
<form:input path="firstName" />
</div>
</div>
<div class="control-group">
<form:label cssClass="control-label" path="lastName">Last Name:</form:label>
<div class="controls">
<form:input path="lastName" />
</div>
</div>
<div class="control-group">
<form:label cssClass="control-label" path="email">Email:</form:label>
<div class="controls">
<form:input path="email" />
</div>
</div>
<div class="control-group">
<div class="controls">
<input type="submit" value="Add User" class="btn" />
</div>
</div>
</form:form> <c:if test="${!empty users}">
<h3>Users</h3>
<table class="table table-bordered table-striped">
<thead>
<tr>
<th>Name</th>
<th>Email</th>
<th> </th>
</tr>
</thead>
<tbody>
<c:forEach items="${users}" var="user">
<tr>
<td>${user.lastName}, ${user.firstName}</td>
<td>${user.email}</td>
<td>
<form action="/delete/${user.id}" method="post">
<input type="submit" class="btn btn-danger btn-mini" value="Delete" />
</form>
</td>
</tr>
</c:forEach>
</tbody>
</table>
</c:if>
</div>
</div>
</div> </body>
</html>
到了这里,基本任务就算完成了。
下面就是测试了。在Tomcat中运行起你的项目。就可以在浏览器中看到效果了.

如果想查看返回的JSON数据。在浏览器中输入http://localhost:8080/api/users 即可。
IntelliJ IDEA:Getting Started with Spring MVC, Hibernate and JSON实践的更多相关文章
- IntelliJIDEA Getting+Started+with+Spring+MVC,+Hibernate+and+JSON
https://confluence.jetbrains.com/display/IntelliJIDEA/Getting+Started+with+Spring+MVC,+Hibernate+and ...
- Intellij IDEA采用Maven+Spring MVC+Hibernate的架构搭建一个java web项目
原文:Java web 项目搭建 Java web 项目搭建 简介 在上一节java web环境搭建中,我们配置了开发java web项目最基本的环境,现在我们将采用Spring MVC+Spring ...
- IntelliJ IDEA上创建maven Spring MVC项目
IntelliJ IDEA上创建Maven Spring MVC项目 各软件版本 利用maven骨架建立一个webapp 建立相应的目录 配置Maven和SpringMVC 配置Maven的pom.x ...
- 使用Intellij IDEA从零使用Spring MVC
原文:使用Intellij IDEA从零使用Spring MVC 使用Intellij IDEA从零使用Spring MVC 黑了Java这么多年, 今天为Java写一篇文章吧. 这篇文章主要是想帮助 ...
- Spring + Spring MVC + Hibernate
Spring + Spring MVC + Hibernate项目开发集成(注解) Posted on 2015-05-09 11:58 沐浴未来的我和你 阅读(307) 评论(0) 编辑 收藏 在自 ...
- Spring + Spring MVC + Hibernate项目开发集成(注解)
在自己从事的项目中都是使用xml配置的方式来进行的,随着项目的越来越大,会发现配置文件会相当的庞大,这个不利于项目的进行和后期的维护.于是考虑使用注解的方式来进行项目的开发,前些日子就抽空学习了一下. ...
- Java 本地开发环境搭建(框架采用 Spring+Spring MVC+Hibernate+Jsp+Gradle+tomcat+mysql5.6)
项目搭建采用技术栈为:Spring+Spring MVC+Hibernate+Jsp+Gradle+tomcat+mysql5.6 搭建环境文档目录结构说明: 使用Intellj Idea 搭建项目过 ...
- spring mvc: Hibernate验证器(字段不能为空,在1-150自己)
spring mvc: Hibernate验证器(字段不能为空,在1-150自己) 准备: 下载Hibernate Validator库 - Hibernate Validator.解压缩hibern ...
- Spring MVC第一课:用IDEA构建一个基于Spring MVC, Hibernate, My SQL的Maven项目
作为一个Spring MVC新手最基本的功夫就是学会如何使用开发工具创建一个完整的Spring MVC项目,本文站在一个新手的角度讲述如何一步一步创建一个基于Spring MVC, Hibernate ...
随机推荐
- 面向对象设计SOLID五大原则
转载自:码农社区,http://w3croom.com/read.php?tid-4522.html 今天我给大家带来的是面向对象设计SOLID五大原则的经典解说. 我们知道,面向对象对于 ...
- 作用域+闭包+this理解
函数预解析过程 函数会覆盖同名变量 也就是var 他的优先级高 如果是同名函数则后者覆盖前者 逐行解读代码的时候 表达式 和参数 会改变预解析仓库里面的值..也就是表达式能干掉函数 ...
- Softnet_data
Softnet_data的初始化: 每个CPU的softnet_data是在net_dev_init中初始化的,代码如下: "/net/core/dev.c" "stat ...
- 【CentOS】搭建Web服务器
参考资料: http://www.paipat.com/?post=24 http://www.cnblogs.com/xiaoluo501395377/archive/2013/04 ...
- poi生成excel
转自:http://www.cnblogs.com/bmbm/archive/2011/12/08/2342261.html 1.首先下载poi-3.6-20091214.jar,下载地址如下: ht ...
- JS模板引擎 :ArtTemplate (1)
1.为什么需要用到模板引擎 我们在做前端开发的时候,有时候经常需要根据后端返回的json数据,然后来生成html,再显示到页面中去. 例如这样子: var data = [ {text: " ...
- 引擎设计跟踪(九.14.2f) 最近更新: OpenGL ES & tools
之前骨骼动画的IK暂时放一放, 最近在搞GLES的实现. 之前除了GLES没有实现, Android的代码移植已经完毕: [原]跨平台编程注意事项(三): window 到 android 的 移植 ...
- jquery中如何退出each循环
在for循环中我们用continue退出当前循环,进入下一循环.用break跳出所有循环. 可是在jQuery中却并没有这两条命令,那么如何退出each循环呢? 经过查询得知: 在jQuery中用 r ...
- CSS Hack大全-可区分出IE6-IE10、FireFox、Chrome、Opera
今天把一些常用的CSS Hack整理了一下,包括常用的IE hack以及火狐.Chrome.Opera浏览器的Hack,并把这些CSS Hack综合的一起,写了一个小的浏览器测试器.如图所示: 下面就 ...
- 如何做到尽可能不使用庞大的jQuery
jQuery 是现在最流行的 JavaScript 工具库. 据统计,目前全世界 57.3% 的网站使用它.也就是说,10 个网站里面,有 6 个使用 jQuery.如果只考察使用工具库的网站,这个比 ...
