subprocess模块和logging模块
主要内容:
一、subprocess模块
二、logging模块
1️⃣ subprocess模块
三种执行命令的方法
subprocess.run(*popenargs, input=None, timeout=None, check=False, **kwargs) #官方推荐

subprocess.call(*popenargs, timeout=None, **kwargs) #跟上面实现的内容差不多,另一种写法

subprocess.Popen() #上面各种方法的底层封装
run()方法
Run command with arguments and return a CompletedProcess instance.The returned instance will have attributes args, returncode, stdout and stderr. By default, stdout and stderr are not captured, and those attributes will be None. Pass stdout=PIPE and/or stderr=PIPE in order to capture them.

If check is True and the exit code was non-zero, it raises a CalledProcessError. The CalledProcessError object will have the return code in the returncode attribute, and output & stderr attributes if those streams were captured.

If timeout is given, and the process takes too long, a TimeoutExpired exception will be raised.

The other arguments are the same as for the Popen constructor.
标准写法
subprocess.run(['df','-h'],stderr=subprocess.PIPE,stdout=subprocess.PIPE,check=True)
涉及到管道|的命令需要这样写
subprocess.run('df -h|grep disk1',shell=True) #shell=True的意思是这条命令直接交给系统去执行,不需要python负责解析
call()方法
#执行命令,返回命令执行状态 , 0 or 非0

>>> retcode = subprocess.call(["ls", "-l"])

#执行命令,如果命令结果为0,就正常返回,否则抛异常

>>> subprocess.check_call(["ls", "-l"])

0

#接收字符串格式命令,返回元组形式,第1个元素是执行状态,第2个是命令结果

>>> subprocess.getstatusoutput('ls /bin/ls')

(0, '/bin/ls')

#接收字符串格式命令,并返回结果

>>> subprocess.getoutput('ls /bin/ls')

'/bin/ls'

#执行命令,并返回结果,注意是返回结果,不是打印,下例结果返回给res

>>> res=subprocess.check_output(['ls','-l'])

>>> res

b'total 0\ndrwxr-xr-x 12 alex staff 408 Nov 2 11:05 OldBoyCRM\n'
Popen()方法
常用参数:
args:shell命令,可以是字符串或者序列类型(如:list,元组)

stdin, stdout, stderr:分别表示程序的标准输入、输出、错误句柄

preexec_fn:只在Unix平台下有效,用于指定一个可执行对象(callable object),它将在子进程运行之前被调用

shell:同上

cwd:用于设置子进程的当前目录

env:用于指定子进程的环境变量。如果env = None,子进程的环境变量将从父进程中继承。
下面这2条语句执行会有什么区别?
a=subprocess.run('sleep 10',shell=True,stdout=subprocess.PIPE)

a=subprocess.Popen('sleep 10',shell=True,stdout=subprocess.PIPE)
区别是Popen会在发起命令后立刻返回,而不等命令执行结果。这样的好处是什么呢?
如果你调用的命令或脚本 需要执行10分钟,你的主程序不需卡在这里等10分钟,可以继续往下走,干别的事情,每过一会,通过一个什么方法来检测一下命令是否执行完成就好了。
Popen调用后会返回一个对象,可以通过这个对象拿到命令执行结果或状态等,该对象有以下方法
poll()

Check if child process has terminated. Returns returncode
wait()

Wait for child process to terminate. Returns returncode attribute.
terminate()终止所启动的进程Terminate the process with SIGTERM
kill() 杀死所启动的进程 Kill the process with SIGKILL
communicate()与启动的进程交互,发送数据到stdin,并从stdout接收输出,然后等待任务结束
>>> a = subprocess.Popen('python3 guess_age.py',stdout=subprocess.PIPE,stderr=subprocess.PIPE,stdin=subprocess.PIPE,shell=True)

>>> a.communicate(b'')

(b'your guess:try bigger\n', b'')
send_signal(signal.xxx)发送系统信号
pid 拿到所启动进程的进程号
1、何谓logging模块,干什么用?
很多程序都有记录日志的需求,并且日志中包含的信息即有正常的程序访问日志,还可能有错误、警告等信息输出,python的logging模块提供了标准的日志接口,你可以通过它存储各种格式的日志,logging的日志可以分为 debug(), info(), warning(), error() and critical()5个级别,级别依次升高。下面来具体看下:
DEBUG 调试
INFO 正常
WARNING 警告
ERROR 错误
CRITICAL 严重
2、最简单的用法
#!/usr/bin/env python3

#-*- coding:utf-8 -*-

import logging

logging.basicConfig(filename='example.log',

                    level=logging.INFO,

                    format='%(asctime)s %(levelname)s %(message)s  %(filename)s %(funcName)s  %(lineno)s',

                    datefmt='%Y/%m/%d %H:%M:%S %p')

'''

   level=loggin.INFO意思是,把日志纪录级别设置为INFO,也就是说,只有比日志是INFO或比INFO级别,更高的日志才会被纪录到文件里,

 如果希望纪录debug的日志,那把日志级别改成DEBUG就行了。第二次运行会以追加模式接着写。

'''
ogging.debug('This message should go to the log file')
logging.info('welcome come !')
logging.warning("user [cc] attempted wrong password more than 3 times")
'''
example.log中会写入以下内容:
2018/01/28 23:30:22 PM welcome come !
2018/01/28 23:30:22 PM user [cc] attempted wrong password more than 3 times
2018/01/28 23:30:22 PM server is down
'''
除了加时间,还可以自定义一大堆格式,下表就是所有支持的格式
        %(name)s                Logger的名字

        %(levelno)s            数字形式的日志级别

        %(levelname)s        文本形式的日志级别

        %(pathname)s        调用日志输出函数的模块的完整路径名,可能没有

        %(filename)s        调用日志输出函数的模块的文件名

        %(module)s            调用日志输出函数的模块名

        %(funcName)s        调用日志输出函数的函数名

        %(lineno)d            调用日志输出函数的语句所在的代码行

        %(created)f            当前时间,用UNIX标准的表示时间的浮 点数表示

    %(relativeCreated)d        输出日志信息时的,自Logger创建以 来的毫秒数

        %(asctime)s            字符串形式的当前时间。默认格式是 “2003-07-08 16:49:45,896”。逗号后面的是毫秒

        %(thread)d            线程ID。可能没有

        %(threadName)s        线程名。可能没有

        %(process)d            进程ID。可能没有

        %(message)s            用户输出的消息
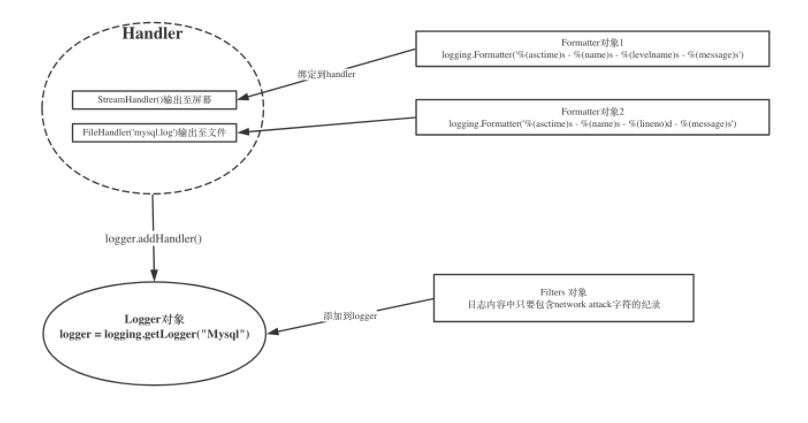
3、日志同时输出到屏幕和文件
Python 使用logging模块记录日志涉及四个主要类,使用官方文档中的概括最为合适:
- logger提供了应用程序可以直接使用的接口;
- handler将(logger创建的)日志记录发送到合适的目的输出;
- filter提供了细度设备来决定输出哪条日志记录;
- formatter决定日志记录的最终输出格式。
关系如下:
较综合的案例(带筛选和文件自动截断):
#!/usr/bin/env python3

#-*- coding:utf-8 -*-

import logging

from logging import handlers

class IgnoreBackupLogFilter(logging.Filter):

    '''忽略带backup的日志'''

    def filter(self, record):

        return 'backup'not in record.getMessage()

# 1 生成logger对象

logger = logging.getLogger('web')

logger.setLevel(logging.DEBUG) # 设定全局输出级别

    # 1、1 把filter对象添加到logger中

logger.addFilter(IgnoreBackupLogFilter())

# 2 生成handler 对象

sh = logging.StreamHandler() # 输出到屏幕

#sh.setLevel(logging.INFO)

#ch = logging.FileHandler('web.log') # 输出到web.log文件中

#ch.setLevel(logging.WARNING)

# 间隔一定时间就 自动创建新的日志文件。重命名的过程与RotatingFileHandler类似,不过新的文件不是附加数字,而是当前时间。

ch = handlers.TimedRotatingFileHandler('web.log',when='S',interval=3)

# when参数是一个字符串。表示时间间隔的单位,不区分大小写(S 秒,M 分,H 时,D 天,W 每星期)。interval是时间间隔。

# 按文件大小分隔,到达指定大小(默认单位是字节)之后,它会自动将当前日志文件改名,然后创建 一个新的同名日志文件继续输出。

#ch = handlers.RotatingFileHandler('web.log',maxBytes=6,backupCount=3)

   # 2、1 绑定到logger对象

logger.addHandler(sh)

logger.addHandler(ch)

# 3 生成formatter 对象

sh_formater = logging.Formatter('%(levelno)s:%(asctime)s  %(name)s %(message)s')

ch_formater = logging.Formatter('%(levelname)s:%(asctime)s  %(name)s %(message)s')

    # 3、1 绑定到handler对象

sh.setFormatter(sh_formater)

ch.setFormatter(ch_formater)

logger.debug('this is debug ,but backup')

logger.info('this is info back up')

logger.warning('this is waring')

logger.error('this is error')

# 全局设置为DEBUG后, console handler 设置为INFO, 如果输出的日志级别是debug, 那就不会在屏幕上打印
subprocess模块和logging模块的更多相关文章
- 常用模块:os模块,logging模块等
一 os模块 那么作为一个常用模块,os模块是与操作系统交互的一个模块. 那么os模块中我们常用的一般有以下几种: os.listdir('dirname') 以列表的形式列出指定目录下的所有文 ...
- os模块,sys模块,json和pickle模块,logging模块
目录 OS模块 sys模块 json和pickle模块 序列化和反序列化 json模块 pickle logging模块 OS模块 能与操作系统交互,控制文件 / 文件夹 # 创建文件夹 import ...
- 模块讲解---os模块,sys模块,json和pickle模块,logging模块
目录 模块的用法 os模块 常用的功能 sys模块 常用的功能 json和pickle模块 4. logging模块 模块的用法 通过 import 或者from......import...... ...
- day6 subprocess模块、logging模块
logging模块 很多程序都有记录日志的需求,并且日志中包含的信息即有正常的程序访问日志,还可能有错误.警告等信息输出,python的logging模块提供了标准的日志接口,你可以通过它存储 ...
- Python模块之hashlib模块、logging模块
一.hashlib模块 hashlib模块介绍:hashlib这个模块提供了摘要算法,例如 MD5.hsa1 摘要算法又称为哈希算法,它是通过一个函数,把任意长度的数据转换为一个长度固定的数据串,这个 ...
- python之路--day15--常用模块之logging模块
常用模块 1 logging模块 日志级别:Noset (不设置) Debug---(调试信息)----也可用10表示 Info--(消息信息)----也可用20表示 Warning---(警告信息) ...
- Python:Day18 os模块、logging模块、正则表达式
迭代器 满足迭代器协议: 1.内部有next方法 2.内部有iter()方法 os模块 import os print(os.getcwd()) #C:\Users\Lowry\PycharmProj ...
- 常见模块(二) logging模块
logging模块是专门做日志系统的.分为函数版和自定义函数. (一)logging模块初级版 缺点,不能指定字符集,不能把屏幕输出和文件日志同时记录.只能选择其一. 文件记录日志 import lo ...
- 《Python》hashlib模块、configparser模块、logging模块
一.hashlib模块 Python的hashlib模块中提供了常见的摘要算法,如md5,sha1等等. 摘要算法又称哈希算法.散列算法.它通过一个函数,把任意长度的数据转换为一个长度固定的字符串(通 ...
随机推荐
- VS字体颜色配置
- 关于SQL Sever连接问题
错误: 与 SQL Server 建立连接时出现与网络相关的或特定于实例的错误.未找到或无法访问服务器.请验证实例名称是否正确并且 SQL Server 已配置为允许远程连接. (provider: ...
- 修改CentOS7网卡名称为传统名称eth0格式
1.调整网卡名称 进入网卡目录```[root@tools]# cd/etc/sysconfig/network-scripts/``` 修改名称```[root@network-scripts]# ...
- 【Python系统学习】基础篇
这次真的是最后一次了!第三次滚Python的基础.走了太多弯路.认真一点!菜鸟! 教程 转义字符 \ 可以转义很多字符,比如\n表示换行,\t表示制表符,字符\本身也要转义,所以\\表示的字符就是\ ...
- Django之模板继承
为了在Django模板配置中减少代码的冗余,需使用模板继承 1. 语法 {% block classinfo %} {% endblock} 2. 步骤 (1)创建一个base.html把需要显示的页 ...
- inline 关键字
inline 定义一个函数时最好前面再加上static: static inline 定义的函数,会在链接阶段将代码段中没有使用的inline 函数定义“剔除”,从而减小编译体积:即使加了-g参数仍然 ...
- ACM学习历程—HDU5701 中位数计数(中位数 && 计数排序)
http://acm.hdu.edu.cn/showproblem.php?pid=5701 这是这次百度之星初赛2B的第六题.之前白山云做过类似的题,省赛完回来,我看了一下大概就有这样的思路:首先枚 ...
- STM32GPIO管脚设置
(1)GPIO_Mode_AIN 模拟输入 (2)GPIO_Mode_IN_FLOATING 浮空输入(3)GPIO_Mode_IPD 下拉输入 (4)GPIO_Mode_IPU 上拉输入 (5)GP ...
- 戴尔PowerEdge RAID控制卡使用示例(PERC H710P为例)
Dell PERC使用示例列表(H710p) 特别说明,本文相关RAID的操作,仅供网友在测试环境里学习和理解戴尔PowerEdge服务器RAID控制卡的功能和使用方法.切勿直接在生产服务器上做相关实 ...
- c# HttpWebResponse 调用WebApi
public static class WebApiCaller { public static string HttpPost(string url, string body) { try { // ...