opsmanage 自动化运维管理平台
关闭防火墙、selinux
更换阿里云 yum源
依赖环境
yum install -y epel-release
yum install vim net-tools nmon htop rsync tree ntp iftop wget clamav -y
安装easy_install
cd /tools

[root@jason tools]# wget --no-check-certificate  https://pypi.python.org/packages/f7/94/eee867605a99ac113c4108534ad7c292ed48bf1d06dfe7b63daa51e49987/setuptools-28.0.0.tar.gz#md5=9b23df90e1510c7353a5cf07873dcd22

[root@jason tools]# tar -xzvf setuptools-28.0.0.tar.gz

[root@jason tools]#cd setuptools-28.0.0

[root@jason tools]#python  setup.py  install
安装pip
# wget --no-check-certificate https://github.com/pypa/pip/archive/1.5.5.tar.gz -O pip-1.5.5.tar.gz

# tar -xzvf pip-1.5.5.tar.gz

# cd pip-1.5.5/

# python setup.py install

# pip install -U pip
安装模块
依赖环境
yum install -y mysql-devel python-devel
# cd /mnt/

# git clone https://github.com/welliamcao/OpsManage.git

# cd /mnt/OpsManage/

#vim  requirements.txt

将Django版本改为1.8.17

# pip install -r requirements.txt
pip install paramiko
安装Redis
# wget http://download.redis.io/releases/redis-3.2.8.tar.gz
# tar -xzvf redis-3.2.8.tar.gz
# cd redis-3.2.8
# make
# make install
# vim redis.conf
修改以下配置
daemonize yes #128行
loglevel warning #158行
logfile "/var/log/redis.log" #163行
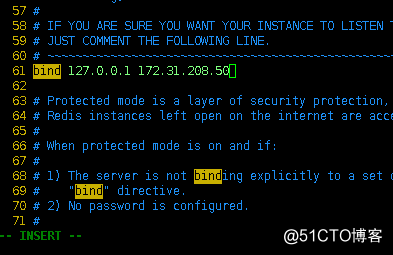
bind 你的服务器ip地址 #61行
例如: bind 127.0.0.1 192.168.88.201
# cd ../
# mv redis-3.2.8 /usr/local/redis
# /usr/local/redis/src/redis-server /usr/local/redis/redis.conf
开机自启
将/usr/local/redis/src/redis-server /usr/local/redis/redis.conf加入到/etc/rc.d/rc.local
安装mysql
配置文件添加
[root@jason ~]# cat /etc/my.cnf |grep -Ev '^%|^$'

# For advice on how to change settings please see

# http://dev.mysql.com/doc/refman/5.7/en/server-configuration-defaults.html

[mysqld]

character_set_server = utf8

sql_mode='STRICT_TRANS_TABLES,NO_ZERO_IN_DATE,NO_ZERO_DATE,ERROR_FOR_DIVISION_BY_ZERO,NO_AUTO_CREATE_USER,NO_ENGINE_SUBSTITUTION' ##添加

#

# Remove leading # and set to the amount of RAM for the most important data

# cache in MySQL. Start at % of total RAM for dedicated server, else %.

# innodb_buffer_pool_size = 128M

#

# Remove leading # to turn on a very important data integrity option: logging

# changes to the binary log between backups.

# log_bin

#

# Remove leading # to set options mainly useful for reporting servers.

# The server defaults are faster for transactions and fast SELECTs.

# Adjust sizes as needed, experiment to find the optimal values.

# join_buffer_size = 128M

# sort_buffer_size = 2M

# read_rnd_buffer_size = 2M

datadir=/var/lib/mysql

socket=/var/lib/mysql/mysql.sock

# Disabling symbolic-links is recommended to prevent assorted security risks

symbolic-links=

log-error=/var/log/mysqld.log

pid-file=/var/run/mysqld/mysqld.pid
创建数据库opsmanage ,并赋予全部权限
# mysql -uroot -p

mysql> create database opsmanage DEFAULT CHARACTER SET utf8 COLLATE utf8_general_ci;

mysql> grant all privileges on opsmanage.* to root@'%' identified by 'jason_zhang';

mysql> FLUSH PRIVILEGES;
配置OpsManage
[root@jason ~]# cd /mnt/OpsManage/

[root@jason OpsManage]# cd OpsManage/

[root@jason OpsManage]# cat settings.py |grep -Ev '^%|^$'

#!/usr/bin/env python

# _#_ coding:utf- _*_

"""

Django settings for OpsManage project.

Generated by 'django-admin startproject' using Django 1.9..

For more information on this file, see

https://docs.djangoproject.com/en/1.9/topics/settings/

For the full list of settings and their values, see

https://docs.djangoproject.com/en/1.9/ref/settings/

"""

import os

import djcelery

from celery import  platforms

from kombu import Queue,Exchange

# Build paths inside the project like this: os.path.join(BASE_DIR, ...)

BASE_DIR = os.path.dirname(os.path.dirname(os.path.abspath(__file__)))

''' celery config '''

djcelery.setup_loader()

BROKER_URL = 'redis://192.168.199.224:6379/4'    ##redis的IP、端口和库

CELERY_RESULT_BACKEND = 'djcelery.backends.database.DatabaseBackend'

CELERY_RESULT_SERIALIZER = 'json'

CELERY_TASK_SERIALIZER='pickle'

CELERY_ACCEPT_CONTENT = ['pickle','json']

CELERYBEAT_SCHEDULER = 'djcelery.schedulers.DatabaseScheduler'

CELERY_TASK_RESULT_EXPIRES =  *  *

CELERYD_MAX_TASKS_PER_CHILD =

CELERY_TRACK_STARTED = True

CELERY_ENABLE_UTC = False

CELERY_TIMEZONE='Asia/Shanghai'

platforms.C_FORCE_ROOT = True

#celery route config

CELERY_IMPORTS = ("OpsManage.tasks.assets","OpsManage.tasks.ansible",

                  "OpsManage.tasks.cron","OpsManage.tasks.deploy",

                  "OpsManage.tasks.sql","OpsManage.tasks.sched")

CELERY_QUEUES = (

    Queue('default',Exchange('default'),routing_key='default'),

    Queue('ansible',Exchange('ansible'),routing_key='ansible'),

)

CELERY_ROUTES = {

    'OpsManage.tasks.sql.*':{'queue':'default','routing_key':'default'},

    'OpsManage.tasks.assets.*':{'queue':'default','routing_key':'default'},

    'OpsManage.tasks.cron.*':{'queue':'default','routing_key':'default'},

    'OpsManage.tasks.sched.*':{'queue':'default','routing_key':'default'},

    'OpsManage.tasks.ansible.AnsibleScripts':{'queue':'ansible','routing_key':'ansible'},

    'OpsManage.tasks.ansible.AnsiblePlayBook':{'queue':'ansible','routing_key':'ansible'},

}

CELERY_DEFAULT_QUEUE = 'default'

CELERY_DEFAULT_EXCHANGE_TYPE = 'topic'

CELERY_DEFAULT_ROUTING_KEY = 'default'

REDSI_KWARGS_LPUSH = {"host":'192.168.199.224','port':6379,'db':4}
REDSI_LPUSH_POOL = None

# Quick-start development settings - unsuitable for production

# See https://docs.djangoproject.com/en/1.9/howto/deployment/checklist/

# SECURITY WARNING: keep the secret key used in production secret!

SECRET_KEY = 'kd8f&jx1h^1m-uldfdo3d#10d9mbc-ijjz!tozusy@aw#h+875'

# SECURITY WARNING: don't run with debug turned on in production!

DEBUG = True

ALLOWED_HOSTS = ['*']

# Channels settings

CHANNEL_LAYERS = {

    "default": {

       "BACKEND": "asgi_redis.RedisChannelLayer",  # use redis backend

       "CONFIG": {

            "hosts": [("localhost", )],

            "channel_capacity": {

                                   "http.request": ,

                                   "websocket.send*": ,

                                },

            "capacity": ,

           },

       "ROUTING": "OpsManage.routing.channel_routing",  # load routing from our routing.py file

       },

}

# Application definition

INSTALLED_APPS = (

    'django.contrib.admin',

    'django.contrib.auth',

    'django.contrib.contenttypes',

    'django.contrib.sessions',

    'django.contrib.messages',

    'django.contrib.staticfiles',

    'OpsManage',

    'rest_framework',

    'djcelery',

    'channels',

    'storages',

    'wiki',

    'orders',

    'api',

    'filemanage',

)

MIDDLEWARE_CLASSES = (

    'django.contrib.sessions.middleware.SessionMiddleware',

    'django.middleware.common.CommonMiddleware',

    'django.middleware.csrf.CsrfViewMiddleware',

#     'django.middleware.csrf.CsrfResponseMiddleware',

    'django.contrib.auth.middleware.AuthenticationMiddleware',

    'django.contrib.auth.middleware.SessionAuthenticationMiddleware',

    'django.contrib.messages.middleware.MessageMiddleware',

    'django.middleware.clickjacking.XFrameOptionsMiddleware',

)

REST_FRAMEWORK = {

    'DEFAULT_PERMISSION_CLASSES': (

        'rest_framework.permissions.IsAuthenticated',

    ),

    'DEFAULT_AUTHENTICATION_CLASSES': (

        'rest_framework_jwt.authentication.JSONWebTokenAuthentication',

        'rest_framework.authentication.SessionAuthentication',

        'rest_framework.authentication.BasicAuthentication',

    ),

}

ROOT_URLCONF = 'OpsManage.urls'

TEMPLATES = [

    {

        'BACKEND': 'django.template.backends.django.DjangoTemplates',

        'DIRS': ["/mnt/OpsManage/OpsManage/static/",'/mnt/OpsManage/OpsManage/templates/'], ##根据下载的opsmanage存放位置

        'APP_DIRS': True,

        'OPTIONS': {

            'context_processors': [

                'django.template.context_processors.debug',

                'django.template.context_processors.request',

                'django.contrib.auth.context_processors.auth',

                'django.contrib.messages.context_processors.messages',

            ],

        },

    },

]

WSGI_APPLICATION = 'OpsManage.wsgi.application'

# Database

# https://docs.djangoproject.com/en/1.9/ref/settings/#databases

DATABASES = {

    'default': {

        'ENGINE':'django.db.backends.mysql',

        'NAME':'opsmanage',

        'USER':'root',

        'PASSWORD':'jason_zhang',

        'HOST':'192.168.199.224'

#         'ENGINE': 'django.db.backends.sqlite3',

#         'NAME': os.path.join(BASE_DIR, 'db.sqlite3'),

    }

}

# Internationalization

# https://docs.djangoproject.com/en/1.9/topics/i18n/

LANGUAGE_CODE = 'en-us'

TIME_ZONE = 'Asia/Shanghai'

STATIC_URL = '/static/'

STATICFILES_DIRS = (

     '/mnt/OpsManage/OpsManage/static/',

    )

MEDIA_ROOT = os.path.join(BASE_DIR,'upload/')

MEDIA_URL = '/upload/'

SFTP_CONF = {

             'port':,

             'username':'root',

             'password':'welliam',

             'timeout':

             }

WORKSPACES = '/var/lib/opsmanage/workspaces/'

LOGIN_URL = '/login'
生成数据表与管理员账户
yum remove python-gssapi.x86_64 不然会django、Paramiko报错
# cd /mnt/OpsManage/

# python manage.py makemigrations OpsManage

# python manage.py makemigrations wiki

# python manage.py makemigrations orders

# python manage.py makemigrations filemanage

# python manage.py migrate

# python manage.py createsuperuser
启动部署平台
# cd /mnt/OpsManage/

# python manage.py runserver 0.0.0.0:8000

注意,启动后,会占用当前终端,需要调整时开启新终端登录
http://192.168.199.224:8000

配置Celery异步任务系统
celery-分布式异步任务调度系统
了解:https://blog.csdn.net/bojie5744/article/details/52965668
# echo_supervisord_conf > /etc/supervisord.conf

# export PYTHONOPTIMIZE=1

# vim /etc/supervisord.conf
在最后面加上
[program:celery-worker-default]

command=/usr/bin/python manage.py celery worker --loglevel=info -E -Q default

directory=/mnt/OpsManage

stdout_logfile=/var/log/celery-worker-default.log

autostart=true

autorestart=true

redirect_stderr=true

stopsignal=QUIT

numprocs=1

[program:celery-worker-ansible]

command=/usr/bin/python manage.py celery worker --loglevel=info -E -Q ansible

directory=/mnt/OpsManage

stdout_logfile=/var/log/celery-worker-ansible.log

autostart=true

autorestart=true

redirect_stderr=true

stopsignal=QUIT

numprocs=1

[program:celery-beat]

command=/usr/bin/python manage.py celery beat

directory=/mnt/OpsManage

stdout_logfile=/var/log/celery-beat.log

autostart=true

autorestart=true

redirect_stderr=true

stopsignal=QUIT

numprocs=1

[program:celery-cam]

command=/usr/bin/python manage.py celerycam

directory=/mnt/OpsManage

stdout_logfile=/var/log/celery-celerycam.log

autostart=true

autorestart=true

redirect_stderr=true

stopsignal=QUIT

numprocs=1
启动celery
# /usr/bin/supervisord -c /etc/supervisord.conf    #注意centos7上路径

# supervisorctl status #要检查是否都是running状态


SQL审核
自行安装Inception与SQLadvisor,SQLadvisor可执行文件请放在OpsManage服务器/usr/bin/sqladvisor路径 (不支持阿里云RDS)
详看inception+archery SQL审核平台   https://www.cnblogs.com/xiaoyou2018/p/9936585.html

参考:http://blog.51cto.com/11555417/2155028
      https://github.com/welliamcao/OpsManage
      https://www.oschina.net/p/opsmanage
Python 进程管理工具 Supervisor 使用教程
https://www.restran.net/2015/10/04/supervisord-tutorial/
opsmanage 自动化运维管理平台的更多相关文章
- Linux运维之Ansible自动化运维管理工具
Ansible简介:Ansible是一个简单高效的自动化运维管理工具,用Python开发,能大批量管理N多台机器,可以并发的在多台机器上部署应用.安装软件.执行命令.配置和编排任务.后面会提到批量安装 ...
- django 实现linux运维管理平台
概述 使用django实现一个linux运维管理平台,可以实现注册登录,机器管理 ,服务器批量操作,服务器性能监控. 详细 代码下载:http://www.demodashi.com/demo/112 ...
- Ansible 自动化运维管理工具
Ansible 自动化运维管理工具 1.Ansible概述 2.Ansible部署 3.Ansible模块 1.Ansible概述: Ansible是一个基于Python开发的配置管理和应用部署工具, ...
- Ansible-Tower自动化运维管理环境 - 安装破解记录
公司中实现运维自动化的架构中主要用到ansible,ansible脚本在部署服务器指令行中显得不太直观.Ansible-Tower(之前叫做awx)是将ansible的指令界面化,简明直观,简单易用. ...
- 安装配置OSA运维管理平台
1.下载完整包V1.0.2wget http://www.osapub.com/download/OSA_BETA_V1.0.2.tar.gzV1.0.5wget http://www.osapub. ...
- ansible自动化运维管理工具
1.Ansible介绍 1)Ansible:Ansible的核心程序 2)Host Inventory:(默认路径:/etc/ansible/hosts)记录了每一个由Ansible管理的主机信息,信 ...
- MySQL 运维管理平台
github: https://github.com/XiaohaoYu/mysql_platform
- 国产安全自主可控IT智能运维管理解决方案
新一轮科技革命和产业变革席卷全球,大数据.云计算.物联网.人工智能.区块链等新技术不断涌现,数字经济正深刻地改变着人类的生产和生活方式,作为经济增长新动能的作用日益凸显.伴随增长的,还有网络中不断涌现 ...
- 解决连锁零售行业IT运维管理四大困境
解决连锁零售行业IT运维管理四大困境 中国近年来,连锁零售行业进入了行业的发展高潮,迅速崛起一批大型连锁业态.而随着IT技术的不断进步,连锁零售企业已经步入IT信息化快速发展的重要阶段:在面对激烈 ...
随机推荐
- Maven环境变量
Windows: M2_HOME=D:\ProgramFiles\apache-maven-3.5.0M2_REPO=D:\ProgramFiles\maven\repositoryPATH=%PAT ...
- webapi_uploadfile_gdal_to_geojson_and_unzipfile
using ICSharpCode.SharpZipLib.Zip; using OSGeo.GDAL; using OSGeo.OGR; using System; using System.Col ...
- 36. Oracle查询数据库中所有表的记录数
select t.table_name,t.num_rows from user_tables t
- ndoejs处理编码的爬虫
var express=require('express');var http=require('http');var cheerio=require('cheerio');var fs=requir ...
- Linux 文件查找(find)
find(选项)(参数) 选项 -amin<分钟>:查找在指定时间曾被存取过的文件或目录,单位以分钟计算: -anewer<参考文件或目录>:查找其存取时间较指定文件或目录的存 ...
- Netty socket.io 启用Epoll 模式异常
Epoll 环境为Linux 内核2.6 以上版本 Windows下不能启动 1:判断Linux环境 public static boolean isOSLinux() { Properties p ...
- printf 输出% 和 \
在小白第一章后面1.5.3中有仨题: 1 试着把%d中的两个字符(百分号和小写字母d)输出到屏幕. 2 试着把\n中的两个字符(反斜线和小写字母n)输出到屏幕. 3 像 1.2这样需要“特殊方法”才能 ...
- Linux创建SSH信任关系
Linux服务器创建信任关系可以解决远程执行命令.远程传输文件多次手工输入的麻烦.可以实现环境一键打包备份. 测试环境 SuSE 手工创建 假设服务器A与B间要建立信任关系.用户想从服务器A免密码登录 ...
- TCP/IP网络协议的通俗理解,SOCKET,HTTP,SOAP
TCP/IP,HTTP,SOAP等协议之区别 术语TCP/IP代表传输控制协议/网际协议,指的是一系列协议.“IP”代表网际协议,TCP和UDP使用该协议从一个网络传送数据包到另一个网络.把IP想 ...
- python 拷贝 深拷贝 浅拷贝 赋值
t = [1,["a","b"]] t_bak = t t_cop = copy.copy(t) t_deep = copy.deepcopy(t) print ...