第四章 部署K8s前准备工作
一、主机准备
1、硬件
准备5台2C/2g/50g虚拟机;
Centos7.6系统
2、集群规划
使用10.4.7.0/24网络
IP			主机名

10.4.7.11		hdss7-11.host.com

10.4.7.12		hdss7-12.host.com

10.4.7.21		hdss7-21.host.com

10.4.7.22		hdss7-22.host.com

10.4.7.200	        hdss7-200.host.com

10.4.7.10		21/22的虚拟VIP
二、操作系统优化
1、可以ping通外网
[root@hdss7-11 ~]# ping baidu.com

PING baidu.com (39.156.69.79) 56(84) bytes of data.

64 bytes from 39.156.69.79 (39.156.69.79): icmp_seq=1 ttl=53 time=9.59 ms
2、关闭防火墙与SElinux
[root@hdss7-11 ~]# sed -i 's/SELINUX=enforcing/SELINUX=disabled/g' /etc/selinux/config

[root@hdss7-11 ~]# setenforce 0

[root@hdss7-11 ~]# getenforce

Disabled
3、查看内核
要求在3.10以上,docker使用
[root@hdss7-11 ~]# uname -a

Linux hdss7-11.host.com 3.10.0-1062.el7.x86_64 #1 SMP Wed Aug 7 18:08:02 UTC 2019 x86_64 x86_64 x86_64 GNU/Linux
4、配置yum源
[root@hdss7-11 ~]# yum -y isntall vim telnet wget
安装yum源于eple源
[root@hdss7-11 ~]# cd /etc/yum.repos.d/

[root@hdss7-11 ~]# mkdir bak

[root@hdss7-11 ~]# mv * bak/
安装网易的yum源及eple源
[root@hdss7-11 ~]# wget http://mirrors.163.com/.help/CentOS7-Base-163.repo

[root@hdss7-11 ~]# yum list

[root@hdss7-11 ~]# yum -y install eple-release
安装阿里云的
[root@hdss7-11 ~]# wget http://mirrors.aliyun.com/repo/Centos-7.repo

[root@hdss7-11 ~]# wget -O /etc/yum.repos.d/epel-7.repo http://mirrors.aliyun.com/repo/epel-7.repo

[root@hdss7-11 ~]# yum clean all

[root@hdss7-11 ~]# yum makecache
5、安装必要工具软件
[root@hdss7-11 ~]# yum -y install wget net-tools tree nmap sysstat lrzsz dos2unix bind-utils
三、部署DNS系统
我们要对集群进行7层的流量调度,所以需要部署自己的DNS环境,方便进行域名解析
在10.4.7.11上进行部署操作
1、安装bind
[root@hdss7-11 ~]# yum -y install bind

[root@hdss7-11 ~]# rpm -qa bind

bind-9.11.4-26.P2.el7_9.5.x86_64
2、配置主配置文件
[root@hdss7-11 ~]# vim /etc/named.conf

options {

        listen-on port 53 { 10.4.7.11; };

//      listen-on-v6 port 53 { ::1; };

        directory       "/var/named";

        dump-file       "/var/named/data/cache_dump.db";

        statistics-file "/var/named/data/named_stats.txt";

        memstatistics-file "/var/named/data/named_mem_stats.txt";

        recursing-file  "/var/named/data/named.recursing";

        secroots-file   "/var/named/data/named.secroots";

        allow-query     { any; };

        forwarders      { 10.4.7.1; };

      	dnssec-enable no;

        dnssec-validation no;

检查,无报错就ok

[root@hdss7-11 ~]# named-checkconf
3、配置区域配置文件(配置主机域、业务域)
[root@hdss7-11 ~]# vim /etc/named.rfc1912.zones

zone "host.com" IN {

        type  master;

        file  "host.com.zone";

        allow-update { 10.4.7.11; };

};

zone "od.com" IN {

        type  master;

        file  "od.com.zone";

        allow-update { 10.4.7.11; };

};
4、配置区域数据文件
[root@hdss7-11 ~]# vim /var/named/host.com.zone

$ORIGIN host.com.

$TTL 600  ; 10 minute

@       IN SOA  dns.host.com. dnsadmin.host.com. (

        2020010501 ; serial

        10800      ; refresh (3 hours) # soa参数

        900        ; retry (15 minutes)

        604800     ; expire (1 week)

        86400      ; minimum (1 day)

        )

      NS   dns.host.com.

$TTL 60 ; 1 minute

dns                A    10.4.7.11

HDSS7-11           A    10.4.7.11

HDSS7-12           A    10.4.7.12

HDSS7-21           A    10.4.7.21

HDSS7-22           A    10.4.7.22

HDSS7-200          A    10.4.7.200
5、配置业务域数据文件
[root@hdss7-11 ~]# vim /var/named/od.com.zone

$ORIGIN od.com.

$TTL 600  ; 10 minutes

@       IN SOA  dns.od.com. dnsadmin.od.com. (

        2020010501 ; serial

        10800      ; refresh (3 hours)

        900        ; retry (15 minutes)

        604800     ; expire (1 week)

        86400      ; minimum (1 day)

        )

        NS   dns.od.com.

$TTL 60 ; 1 minute

dns                A    10.4.7.11
6、启动测试
[root@hdss7-11 ~]# named-checkconf

启动服务

[root@hdss7-11 ~]# systemctl start named && systemctl enable named

测试解析

[root@hdss7-11 ~]# dig -t A hdss7-11.host.com  @10.4.7.11 +shor

10.4.7.11

[root@hdss7-11 ~]# dig -t A hdss7-200.host.com  @10.4.7.11 +shor

10.4.7.200
7、修改所有主机DNS
[root@hdss7-11 ~]# vim /etc/sysconfig/network-scripts/ifcfg-ens33
DNS1=10.4.7.11
[root@hdss7-11 ~]# systemctl restart network
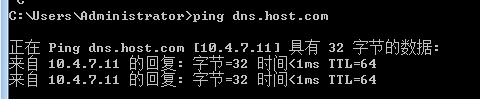
[root@hdss7-11 ~]# ping baidu.com
PING baidu.com (39.156.69.79) 56(84) bytes of data.
64 bytes from 39.156.69.79 (39.156.69.79): icmp_seq=1 ttl=53 time=22.7 ms
[root@hdss7-11 ~]# ping hdss7-21.host.com
PING HDSS7-21.host.com (10.4.7.21) 56(84) bytes of data.
64 bytes from 10.4.7.21 (10.4.7.21): icmp_seq=1 ttl=64 time=2.24 ms
走的是内网DNS
修改宿主机DNS
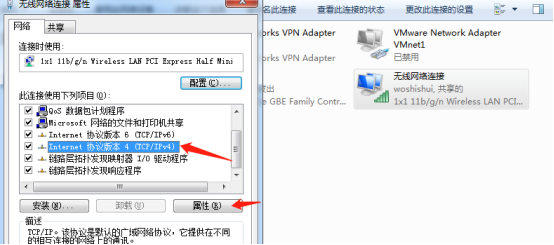
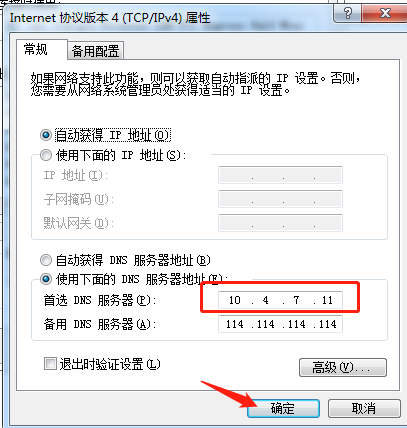
7、修改resolv.conf
添加后解析主机A记录 可以不加域名 例如 dig -t A hdss7-11
[root@hdss7-11 ~]# vim /etc/resolv.conf
# Generated by NetworkManager
search host.com
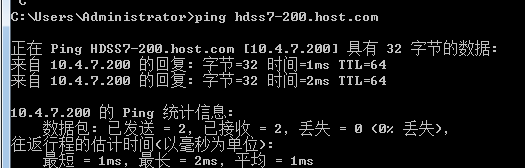
nameserver 10.4.7.11
[root@hdss7-11 ~]# ping hdss7-200
PING HDSS7-200.host.com (10.4.7.200) 56(84) bytes of data.
64 bytes from 10.4.7.200 (10.4.7.200): icmp_seq=1 ttl=64 time=10.1 ms
四、准备自签证书环境
签发证书有两种方法:openssl和cfssl
本例使用cfssl证书,在10.4.7.200上部署
10.4.7.200主机上部署,使用cfssl证书
1、下载cfssl工具
[root@hdss7-200 ~]# wget https://pkg.cfssl.org/R1.2/cfssl_linux-amd64 -O /usr/local/bin/cfssl

[root@hdss7-200 ~]# wget https://pkg.cfssl.org/R1.2/cfssljson_linux-amd64 -O /usr/local/bin/cfssl-json

[root@hdss7-200 ~]# wget https://pkg.cfssl.org/R1.2/cfssl-certinfo_linux-amd64 -O /usr/local/bin/cfssl-certinfo

[root@hdss7-200 ~]# chmod +x /usr/local/bin/cfssl*

[root@hdss7-200 ~]# which cfssl

/usr/local/bin/cfssl

[root@hdss7-200 ~]# which cfssl-json

/usr/local/bin/cfssl-json

[root@hdss7-200 ~]# which cfssl-certinfo

/usr/local/bin/cfssl-certinfo
2、签发根证书
[root@hdss7-200 ~]# mkdir /opt/certs/ ; cd /opt/certs/

创建生成CA证书签名请求的(csr)JSON配置文件

[root@hdss7-200 certs]# vim /opt/certs/ca-csr.json

{

    "CN": "OldboyEdu",

    "hosts": [

    ],

    "key": {

        "algo": "rsa",

        "size": 2048

    },

    "names": [

        {

            "C": "CN",

            "ST": "beijing",

            "L": "beijing",

            "O": "od",

            "OU": "ops"

        }

    ],

    "ca": {

        "expiry": "175200h"

    }

}

说明:

CN: Common Name ,浏览器使用该字段验证网站是否合法, 一般写的是域名。非常重要。浏览器使

用该字段验证网站是否合法C: Country,国家ST:State,州,省L: Locality ,地区,城市O: Organization Name ,组织名称,公司名称OU: Organization Unit Name ,组织单位名称,公司部门;

"expiry": 证书有效时间,默认是一年
3、生成CA证书和私钥
[root@hdss7-200 certs]# cfssl gencert -initca ca-csr.json | cfssl-json -bare ca

2021/06/01 23:10:34 [INFO] generating a new CA key and certificate from CSR

2021/06/01 23:10:34 [INFO] generate received request

2021/06/01 23:10:34 [INFO] received CSR

2021/06/01 23:10:34 [INFO] generating key: rsa-2048

2021/06/01 23:10:34 [INFO] encoded CSR

2021/06/01 23:10:34 [INFO] signed certificate with serial number 12748630169764283939229873301851730667516456874

[root@hdss7-200 certs]# ls

ca.csr  ca-csr.json  ca-key.pem  ca.pem
ca-key.pem是ca证书的私钥
ca.pem是ca证书的公钥
4、问题排查
关于未生成证书,过程中无任何报错的问题:
如果所有配置都没有问题,如上所示,生成过程无异常,显示成功,却没有找到证书,那么最大的可能就是wget的时候下载的工具有问题,删除后重新下载,再不济就先下载再重新命名移动到对应路径后再重新使用命令生成就可以了,如下所示:
[root@hdss7-200 certs]# ls -l ca*

-rw-r--r-- 1 root root 328 6月   1 23:10 ca-csr.json

[root@hdss7-200 certs]# cfssl gencert -initca ca-csr.json | cfssl-json -bare ca

2021/06/02 22:03:40 [INFO] generating a new CA key and certificate from CSR

2021/06/02 22:03:40 [INFO] generate received request

2021/06/02 22:03:40 [INFO] received CSR

2021/06/02 22:03:40 [INFO] generating key: rsa-2048

2021/06/02 22:03:40 [INFO] encoded CSR

2021/06/02 22:03:40 [INFO] signed certificate with serial number 490755025334259446132565112154920848798661768876
五、安装部署Dokcer环境
在10.4.7.21/22/200上安装,此处以21为例
1、下载docker的yum源(aliyun的)
[root@hdss7-21 ~]# wget -O /etc/yum.repos.d/docker-ce.repo https://mirrors.aliyun.com/docker-ce/linux/centos/docker-ce.repo
2、安装docker-ce
[root@hdss7-21 ~]# yum install -y docker-ce

[root@hdss7-21 ~]# mkdir /etc/docker/

[root@hdss7-21 ~]# vim /etc/docker/daemon.json

注意bip处22和200主机分别改成22和200的网段

{

  "graph": "/data/docker",

  "storage-driver": "overlay2",

  "insecure-registries": ["registry.access.redhat.com","quay.io","harbor.od.com"],

  "registry-mirrors": ["https://registry.docker-cn.com"],

  "bip": "172.7.21.1/24",

  "exec-opts": ["native.cgroupdriver=systemd"],

  "live-restore": true

}
3、创建数据目录
[root@hdss7-21 ~]# mkdir -p /data/docker
4、启动测试
[root@hdss7-21 ~]# systemctl start docker && systemctl enable docker

[root@hdss7-21 ~]# systemctl status docker

[root@hdss7-21 ~]# docker version

Client: Docker Engine - Community

 Version:           20.10.6
六、部署Harbor仓库
在10.4.7.200上部署
官方地址:https://goharbor.io/
下载地址:https://github.com/goharbor/harbor/releases
注意 不要选择1.7.5以下版本 有漏洞
下载的时候下载harbor-offline-installer-vx.x.x.tgz版本(离线安装版本)
1、下载harbor
[root@hdss7-200 ~]# mkdir /opt/src && cd /opt/src

[root@hdss7-200 src]# wget https://github.com/goharbor/harbor/releases/download/v1.8.5/harbor-offline-installer-v1.8.5.tgz

[root@hdss7-200 src]# tar -zxvf harbor-offline-installer-v1.8.5.tgz

[root@hdss7-200 src]# mv harbor /opt/harbor-v1.8.5

[root@hdss7-200 src]# ln -s /opt/harbor-v1.8.5 /opt/harbor
2、修改harbor配置文件
实验环境只需要修改以下配置,生产环境还需要修改密码等配置
[root@hdss7-200 src]# vim /opt/harbor/harbor.yml

hostname: harbor.od.com

http:

  port: 180

data_volume: /data/harbor

location: /data/harbor/logs
3、安装docker-compose
[root@hdss7-200 src]# yum -y install docker-compose
4、安装harbor
[root@hdss7-200 src]# cd /opt/harbor

[root@hdss7-200 harbor]# ./install.sh

 ----Harbor has been installed and started successfully.----

[root@hdss7-200 harbor]# docker-compose ps

      Name                     Command               State                 Ports

-----------------------------------------------------------------------------------------------

harbor-core         /harbor/start.sh                 Up

harbor-db           /entrypoint.sh postgres          Up      5432/tcp

harbor-jobservice   /harbor/start.sh                 Up

harbor-log          /bin/sh -c /usr/local/bin/ ...   Up      127.0.0.1:1514->10514/tcp

harbor-portal       nginx -g daemon off;             Up      80/tcp

nginx               nginx -g daemon off;             Up      0.0.0.0:180->80/tcp,:::180->80/tcp

redis               docker-entrypoint.sh redis ...   Up      6379/tcp

registry            /entrypoint.sh /etc/regist ...   Up      5000/tcp

registryctl         /harbor/start.sh                 Up
5、设置harbor开机自启
添加如下内容
[root@hdss7-200 harbor]# vim /etc/rc.d/rc.local

# start harbor

cd /opt/harbor

/usr/docker-compose stop

/usr/docker-compose start
6、安装nginx,反向代理harbor
10.4.7.200上操作
当前机器中nginx功能较少,使用yum安装节课。如果有多个harbor则需要考虑源码安装
[root@hdss7-200 harbor]# yum -y install nginx

[root@hdss7-200 harbor]# vim /etc/nginx/conf.d/harbor.conf

server {

    listen       80;

    server_name  harbor.od.com;

    # 避免出现上传失败的情况

    client_max_body_size 1000m;

    location / {

        proxy_pass http://127.0.0.1:180;

}

}

[root@hdss7-200 harbor]# nginx -t

[root@hdss7-200 harbor]# systemctl start nginx && systemctl enable nginx
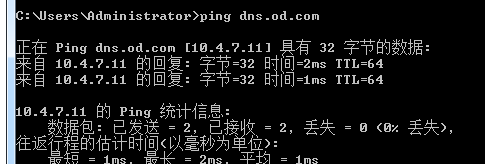
7、配置DNS解析
在10.4.7.11上操作(注意序列号增加)
[root@hdss7-11 ~]## vim /var/named/od.com.zone

$ORIGIN od.com.

$TTL 600  ; 10 minutes

@       IN SOA  dns.od.com. dnsadmin.od.com. (

        2020010502 ; serial

        10800      ; refresh (3 hours)

        900        ; retry (15 minutes)

        604800     ; expire (1 week)

        86400      ; minimum (1 day)

        )

        NS   dns.od.com.

$TTL 60 ; 1 minute

dns                A    10.4.7.11

harbor             A    10.4.7.200

Reload无法使配置生效,需要重启named服务

[root@hdss7-11 ~]# systemctl restart named.service
8、检查DNS生效
[root@hdss7-11 ~]# host harbor.od.com

harbor.od.com has address 10.4.7.200
9、访问harbor
在本地windows上访问自建的harbor
http://harbor.od.com/
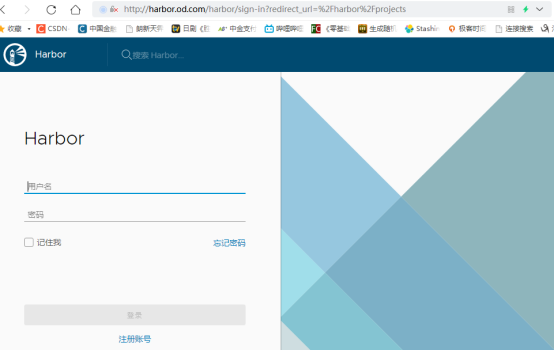
默认用户名admin
默认密码Harbor12345
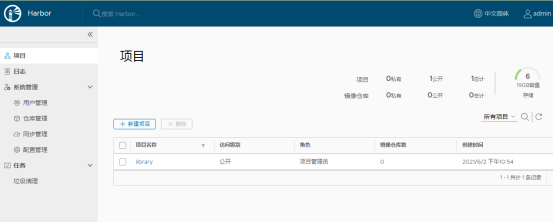
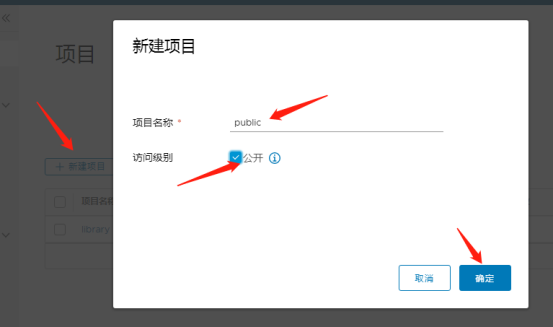
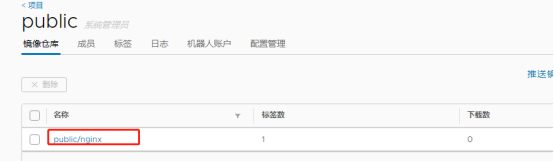
新建一个公开的项目
10、测试harbor
[root@hdss7-200 ~]# docker pull nginx:1.7.9
[root@hdss7-200 ~]# docker images|grep nginx
goharbor/nginx-photon v1.8.5 aa935743d903 19 months ago 37MB
nginx 1.7.9 84581e99d807 6 years ago 91.7MB
打标签
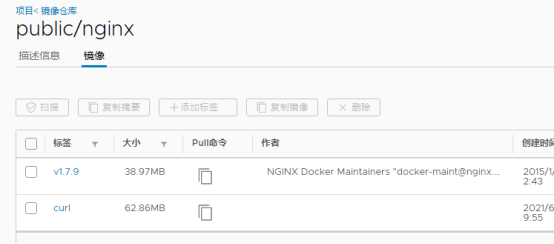
[root@hdss7-200 ~]# docker tag nginx:1.7.9 harbor.od.com/public/nginx:v1.7.9
[root@hdss7-200 ~]# docker images|grep nginx
goharbor/nginx-photon v1.8.5 aa935743d903 19 months ago 37MB
nginx 1.7.9 84581e99d807 6 years ago 91.7MB
harbor.od.com/public/nginx v1.7.9 84581e99d807 6 years ago 91.7MB
登录harbor仓库(不登录默认连接的都是公网的docker仓库地址)
[root@hdss7-200 ~]# docker login -u admin harbor.od.com
Password:
WARNING! Your password will be stored unencrypted in /root/.docker/config.json.
Configure a credential helper to remove this warning. See
https://docs.docker.com/engine/reference/commandline/login/#credentials-store
推送镜像
[root@hdss7-200 ~]# docker push harbor.od.com/public/nginx:v1.7.9
退出harbor仓库
[root@hdss7-200 ~]# docker logout
去服务器上查看
11、制作一个curl镜像
制作有curl命令的nginx容器镜像
在10.4.7.200上操作,之前pull过nginx镜像
~]# docker images|grep nginx

goharbor/nginx-photon           v1.8.5                     aa935743d903   19 months ago   37MB

harbor.od.com/public/nginx      v1.7.9                     84581e99d807   6 years ago     91.7MB

nginx                           1.7.9                      84581e99d807   6 years ago     91.7MB

创建一个nginx容器

root@cc8ae2b47946:/# tee /etc/apt/sources.list << EOF

deb http://mirrors.163.com/debian/ jessie main non-free contrib

deb http://mirrors.163.com/debian/ jessie-updates main non-free contrib

EOF

root@cc8ae2b47946:/# apt-get update && apt-get install curl -y

尝试curl百度首页

root@cc8ae2b47946:/# curl -k https://www.baidu.com

不要退出容器,打开另外一个终端,用此容器生成镜像

[root@hdss7-200 ~]# docker ps|grep nginx

cc8ae2b47946   nginx:1.7.9                                         "bash"                   25 minutes ago   Up 25 minutes                80/tcp, 443/tcp                       wizardly_jennings

~]# docker commit -p cc8ae2b47946 harbor.od.com/public/nginx:curl

sha256:734f6052b94d226f0f42a9f06aba02b4a0bec706ca64522378f775204804e64e

~]# docker push harbor.od.com/public/nginx:curl
在harbor仓库中可以查看到新推送的镜像,就可以退出容器了
12、报错排查Harbor
网关502错误
当你登录时发现密码和用户都正确,却提示错误,尝试用docker登录,提示以下错误
[root@hdss7-200 ~]# docker login -u admin harbor.od.com

Password:

Error response from daemon: login attempt to http://harbor.od.com/v2/ failed with status: 502 Bad Gateway

切换到对应目录,查看是否所有的docker容器正常运行

src]# cd /opt/harbor

harbor]# ls

common  docker-compose.yml  harbor.v1.8.5.tar.gz  harbor.yml  install.sh  LICENSE  prepare

如下,发现有些容器未能正常启动

harbor]# docker-compose ps

      Name                     Command                State               Ports

-----------------------------------------------------------------------------------------

harbor-core         /harbor/start.sh                 Up

harbor-db           /entrypoint.sh postgres          Exit 255

harbor-jobservice   /harbor/start.sh                 Exit 255

harbor-log          /bin/sh -c /usr/local/bin/ ...   Up         127.0.0.1:1514->10514/tcp

harbor-portal       nginx -g daemon off;             Up         80/tcp

nginx               nginx -g daemon off;             Exit 255

redis               docker-entrypoint.sh redis ...   Exit 255

registry            /entrypoint.sh /etc/regist ...   Exit 255

registryctl         /harbor/start.sh                 Up

此时只需要重启一下容器集群就行

harbor]# docker-compose stop

Stopping harbor-portal ... done

Stopping harbor-core   ... done

Stopping registryctl   ... done

Stopping harbor-log    ... done

harbor]# docker-compose ps

      Name                     Command                State     Ports

---------------------------------------------------------------------

harbor-core         /harbor/start.sh                 Exit 137

harbor-db           /entrypoint.sh postgres          Exit 255

harbor-jobservice   /harbor/start.sh                 Exit 255

harbor-log          /bin/sh -c /usr/local/bin/ ...   Exit 137

harbor-portal       nginx -g daemon off;             Exit 0

nginx               nginx -g daemon off;             Exit 255

redis               docker-entrypoint.sh redis ...   Exit 255

registry            /entrypoint.sh /etc/regist ...   Exit 255

registryctl         /harbor/start.sh                 Exit 137

harbor]# docker-compose start

Starting log         ... done

Starting registry    ... done

Starting registryctl ... done

Starting postgresql  ... done

Starting core        ... done

Starting portal      ... done

Starting redis       ... done

Starting jobservice  ... done

Starting proxy       ... done

harbor]# docker-compose ps

      Name                     Command               State                 Ports

-----------------------------------------------------------------------------------------------

harbor-core         /harbor/start.sh                 Up

harbor-db           /entrypoint.sh postgres          Up      5432/tcp

harbor-jobservice   /harbor/start.sh                 Up

harbor-log          /bin/sh -c /usr/local/bin/ ...   Up      127.0.0.1:1514->10514/tcp

harbor-portal       nginx -g daemon off;             Up      80/tcp

nginx               nginx -g daemon off;             Up      0.0.0.0:180->80/tcp,:::180->80/tcp

redis               docker-entrypoint.sh redis ...   Up      6379/tcp

registry            /entrypoint.sh /etc/regist ...   Up      5000/tcp

registryctl         /harbor/start.sh                 Up

尝试登录,没有问题

harbor]# docker login -u admin harbor.od.com

Password:

WARNING! Your password will be stored unencrypted in /root/.docker/config.json.

Configure a credential helper to remove this warning. See

https://docs.docker.com/engine/reference/commandline/login/#credentials-store

Login Succeeded

~]# docker logout
页面平台登录也正常
也有可能是nginx代理问题,具体参考如下文档
今日排错---harbor无法登陆failed with status: 502 Bad Gateway - 骁珺在努力 - 博客园 https://www.cnblogs.com/i-xiaojun/p/14763350.html
第四章 部署K8s前准备工作的更多相关文章
- Linux网络服务第四章部署yum仓库
第四章部署yum仓库服务 1.笔记 systemctl start 命令 :重启 systemctl enable 命令 :开机自启动 netstat -anput | grep 命令:查看是否开启 ...
- lvs+keepalived部署k8s v1.16.4高可用集群
一.部署环境 1.1 主机列表 主机名 Centos版本 ip docker version flannel version Keepalived version 主机配置 备注 lvs-keepal ...
- 第四章——SQLServer2008-2012资源及性能监控(3)
原文:第四章--SQLServer2008-2012资源及性能监控(3) 本文为本系列最后一章,监控内存使用.监控服务器的内存是非常重要的事情,有很多情况会引起内存消耗.所以要经常性地做检查. 本文将 ...
- 【安富莱STM32H7教程】第1章 初学STM32H7的准备工作
完整教程下载地址:http://forum.armfly.com/forum.php?mod=viewthread&tid=86980 第1章 初学STM32H7的准备工作 俗话说万事开头 ...
- R in action读书笔记(19)第十四章 主成分和因子分析
第十四章:主成分和因子分析 本章内容 主成分分析 探索性因子分析 其他潜变量模型 主成分分析(PCA)是一种数据降维技巧,它能将大量相关变量转化为一组很少的不相关变量,这些无关变量称为主成分.探索性因 ...
- Centos7.6部署k8s v1.16.4高可用集群(主备模式)
一.部署环境 主机列表: 主机名 Centos版本 ip docker version flannel version Keepalived version 主机配置 备注 master01 7.6. ...
- PMP--2. 项目启动前准备工作
####################################################### 概述:在第一章节的1.1-1.7中基本都是介绍的<PMBOK>的理论概念以及 ...
- kubernetes之手动部署k8s 1.14.1高可用集群
1. 架构信息 系统版本:CentOS 7.6 内核:3.10.0-957.el7.x86_64 Kubernetes: v1.14.1 Docker-ce: 18.09.5 推荐硬件配置:4核8G ...
- suse 12 二进制部署 Kubernetets 1.19.7 - 第02章 - 部署etcd集群
文章目录 1.2.部署etcd集群 1.2.0.下载etcd二进制文件 1.2.1.创建etcd证书和私钥 1.2.2.生成etcd证书和私钥 1.2.3.配置etcd为systemctl管理 1.2 ...
随机推荐
- MySQL-2-DQL
DQL:数据查询语言 SQLyog中格式化某段语句片段:CTRL+F12 基础查询 语法: select 查询列表 from 表名: 特点: ① 查询列表可以是:表中的字段.常量值.表达式.函数 ② ...
- 全新升级的AOP框架Dora.Interception[4]: 基于Lambda表达式的拦截器注册方式
如果拦截器应用的目标类型是由自己定义的,Dora.Interception(github地址,觉得不错不妨给一颗星)可以在其类型或成员上标注InterceptorAttribute特性来应用对应的拦截 ...
- RPA应用场景-营业收入核对
场景概述营业收入核对 所涉系统名称 SAP ,Excel,门店业务系统 人工操作(时间/次) 4 小时 所涉人工数量 6 操作频率每日 场景流程 1.每日13点起进入SAP查询前一日营业收入记账情况: ...
- ShardingSphere-proxy-5.0.0企业级分库分表、读写分离、负载均衡、雪花算法、取模算法整合(八)
一.简要说明 以下配置实现了: 1.分库分表 2.每一个分库的读写分离 3.读库负载均衡算法 4.雪花算法,生成唯一id 5.字段取模 二.配置项 # # Licensed to the Apache ...
- Scanner的使用步骤和匿名对象的说明
Scanner使用步骤 查看类 ~java.util.Scanner :该类需要import导入后使用. 查看构造方法 ~public Scanner(InputStream source) : 构造 ...
- 聊聊 C++ 中的四种类型转换符
一:背景 在玩 C 的时候,经常会用 void* 来指向一段内存地址开端,然后再将其强转成尺度更小的 char* 或 int* 来丈量一段内存,参考如下代码: int main() { void* p ...
- VIM编辑器的宏操作
这两天看到一个小练习,要求如下: 在GVIM下,将下面这张图的内容 改成下面这样 并且指出,要用批量操作的方式,不能一行一行的键入 其实第一反应是利用正则表达式来操作,但是让用正则表达式以外的操作方式 ...
- postgres备份与恢复
一 利用pgAdmin工具进行备份与恢复 pgAdmin是postgres官方的客户端管理工具,可以进行数据库的涉及与维护. 示例:以logs库为例记录操作 1) 右击需要备份的数据( ...
- 请问为啥计算器16进制FFFFFFFFFFFF时10进制是-1?
请问为啥计算器16进制FFFFFFFFFFFF时10进制是-1?
- idea的使用技巧和必要的设置
idea 如何开启多个线程 打开下面按钮,然后运行相同的代码即可 打开idea需要选择打开哪一个项目 * 设置如下,关闭下面选项即可