flutter ui---->一些类QQ的实现
整理一下比较有意思的类QQ的UI实现。Nothing that has meaning is easy. Easy doesn’t enter into grown-up life.
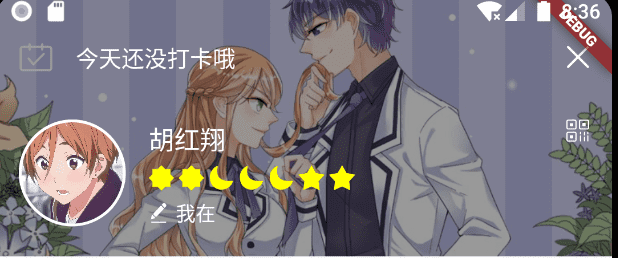
darken the background image
很多场景下,我们需要背景图片上面显示文字。如果是白色字体的话,那么暗化图片是必须的,否则会影响文字的显示。可以设置Container的decoration里面的colorFilter属性
decoration: BoxDecoration(

  image: DecorationImage(

  colorFilter: ColorFilter.mode(Colors.black.withOpacity(0.4), BlendMode.darken),

  image: AssetImage("assets/image/me_header_bg.jpg"),

  fit: BoxFit.fitWidth,

),
显示的效果如下:原背景图片是亮色的
实现类QQ的卡片展示效果
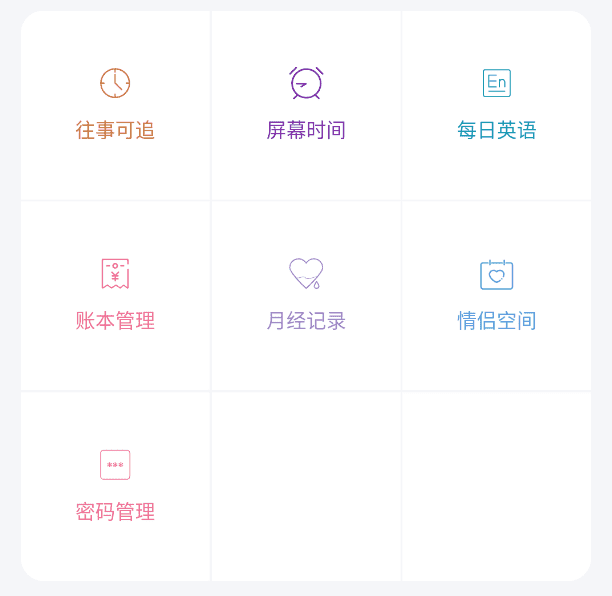
- 最外层的Container设置背景浅灰色:
Container(

  color: Color.fromRGBO(245, 246, 249, 1),

  child: UserToolWidget(tools)

)
- 主体部分是UserToolWidget
class UserToolWidget extends StatelessWidget {

  final List<ToolResp> tools;

  UserToolWidget(this.tools);

  @override

  Widget build(BuildContext context) {

    List<Widget> widgetList = tools.map((tool) => _buildToolItem(context, tool)).toList();

    if (tools.length % 3 == 1) {

      widgetList.addAll([Container(color: Colors.white), Container(color: Colors.white)]);

    }

    if (tools.length % 3 == 2) {

      widgetList.add(Container(color: Colors.white));

    }

    return Padding(

      padding: const EdgeInsets.all(16),

      child: ClipRRect(

        borderRadius: BorderRadius.circular(16.0),

        child: GridView.count(

          crossAxisCount: 3,

          physics: ClampingScrollPhysics(),

          shrinkWrap: true,

          mainAxisSpacing: 1.5,

          crossAxisSpacing: 1.5,

          children: widgetList,

        ),

      ),

    );

  }

  Widget _buildToolItem(BuildContext context, ToolResp tool) {

    Color color = CommUtil.getColorFromRGBOString(tool.iconColor);

    return GestureDetector(

      onTap: () => toolHandler.handleToolJump(tool.type, context),

      child: Container(

        color: Colors.white,

        alignment: Alignment.center,

        child: Column(

          mainAxisAlignment: MainAxisAlignment.center,

          children: <Widget>[

            SvgUtil.withColor(tool.iconName, color),

            SizedBox(height: 10),

            Text(tool.label, style: TextStyle(color: color)),

          ],

        ),

      ),

    );

  }

}
实现头像嵌入的效果

Stack(

  overflow: Overflow.visible,

  alignment: Alignment.topCenter,

  children: <Widget>[

    GestureDetector(

      onTap: () => CommUtil.toBeDev(),

      child: Card(

        shape: RoundedRectangleBorder(borderRadius: BorderRadius.all(Radius.circular(20))),

        child: Container(

          padding: const EdgeInsets.fromLTRB(20, 50, 20, 20),

          child: Column(

            children: <Widget>[

              Text(user.fullName, style: TextStyle(fontSize: 26, fontWeight: FontWeight.w500)),

              Text('手机:${user.phone}', style: TextStyle(fontSize: 16)),

              SizedBox(height: 6),

              QrImage(data: user.phone, version: QrVersions.auto, size: 250.0),

              SizedBox(height: 6),

              Text("点击卡片更换背景", style: TextStyle(color: Colors.grey))

            ],

          ),

        ),

      ),

    ),

    Positioned(

      top: -40,

      child: CircleImageWidget(filename: user.imageUrl, size: 80, borderWidth: 3.0),

    )

  ],

)
实现swipe卡片的功能
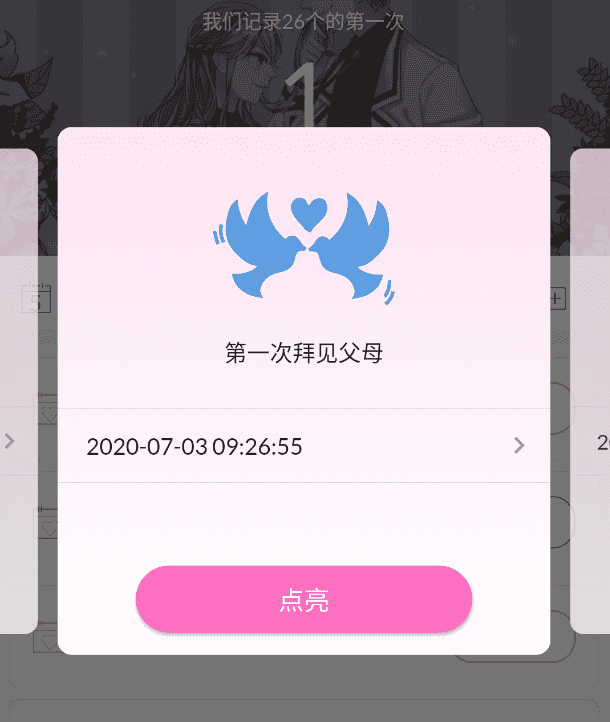
- Swipe的代码
class FirstDaySwipeScreen extends StatelessWidget {

  final int index;

  FirstDaySwipeScreen(this.index);

  @override

  Widget build(BuildContext context) {

    return BlocBuilder<FirstDayBloc, FirstDayState>(

      builder: (_, FirstDayState state) {

        return Center(

          child: Container(

            height: 370,

            child: Swiper(

              index: index,

              loop: false,

              fade: 0.7,

              itemBuilder: (_, int index) {

                FirstDay firstDay = (state as FirstDayLoadSuccess).firstDays[index];

                return FirstDayItemWidget(index, firstDay);

              },

              itemCount: (state as FirstDayLoadSuccess).firstDays.length,

              viewportFraction: 0.8,

              scale: 0.9,

            ),

          ),

        );

      },

    );

  }

}
- 主体部分是卡片
class FirstDayItemWidget extends StatelessWidget {

  final int index;

  final FirstDay firstDay;

  FirstDayItemWidget(this.index, this.firstDay);

  @override

  Widget build(BuildContext context) {

    final textColor = CommUtil.getColorByIndex(index);

    return Material(

      borderRadius: BorderRadius.all(Radius.circular(10)),

      clipBehavior: Clip.antiAlias,

      child: Container(

        alignment: Alignment.topCenter,

        decoration: BoxDecoration(

          gradient: LinearGradient(

            begin: Alignment.topLeft,

            end: Alignment.bottomLeft,

            colors: <Color>[Color.fromRGBO(255, 227, 243, 1), Colors.white],

          ),

        ),

        child: Column(

          children: <Widget>[

            Padding(

              child: SvgUtil.convertFromFile('first_love', textColor, 80),

              padding: const EdgeInsets.only(top: 45, bottom: 20),

            ),

            Padding(

              child: Text('第一次${firstDay.description}', style: TextStyle(fontSize: 16)),

              padding: const EdgeInsets.only(bottom: 20),

            ),

            Divider(),

            _buildFirstDialogDate(firstDay),

            Divider(),

            SizedBox(height: 50),

            _buildConfirmButton(context, firstDay),

          ],

        ),

      ),

    );

  }

  _buildFirstDialogDate(FirstDay firstDay) {

    firstDay.firstDateTime = firstDay.firstDateTime ?? DateTime.now();

    return StatefulBuilder(builder: (BuildContext buildContext, StateSetter setState) {

      return InkWell(

        onTap: () {},

        child: Container(

          alignment: Alignment.topLeft,

          padding: const EdgeInsets.only(top: 6, bottom: 6, left: 20, right: 10),

          child: Row(

            mainAxisAlignment: MainAxisAlignment.spaceBetween,

            children: <Widget>[

              Text(

                DateTimeUtil.formatDateTime(firstDay.firstDateTime),

                style: TextStyle(fontSize: 16),

              ),

              IconTheme(child: Icon(Icons.keyboard_arrow_right), data: IconThemeData(color: Colors.grey)),

            ],

          ),

        ),

      );

    });

  }

  _buildConfirmButton(BuildContext context, FirstDay firstDay) {

    return StatefulBuilder(

      builder: (BuildContext buildContext, StateSetter setState) {

        return RaisedButton(

          child: Text(firstDay.open ? '取消点亮' : '点亮', style: TextStyle(fontSize: 18)),

          shape: StadiumBorder(),

          padding: const EdgeInsets.symmetric(horizontal: 100, vertical: 10),

          onPressed: () {},

          textColor: Colors.white,

          color: Color.fromRGBO(253, 111, 193, 1),

        );

      },

    );

  }

}
flutter ui---->一些类QQ的实现的更多相关文章
- Android代码优化----Application节点的模板写法及UI工具类
一. MyApplication类的编写: 新建一个类MyApplication,继承自Application.代码如下: MyApplication.java: package com.smyhva ...
- iOS开发——项目实战OC篇&类QQ黏性按钮(封装)
类QQ粘性按钮(封装) 那个,先来说说原理吧: 这里原理就是,在界面设置两个控件一个按钮在上面,一个View在下面(同样大小),当我们拖动按钮的时候显示下面的View,view不移动,但是会根据按钮中 ...
- Flutter 即学即用系列博客——04 Flutter UI 初窥
前面三篇可以算是一个小小的里程碑. 主要是介绍了 Flutter 环境的搭建.如何创建 Flutter 项目以及如何在旧有 Android 项目引入 Flutter. 这一篇我们来学习下 Flutte ...
- CSS 伪类(下)结构性伪类\UI伪类\动态伪类和其他伪类 valid check enable child required link visit
伪类选择器汇总伪类选择器有4种, 结构性伪类\UI伪类\动态伪类和其他伪类. 具体如下 结构性伪类选择器结构性伪类选择器它能够根据元素在文档中的位置选择元素, 这类元素都有个前缀":&q ...
- CSS链接四种状态注意顺序、UI伪类选择器的顺序
css定义超链接是要有先后顺序的.否则,可能会出现某个或某几个样式不起作用的bug.例如:visited与hover顺序颠倒了,则不能显示hover和active的样式了. 正确的顺序: a:link ...
- [cocos2dx笔记012]一定简易的UI配置类
使用cocostudio能够装载编辑好的UI,可是过于复杂.特别是在加截UI后,发现触屏事件有些问题. 假设直接使用程序写死载入UI又过于麻烦.花点时间,添加了一个基于ini的UI配置类,眼下仅仅实现 ...
- Flutter UI系统
我们可以看到,无论是Android SDK还是iOS的UIKit 的职责都是相同的,它们只是语言载体和底层的系统不同而已.那么可不可以实现这么一个UI系统:可以使用同一种编程语言开发,然后针对不同操作 ...
- Flutter & UI system & GUI & API & SDK
Flutter & UI system & GUI & API & SDK https://book.flutterchina.club/chapter14/flutt ...
- 全网最详细的一篇Flutter 尺寸限制类容器总结
Flutter中尺寸限制类容器组件包括ConstrainedBox.UnconstrainedBox.SizedBox.AspectRatio.FractionallySizedBox.Limited ...
- Flutter 容器Container类和布局Layout类
1.布局和容器 [布局]是把[容器]按照不同的方式排列起来. Scaffold包含的主要部门:appBar,body,bottomNavigator 其中body可以是一个布局组件,也可以是一个容器组 ...
随机推荐
- 1903021126 申文骏 Java 第六周作业 类与对象
项目 内容 课程班级博客链接 19级信计班(本) 作业要求链接 第六周作业 博客名称 1903021126 申文骏 Java 第六周作业 类与对象 要求 每道题要有题目,代码(使用插入代码,不会 ...
- stream 在 groupingby 之后,对结果数据再进行封装后返回
使用 Collectors.mapping 来指定 分组结果要取哪些数据
- c++学习2 基础关键词
三 volatile强制访问内存 在一个变量的频繁使用中,系统为了提高效率,会自动将内存里面的数据放入CPU里的寄存器里.但在某些特殊场景下,放入寄存器这个操作反倒会导致CPU无法及时获取最新的一手数 ...
- 进入容器后不显示id
https://www.656463.com/wenda/dockerexejrrqbxsrqID_493 net=host的原因
- uniapp里面设置onlaunch以后在加载页面调接口
main.js 里面 Vue.prototype.$onLaunched = new Promise(resolve => { Vue.prototype.$isResolve = resolv ...
- 解决CentOS 7.x虚拟机无法上网的问题
参考地址:https://blog.csdn.net/weixin_43317914/article/details/124770393 1.关闭虚拟机 2.打开cmd,查看本机dns 3.打开虚拟机 ...
- StringIO 和 BytesIO
StringIO 要把 str 字符串写入内存中,我们需要创建一个 StringIO 对象,然后像文件一样对读取内容.其中 StringIO 中多了一个 getvalue() 方法,目的是用于获取写入 ...
- mapreduce启动命令
mapreduce启动命令 hadoop jar /var/lib/hadoop-hdfs/codejar/flash_format_testip.jar com.js.dataclean.hm2_h ...
- LINUX下的VSCODE-C/C++配置
LINUX下的VSCODE-C/C++配置 1.生成默认的任务文件 2.lunch.json,调整"configurations"里的成员,如下 ①添加 "preLaun ...
- tuxedo How To Disable Server Side Trace Which IS Enabled BY Client?
影响版本: Oracle Tuxedo - Version 8.1 to 11.1.1.2.0Information in this document applies to any platform. ...