rsync工具介绍
rsync工具介绍
http://man.linuxde.net/rsync
rsync命令是一个远程数据同步工具,可通过LAN/WAN快速同步多台主机间的文件。rsync使用所谓的“rsync算法”来使本地和远程两个主机之间的文件达到同步,这个算法只传送两个文件的不同部分,而不是每次都整份传送,因此速度相当快。 rsync是一个功能非常强大的工具,其命令也有很多功能特色选项,我们下面就对它的选项一一进行分析说明。
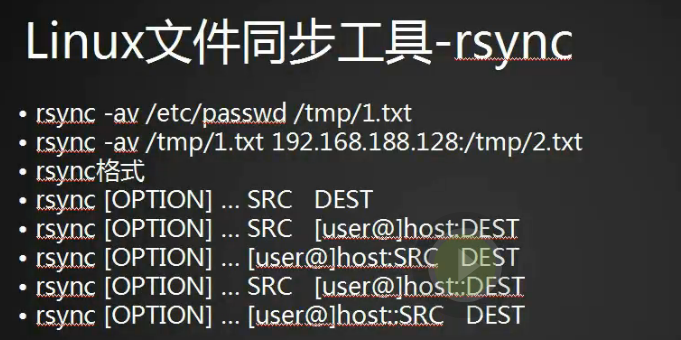
rsync [OPTION]... SRC DEST

rsync [OPTION]... SRC [USER@]host:DEST

rsync [OPTION]... [USER@]HOST:SRC DEST

rsync [OPTION]... [USER@]HOST::SRC DEST

rsync [OPTION]... SRC [USER@]HOST::DEST

rsync [OPTION]... rsync://[USER@]HOST[:PORT]/SRC [DEST]
对应于以上六种命令格式,rsync有六种不同的工作模式:
- 拷贝本地文件。当SRC和DES路径信息都不包含有单个冒号":"分隔符时就启动这种工作模式。如:
rsync -a /data /backup - 使用一个远程shell程序(如rsh、ssh)来实现将本地机器的内容拷贝到远程机器。当DST路径地址包含单个冒号":"分隔符时启动该模式。如:
rsync -avz *.c foo:src - 使用一个远程shell程序(如rsh、ssh)来实现将远程机器的内容拷贝到本地机器。当SRC地址路径包含单个冒号":"分隔符时启动该模式。如:
rsync -avz foo:src/bar /data - 从远程rsync服务器中拷贝文件到本地机。当SRC路径信息包含"::"分隔符时启动该模式。如:
rsync -av root@192.168.78.192::www /databack - 从本地机器拷贝文件到远程rsync服务器中。当DST路径信息包含"::"分隔符时启动该模式。如:
rsync -av /databack root@192.168.78.192::www - 列远程机的文件列表。这类似于rsync传输,不过只要在命令中省略掉本地机信息即可。如:
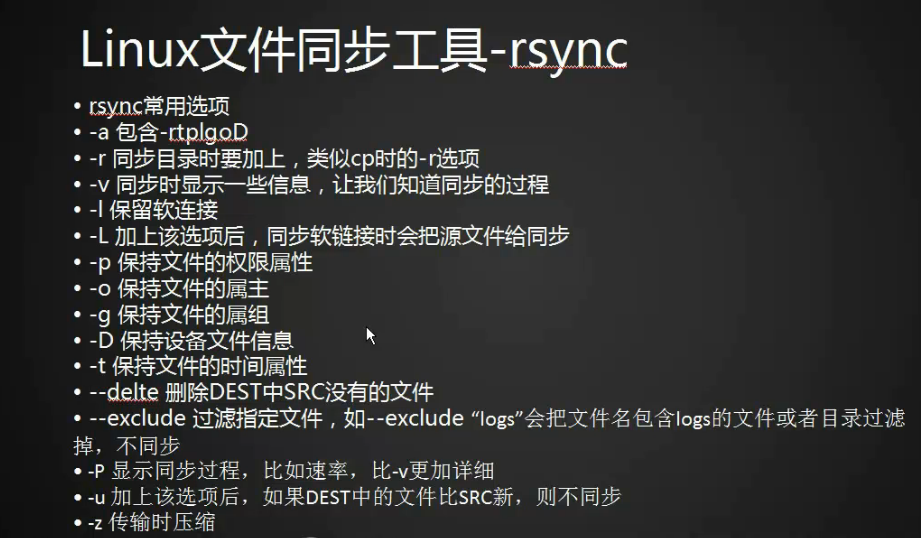
rsync -v rsync://192.168.78.192/www -v, --verbose 详细模式输出。
-q, --quiet 精简输出模式。
-c, --checksum 打开校验开关,强制对文件传输进行校验。
-a, --archive 归档模式,表示以递归方式传输文件,并保持所有文件属性,等于-rlptgoD。
-r, --recursive 对子目录以递归模式处理。
-R, --relative 使用相对路径信息。
-b, --backup 创建备份,也就是对于目的已经存在有同样的文件名时,将老的文件重新命名为~filename。可以使用--suffix选项来指定不同的备份文件前缀。
--backup-dir 将备份文件(如~filename)存放在在目录下。
-suffix=SUFFIX 定义备份文件前缀。
-u, --update 仅仅进行更新,也就是跳过所有已经存在于DST,并且文件时间晚于要备份的文件,不覆盖更新的文件。
-l, --links 保留软链结。
-L, --copy-links 想对待常规文件一样处理软链结。
--copy-unsafe-links 仅仅拷贝指向SRC路径目录树以外的链结。
--safe-links 忽略指向SRC路径目录树以外的链结。
-H, --hard-links 保留硬链结。
-p, --perms 保持文件权限。
-o, --owner 保持文件属主信息。
-g, --group 保持文件属组信息。
-D, --devices 保持设备文件信息。
-t, --times 保持文件时间信息。
-S, --sparse 对稀疏文件进行特殊处理以节省DST的空间。
-n, --dry-run现实哪些文件将被传输。
-w, --whole-file 拷贝文件,不进行增量检测。
-x, --one-file-system 不要跨越文件系统边界。
-B, --block-size=SIZE 检验算法使用的块尺寸,默认是700字节。
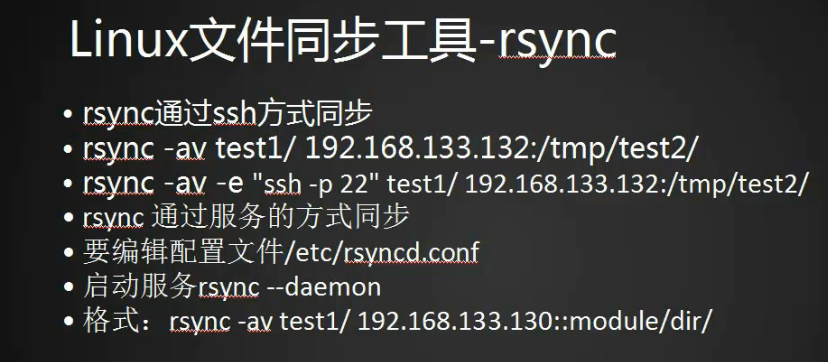
-e, --rsh=command 指定使用rsh、ssh方式进行数据同步。
--rsync-path=PATH 指定远程服务器上的rsync命令所在路径信息。
-C, --cvs-exclude 使用和CVS一样的方法自动忽略文件,用来排除那些不希望传输的文件。
--existing 仅仅更新那些已经存在于DST的文件,而不备份那些新创建的文件。
--delete 删除那些DST中SRC没有的文件。
--delete-excluded 同样删除接收端那些被该选项指定排除的文件。
--delete-after 传输结束以后再删除。
--ignore-errors 及时出现IO错误也进行删除。
--max-delete=NUM 最多删除NUM个文件。
--partial 保留那些因故没有完全传输的文件,以是加快随后的再次传输。
--force 强制删除目录,即使不为空。
--numeric-ids 不将数字的用户和组id匹配为用户名和组名。
--timeout=time ip超时时间,单位为秒。
-I, --ignore-times 不跳过那些有同样的时间和长度的文件。
--size-only 当决定是否要备份文件时,仅仅察看文件大小而不考虑文件时间。
--modify-window=NUM 决定文件是否时间相同时使用的时间戳窗口,默认为0。
-T --temp-dir=DIR 在DIR中创建临时文件。
--compare-dest=DIR 同样比较DIR中的文件来决定是否需要备份。
-P 等同于 --partial。
--progress 显示备份过程。
-z, --compress 对备份的文件在传输时进行压缩处理。
--exclude=PATTERN 指定排除不需要传输的文件模式。
--include=PATTERN 指定不排除而需要传输的文件模式。
--exclude-from=FILE 排除FILE中指定模式的文件。
--include-from=FILE 不排除FILE指定模式匹配的文件。
--version 打印版本信息。
--address 绑定到特定的地址。
--config=FILE 指定其他的配置文件,不使用默认的rsyncd.conf文件。
--port=PORT 指定其他的rsync服务端口。
--blocking-io 对远程shell使用阻塞IO。
-stats 给出某些文件的传输状态。
--progress 在传输时现实传输过程。
--log-format=formAT 指定日志文件格式。
--password-file=FILE 从FILE中得到密码。
--bwlimit=KBPS 限制I/O带宽,KBytes per second。
-h, --help 显示帮助信息。实例
SSH方式
首先在服务端启动ssh服务:
service sshd start

启动 sshd: [确定]
使用rsync进行同步
接下来就可以在客户端使用rsync命令来备份服务端上的数据了,SSH方式是通过系统用户来进行备份的,如下:
rsync -vzrtopg --progress -e ssh --delete work@172.16.78.192:/www/* /databack/experiment/rsync

work@172.16.78.192's password:

receiving file list ...

5 files to consider

test/

a

0 100% 0.00kB/s 527:35:41 (1, 20.0% of 5)

b

67 100% 65.43kB/s 0:00:00 (2, 40.0% of 5)

c

0 100% 0.00kB/s 527:35:41 (3, 60.0% of 5)

dd

100663296 100% 42.22MB/s 0:00:02 (4, 80.0% of 5)

sent 96 bytes received 98190 bytes 11563.06 bytes/sec

total size is 100663363 speedup is 1024.19
上面的信息描述了整个的备份过程,以及总共备份数据的大小。
后台服务方式
启动rsync服务,编辑
/etc/xinetd.d/rsync文件,将其中的disable=yes改为disable=no,并重启xinetd服务,如下:vi /etc/xinetd.d/rsync #default: off
# description: The rsync server is a good addition to an ftp server, as it \
# allows crc checksumming etc.
service rsync {
disable = no
socket_type = stream
wait = no
user = root
server = /usr/bin/rsync
server_args = --daemon
log_on_failure += USERID
}/etc/init.d/xinetd restart
停止 xinetd: [确定]
启动 xinetd: [确定]创建配置文件,默认安装好rsync程序后,并不会自动创建rsync的主配置文件,需要手工来创建,其主配置文件为“/etc/rsyncd.conf”,创建该文件并插入如下内容:
vi /etc/rsyncd.conf

uid=root

gid=root

max connections=4

log file=/var/log/rsyncd.log

pid file=/var/run/rsyncd.pid

lock file=/var/run/rsyncd.lock

secrets file=/etc/rsyncd.passwd

hosts deny=172.16.78.0/22

[www]

comment= backup web

path=/www

read only = no

exclude=test

auth users=work
创建密码文件,采用这种方式不能使用系统用户对客户端进行认证,所以需要创建一个密码文件,其格式为“username:password”,用户名可以和密码可以随便定义,最好不要和系统帐户一致,同时要把创建的密码文件权限设置为600,这在前面的模块参数做了详细介绍。
echo "work:abc123" > /etc/rsyncd.passwd

chmod 600 /etc/rsyncd.passwd
备份,完成以上工作,现在就可以对数据进行备份了,如下:
rsync -avz --progress --delete work@172.16.78.192::www /databack/experiment/rsync

Password:

receiving file list ...

6 files to consider

./ files...

a

0 100% 0.00kB/s 528:20:41 (1, 50.0% of 6)

b

67 100% 65.43kB/s 0:00:00 (2, 66.7% of 6)

c

0 100% 0.00kB/s 528:20:41 (3, 83.3% of 6)

dd

100663296 100% 37.49MB/s 0:00:02 (4, 100.0% of 6)

sent 172 bytes received 98276 bytes 17899.64 bytes/sec

total size is 150995011 speedup is 1533.75
恢复,当服务器的数据出现问题时,那么这时就需要通过客户端的数据对服务端进行恢复,但前提是服务端允许客户端有写入权限,否则也不能在客户端直接对服务端进行恢复,使用rsync对数据进行恢复的方法如下:
rsync -avz --progress /databack/experiment/rsync/ work@172.16.78.192::www

Password:

building file list ...

6 files to consider

./

a

b

67 100% 0.00kB/s 0:00:00 (2, 66.7% of 6)

c

sent 258 bytes received 76 bytes 95.43 bytes/sec

total size is 150995011 speedup is 452080.87
2.rsync可以实现增量拷贝,支持远程同步
3.将passwd文件拷贝到/tmp目录下并命名为1.txt
-a : --archive 归档模式,表示以递归方式传输文件,并保持所有文件属性,等于-rlptgoD。
-v :--verbose 详细模式输出,查看拷贝的过程。
[root@sunyujun01 /]# rsync -av /etc/passwd /tmp/1.txt

sending incremental file list

passwd

sent 2484 bytes  received 31 bytes  5030.00 bytes/sec

total size is 2410  speedup is 0.96

[root@sunyujun01 /]#
4.远程拷贝
root:当前服务器用户名
10.21.95.122:远程服务器主机名
/tmp/1.txt:远程服务器目录
root@可以省略
[root@sunyujun01 /]# rsync -av /etc/passwd root@10.21.95.122:/tmp/1.txt
rsync常用选项
1.将root下rsyncs目录拷贝到tmp下的rsyncd目录
[root@sunyujun01 ~]# rsync -av /root/rsyncs/ /tmp/rsyncd/

sending incremental file list

./

sent 29 bytes  received 15 bytes  88.00 bytes/sec

total size is 0  speedup is 0.00

[root@sunyujun01 ~]#
2.加上大L选项可以把软连接所指向的源文件拷贝过来
[root@sunyujun01 ~]# rsync -avL /root/rsyncs/ /tmp/rsyncd/

sending incremental file list

sent 26 bytes  received 12 bytes  76.00 bytes/sec

total size is 0  speedup is 0.00

[root@sunyujun01 ~]#
3.--delete 选项是删除目标文件比原文件多的文件
[root@sunyujun01 rsyncs]# ls

111.txt

[root@sunyujun01 rsyncs]# cd /tmp/rsyncd/

[root@sunyujun01 rsyncd]# ls

111.txt  222.txt

[root@sunyujun01 rsyncd]# rsync -avL --delete /root/rsyncs/ /tmp/rsyncd/

sending incremental file list

./

deleting 222.txt

111.txt

sent 84 bytes  received 34 bytes  236.00 bytes/sec

total size is 0  speedup is 0.00

[root@sunyujun01 rsyncd]#
4.--exclude参数排除文件,支持通配符,支持多个--exclude连写
[root@sunyujun01 rsyncs]# ls

111.exe  111.txt

[root@sunyujun01 rsyncs]# ls /tmp/rsyncd/

[root@sunyujun01 rsyncs]# rsync -avL --exclude "*.txt" /root/rsyncs/ /tmp/rsyncd/

sending incremental file list

./

111.exe

sent 84 bytes  received 34 bytes  236.00 bytes/sec

total size is 0  speedup is 0.00

[root@sunyujun01 rsyncs]#
[root@sunyujun01 rsyncs]# rsync -avL --exclude "*.txt" --exclude "111.txt" /root/rsyncs/ /tmp/rsyncd/
5. -P 选项显示文件传输过程中详细过程
[root@sunyujun01 rsyncs]# ls /tmp/rsyncd/

[root@sunyujun01 rsyncs]# ls

111.exe  111.txt

[root@sunyujun01 rsyncs]# rsync -avP /root/rsyncs/ /tmp/rsyncd/

sending incremental file list

./

111.exe

           0 100%    0.00kB/s    0:00:00 (xfer#1, to-check=1/3)

111.txt

           0 100%    0.00kB/s    0:00:00 (xfer#2, to-check=0/3)

sent 140 bytes  received 53 bytes  386.00 bytes/sec

total size is 0  speedup is 0.00

[root@sunyujun01 rsyncs]# ls /tmp/rsyncd/

111.exe  111.txt

[root@sunyujun01 rsyncs]#
6.-u选项加入目标文件被更改过则同步的时候不将源文件直接覆盖目标文件,跳过这个文件
[root@sunyujun01 rsyncs]# ls

111.exe  111.txt

[root@sunyujun01 rsyncs]# ls /tmp/rsyncd/

111.exe  111.txt

[root@sunyujun01 rsyncs]# echo 111 > /tmp/rsyncd/111.txt

[root@sunyujun01 rsyncs]# cat /tmp/rsyncd/111.txt

111

[root@sunyujun01 rsyncs]# cat 111.txt

[root@sunyujun01 rsyncs]# rsync -avu /root/rsyncs/ /tmp/rsyncd/

sending incremental file list

sent 59 bytes  received 12 bytes  142.00 bytes/sec

total size is 0  speedup is 0.00

[root@sunyujun01 rsyncs]# cat /tmp/rsyncd/111.txt

111

[root@sunyujun01 rsyncs]#
5.-z传输中压缩
[root@sunyujun01 rsyncs]# rsync -avPz /root/rsyncs/ /tmp/rsyncd/

sending incremental file list

111.txt

           0 100%    0.00kB/s    0:00:00 (xfer#1, to-check=0/3)

sent 95 bytes  received 31 bytes  252.00 bytes/sec

total size is 0  speedup is 0.00

[root@sunyujun01 rsyncs]#
rsync通过ssh同步
1.现在有两台服务器10.21.95.122(源)和10.21.95.58(目标)使用rsync将122服务器文件111.txt同步到58服务器下
[root@sunyujun01 rsyncs]# rsync -avP 111.txt 10.21.95.58:/root/rsyncd/

The authenticity of host '10.21.95.58 (10.21.95.58)' can't be established.

ECDSA key fingerprint is 18:59:d2:46:49:14:c3:70:66:09:7f:70:85:49:d8:c3.

Are you sure you want to continue connecting (yes/no)? yes

Warning: Permanently added '10.21.95.58' (ECDSA) to the list of known hosts.

root@10.21.95.58's password:

sending incremental file list

111.txt

           0 100%    0.00kB/s    0:00:00 (xfer#1, to-check=0/1)

sent 71 bytes  received 31 bytes  0.93 bytes/sec

total size is 0  speedup is 0.00

[root@sunyujun01 rsyncs]#
[root@sunyujun02 rsyncd]# ls

111.txt

[root@sunyujun02 rsyncd]#
2.也可以拉文件源和目标路径换下位置
[root@sunyujun01 rsyncs]# rsync -avP 10.21.95.58:/root/rsyncd/111.txt 123.txt

root@10.21.95.58's password:

receiving incremental file list

111.txt

           0 100%    0.00kB/s    0:00:00 (xfer#1, to-check=0/1)

sent 30 bytes  received 76 bytes  14.13 bytes/sec

total size is 0  speedup is 0.00

[root@sunyujun01 rsyncs]# ls

111.txt  123.txt

[root@sunyujun01 rsyncs]#
3.如果对方主机端口不是22默认端口,可以用-e执行指定端口
[root@sunyujun01 rsyncs]# rsync -avP -e "ssh -p 22" 10.21.95.58:/root/rsyncd/111.txt 123.txt

root@10.21.95.58's password:

receiving incremental file list

sent 11 bytes  received 37 bytes  10.67 bytes/sec

total size is 0  speedup is 0.00

[root@sunyujun01 rsyncs]#
4.ssh 命令可以直接登录对方主机
[root@sunyujun01 rsyncs]# ssh -p 22 10.21.95.58

root@10.21.95.58's password:

Last login: Thu Jan 25 11:03:38 2018 from 10.21.95.218

[root@sunyujun02 ~]#
rsync通过服务同步
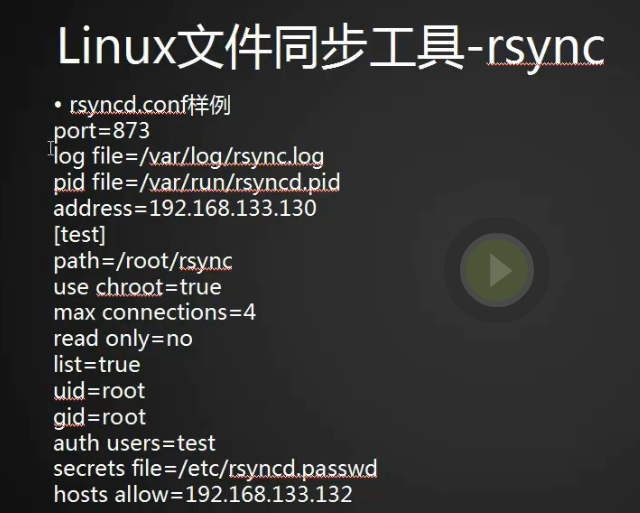
1.rsync配置文件
post = 873

log file=/var/log/rsync.log

pid file=/var/run/rsyncd.pid

address=10.21.95.122

[test]

path=/root/rsync

use chroot=true

max connections=4

read only=no

list=true

uid=root

gid=root

auth users=test

secrets file=/etc/rsyncd.passwd

hosts allow=10.21.95.58
2.启动rsync服务并查看是否启动成功
[root@sunyujun01 rsyncs]# rsync --daemon

[root@sunyujun01 rsyncs]# ps aux |grep rsync

root      47652  0.0  0.0 114644   380 ?        Ss   11:38   0:00 rsync --daemon

root      47696  0.0  0.0 112668   972 pts/2    R+   11:38   0:00 grep --color=auto rsync

[root@sunyujun01 rsyncs]#
[root@sunyujun01 rsyncs]# netstat -lntp

Active Internet connections (only servers)

Proto Recv-Q Send-Q Local Address           Foreign Address         State       PID/Program name

tcp        0      0 10.21.95.122:873        0.0.0.0:*               LISTEN      47652/rsync

tcp        0      0 0.0.0.0:3306            0.0.0.0:*               LISTEN      3558/mysqld

tcp        0      0 0.0.0.0:80              0.0.0.0:*               LISTEN      2835/nginx: master

tcp        0      0 192.168.122.1:53        0.0.0.0:*               LISTEN      4588/dnsmasq

tcp        0      0 0.0.0.0:22              0.0.0.0:*               LISTEN      1222/sshd

tcp        0      0 127.0.0.1:631           0.0.0.0:*               LISTEN      1223/cupsd

tcp6       0      0 :::22                   :::*                    LISTEN      1222/sshd

tcp6       0      0 ::1:631                 :::*                    LISTEN      1223/cupsd

[root@sunyujun01 rsyncs]#
3.执行同步命令,报route错误
[root@sunyujun02 rsyncd]# rsync -avP /root/rsyncd/111.txt 10.21.95.122::test/123.txt

rsync: failed to connect to 10.21.95.122 (10.21.95.122): No route to host (113)

rsync error: error in socket IO (code 10) at clientserver.c(122) [sender=3.0.9]

[root@sunyujun02 rsyncd]#
4.telnet测试下链接情况
[root@sunyujun02 rsyncd]# ping 10.21.95.122

PING 10.21.95.122 (10.21.95.122) 56(84) bytes of data.

64 bytes from 10.21.95.122: icmp_seq=1 ttl=64 time=45.8 ms

64 bytes from 10.21.95.122: icmp_seq=2 ttl=64 time=0.524 ms

^C

--- 10.21.95.122 ping statistics ---

2 packets transmitted, 2 received, 0% packet loss, time 1002ms

rtt min/avg/max/mdev = 0.524/23.205/45.886/22.681 ms

[root@sunyujun02 rsyncd]# telnet 10.21.95.122

Trying 10.21.95.122...

telnet: connect to address 10.21.95.122: No route to host

[root@sunyujun02 rsyncd]# telnet 10.21.95.122 873

Trying 10.21.95.122...

telnet: connect to address 10.21.95.122: No route to host

[root@sunyujun02 rsyncd]#
5.检查是否是iptables的问题
[root@sunyujun02 rsyncd]# iptables -nvL

Chain INPUT (policy ACCEPT 0 packets, 0 bytes)

 pkts bytes target     prot opt in     out     source               destination

    0     0 ACCEPT     udp  --  virbr0 *       0.0.0.0/0            0.0.0.0/0            udp dpt:53

    0     0 ACCEPT     tcp  --  virbr0 *       0.0.0.0/0            0.0.0.0/0            tcp dpt:53

    0     0 ACCEPT     udp  --  virbr0 *       0.0.0.0/0            0.0.0.0/0            udp dpt:67

    0     0 ACCEPT     tcp  --  virbr0 *       0.0.0.0/0            0.0.0.0/0            tcp dpt:67

 5914   14M ACCEPT     all  --  *      *       0.0.0.0/0            0.0.0.0/0            state RELATED,ESTABLISHED

    0     0 ACCEPT     icmp --  *      *       0.0.0.0/0            0.0.0.0/0

    0     0 ACCEPT     all  --  lo     *       0.0.0.0/0            0.0.0.0/0

   10   560 ACCEPT     tcp  --  *      *       0.0.0.0/0            0.0.0.0/0            state NEW tcp dpt:22

 131K   23M REJECT     all  --  *      *       0.0.0.0/0            0.0.0.0/0            reject-with icmp-host-prohibited

Chain FORWARD (policy ACCEPT 0 packets, 0 bytes)

 pkts bytes target     prot opt in     out     source               destination

    0     0 ACCEPT     all  --  *      virbr0  0.0.0.0/0            192.168.122.0/24     ctstate RELATED,ESTABLISHED

    0     0 ACCEPT     all  --  virbr0 *       192.168.122.0/24     0.0.0.0/0

    0     0 ACCEPT     all  --  virbr0 virbr0  0.0.0.0/0            0.0.0.0/0

    0     0 REJECT     all  --  *      virbr0  0.0.0.0/0            0.0.0.0/0            reject-with icmp-port-unreachable

    0     0 REJECT     all  --  virbr0 *       0.0.0.0/0            0.0.0.0/0            reject-with icmp-port-unreachable

    0     0 REJECT     all  --  *      *       0.0.0.0/0            0.0.0.0/0            reject-with icmp-host-prohibited

Chain OUTPUT (policy ACCEPT 5389 packets, 425K bytes)

 pkts bytes target     prot opt in     out     source               destination

    0     0 ACCEPT     udp  --  *      virbr0  0.0.0.0/0            0.0.0.0/0            udp dpt:68

[root@sunyujun02 rsyncd]#
6.将Firewalls停掉 systemctl stop firewalld 或 iptables -F
[root@sunyujun02 rsyncd]# systemctl stop firewalld
7.再测telnet成功,按ctrl+】再按quit退出
[root@sunyujun02 rsyncd]# telnet 10.21.95.122 873

Trying 10.21.95.122...

Connected to 10.21.95.122.

Escape character is '^]'.

@RSYNCD: 30.0
8.再试输入密码又报错需要密码,
[root@sunyujun02 rsyncd]# rsync -avP /root/rsyncd/111.txt 10.21.95.122::test/123.txt

Password:

@ERROR: auth failed on module test

rsync error: error starting client-server protocol (code 5) at main.c(1516) [sender=3.0.9]

[root@sunyujun02 rsyncd]#
9.先把配置文件中的密码项注释掉
post = 873

log file=/var/log/rsync.log

pid file=/var/run/rsyncd.pid

address=10.21.95.122

[test]

path=/root/rsync

use chroot=true

max connections=4

read only=no

list=true

uid=root

gid=root

#auth users=test

#secrets file=/etc/rsyncd.passwd

hosts allow=10.21.95.58
10.成功同步
[root@sunyujun02 rsyncd]# rsync -avP /root/rsyncd/111.txt 10.21.95.122::test/123.txt

sending incremental file list

111.txt

           0 100%    0.00kB/s    0:00:00 (xfer#1, to-check=0/1)

sent 67 bytes  received 27 bytes  188.00 bytes/sec

total size is 0  speedup is 0.00

[root@sunyujun02 rsyncd]#
[root@sunyujun01 rsyncs]# ls

123.txt

[root@sunyujun01 rsyncs]#
11.将远程文件拉下来也是可以的
[root@sunyujun02 rsyncd]# rsync -avP  10.21.95.122::test/123.txt /root/rsyncd/456.txt

receiving incremental file list

123.txt

           0 100%    0.00kB/s    0:00:00 (xfer#1, to-check=0/1)

sent 45 bytes  received 98 bytes  26.00 bytes/sec

total size is 0  speedup is 0.00

[root@sunyujun02 rsyncd]#
[root@sunyujun02 rsyncd]# ls

111.txt  456.txt

[root@sunyujun02 rsyncd]#
12.如果不是默认的873端口试用命令时需要指定端口
rsync -avP --port 8370 10.21.95.122::test/123.txt /root/rsyncd/456.txt
13.配置文件中的list选项为true可列出模块名
[root@sunyujun02 rsyncd]# rsync 10.21.95.122::

test

[root@sunyujun02 rsyncd]#
14.开启密码文件选项
post = 873

log file=/var/log/rsync.log

pid file=/var/run/rsyncd.pid

address=10.21.95.122

[test]

path=/root/rsyncs

use chroot=true

max connections=4

read only=no

list=true

uid=root

gid=root

auth users=test

secrets file=/etc/rsyncd.passwd

hosts allow=10.21.95.58
15.编辑密码文件
[root@sunyujun01 etc]# vim rsyncd.passwd

[root@sunyujun01 etc]# chmod 600 rsyncd.passwd

[root@sunyujun01 etc]#
16.rsyncd.passwd文件
test:sunyujun02
17.再次测试需要输入密码,测试成功。
[root@sunyujun02 rsyncd]# rsync -avP /root/rsyncd/456.txt  test@10.21.95.122::test/123.txt

Password:

sending incremental file list

sent 28 bytes  received 8 bytes  6.55 bytes/sec

total size is 0  speedup is 0.00

[root@sunyujun02 rsyncd]#
18.还有一种情况可以将用户的密码保存到一个文件中,就不用每次用户都需要输入了
[root@sunyujun02 rsyncd]# cat /etc/rsync_pass.txt

sunyujun02

[root@sunyujun02 rsyncd]#
19.哈哈不用输入密码了直接成功
[root@sunyujun02 rsyncd]# chmod 600 /etc/rsync_pass.txt

[root@sunyujun02 rsyncd]# rsync -avP /root/rsyncd/456.txt --password-file=/etc/rsync_pass.txt test@10.21.95.122::test/123.txt

sending incremental file list

sent 28 bytes  received 8 bytes  72.00 bytes/sec

total size is 0  speedup is 0.00

[root@sunyujun02 rsyncd]#
[root@sunyujun02 rsyncd]# rsync -avP /root/rsyncd/ --password-file=/etc/rsync_pass.txt test@10.21.95.122::test/

sending incremental file list

./

1.php

           0 100%    0.00kB/s    0:00:00 (xfer#1, to-check=2/4)

111.txt

           0 100%    0.00kB/s    0:00:00 (xfer#2, to-check=1/4)

456.txt

           0 100%    0.00kB/s    0:00:00 (xfer#3, to-check=0/4)

sent 188 bytes  received 68 bytes  512.00 bytes/sec

total size is 0  speedup is 0.00

[root@sunyujun02 rsyncd]#
20.允许那些ip链接
host allow ip地址
Linux系统日志
1.系统日志文件
[root@sunyujun01 log]# less /var/log/messages
2.有一个问题日志一直增加文件会很大,为了解决这个问题,系统有一个日志切割配置文件
[root@sunyujun01 log]# du -sh /var/log/messages

1.7M    /var/log/messages

[root@sunyujun01 log]# ls /var/log/messages*

/var/log/messages           /var/log/messages-20180119

/var/log/messages-20171226  /var/log/messages-20180122

/var/log/messages-20180103

[root@sunyujun01 log]#
[root@sunyujun01 log]# cat /etc/logrotate.conf
3.硬件相关日志
[root@sunyujun01 log]# dmesg
4.查看用户登录日志last
screen工具

Screen是一款由GNU计划开发的用于命令行终端切换的自由软件
http://man.linuxde.net/screen
rsync工具介绍的更多相关文章
- Linux centos7 rsync工具介绍、rsync常用选项、rsync通过ssh同步
一.rsync工具介绍 rsync是类unix系统下的数据镜像备份工具,从软件的命名上就可以看出来了——remote sync.rsync是Linux系统下的文件同步和数据传输工具,它采用“rsync ...
- rsync工具介绍 rsync常用选项 rsync通过ssh同步
linux文件同步工具-rsync [root@centos7 tmp]# yum install -y rsync rsync可以增量的同步,只同步变更的文件 把/etc/passwd 同步到/tm ...
- Rsync,Linux日志及Screen工具介绍
第十六次课 Rsync,Linux日志及Screen工具介绍 目录 一.rsync工具介绍 二.rsync常用选项 三.rsync通过ssh同步 四. rsync通过服务同步 五.linux系统日志 ...
- rsync工具、rsync常用选项、以及rsync通过ssh同步 使用介绍
第8周5月14日任务 课程内容: 10.28 rsync工具介绍10.29/10.30 rsync常用选项10.31 rsync通过ssh同步 10.28 rsync工具介绍 rsync是一个同步的工 ...
- Rsync服务介绍与配置
Rsync 简要介绍 rsync 是一个用于增量文件传输的开源工具,不得不说,rsync简直是不同服务器间传输文件.同步文件的利器.与FTP相比,它具有非常简单的安装和配置方法.而且,rsync可以只 ...
- rsync工具
rsync工具 一.介绍 1.可以实现 本地数据 <----------> 远程数据/本地数据 的传输 2.两种通信方式(man rsync) (1)remote shell(一个冒号 ...
- rsync的介绍及参数详解,配置步骤,工作模式介绍
rsync的介绍及参数详解,配置步骤,工作模式介绍 rsync是类unix系统下的数据镜像备份工具.它是快速增量备份.全量备份工具. Sync可以远程同步,支持本地复制,或者与其他SSH.rsync主 ...
- Rsync参数介绍
Rsync参数介绍 一.Rsync Rsync是一款开源的.快速的.多功能的.可实现全量及增量的本地或远程数据镜像同步备份的优秀工具.rsync适用于unix/linux/windows等多种操作 ...
- 《连载 | 物联网框架ServerSuperIO教程》- 14.配制工具介绍,以及设备驱动、视图驱动、服务实例的挂载
注:ServerSuperIO二次开发套件授权码申请---截止到:2016-12-09 1.C#跨平台物联网通讯框架ServerSuperIO(SSIO)介绍 <连载 | 物联网框架Server ...
随机推荐
- Problem F: 调用函数,判断各位数字立方和是否等于它本身
#include<stdio.h> #include<math.h> int is(int number)//定义函数 { ; ) { s=number%; sum=sum+p ...
- iOS \U6b3e转字符串
-(NSString *)replaceUnicode:(NSString *)unicodeStr { NSString *tempStr1 = [unicodeStr stringByReplac ...
- MYSQL复习笔记2-自带工具介绍
Date: 20140102Auth: Jin 一.mysql 命令行客户端1)base-h host-P port--socket=path,-S path用于连接的套接字文件替换使用IP PORT ...
- Web安全开发指南--数据验证
1.数据验证 4.1.输入数据验证安全规则 1 数据验证必须放在服务器端进行. 2 至少对输入数据的数据类型.数据范围和数据长度进行验证. 3 所有来自不可信数据源(比如网络.用户命令.数据库和文件系 ...
- 用WPF写了一个弹幕播放器
看弹幕视频的时候,如果不发弹幕,一个本地的弹幕播放器往往能带来更好的体验.目前已经有一些实现了,最初用过一个MukioPlayer, 后来又用过一个用C++写的BiliLocal,这个程序能自动下载弹 ...
- 【shiro】关于shiro匹配URL的小用法
今天涉及到这个地方 1.登录请求需要带着username和password一起过去,这样的话发出的请求就是:http://localhost:8080/wxSecond/welcome/login.h ...
- IIS_右键点击浏览网站没有反应
现象: 点击浏览不会打开浏览器,没有任何反应 解决方法: 将IE设为默认浏览器即可
- 如何将你的github仓库部署到github pages(github.io博客)
详细的git教程:http://www.cnblogs.com/tugenhua0707/p/4050072.html#!comments 作为教程,很重要的一点就是要最大化的傻瓜化,本文将从新建一个 ...
- C语言大总结
C语言大总结 一. C语言基本常识 1.语言由函数组成 2.main是程序入口 3.C语言中不能出现中文或中文字符 (凝视和字符串除外) keyword : C语言提供表示特殊含义的单词 特点 : 1 ...
- Unity3D新手教学,让你十二小时,从入门到掌握!(一) [转]
http://blog.csdn.net/aries_h/article/details/47307799 版权声明:本文为Aries原创文章,转载请标明出处.如有不足之处欢迎提出意见或建议,联系QQ ...