Spring4.2.3+Hibernate4.3.11整合( IntelliJ maven项目)(使用Annotation注解)(Junit测试类)
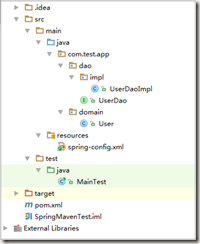
1. 在IntelliJ中新建maven项目
给出一个建好的示例
2. 在pom.xml中配置依赖
包括:

spring-context

spring-orm

hibernate-core

mysql

commons-dbcp
3. resources右键new一个Xml Configuration File--Spring Config配置文件:spring-config.xml(或者applicationContext.xml)
配置dataSource、sessionFactory及transactionManager。
可能会提示一个Application Context的什么配置,按提示操作即可;或者在IntelliJ工具的Project Structure下的Facets中进行spring的配置。
<?xml version="1.0" encoding="UTF-8"?>

<beans xmlns="http://www.springframework.org/schema/beans"

       xmlns:xsi="http://www.w3.org/2001/XMLSchema-instance" xmlns:tx="http://www.springframework.org/schema/tx"

       xmlns:context="http://www.springframework.org/schema/context"

       xsi:schemaLocation="http://www.springframework.org/schema/beans http://www.springframework.org/schema/beans/spring-beans.xsd http://www.springframework.org/schema/tx http://www.springframework.org/schema/tx/spring-tx.xsd http://www.springframework.org/schema/context http://www.springframework.org/schema/context/spring-context.xsd">

       <!--自动扫描指定包及其子包下的所有Bean类-->

       <context:component-scan base-package="com.test.app.dao.impl"/>

       <bean id="dataSource" class="org.apache.commons.dbcp.BasicDataSource" destroy-method="close">

              <property name="driverClassName" value="com.mysql.jdbc.Driver"/>

              <property name="url" value="jdbc:mysql://localhost:3306/javaee"/>

              <property name="username" value="root"/>

              <property name="password" value="root"/>

       </bean>

       <bean id="sessionFactory" class="org.springframework.orm.hibernate4.LocalSessionFactoryBean">

              <property name="dataSource" ref="dataSource"/>

              <property name="annotatedClasses">

                     <list>

                            <value>com.test.app.domain.User</value>

                     </list>

              </property>

              <property name="hibernateProperties">

                     <value>

                            hibernate.dialect=org.hibernate.dialect.MySQLDialect

                            hibernate.hbm2ddl.auto=update

                            hibernate.show_sql=true

                            <!--hibernate.format_sql=true-->

                     </value>

              </property>

       </bean>

       <!--配置hibernate事务管理器-->

       <bean id="transactionManager" class="org.springframework.orm.hibernate4.HibernateTransactionManager">

              <property name="sessionFactory" ref="sessionFactory"/>

       </bean>

       <!--根据Annotation来生成事务代理-->

       <tx:annotation-driven transaction-manager="transactionManager"/>

</beans>
4. 新建User实体类,并进行Annotation注解
@Entity    //把当前bean设置成实体对象

@Table(name = "user")    //设置数据库的表名,默认为类名首字母小写

public class User {

    @Id

    @GeneratedValue(strategy=GenerationType.IDENTITY)   //id生成策略:自增

    @Column(name = "user_id")

    private int id;

    @Column

    private String name;

    @Column

    private int age;

//省略setter和getter方法

}
5. 新建UserDao接口及其实现类UserDaoImpl,并进行Annotation注解
public interface UserDao {

    Integer insert(User user);

    void delete(User user);

    void update(User user);

    User find(int id);

}
UserDaoImpl实现类代码如下:
//指定该类作为Spring Bean,实例名为userDao。默认为Bean类的首字母小写

@Repository("userDao")  //标注一个DAO组建类

@Transactional

public class UserDaoImpl implements UserDao {

    @Autowired    //自动装配  或者用@Resource(name = "sessionFactory")配置依赖

    private SessionFactory sessionFactory;

    @Override

    public Integer insert(User user) {

        return (Integer) sessionFactory.getCurrentSession().save(user);

    }

    @Override

    public void delete(User user) {

        sessionFactory.getCurrentSession().delete(user);

    }

    @Override

    public void update(User user) {

        sessionFactory.getCurrentSession().update(user);

    }

    @Override

    public User find(int id) {

        return (User) sessionFactory.getCurrentSession().get(User.class, id);

    }

}
使用@Repository注解需要在Spring的配置文件中指定搜索路径,如下:
<context:component-scan base-package="com.test.app.dao.impl"/>
使用@Transactional注解需要在Spring配置文件中增加如下配置片段
<!--配置hibernate事务管理器-->

<bean id="transactionManager" class="org.springframework.orm.hibernate4.HibernateTransactionManager">

       <property name="sessionFactory" ref="sessionFactory"/>

</bean>

<!--根据Annotation来生成事务代理-->

<tx:annotation-driven transaction-manager="transactionManager"/>
6. 新建测试类MainTest
public class MainTest {

    public static void main(String[] args) {

        ApplicationContext applicationContext = new ClassPathXmlApplicationContext("spring-config.xml");

        UserDao userDao = (UserDao) applicationContext.getBean("userDao");

        User user = new User();

        user.setName("zhangsan");

        user.setAge(23);

        userDao.insert(user);

    }

}
在此,推荐使用junit测试类进行测试,下面进行简要介绍
1. 添加依赖
在pom.xml中添加junit和spring-test依赖,如下:
<dependency>

    <groupId>junit</groupId>

    <artifactId>junit</artifactId>

    <version>4.12</version>

</dependency>

<dependency>

    <groupId>org.springframework</groupId>

    <artifactId>spring-test</artifactId>

    <version>4.2.3.RELEASE</version>

</dependency>
2. 创建测试类
UserDaoImpl——Alt+Enter——Create Test,将自动新建一个UserDapImplTest测试类
3. 配置测试类
在类名上方添加如下内容,用于配置Spring配置文件的位置
@RunWith(SpringJUnit4ClassRunner.class)

@ContextConfiguration(locations = "classpath:spring-config.xml")
4. 执行测试类
类名:右键——Run,执行所有方法
方法名:右键——Run,执行当前方法
5. 示例代码
@RunWith(SpringJUnit4ClassRunner.class)

@ContextConfiguration(locations = "classpath:spring-config.xml")

public class UserDaoImplTest {

    @Resource

    private UserDao userDao;

    @Test

    public void testInsert() throws Exception {

        //省略...

    }

    @Test

    public void testDelete() throws Exception {

        //省略...

    }

    @Test

    public void testUpdate() throws Exception {

        User user = userDao.find(2);

        user.setAge(20);

        userDao.update(user);

    }

    @Test

    public void testFind() throws Exception {

        User user = userDao.find(2);

        System.out.println(user.getName());

    }

}
Spring4.2.3+Hibernate4.3.11整合( IntelliJ maven项目)(使用Annotation注解)(Junit测试类)的更多相关文章
- Spring4.2.3+Hibernate4.3.11整合( IntelliJ maven项目)
1. 在IntelliJ中新建maven项目 给出一个建好的示例 2. 在pom.xml中配置依赖 包括: spring-context spring-orm hibernate-core mysql ...
- (转)Spring4.2.5+Hibernate4.3.11+Struts2.3.24整合开发
http://blog.csdn.net/yerenyuan_pku/article/details/52902851 前面我们已经学会了Spring4.2.5+Hibernate4.3.11+Str ...
- (转)Spring4.2.5+Hibernate4.3.11组合开发
http://blog.csdn.net/yerenyuan_pku/article/details/52887573 搭建和配置Spring与Hibernate整合的环境 今天我们来学习Spring ...
- spring mvc4.1.6 + spring4.1.6 + hibernate4.3.11 + mysql5.5.25 开发环境搭建及相关说明
一.准备工作 开始之前,先参考上一篇: struts2.3.24 + spring4.1.6 + hibernate4.3.11 + mysql5.5.25 开发环境搭建及相关说明 struts2.3 ...
- (转)Spring4.2.5+Hibernate4.3.11+Struts1.3.8集成方案二
http://blog.csdn.net/yerenyuan_pku/article/details/52894958 前面我们已经集成了Spring4.2.5+Hibernate4.3.11+Str ...
- (转)Spring4.2.5+Hibernate4.3.11+Struts1.3.8集成方案一
http://blog.csdn.net/yerenyuan_pku/article/details/52888808 前面我们已经集成了Spring4.2.5+Hibernate4.3.11这两个框 ...
- Spring Data Jpa示例(IntelliJ maven项目)
1. 在IntelliJ中新建maven项目 给出一个建好的示例,(本示例中省略了业务逻辑组件UserService) 2. 在pom.xml中配置依赖 包括: spring-context spri ...
- 高并发秒杀系统--junit测试类与SpringIoc容器的整合
1.原理是在Junit启动时加载SpringIoC容器 2.SpringIoC容器要根据Spring的配置文件加载 [示例代码] package org.azcode.dao; import org. ...
- struts2.3.24 + spring4.1.6 + hibernate4.3.11+ mysql5.5.25开发环境搭建及相关说明
一.目标 1.搭建传统的ssh开发环境,并成功运行(插入.查询) 2.了解c3p0连接池相关配置 3.了解验证hibernate的二级缓存,并验证 4.了解spring事物配置,并验证 5.了解spr ...
随机推荐
- 【转】SetThreadLocale解决越南文乱码问题
转自http://hi.baidu.com/killwolf110/item/838d56224067c63395f62b70 程序需要运行在越南地区,语言为越南文,操作系统为英文版,程序支持unic ...
- Python_selenium中类函数模块的简单介绍
Python_selenium中类函数模块的简单介绍 一.demo1.py的代码如下所示 #coding:utf-8 class ClassA(object): string = "这是一个 ...
- 一起talk C栗子吧(第二十五回:C语言实例--二分查找)
各位看官们,大家好,上一回中咱们说的是顺序查找的样例,这一回咱们说的样例是:二分查找.闲话休 提,言归正转. 让我们一起talk C栗子吧. 看官们,我们在上一回中说了查找的相关内容,而且介绍了一种查 ...
- Http服务器实现文件上传与下载(三)
一.引言 在前2章的内容基本上已经讲解了整个的大致流程.在设计Http服务器时,我设计为四层的结构,最底层是网络传输层,就是socket编程.接着一层是请求和响应层,叫做Request和Respons ...
- 认识tornado(一)
tornado 源码包中 demos 目录下包含一些示例程序,就从最简单的 helloworld.py 来看一个 tornado 应用程序的代码结构. 完整的实例程序如下: 01 #!/usr/bin ...
- vijos P1740 聪明的质检员
题目链接:传送门 题目大意:给你n个物品,每件物品有重量 W 和价值 V,给m个区间,和一个标准值.(n,m最大200000) 要求找到一个值x,使得m个所有区间的权值和与标准值的差的绝对值最小.单个 ...
- [LintCode] 第k大元素
基于快速排序: class Solution { public: /* * param k : description of k * param nums : description of array ...
- 决策树ID3算法python实现 -- 《机器学习实战》
from math import log import numpy as np import matplotlib.pyplot as plt import operator #计算给定数据集的香农熵 ...
- Downgrading an Exchange 2010 Server(Exchange降级)
Downgrading an Exchange 2010 Server Microsoft Exchange Server 2010 comes in two versions: enterprise ...
- MVC异步消息推送机制
在MVC里面,有异步控制器,可以实现模拟消息推送机制功能 1.控制器要继承至AsyncController,如 public class RealTimeController : AsyncContr ...