Xamarin.Android之ListView和Adapter
一、前言
如今不管任何应用都能够看到列表的存在,而本章我们将学习如何使用Xamarin去实现它,以及如何使用适配器和自定义适配器(本文中的适配器的主要内容就是将原始的数据转换成了能够供列表控件显示的项)。
二、简介适配器
在开始之前我们需要先了解下适配器,首先是提供给我们使用的适配器之间的关系:
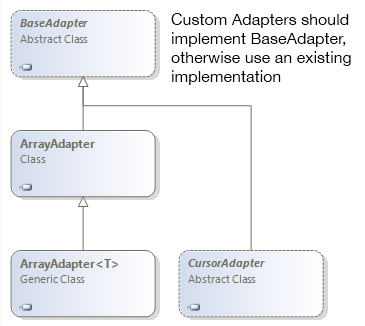
下面我们将上面的适配器进行简单的介绍:
BaseAdapter:顾名思义,就是所以适配器的基类,但是我们不能将其实例化,因为它是一个虚类,一般我们都是继承该类并实现其中的方法,形成形成自定义的列表(大多数情况下我们都会使用到它)。
ArrayAdapter和ArrayAdapter<T>:就是专门用于将列表数据的适配器,该适配器内部已经实现了BaseAdapter的方法,所以我们只需要指定对应的数据项以及列表项资源即可。
CursorAdapter:上面的适配器只是用于列表数据,而该适配器则可以用在将数据库返回的结果集显示到列表中去,当然在难度上也要比上面的适配器高。
三、正文
1.简单列表
下面我们将利用ListActivity和ArrayAdapater<T>去实现一个简单的列表界面,下面为该示例的代码(MainActivity.cs):
     public class MainActivity : ListActivity

     {

         protected string[] items;

         protected override void OnCreate(Bundle bundle)

         {

             base.OnCreate(bundle);

             items = new string[]{

                 "First","Second","Third"

             };

             ListAdapter = new ArrayAdapter<string>(this, Android.Resource.Layout.SimpleListItem1, items);

         }

         protected override void OnListItemClick(ListView l, View v, int position, long id)

         {

             var t = items[position];

             Toast.MakeText(this, t, ToastLength.Short).Show();

         }

 }
这里有一个重要的关键词就是ListActivity,如果存在一个界面整个界面都是列表,那么我们就可以继承这个特殊的活动,并且可以通过ListView属性和ListAdapter去控制,同时还可以响应关于列表的事件。其中我们利用了ArrayAdapter给列表指定了一个适配器,而这个适配器的第一个参数是当前的上下文,第二个是列表中的项的界面,最后一个就是对应的数据了。
最后将显示如下的界面:
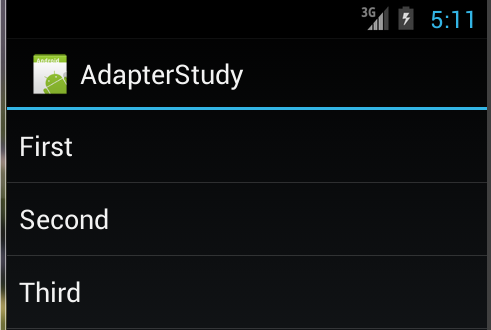
当我们点击不同的项后,还能看到底部显示了当前我们选择的项。这个功能就是在我们重写了OnListItemClick实现了,正如代码中所示,我们根据position获取指定的数据,然后通过Toast将其显示出来。
2.自定义一个适配器
简单介绍过如何使用适配器后,我们将开始学习如何利用BaseAdapter自定义一个适配器,能够促使我们理解适配器内部的工作原理,首先我们来看下笔者的写的代码:
         public class MyCustomeAdapter : BaseAdapter<string>

         {

             string[] items;

             Activity activity;

             public MyCustomeAdapter(Activity context, string[] values)

                 : base()

             {

                 activity = context;

                 items = values;

             }

             public override string this[int position]

             {

                 get { return items[position]; }

             }

             public override int Count

             {

                 get { return items.Length; }

             }

             public override long GetItemId(int position)

             {

                 return position;

             }

             public override View GetView(int position, View convertView, ViewGroup parent)

             {

                 View v = convertView;

                 if (v == null)

                     v = activity.LayoutInflater.Inflate(Android.Resource.Layout.SimpleListItem1, null);

                 v.FindViewById<TextView>(Android.Resource.Id.Text1).Text = items[position];

                 return v;

             }

         }
其中最主要的是GetView方法,ListView和ListActivity主要是通过调用该方法获取对应项的视图,然后将其添加为子控件,从而显示,如果我们需要显示例如淘宝等app那种复杂的列表就需要通过重写该方法达到,细心的读者可以发现笔者是先判断convertView是否为null,如果为null才通过Inflate方法重新实例化一个视图,关于这部分我们可以参考该文章。
关于其他的方法相信大家靠名称就能够明白了,这里就不多做解释,具体的使用方法如下所示:
         protected override void OnCreate(Bundle bundle)

         {

             base.OnCreate(bundle);

             string[] items = new string[]{

                 "First","Second","Third"

             };

             ListAdapter = new MyCustomeAdapter(this, items);

         }
3.关键字索引
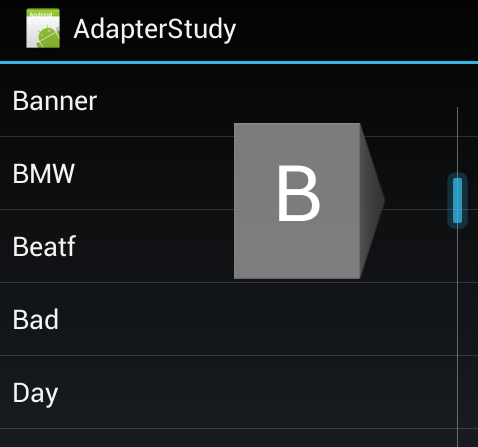
在手机的使用中,大家一定经常使用着电话簿,当我们点击右边的滚动条进行滑动的时候还会显示a-z的字母并且列表的内容也会根据这些字母的变化发生变化,将快速定位到联系人姓名为指定字母开头的位置,本节我们将会学习如何实现该功能。
提供这个功能我们需要实现一个接口,这个接口就是ISectionIndexer,下面是关于该接口的代码:
     public interface ISectionIndexer : IJavaObject, IDisposable

     {

         int GetPositionForSection(int section);

         int GetSectionForPosition(int position);

         Object[] GetSections();

     }
关于这些接口简单的介绍下:
GetPositionForSection:根据关键字的索引获取该关键字的起始数据索引。
GetSectionForPosition:根据数据索引获取关键字索引。
GetSections:返回关键字数组。
笔者为了能够节约时间,所以利用上节的示例代码,在MyCustomeAdapter中实现了ISectionIndexer接口,下面是笔者的代码:
 public class MyCustomeAdapter : BaseAdapter<string> , ISectionIndexer

         {

             string[] items;

             Activity activity;

             Dictionary<string, int> alphaindex;

             Java.Lang.Object[] sectionsObjects;

             string[] sections;

             public MyCustomeAdapter(Activity context, string[] values)

                 : base()

             {

                 activity = context;

                 items = values;

                 alphaindex = new Dictionary<string, int>();

                 //获取每种关键字的起始数据索引

                 for (int i = ; i < items.Length; i++)

                 {

                     string key = items[i][].ToString();

                     if (!alphaindex.ContainsKey(key))

                         alphaindex.Add(key, i);

                 }

                 //将关键字转换成数据

                 sections = new string[alphaindex.Keys.Count];

                 alphaindex.Keys.CopyTo(sections, );

                 //将关键字转换成Java.Lang.String类型

                 sectionsObjects = new Java.Lang.Object[alphaindex.Keys.Count];

                 for (int i = ; i < sections.Length; i++)

                 {

                     sectionsObjects[i] = new Java.Lang.String(sections[i]);

                 }

             }

             public override string this[int position]

             {

                 get { return items[position]; }

             }

             public override int Count

             {

                 get { return items.Length; }

             }

             public override long GetItemId(int position)

             {

                 return position;

             }

             public override View GetView(int position, View convertView, ViewGroup parent)

             {

                 View v = convertView;

                 if (v == null)

                     v = activity.LayoutInflater.Inflate(Android.Resource.Layout.SimpleListItem1, null);

                 v.FindViewById<TextView>(Android.Resource.Id.Text1).Text = items[position];

                 return v;

             }

             public int GetPositionForSection(int section)

             {

                 //根据关键字索引获取关键字,然后在根据关键字从alphaindex获取对应的value,即该关键字的起始数据索引

                 return alphaindex[sections[section]];

             }

             public int GetSectionForPosition(int position)

             {

                 int preposition = ;

                 //循环关键字

                 for (int i = ; i < sections.Length; i++)

                 {

                     //判断当前的索引是否在i所在关键字的范围内

                     if (GetPositionForSection(i) > position)

                         break;

                     preposition = i;

                 }

                 return preposition;

             }

             public Java.Lang.Object[] GetSections()

             {

                 return sectionsObjects;

             }

         }
关于该接口方法中的实现可以看代码中的注释,在使用的时候也要写如下代码:
         protected override void OnCreate(Bundle bundle)

         {

             base.OnCreate(bundle);

             string[] items = new string[]{

                 "Apple","As","Banner",

                 "BMW","Beatf","Bad",

                 "Day","Dazy","Eat","Else",

                 "Feel","Fly","Go","Hourse"

             };

             ListAdapter = new MyCustomeAdapter(this, items);

             ListView.FastScrollEnabled = true;

             ListView.FastScrollAlwaysVisible = true;

         }
按照官方的说法其实只要将FastScrollEnabled设置为true即可,但是笔者在虚拟机中测试的时候并不会显示,所以笔者还要再将FastScrollAlwaysVisible一起设置为true才可以看到效果,下面为笔者的虚拟机上的截图:
4.Cursor列表
前面我们都是通过数组来填充列表的,但是实际情况下数据大多数都是来自于数据库,而数据库通过查询后将会得到ICursor类型的返回值,当然我们也可以通过将ICursor转换成数组或者键值对,但这些都是没有必要的,因为有自带的适配器(CursorAdapter)。
首先我们需要创建一个数据库,下面是笔者的代码,想学习数据库的可以参考本人的以下随笔:
《Xamarin.Android之SQLiteOpenHelper》
《Xamarin.Android之ContentProvider》
《Xamarin.Android之SQLite.NET ORM》
代码如下所示:
     public class TestDatabase : SQLiteOpenHelper

     {

         public TestDatabase(Context context):base(context,"testdatabase.db",null,)

         {}

         public override void OnCreate(SQLiteDatabase db)

         {

             db.ExecSQL("CREATE TABLE TestTable ( _id INTEGER PRIMARY KEY AUTOINCREMENT NOT NULL,name TEXT NOT NULL)");

             db.ExecSQL("INSERT INTO TestTable (name) values('Vegetables')");

             db.ExecSQL("INSERT INTO TestTable (name) values('Fruits')");

             db.ExecSQL("INSERT INTO TestTable (name) values('Flower Buds')");

             db.ExecSQL("INSERT INTO TestTable (name) values('Legumes')");

             db.ExecSQL("INSERT INTO TestTable (name) values('Bulbs')");

             db.ExecSQL("INSERT INTO TestTable (name) values('Tubers')");

         }

         public override void OnUpgrade(SQLiteDatabase db, int oldVersion, int newVersion)

         {

         }

 }
数据库创建部分比较简单,主要的重点是下面的代码。我们将实例化SimpleCursorAdapter并赋值给ListAdapter中去,代码如下所示:
     [Activity(Label = "CursorAdapter", MainLauncher = true, Icon = "@drawable/icon")]

     public class MainActivity : ListActivity

     {

         TestDatabase vdb;

         ICursor cursor;

         protected override void OnCreate(Bundle bundle)

         {

             base.OnCreate(bundle);

             vdb = new TestDatabase(this);

             //通过SQL查询数据库

             cursor = vdb.ReadableDatabase.RawQuery("SELECT * FROM TestTable", null);

             StartManagingCursor(cursor);

             //创建适配器

             ListAdapter = new SimpleCursorAdapter(this, Android.Resource.Layout.SimpleListItem1, cursor,

                 new string[] { "name" },  //指定使用结果集中的哪个字段数据

                 new int[] { Android.Resource.Id.Text1 }); //填充到哪个控件中

         }

         protected override void OnDestroy()

         {

             base.OnDestroy();

             StopManagingCursor(cursor);

             cursor.Close();

         }

 }
通过上面的代码我们可以看到SimpleCursorAdapter相比之前的适配器,需要的参数更多。同时还需要对Cursor这个重要资源进行管理,对应的可以看到StartManagingCursor和StopManagingCursor,希望读者在实际开发中一定要注意资源的释放,以上的结果笔者就不截图了。
5.自定义CursorAdapter
为了某些效果我们不一定非要继承BaseAdapter从而实现很多的方法,如果数据是来自于数据库的我们还可以继承自CursorAdapter,这样我们能够节省实现很多的方法,从而只需要关注重要部分,下面我们继承CursorAdapter来查看需要实现哪些方法:
     public class CustomeCursorAdapter : Android.Widget.CursorAdapter

     {

         public override void BindView(Android.Views.View view, Android.Content.Context context, Android.Database.ICursor cursor)

         {

             throw new NotImplementedException();

         }

         public override Android.Views.View NewView(Android.Content.Context context, Android.Database.ICursor cursor, Android.Views.ViewGroup parent)

         {

             throw new NotImplementedException();

         }

 }
可以看到我们只需要实现两个方法,相比BaseAdapter而言减少了很多,其中BindView就是将ICursor中的数据与View进行绑定,而NewView则是创建所需的界面。下面我们自定一个适配器实现和上一节一样的效果:
     public class CustomeCursorAdapter : Android.Widget.CursorAdapter

     {

         Activity context;

         public CustomeCursorAdapter(Activity context, ICursor cursor)

             : base(context, cursor)

         {

             this.context = context;

         }

         public override void BindView(Android.Views.View view, Android.Content.Context context, Android.Database.ICursor cursor)

         {

             TextView tv = view.FindViewById<TextView>(Android.Resource.Id.Text1);

             tv.Text = cursor.GetString();

         }

         public override Android.Views.View NewView(Android.Content.Context context, Android.Database.ICursor cursor, Android.Views.ViewGroup parent)

         {

             return this.context.LayoutInflater.Inflate(Android.Resource.Layout.SimpleListItem1, parent, false);

         }

 }
6.注意点
需要读者需要使用系统自带的SimpleAdapter时,传递数据时候不能以Dictionary类型添加,必须以JavaDictionary,否则将会出现无法将其转换为java.util.map的错误。
Xamarin.Android之ListView和Adapter的更多相关文章
- 大叔也说Xamarin~Android篇~ListView里的Click事件并获取本行的其它元素
回到目录 我原创,我贡献,我是仓储大叔 本篇大叔原创,本着对技术的热爱去研究它,把成果分享给国人!大叔始终相信一句话:你只有选择一个感兴趣的工作,你才能更好的发挥你的潜力,而这一切都建立在你不断研究, ...
- Xamarin.Android 使用ListView绑定数据
使用ListView进行数据绑定 第一步:新建一个类,用于存储显示字段. namespace ListViewDataBIndDemo { public class Person { public i ...
- Android 关于ListView中adapter调用notifyDataSetChanged无效的原因
话说这个问题已经困扰我很久了,一直找不到原因,我以为只要数据变了,调用adapter的notifyDataSetChanged就会更新列表,最近在做微博帐号管理这一块,想着动态更新列表,数据是变了,但 ...
- Android 给ListView设置Adapter
Adapter: class MyAdapter extends BaseAdapter { private List<Person> personList; public MyAdapt ...
- Xamarin.Android开发实践(十四)
Xamarin.Android之ListView和Adapter 一.前言 如今不管任何应用都能够看到列表的存在,而本章我们将学习如何使用Xamarin去实现它,以及如何使用适配器和自定义适配器(本文 ...
- Xamarin.Android 调用Web Api(通过ListView展示远程获取的数据)
xamarin.android如何调用sqlserver 数据库呢(或者其他的),很多新手都会有这个疑问.xamarin.android调用远程数据主要有两种方式: 在Android中保存数据或调用数 ...
- Xamarin android CardView的使用详解
android 5.0新增加的一个控件CardView,在support v7兼容包中,意思就是卡片View,虽然可以设置阴影,圆角等等样式,但是我们也可以自己写出来,谷歌工程师之所以出这个,肯定是帮 ...
- [置顶]
Xamarin android 调用Web Api(ListView使用远程数据)
xamarin android如何调用sqlserver 数据库呢(或者其他的),很多新手都会有这个疑问.xamarin android调用远程数据主要有两种方式: 在Android中保存数据或调用数 ...
- xamarin android listview的用法
listview也许是用的非常频繁的一个控件之一,下面我写一个xamarin的listview栗子,大家尝一尝xamarin android开发的乐趣.原谅我的大小写吧. listview绑定自定义的 ...
随机推荐
- 网络编程之webclient和httpwebrequest的使用
(1)Lambda表达式 “Lambda表达式”是一个匿名函数,它可以包含表达式和语句,并且可用于创建委托或表达式树类型. 所有 Lambda 表达式都使用 Lambda 运算符 =>,该运算符 ...
- DevExpress ChartControl 柱状图的使用【转】
//中心业务平台的“热门岗位信息监测”柱状图 public partial class HotJobInfo : UserControl { private object _o ...
- SCRIPT5009: “Sys”未定义 部署.net ajax 解决方案
今天在部署asp.net ajax 的时候发现部署服务器的时候,ajax刷新不正确,开始以为是System.Web.Extensions没有引用到本地,baidu一圈发现(最近google上不了郁闷~ ...
- 屌丝就爱尝鲜头——java8初体验
Java8已经推出,让我们看看他的魅力.让我们看看他改变较大的部分. 一.java8概述 Java8是由Oracle(甲骨文)公司与2014年3月27日正式推出的.Java8同时推出有3套语言系统,分 ...
- 大数据开发实战:MapReduce内部原理实践
下面结合具体的例子详述MapReduce的工作原理和过程. 以统计一个大文件中各个单词的出现次数为例来讲述,假设本文用到输入文件有以下两个: 文件1: big data offline data on ...
- 【转】TensorFlow四种Cross Entropy算法实现和应用
http://www.jianshu.com/p/75f7e60dae95 作者:陈迪豪 来源:CSDNhttp://dataunion.org/26447.html 交叉熵介绍 交叉熵(Cross ...
- 闲聊DNN CTR预估模型
原文:http://www.52cs.org/?p=1046 闲聊DNN CTR预估模型 Written by b manongb 作者:Kintocai, 北京大学硕士, 现就职于腾讯. 伦敦大学张 ...
- Python输出信息
Python很多情况下,都是通过Console输出信息,大量翻屏滚动的信息,太乱.而pip安装的效果就很好,只是在一行输出信息,不断变化.网上找资料,不难. 用print的话,跟一个“,”就表示不换行 ...
- 鼠标上下滚动支持combobox选中
首先需要jquery插件来支持: 1.代码SVN检出https://github.com/jquery/jquery-mousewheel 2.点击这里下载jquery.mousewheel.zip ...
- 持续集成+自动化部署[代码流水线管理及Jenkins和gitlab集成]
转载:https://www.abcdocker.com/abcdocker/2065 一.代码流水线管理 Pipeline名词顾名思义就是流水线的意思,因为公司可能会有很多项目.如果使用jenkin ...