Linux学习-MySQL的主从复制高可用性解决方案MHA
一、MHA简介
1、MHA
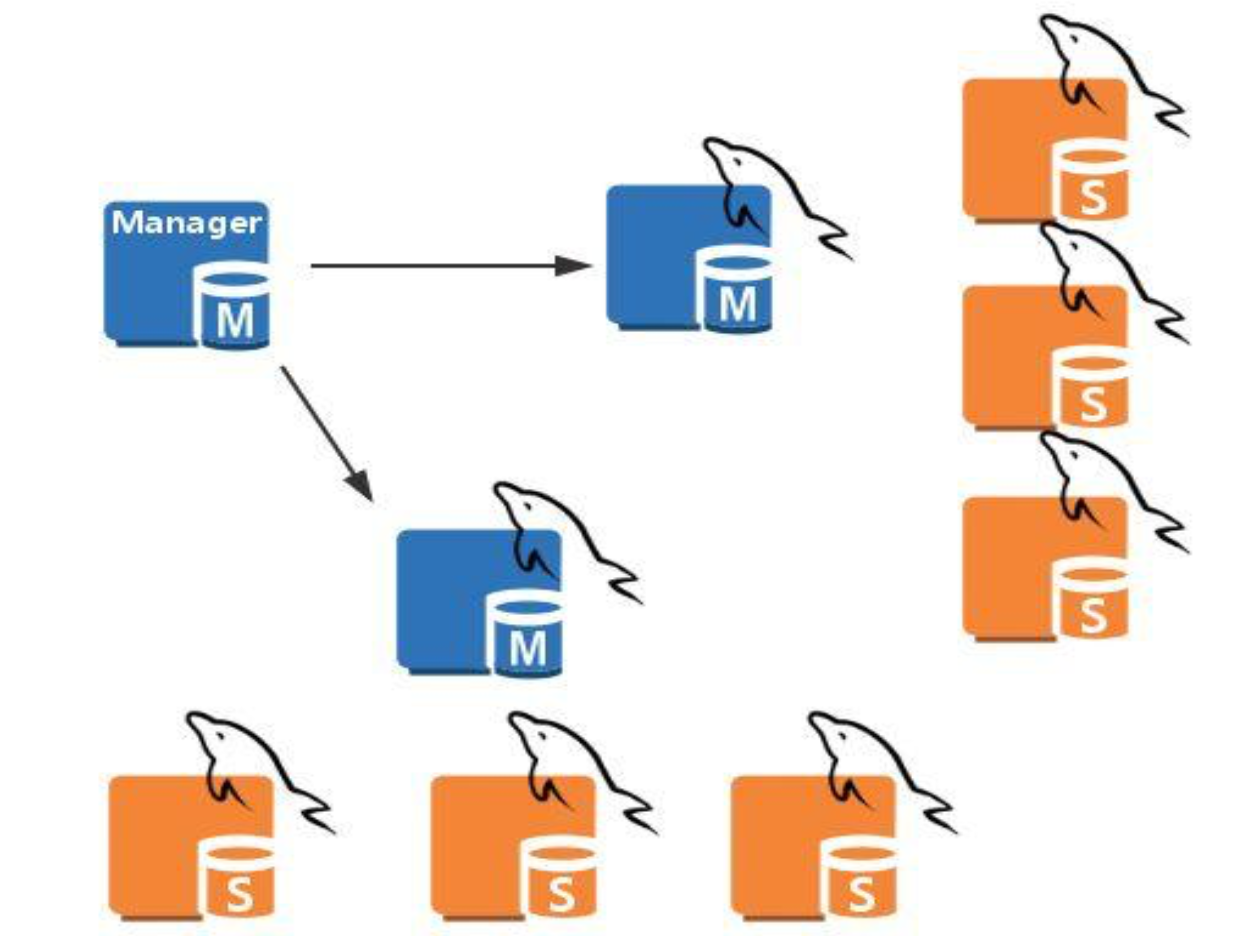
Master High Availability,对主节点进行监控,可实现自动故障转移至其它从节点;通过提升某一从节点为新的主节点,基于主从复制实现,还需要客户端配合实现,目前MHA主要支持一主多从的架构,要搭建MHA,要求一个复制集群中必须最少有三台 数据库服务器,一主二从,即一台充当master,一台充当备用master,另外一台充当从库。
2、MHA集群架构

3、MHA的工作原理
4、MHA软件组成
masterha_check_repl 检查MySQL复制状况
masterha_manger 启动MHA
masterha_check_status 检测当前MHA运行状态
masterha_master_monitor 检测master是否宕机
masterha_master_switch 故障转移(自动或手动)
masterha_conf_host 添加或删除配置的server信息
apply_diff_relay_logs 识别差异的中继日志事件并将其差异的事件应用于其他的slave
filter_mysqlbinlog 去除不必要的ROLLBACK事件(MHA已不再使用此工具)
purge_relay_logs 清除中继日志(不会阻塞SQL线程)
master_ip_ailover_script 更新Application使用的masterip
shutdown_script 强制关闭master节点
report_script 发送报告
init_conf_load_script 加载初始配置参数
master_ip_online_change_script 更新master节点ip地址
(4) 配置文件:
global配置:为各application提供默认配置
application配置:为每个主从复制集群
二、实验环境
主机:4台,一台MHA Manager (192.168.214.17),三台主从复制架构(一主多从),master (192.168.214.27),slave1 (192.168.214.37),slave2 (192.168.214.47)
系统:CentOS7.6
数据库:mariadb-server-5.5.60(光盘yum源)
MHA软件包:mha4mysql-manager-0.56,mha4mysql-node-0.56
三、相关步骤
1、三台主从节点主点先安装mariadb数据库,使用光盘yum源
[root@centos7- ~]# yum install -y mariadb-server

[root@centos7- ~]# yum install -y mariadb-server

[root@centos7- ~]# yum install -y mariadb-server
2、准备MHA软件包,MHA Manager节点需要mha4mysql-manager和mha4mysql-node,其它三个节点只需要mha4mysql-node
[root@centos7- ~]# ll mha4mysql*

-rw-r--r--  root root  Dec   : mha4mysql-manager-0.56-.el6.noarch.rpm

-rw-r--r--  root root  Dec   : mha4mysql-node-0.56-.el6.noarch.rpm

[root@centos7- ~]# ll mha4mysql*

-rw-r--r--  root root  Dec   : mha4mysql-node-0.56-.el6.noarch.rpm

[root@centos7- ~]# ll mha4mysql*

-rw-r--r--  root root  Dec   : mha4mysql-node-0.56-.el6.noarch.rpm

[root@centos7- ~]# ll mha4mysql*

-rw-r--r--  root root  Dec   : mha4mysql-node-0.56-.el6.noarch.rpm
3、安装MHA软件包,MHA Manager节安装mha4mysql-manager时需要依赖epel源,这里使用阿里云的epel源
[root@centos7- ~]# cat /etc/yum.repos.d/base.repo

[development]

name=dvdbase repo

baseurl=file:///mnt/cdrom/

enabled=

gpgcheck=

gpgkey=file:///mnt/cdrom/RPM-GPG-KEY-CentOS-7

[aliyunEpel]

name=aliyun epel

baseurl=https://mirrors.aliyun.com/epel/$releasever/$basearch

enabled=

gpgcheck=

gpgkey=https://mirrors.aliyun.com/epel/RPM-GPG-KEY-EPEL-$releasever

[root@centos7- ~]# yum install -y mha4mysql*

[root@centos7- ~]# yum install -y mha4mysql-node-0.56-.el6.noarch.rpm

[root@centos7- ~]# yum install -y mha4mysql-node-0.56-.el6.noarch.rpm

[root@centos7- ~]# yum install -y mha4mysql-node-0.56-.el6.noarch.rpm
4、配置主从复制(一主多从)
1). master节点
[root@centos7- ~]# vim /etc/my.cnf

[mysqld]

server-id=    #添加此项

bin-log    #添加此项

skip_name_resolve=    #添加此项

datadir=/var/lib/mysql

socket=/var/lib/mysql/mysql.sock

# Disabling symbolic-links is recommended to prevent assorted security risks

symbolic-links=

# Settings user and group are ignored when systemd is used.

# If you need to run mysqld under a different user or group,

# customize your systemd unit file for mariadb according to the

# instructions in http://fedoraproject.org/wiki/Systemd

[mysqld_safe]

log-error=/var/log/mariadb/mariadb.log

pid-file=/var/run/mariadb/mariadb.pid

#

# include all files from the config directory

#

!includedir /etc/my.cnf.d
[root@centos7- ~]# systemctl start mariadb

[root@centos7- ~]# mysql

Welcome to the MariaDB monitor.  Commands end with ; or \g.

Your MariaDB connection id is

Server version: 5.5.-MariaDB MariaDB Server

Copyright (c) , , Oracle, MariaDB Corporation Ab and others.

Type 'help;' or '\h' for help. Type '\c' to clear the current input statement.

MariaDB [(none)]> show master logs;

+--------------------+-----------+

| Log_name           | File_size |

+--------------------+-----------+

| mariadb-bin. |        |

+--------------------+-----------+

 row in set (0.00 sec)

MariaDB [(none)]> grant replication slave on *.* to repluser@'192.168.214.%' identified by 'centos';    #添加主从复制用户

Query OK,  rows affected (0.00 sec)

MariaDB [(none)]> grant all on *.* to mhauser@'192.168.214.%' identified by 'mhauser';    #添加mha管理用户

Query OK,  rows affected (0.00 sec)
2). slave节点,两台节点的配置一样,以slave1(192.168.214.37)为例
[root@centos7- ~]# cat /etc/my.cnf

[mysqld]

server-id=    #添加此项,slave2上的值记得改成47

log_bin    #添加此项

read-only    #添加此项

skip_name_resolve=    #添加此项

relay_log_purge=    #添加此项,是否清除中继日志,默认开启,这里把它关闭,因为需要用到中继日志

...以下省略
[root@centos7-37 ~]# systemctl start mariadb

[root@centos7- ~]# mysql

Welcome to the MariaDB monitor.  Commands end with ; or \g.

Your MariaDB connection id is

Server version: 5.5.-MariaDB MariaDB Server

Copyright (c) , , Oracle, MariaDB Corporation Ab and others.

Type 'help;' or '\h' for help. Type '\c' to clear the current input statement.

MariaDB [(none)]> CHANGE MASTER TO     #配置连接主节点的信息

    -> MASTER_HOST='192.168.214.27',    #主节点IP

    -> MASTER_USER='repluser',    #用于复制的账号

    -> MASTER_PASSWORD='centos',  #密码

    -> MASTER_LOG_FILE='mariadb-bin.000001', #要复制的二进制日志

    -> MASTER_LOG_POS=;   #开始复制的二进制日志的位置

Query OK,  rows affected (0.01 sec)

MariaDB [(none)]> start slave;    #开启复制线程

Query OK,  rows affected (0.00 sec)

MariaDB [(none)]> show slave status\G;  #可用于查看开启状态
5、配置MHA Manager主机和其它三台主机的基于key验证的ssh服务
[root@centos7- ~]# ssh-keygen  #生成密钥

Generating public/private rsa key pair.

Enter file in which to save the key (/root/.ssh/id_rsa):

Enter passphrase (empty for no passphrase):

Enter same passphrase again:

Your identification has been saved in /root/.ssh/id_rsa.

Your public key has been saved in /root/.ssh/id_rsa.pub.

The key fingerprint is:

SHA256:F8VxSwWdphlQLd1J9csOHEW932/ZIhi6agC2BxDJ89A root@centos7.localdomain

The key's randomart image is:

+---[RSA ]----+

|oo.        o=oOBO|

|o+ E       ..=.B=|

| .+       .  .B o|

|  +.       ..oo..|

| . +    S .  o oo|

|  . o    ..   o o|

|   . .   . o   .+|

|      . . . . ..+|

|     .....   . o |

+----[SHA256]-----+

[root@centos7- ~]# ls -a .ssh

.  ..  id_rsa  id_rsa.pub  known_hosts

#拷贝公钥到本地,然后把本地的.ssh文件夹复制到其它三台主机的/root/目录下

#即可实现四台主机之前相互之间都可以互机登录而不用输密码

#如果只是配置MHA Manage登陆其它三台,只需要用以下命令

# ssh-copy-id -i  /root/.ssh/id_rsa.pub root@192.168.214.27

[root@centos7- ~]# ssh-copy-id -i /root/.ssh/id_rsa.pub root@192.168.214.17

[root@centos7- ~]# scp -r .ssh root@192.168.214.27:/root/

[root@centos7- ~]# scp -r .ssh root@192.168.214.37:/root/

[root@centos7- ~]# scp -r .ssh root@192.168.214.47:/root/
6、配置MHA Manager节点的配置文件
[root@centos7- ~]# mkdir /etc/mha/

[root@centos7- ~]# vim /etc/mha/app1.cnf

[server default]

user=mhauser    #管理用户

password=mhauser    #密码

manager_workdir=/data/mastermha/app1/

manager_log=/data/mastermha/app1/manager.log

remote_workdir=/data/mastermha/app1/

ssh_user=root  #ssh用户

repl_user=repluser #复制用户

repl_password=centos  #密码

ping_interval=    #监测master的时间1s

[server1]

hostname=192.168.214.27

candidate_master=    #此选项表示优先使用此主节点

[server2]

hostname=192.168.214.37

candidate_master=

[server3]

hostname=192.168.214.47
7、验证与启动
[root@centos7- ~]# masterha_check_ssh --conf=/etc/mha/app1.cnf  #验证ssh

[root@centos7- ~]# masterha_check_repl --conf=/etc/mha/app1.cnf  #验证主从复制

[root@centos7- ~]# masterha_manager --conf=/etc/mha/app1.cnf  #启动
注意:masterha_manager --conf=/etc/mha/app1.cnf 这种启动是一次性的(完成一次切换后就退出了),且只是在当前会话;建议后台启动运行:nohup masterha_manager --conf=/etc/mha/app1.cnf > mha.log
8、测试当mater节点断开时,主从的切换
[root@centos7- ~]# systemctl stop mariadb  #关闭主节点数据库服务

[root@centos7- ~]# mysql

Welcome to the MariaDB monitor.  Commands end with ; or \g.

Your MariaDB connection id is

Server version: 5.5.-MariaDB MariaDB Server

Copyright (c) , , Oracle, MariaDB Corporation Ab and others.

Type 'help;' or '\h' for help. Type '\c' to clear the current input statement.

MariaDB [(none)]> show slave status\G;   #查询为空,说明slave1节点已提升为主节点

Empty set (0.00 sec)

MariaDB [(none)]> show variables like 'read_only'; #slave1节点的read-only选项也关闭了

+---------------+-------+

| Variable_name | Value |

+---------------+-------+

| read_only     | OFF   |

+---------------+-------+

 row in set (0.00 sec)

[root@centos7- ~]# mysql

MariaDB [(none)]> show slave status\G;   #在slave2上查看

*************************** . row ***************************

               Slave_IO_State: Waiting for master to send event

                  Master_Host: 192.168.214.37  #主节点变为了slave1

                  Master_User: repluser

                  Master_Port:

                Connect_Retry:

              Master_Log_File: mariadb-bin.

          Read_Master_Log_Pos:

               Relay_Log_File: mariadb-relay-bin.

                Relay_Log_Pos:

        Relay_Master_Log_File: mariadb-bin.

             Slave_IO_Running: Yes

            Slave_SQL_Running: Yes

...以下省略
Linux学习-MySQL的主从复制高可用性解决方案MHA的更多相关文章
- MySQL Replication 主从复制全方位解决方案
1.1 主从复制基础概念 在了解主从复制之前必须要了解的就是数据库的二进制日志(binlog),主从复制架构大多基于二进制日志进行,二进制日志相关信息参考:http://www.cnblogs.com ...
- 图文详解linux/windows mysql忘记root密码解决方案
经常有用户过来咨询说自己的mysql服务器忘记密码了怎么办,为了更好的解决大家的困扰,本文特归档整理了windows和linux系统下,mysql忘记密码的解决方案.本文内容是我亲测实用,当然过程中踩 ...
- Linux mariadb(Mysql)的主从复制架构
mysql的主从复制架构,需要准备两台机器,并且可以通信,安装好2个mysql,保持版本一致性 mysql -v 查看数据库版本 1.准备主库的配置文件 /etc/my.cnf 写入开启主库的参数[ ...
- Linux学习—mysql安装配置及远程连接
安装前准备 1.检查是否已经安装过mysql 执行命令 [root@localhost /]# rpm -qa | grep mysql 从执行结果,可以看出我们已经安装了mysql-libs-5. ...
- Linux下Mysql安装与常见问题解决方案
1.Mysql安装 环境: Mysql版本: 开始安装: 首先检查环境有没有老版本mysql,有的话先卸载干净,具体百度. 接着先获取mysql的安装包:wget https://dev.mysql. ...
- Linux学习-MySQL的高可用性集群Galera Cluste
一.Galera Cluste简介 1.Galera Cluster 集成了Galera插件的MySQL集群,是一种新型的,数据不共享的,高度冗余的高可用方案,目前Galera Cluster有两个版 ...
- Linux下mysql的主从复制配置
1.准备两台数据库环境,或者单台多实例环境,能正常启动和登录. 数据库的安装和多实例配置请参考https://www.cnblogs.com/qiuhom-1874/p/9757061.html. 2 ...
- 好记性不如烂笔头-linux学习笔记5mysql主从复制
mysql主从复制的原理 mysql master服务器,开启bin-log日志,开启IO线程 slave服务器,开启IO线程,开启SQL线程(执行SQL) 1)slave服务器,通过授权用户开启IO ...
- linux 学习 mysql安装到连接
在Centos7.6 上安装mysql ps:一般mysql安装后会在/var/log/下面生成一个mysqld.log文件,如果遇到启动不了或者其他问题,基本都可以在这个log文件里面找到错误原因 ...
随机推荐
- nginx下使用asan和valgrind两个静态检查工具
1.valgrind valgrind安装:参考:https://blog.csdn.net/justheretobe/article/details/52986461 wegit:http://va ...
- 测开之路八十六:python操作sqlite
创建sqlite数据库,并创建表和数据 python自带sqlite3库可以创建数据库文件 导入库:import sqlite3 创建游标,指定数据库名字:con = sqlite3.connect( ...
- MySQL-mysql 8.0.11安装教程 windows
网上的教程有很多,基本上大同小异.但是安装软件有时就可能因为一个细节安装失败.我也是综合了很多个教程才安装好的,所以本教程可能也不是普遍适合的. 安装环境:win7 1.下载zip安装包: MySQL ...
- .aspx和.aspx.cs之间的区别
在vs里面创建一个web窗体会产生两种文件:后缀是.aspx和.aspx.cs. 简单的来说,.aspx是表现层,可以简单理解为是写html代码的,界面的设计部分:.cs是对应的逻辑代码,再通过特定的 ...
- python基础-6.1 match search findall group(s) 区别
import re # match findall经常用 # re.match() #从开头匹配,没有匹配到对象就返回NONE # re.search() #浏览全部字符,匹配第一个符合规则的字符串 ...
- 2019寒假作业二:PTA7-1币值转换
7-1 币值转换 (20 分) 输入一个整数(位数不超过9位)代表一个人民币值(单位为元),请转换成财务要求的大写中文格式.如23108元,转换后变成“贰万叁仟壹百零捌”元.为了简化输出,用小写英文字 ...
- SpringBoot(七) -- 嵌入式Servlet容器
一.嵌入式Servlet容器 在传统的开发中,我们在完成开发后需要将项目打成war包,在外部配置好TomCat容器,而这个TomCat就是Servlet容器.在使用SpringBoot开发时,我们无需 ...
- 剑指Offer编程题(Java实现)——二维数组中的查找
题目描述 在一个二维数组中(每个一维数组的长度相同),每一行都按照从左到右递增的顺序排序,每一列都按照从上到下递增的顺序排序.请完成一个函数,输入这样的一个二维数组和一个整数,判断数组中是否含有该整数 ...
- es6基本介绍及使用
1.什么是es6 ECMAScript 6.0(以下简称ES6)是JavaScript语言的下一代标准,已经在2015年6月正式发布了.它的目标,是使得JavaScript语言可以用来编写复杂的大型应 ...
- Python学习-第二天-字符串和常用数据结构
Python学习-第二天-字符串和常用数据结构 字符串的基本操作 def main(): str1 = 'hello, world!' # 通过len函数计算字符串的长度 print(len(str1 ...
