NFS、FTP介绍
第二十五课 NFS、FTP介绍
目录
一、 NFS介绍
二、NFS服务端安装配置
三、NFS配置选项
四、exportfs命令
五、NFS客户端问题
六、FTP介绍
七、使用vsftpd搭建ftp
八、xshell使用xftp传输文件
九、使用pure-ftpd搭建ftp服务
十、扩展
一、 NFS介绍
NFS是Network File System的缩写,中文意思是网络文件系统。
NFS的主要功能是通过网络(一般是局域网)让不同的主机系统之间共享文件或目录。
NFS最早由Sun公司开发,分2,3,4三个版本,2和3由Sun起草开发,4.0开始Netapp公司参与并主导开发,最新为4.1版本
NFS数据传输基于RPC协议,RPC为Remote Procedure Call的简写。
NFS应用场景是:A,B,C三台机器上需要保证被访问到的文件是一样的,A共享数据出来,B和C分别去挂载A共享的数据目录,从而B和C访问到的数据和A上的一致
NFS工作原理流程
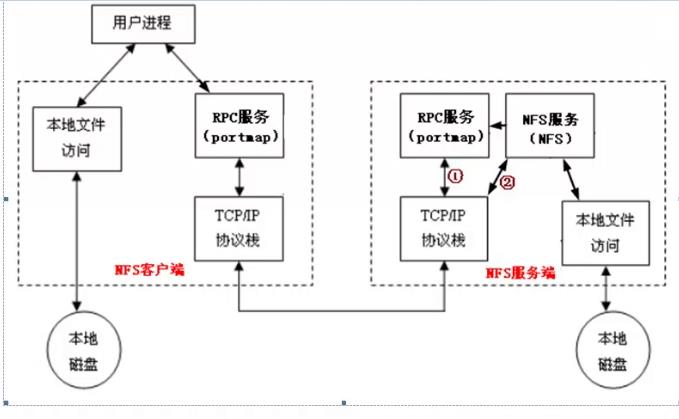
当访问程序通过NFS客户端向NFS服务器端存取文件时,其请求数据流程大致如下:
1)首先用户访问网站程序,由程序在NFS客户端上发出存取NFS文件的请求,这时NFS客户端的RPC服务就会通过网络向NFS服务器端的RPC服务端的111端口发起NFS文件存取功能的请求。
2)NFS服务器端的RPC服务找到对应的已注册的NFS端口后,通知NFS客户端的RPC服务。
- NFS客户端获取到正确的端口,并与NFS服务器联机读取数据
4)NFS客户端数据存取成功后,返回给前端访问程序,告知用户存取结果,作为网站用户,就完成了一次存取操作。
二、NFS服务端安装配置
NFS服务器的安装
//nfs-utils是NFS服务的主程序,包括rpc.nfsd、rpc.mountedyum -y install nfs-utils rpcbind
安装完成后,修改配置文件
[root@localhost ~]# vim /etc/exports//增加如下内容/home/nfstestdir 192.168.1.0/24(rw,sync,all_squash,anonuid=1000,anongid=1000)//创建/home/nfstestdir目录[root@localhost ~]# mkdir /home/nfstestdir//为简化实验环境,将/home/nfstestdir目录权限设为777[root@localhost ~]# chmod 777 /home/nfstestdir///启动rpcbind.service(必须先于nfs主程序启动)[root@localhost ~]# systemctl start rpcbind.service[root@localhost ~]# systemctl enable rpcbind.service//查看rpcbind是否正常启动[root@localhost ~]# netstat -nltup | grep :111tcp 0 0 0.0.0.0:111 0.0.0.0:* LISTEN 2016/rpcbindtcp6 0 0 :::111 :::* LISTEN 2016/rpcbindudp 0 0 0.0.0.0:111 0.0.0.0:* 2016/rpcbindudp6 0 0 :::111 :::* 2016/rpcbind//启动nfs主程序[root@localhost ~]# systemctl start nfs.service[root@localhost ~]# systemctl enable nfs.service//查看nfs是否正常启动[root@localhost ~]# ps aux | grep nfsroot 2098 0.0 0.0 0 0 ? S< 22:53 0:00 [nfsd4_callbacks]root 2104 0.0 0.0 0 0 ? S 22:53 0:00 [nfsd]root 2105 0.0 0.0 0 0 ? S 22:53 0:00 [nfsd]root 2106 0.0 0.0 0 0 ? S 22:53 0:00 [nfsd]root 2107 0.0 0.0 0 0 ? S 22:53 0:00 [nfsd]root 2108 0.0 0.0 0 0 ? S 22:53 0:00 [nfsd]root 2109 0.0 0.0 0 0 ? S 22:53 0:00 [nfsd]root 2110 0.0 0.0 0 0 ? S 22:53 0:00 [nfsd]root 2111 0.0 0.0 0 0 ? S 22:53 0:00 [nfsd]root 2115 0.0 0.0 112660 968 pts/0 R+ 22:54 0:00 grep --color=auto nfs
三、NFS配置选项
NFS选项
rw 读写
ro 只读
sync 同步模式,内存数据实时写入磁盘
async 非同步模式
no_root_squash 客户端挂载NFS共享目录后,root用户不受约束,权限很大
root_squash 与上面选项相对,客户端上的root用户收到约束,被限定成某个普通用户
all_squash 客户端上所有用户在使用NFS共享目录时都被限定为一个普通用户
anonuid/anongid 和上面几个选项搭配使用,定义被限定用户的uid和gid
NFS客户端安装及共享挂载
[root@localhost ~]# yum -y install rpcbind nfs-utils[root@localhost ~]# systemctl start rpcbind.service[root@localhost ~]# systemctl enable rpcbind.service[root@localhost ~]# showmount -e 192.168.1.22Export list for 192.168.1.22:/home/nfstestdir 192.168.1.0/24[root@localhost ~]# mount -t nfs 192.168.1.22:/home/nfstestdir /mnt[root@localhost ~]# df -hFilesystem Size Used Avail Use% Mounted on/dev/sda2 19G 1.5G 18G 8% /devtmpfs 479M 0 479M 0% /devtmpfs 489M 0 489M 0% /dev/shmtmpfs 489M 6.7M 482M 2% /runtmpfs 489M 0 489M 0% /sys/fs/cgroup/dev/sda1 197M 98M 100M 50% /boottmpfs 98M 0 98M 0% /run/user/0192.168.1.22:/home/nfstestdir 19G 1.5G 18G 8% /mnt//NFS客户端[root@localhost ~]# touch /mnt/testfile.txt[root@localhost ~]# ls -l /mnt/testfile.txt-rw-r--r-- 1 1000 1000 0 Jul 12 23:28 /mnt/testfile.txt//服务器端[root@localhost ~]# ls -l /home/nfstestdir/testfile.txt-rw-r--r-- 1 1000 1000 0 Jul 12 23:28 /home/nfstestdir/testfile.txt
四、exportfs命令
exportfs 命令用来管理当前NFS共享的文件系统列表。
常用选项
-a 全部挂载或者全部卸载
-r 重新挂载
-u 卸载某一个目录
-v 显示共享目录
exportfs实现nfs服务的平滑重启
[root@nfs-server ~]# vim /etc/exports//增加/tmp/test 10.0.1.0/24(rw,sync,all_squash)//未重启前[root@lnmp01 ~]# vim /etc/exports[root@lnmp01 ~]# showmount -e 10.0.1.80Export list for 10.0.1.80:/data 10.0.1.0/24[root@lnmp01 ~]# ifconfig | awk 'NR==2{print $2}'10.0.1.81//重启[root@nfs-server ~]# ifconfig | awk 'NR==2{print $2}'10.0.1.80[root@nfs-server ~]# exportfs -arvexporting 10.0.1.0/24:/tmp/testexporting 10.0.1.0/24:/data[root@lnmp01 ~]# showmount -e 10.0.1.80Export list for 10.0.1.80:/tmp/test 10.0.1.0/24/data 10.0.1.0/24[root@lnmp01 ~]# mkdir /tmp/demo[root@lnmp01 ~]# mount -t nfs 10.0.1.80:/tmp/test /tmp/demo[root@lnmp01 ~]# touch /tmp/demo/lnmp01.txt[root@lnmp01 ~]# ls -l /tmp/demo/lnmp01.txt-rw-r--r--. 1 nfsnobody nfsnobody 0 Jul 15 05:35 /tmp/demo/lnmp01.txt[root@nfs-server ~]# ls -l /tmp/test/lnmp01.txt-rw-r--r--. 1 nfsnobody nfsnobody 0 Jul 15 05:35 /tmp/test/lnmp01.txt//修改参数all_squash为no_root_squash[root@nfs-server ~]# vim /etc/exports/tmp/test 10.0.1.0/24(rw,sync,no_root_squash)[root@nfs-server ~]# exportfs -arvexporting 10.0.1.0/24:/tmp/testexporting 10.0.1.0/24:/data//客户端[root@lnmp01 demo]# touch user01.txt[root@lnmp01 demo]# ll user01.txt-rw-r--r--. 1 root root 0 Jul 15 05:43 user01.txt//服务器端[root@nfs-server ~]# ls -l /tmp/test/user01.txt-rw-r--r--. 1 root root 0 Jul 15 05:43 /tmp/test/user01.txt
五、NFS客户端问题
客户端挂载共享目录后,不管是root用户还是普通用户,创建新文件时属主、属组为nobody
NFS 4版本会有该问题
解决办法:客户端挂载时加上 -o nfsvers=3
如:[root@lnmp01 demo]# mount -t nfs -o remount,nfsvers=3 10.0.1.80:/tmp/test/ /tmp/demo/
或者
vim /etc/idmapd.conf //
把"#Domain = local.domain.edu" 改为 "Domain = xxx.com" (这里的xxx.com,自己定义),然后再重启
rpcbind服务
六、FTP介绍
文件传输协议(英文:File Transfer Protocol,缩写:FTP)是用于在网络上进行文件传输的一套标准协议,使用客户/服务器模式。它属于网络传输协议的应用层。文件传送(file transfer)和文件访问(file access)之间的区别在于:前者由FTP提供,后者由如NFS等应用系统提供。
FTP的主要作用,就是让用户连接上一个远程计算机(这些计算机上运行着FTP服务器程序)察看远程计算机有哪些文件,然后把文件从远程计算机上拷到本地计算机,或把本地计算机的文件送到远程计算机去。
ftp小公司用的多,大企业不用FTP,因为不安全.
七、使用vsftpd搭建ftp
Centos本身自带和ftp软件是vsftp。
vsftp的安装
[root@localhost ~]# yum -y install vsftpdLoaded plugins: fastestmirrorLoading mirror speeds from cached hostfile* base: mirrors.aliyun.com* epel: mirrors.aliyun.com* extras: mirrors.njupt.edu.cn* updates: mirrors.huaweicloud.comResolving Dependencies--> Running transaction check---> Package vsftpd.x86_64 0:3.0.2-22.el7 will be installed--> Finished Dependency ResolutionDependencies Resolved================================================================================================================================Package Arch Version Repository Size================================================================================================================================Installing:vsftpd x86_64 3.0.2-22.el7 base 169 kTransaction Summary================================================================================================================================Install 1 PackageTotal download size: 169 kInstalled size: 348 kDownloading packages:vsftpd-3.0.2-22.el7.x86_64.rpm | 169 kB 00:00:00Running transaction checkRunning transaction testTransaction test succeededRunning transactionInstalling : vsftpd-3.0.2-22.el7.x86_64 1/1Verifying : vsftpd-3.0.2-22.el7.x86_64 1/1Installed:vsftpd.x86_64 0:3.0.2-22.el7Complete!
默认配置文件
[root@localhost ~]# grep -Ev '^#|^$' /etc/vsftpd/vsftpd.confanonymous_enable=YESlocal_enable=YESwrite_enable=YESlocal_umask=022dirmessage_enable=YESxferlog_enable=YESconnect_from_port_20=YESxferlog_std_format=YESlisten=NOlisten_ipv6=YESpam_service_name=vsftpduserlist_enable=YEStcp_wrappers=YES
启动vsftp
[root@localhost ~]# systemctl start vsftpd.serviceudp6 0 0 ::1:323 :::* 684/chronyd[root@localhost ~]# netstat -nltupActive Internet connections (only servers)Proto Recv-Q Send-Q Local Address Foreign Address State PID/Program nametcp 0 0 0.0.0.0:22 0.0.0.0:* LISTEN 1070/sshdtcp 0 0 127.0.0.1:25 0.0.0.0:* LISTEN 1162/mastertcp6 0 0 :::21 :::* LISTEN 1463/vsftpdtcp6 0 0 :::22 :::* LISTEN 1070/sshdtcp6 0 0 ::1:25 :::* LISTEN 1162/masterudp 0 0 127.0.0.1:323 0.0.0.0:* 684/chronydudp6 0 0 ::1:323 :::* 684/chronyd
默认匿名用户可以登录
//默认ftp没有安装,用yum安装一下[root@localhost ~]# ftp 127.0.0.1Connected to 127.0.0.1 (127.0.0.1).220 (vsFTPd 3.0.2)Name (127.0.0.1:root): anonymous331 Please specify the password.Password:230 Login successful.Remote system type is UNIX.Using binary mode to transfer files.ftp>
配置虚拟用户访问ftp
1.添加虚拟用户映射的本地用户
[root@localhost ~]# useradd -s /sbin/nologin vftp[root@localhost ~]# tail -1 /etc/passwdvftp:x:5001:5001::/home/vftp:/sbin/nologin
2.创建虚拟用户密码文件
[root@localhost ~]# vim /etc/vsftpd/vftp_user[root@localhost ~]# cat /etc/vsftpd/vftp_user//内容如下,奇数行为用户名,偶数行为密码,多个用户就写多行frank123456nicole123456[root@localhost ~]#db_load -T -t hash -f /etc/vsftpd/vftp_user /etc/vsftpd/vftp_user.db[root@localhost vsftpd_user_conf]# ls -l /etc/vsftpd/vftp_user.db-rw-r--r-- 1 root root 12288 Jul 15 21:43 /etc/vsftpd/vftp_user.db[root@localhost ~]# chmod 600 /etc/vsftpd/vftp_user.db[root@localhost ~]# ls -l /etc/vsftpd/vftp_user.db-rw------- 1 root root 12288 Jul 15 21:43 /etc/vsftpd/vftp_user.db
3.创建虚拟用户配置文件
[root@localhost ~]# mkdir /etc/vsftpd/vsftpd_user_conf[root@localhost ~]# vim /etc/vsftpd/vsftpd_user_conf/frank//内容如下local_root=/home/vftp/frankanonymous_enable=NOwrite_enable=YESlocal_umask=022anon_upload_enable=NOanon_mkdir_write_enable=NOidle_session_timeout=600data_connection_timeout=120max_clients=10
4.创建虚拟用户家目录
[root@localhost ~]# mkdir -p /home/vftp/frank//创建测试文件[root@localhost ~]# vim /home/vftp/frank/test.txt//修改虚拟用户家目录权限[root@localhost ~]# chown -R vftp:vftp /home/vftp
5.修改登录认证文件
[root@localhost ~]# vim /etc/pam.d/vsftpd#%PAM-1.0//增加如下两行内容auth sufficient /lib64/security/pam_userdb.so db=/etc/vsftpd/vftp_useraccount sufficient /lib64/security/pam_userdb.so db=/etc/vsftpd/vftp_usersession optional pam_keyinit.so force revokeauth required pam_listfile.so item=user sense=deny file=/etc/vsftpd/ftpusers onerr=succeedauth required pam_shells.soauth include password-authaccount include password-authsession required pam_loginuid.sosession include password-auth
6.修改配置文件
[root@localhost ~]# vim /etc/vsftpd/vsftpd.conf//修改内容如下anonymous_enable=YES---->anonymous_enable=NOanonymous_enable=YES---->anonymous_enable=NOanon_mkdir_write_enable=YES---->anon_mkdir_write_enable=NO//增加如下内容chroot_local_user=YESguest_enable=YESguest_username=vftpvirtual_use_local_privs=YESuser_config_dir=/etc/vsftpd/vsftpd_user_confallow_writeable_chroot=YES
7.重启vsftpd服务
[root@localhost ~]# systemctl restart vsftpd.service
8.测试
本地测试
lftp 127.0.0.1:~> quit[root@localhost ~]# lftp frank@127.0.0.1Password:lftp frank@127.0.0.1:~> ls-rw-r--r-- 1 5001 5001 0 Jul 16 01:46 test.txtlftp frank@127.0.0.1:/> quit[root@localhost ~]#
windows下测试
C:\Users\kennminn>ftp 10.0.1.242连接到 10.0.1.242。220 (vsFTPd 3.0.2)200 Always in UTF8 mode.用户(10.0.1.242:(none)): frank331 Please specify the password.密码:230 Login successful.ftp> dir200 PORT command successful. Consider using PASV.150 Here comes the directory listing.-rw-r--r-- 1 5001 5001 0 Jul 16 01:46 test.txt226 Directory send OK.ftp: 收到 69 字节,用时 0.00秒 17.25千字节/秒。ftp> get test.txt200 PORT command successful. Consider using PASV.150 Opening BINARY mode data connection for test.txt (0 bytes).226 Transfer complete.ftp> quit221 Goodbye.
八、xshell使用xftp传输文件
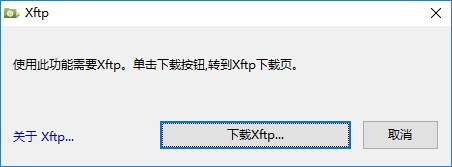
在xshell窗口按ctrl+alt+F,调出xftp安装下载提示界面,根据提示下载安装好xftp软件
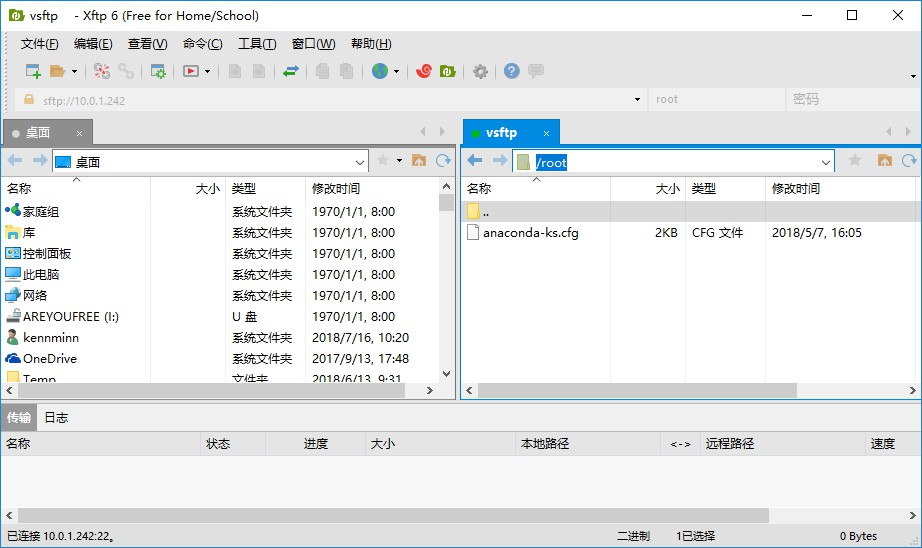
xftp的使用界面,与winscp类似
九、使用pure-ftpd搭建ftp服务
pure-ftpd的安装需要用到epel-release源,如果未安装,可以用yum安装
[root@localhost ~]# yum install -y epel-release
安装pure-ftp
[root@localhost ~]# yum install -y pure-ftpdLoaded plugins: fastestmirror...中间略...Installed:pure-ftpd.x86_64 0:1.0.42-3.el7Dependency Installed:postgresql-libs.x86_64 0:9.2.23-3.el7_4 usermode.x86_64 0:1.111-5.el7Complete!
2.编辑配置文件
[root@localhost ~]# vim /etc/pure-ftpd/pure-ftpd.conf# PureDB user database (see README.Virtual-Users)//取消下行注释PureDB /etc/pure-ftpd/pureftpd.pdb
3.重启pure-ftp服务
[root@localhost ~]# systemctl start pure-ftpd.service[root@localhost ~]# netstat -nltup | grep :21tcp 0 0 0.0.0.0:21 0.0.0.0:* LISTEN 1223/pure-ftpd (SERtcp6 0 0 :::21 :::* LISTEN 1223/pure-ftpd (SER[root@localhost ~]#
4.创建ftp目录及虚拟用户映射的本地用户
//创建目录[root@localhost ~]# mkdir -p /data/ftp[root@localhost ~]# ls -ld !$ls -ld /data/ftpdrwxr-xr-x 2 root root 6 Jul 15 22:46 /data/ftp//创建用户[root@localhost ~]# useradd -u 5001 pure-ftp[root@localhost ~]# chown -R pure-ftp.pure-ftp /data/ftp[root@localhost ~]# ls -ld !$ls -ld /data/ftpdrwxr-xr-x 2 pure-ftp pure-ftp 6 Jul 15 22:46 /data/ftp
5.创建虚拟用户
[root@localhost ~]# pure-pw useradd ftp_usera -u pure-ftp -d /data/ftpPassword:Enter it again:[root@localhost ~]# pure-pw mkdb[root@localhost ~]# pure-pw listftp_usera /data/ftp/.///pure-pw用法参照帮助[root@localhost ~]# pure-pw --helpUsage :pure-pw useradd <login> [-f <passwd file>] -u <uid> [-g <gid>]-D/-d <home directory> [-c <gecos>][-t <download bandwidth>] [-T <upload bandwidth>][-n <max number of files>] [-N <max Mbytes>][-q <upload ratio>] [-Q <download ratio>][-r <allow client ip>/<mask>] [-R <deny client ip>/<mask>][-i <allow local ip>/<mask>] [-I <deny local ip>/<mask>][-y <max number of concurrent sessions>][-z <hhmm>-<hhmm>] [-m]pure-pw usermod <login> -f <passwd file> -u <uid> [-g <gid>]-D/-d <home directory> -[c <gecos>][-t <download bandwidth>] [-T <upload bandwidth>][-n <max number of files>] [-N <max Mbytes>][-q <upload ratio>] [-Q <download ratio>][-r <allow client ip>/<mask>] [-R <deny client ip>/<mask>][-i <allow local ip>/<mask>] [-I <deny local ip>/<mask>][-y <max number of concurrent sessions>][-z <hhmm>-<hhmm>] [-m]pure-pw userdel <login> [-f <passwd file>] [-m]pure-pw passwd <login> [-f <passwd file>] [-m]pure-pw show <login> [-f <passwd file>]pure-pw mkdb [<puredb database file> [-f <passwd file>]][-F <puredb file>]pure-pw list [-f <passwd file>]-d <home directory> : chroot user (recommended)-D <home directory> : don't chroot user-<option> '' : set this option to unlimited-m : also update the /etc/pure-ftpd/pureftpd.pdb databaseFor a 1:10 ratio, use -q 1 -Q 10To allow access only between 9 am and 6 pm, use -z 0900-1800
6.测试
本地测试
[root@localhost ~]# lftp ftp_usera@127.0.0.1Password:lftp ftp_usera@127.0.0.1:~> lsdrwxr-xr-x 2 5001 pure-ftp 6 Jul 15 22:46 .drwxr-xr-x 2 5001 pure-ftp 6 Jul 15 22:46 ..lftp ftp_usera@127.0.0.1:/>
windows下测试
C:\Users\kennminn>ftp 10.0.1.242连接到 10.0.1.242。220---------- Welcome to Pure-FTPd [privsep] [TLS] ----------220-You are user number 2 of 50 allowed.220-Local time is now 22:55. Server port: 21.220-IPv6 connections are also welcome on this server.220 You will be disconnected after 15 minutes of inactivity.200 OK, UTF-8 enabled用户(10.0.1.242:(none)): ftp_usera331 User ftp_usera OK. Password required密码:230 OK. Current directory is /ftp> ls200 PORT command successful150 Connecting to port 4919...226-Options: -a226 2 matches totalftp: 收到 10 字节,用时 0.00秒 10000.00千字节/秒。ftp> quit221-Goodbye. You uploaded 0 and downloaded 0 kbytes.221 Logout.
十、扩展
vsftp使用mysql存放虚拟用户并验证
http://www.aminglinux.com/bbs/thread-342-1-1.html
ftp的主动和被动模式
http://www.aminglinux.com/bbs/thread-961-1-1.html
NFS、FTP介绍的更多相关文章
- exportfs命令 NFS客户端问题 FTP介绍 使用vsftpd搭建ftp
exportfs命令 • 常用选项 • -a 全部挂载或者全部卸载 • -r 重新挂载 • -u 卸载某一个目录 • -v 显示共享目录 • 以下操作在服务端上 • vim /etc/exports ...
- exportfs命令、NFS客户端问题、FTP介绍、使用vsftpd搭建ftp
6月22日任务 14.4 exportfs命令14.5 NFS客户端问题15.1 FTP介绍15.2/15.3 使用vsftpd搭建ftp 14.4 exportfs命令 当我们修改nfs的配置文件e ...
- Linux centosVMware NFS exportfs命令、NFS客户端问题、FTP介绍、使用vsftpd搭建ftp
一.exportfs命令 常用选项 -a 全部挂载或者全部卸载 -r 重新挂载 -u 卸载某一个目录 -v 显示共享目录 以下操作在服务端上 vim /etc/exports //增加 /tmp/ 1 ...
- atitit.网络文件访问协议.unc smb nfs ftp http的区别
atitit.网络文件访问协议.unc smb nfs ftp http的区别 1. 网络文件访问协议1 2. NETBios协议 2 3. SMB(Server Message Block)2 3 ...
- Linux nfs服务介绍
nfs服务介绍 nfs(Network File System) 网络文件系统,能使用户访问服务器的文件系统,就像访问自己的本机的文件系统一样,并且多个 客户端共享访问该文件系统. 目前nfs服务,较 ...
- nfs,ftp配置
一. NFS1. NFS简介NFS全称是network file systemNFS允许一个系统在网络上与他人共享目录和文件.通过使用NFS,用户和程序可以像访问本地文件一样访问远端系统上的文件. 假 ...
- 常用服务搭建(nfs/ftp/samba)
一. NFS1. NFS简介NFS全称是network file systemNFS允许一个系统在网络上与他人共享目录和文件.通过使用NFS,用户和程序可以像访问本地文件一样访问远端系统上的文件. 假 ...
- Bluetooth_FTP_SPEC: 蓝牙FTP介绍
FTP(Bluetooth File Transfer Profile) defines howfolders and files on a server device can be browsed ...
- NFS服务介绍及实验
一.什么是NFS NFS 是 Network File System 的缩写,即网络文件系统.一种使用于分散式文件系统的协定,由 Sun 公司开发,于 1984 年向外公布.功能是通过网络让不同的机器 ...
随机推荐
- docker安装nginx实例
1.拉取nginx镜像: docker pull nginx 2.查看本地镜像文件: docker images 3.创建挂载目录: mkdir -p /docker_data/nginx/{con ...
- 2019 To do List
做好测试不是靠编程,而是靠的是严禁的作风,慎密的逻辑思维,适合的测试流程. 内心有些迷茫的时候,迷茫的是作为测试既然要学那么多编程,为什么不直接去干开发呢?学了编程,用不上,到底有什么用呢? 看了这句 ...
- Phpstorm数组对齐设置
进入 Editor > Code Style > PHP > Wrapping and Braces , 勾选 Align consecutive assignments 和 Ali ...
- Struts 2 概念介绍
概念引入 Web层通常使用Servlet+jsp,现在使用Struts2来处理访问服务器请求 Service层 目前使用JavaBean Dao层目前使用Hibernate Spring是一个大的管家 ...
- 20175317 《Java程序设计》第七周学习总结
20175317 <Java程序设计>第七周学习总结 教材学习内容总结 第七周我学习了教材第八章的内容,学习了许多常用实用类,有以下内容: String类 1. 如何构造String对象 ...
- python中一个汉字点3个字节? utf-8
今天发现了一个汉字占了3个字节,一开始以为是两个呢,字符串切片时总出现乱码,后来才发现一个中文占3个字节.这才解决了乱码问题 原来 1. utf-8 编码中,一个汉字占三个字节.英文字母是一个占用一 ...
- 配置ubuntu
2. 安装配置软件 创建服务器成功后,点击服务器列表页的Ubuntu轻量应用服务器卡片的远程连接按钮 连接成功后开始安装软件. VNC的安装与配置 安装之前先输入 apt-get update 获取最 ...
- 使用npm私有服务器保存公司内部强业务类型组件(三):关于业务性组件的一点思考
编写业务性组件最难的地方不在于技术,而在于沟通, 1:前端将业务给封装了起来,必然导致产品在设计的时候多了一层考虑,在新增功能的时候 他要考虑这个功能是不是在其他项目也需要,如果不是的话,就不应该放在 ...
- DS博客作业01--日期抽象数据类型设计与实验
1.思维导图及学习体会(2分) 1.1第一章绪论知识点思维导图 1.2 学习体会 2.大作业作业内容 (6分) 2.1 设计日期的ADT类型(1分) ADT DATE{ 数据对象:D={year,mo ...
- 微信小程序开发和h5的区别
1. 开发小程序时,每个页面一定要在app.json文件中注册,页面文件夹和其包含的四个文件的名字要保持一致. 2. 小程序发起的都是HTTPS网络请求,在开发调试的过程中可以不校验协议和TLS版本, ...