远程文件管理系统(SpringBoot + Vue)
一、简介
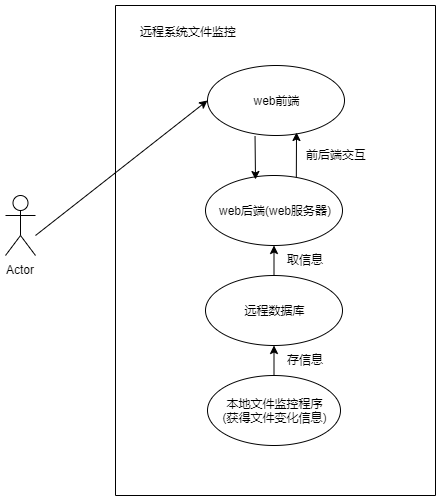
可以实现对本地文件的 增、删、改、重命名等操作的监控,通过登录远程文件监控系统,获取一段时间内本地文件的变化情况。
系统功能图如下:
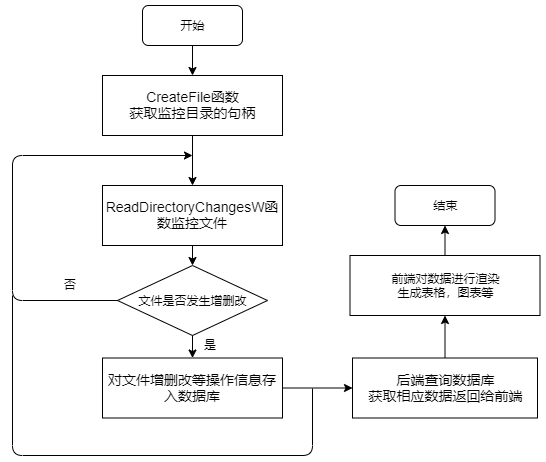
流程图如下:
二、本地文件监控程序的实现(C++)
调用 windows api 监控本地文件操作,将对应的文件操作上传到远程数据库端。
#include <Windows.h>
#include <string>
#include <iostream>
#include <iomanip>
#include <tchar.h>
#include <winsock.h>
#include "include/mysql.h"
#include <ctime>
#include <thread>
#pragma comment(lib,"lib/libmysql.lib")
#pragma comment(lib,"lib/mysqlclient.lib")
using namespace std;
/*
通过CreateFile函数打开监控目录,获取监控目录的句柄
API函数ReadDirecotryChangesW,实现文件监控操作
*/
//字符串替换(全部)
string replace(string& base, string src, string dst)
{
int pos = 0, srclen = src.size(), dstlen = dst.size();
while ((pos = base.find(src, pos)) != string::npos)
{
base.replace(pos, srclen, dst);
pos += dstlen;
}
return base;
}
//void DirectoryMonitoring();
void DirectoryMonitoring(const TCHAR * disk,MYSQL &mysql)
{
//cout << __FUNCTION__ << " is called." << endl; //__FUNCTION__,当前被调用的函数名
string sql;
///mysql下面
DWORD cbBytes; //Double Word Windows.h中
char file_Name[MAX_PATH]; //设置文件名
char file_Name2[MAX_PATH]; //设置文件重命名后的名字
char notify[1024];
int count = 0; //文件操作次数
TCHAR *dir =(TCHAR *) _T(disk); //_T 确保编码的兼容性,磁盘名
//调用CreateFile(Win Api)来获得指向一个物理硬盘的句柄,CreateFile函数打开监控目录,获取监控目录的句柄。
HANDLE dirHandle = CreateFile(dir, GENERIC_READ | GENERIC_WRITE | FILE_LIST_DIRECTORY, //访问模式对设备可以读写数据
FILE_SHARE_READ | FILE_SHARE_WRITE, //共享模式可读可写
NULL, //文件的安全特性,无
OPEN_EXISTING, //文件必须已经存在,若不存在函数返回失败
FILE_FLAG_BACKUP_SEMANTICS, //文件属性
NULL); //用于复制文件句柄
if (dirHandle == INVALID_HANDLE_VALUE) //是否成功
{
cout << "error" + GetLastError() << endl;
}
memset(notify, 0, strlen(notify)); //给notify赋值为0,即清空数组
FILE_NOTIFY_INFORMATION *pnotify = (FILE_NOTIFY_INFORMATION*)notify; //结构体FILE_NOTIFY_INFORMATION,存储文件操作信息其action属性
cout << "正在监视文件" << endl;
while (true)
{
if (ReadDirectoryChangesW(dirHandle, ¬ify, 1024, true, //对目录进行监视的句柄;一个指向FILE_NOTIFY_INFORMATION结构体的缓冲区,其中可以将获取的数据结果将其返回;lpBuffer的缓冲区的大小值,以字节为单位;是否监视子目录.
FILE_NOTIFY_CHANGE_FILE_NAME |
FILE_NOTIFY_CHANGE_DIR_NAME
| FILE_NOTIFY_CHANGE_SIZE, //对文件过滤的方式和标准
&cbBytes, NULL, NULL)) //将接收的字节数转入lpBuffer参数
{
//宽字节转换为多字节
if (pnotify->FileName)
{
memset(file_Name, 0, strlen(file_Name));
WideCharToMultiByte(CP_ACP, 0, pnotify->FileName, pnotify->FileNameLength / 2, file_Name, 99, NULL, NULL);
}
//重命名的文件名
if (pnotify->NextEntryOffset != 0 && (pnotify->FileNameLength > 0 && pnotify->FileNameLength < MAX_PATH))
{
PFILE_NOTIFY_INFORMATION p = (PFILE_NOTIFY_INFORMATION)((char*)pnotify + pnotify->NextEntryOffset);
memset(file_Name2, 0, sizeof(file_Name2));
WideCharToMultiByte(CP_ACP, 0, p->FileName, p->FileNameLength / 2, file_Name2, 99, NULL, NULL);
}
string str=file_Name;
str = replace(str, "\\", "/");
str = dir+str;
string str2=file_Name2;
str2 = replace(str2, "\\", "/");
str2 = dir+str2;
string link = "-->";
//设置类型过滤器,监听文件创建、更改、删除、重命名等
switch (pnotify->Action)
{
case FILE_ACTION_ADDED: //添加文件
count++;
cout << count << setw(5) << "File Add:" << setw(5) << file_Name << endl;
sql = "begin;";
mysql_query(&mysql, sql.c_str());
sql = "insert into file_info(action,name)\
values (\"File Added\",\""+str+"\");";
if (mysql_query(&mysql, sql.c_str()))
{
cout << "line: " << __LINE__ << ";" << mysql_error(&mysql) << mysql_errno(&mysql) << endl;
}
sql = "commit;";
mysql_query(&mysql, sql.c_str());
break;
case FILE_ACTION_MODIFIED: //修改文件
cout << "File Modified:" << setw(5) << file_Name << endl;
sql = "begin;";
mysql_query(&mysql, sql.c_str());
sql = "insert into file_info(action,name)\
values (\"File Modified\",\"" + str + "\");";
if (mysql_query(&mysql, sql.c_str()))
{
cout << "line: " << __LINE__ << ";" << mysql_error(&mysql) << mysql_errno(&mysql) << endl;
}
sql = "commit;";
mysql_query(&mysql, sql.c_str());
break;
case FILE_ACTION_REMOVED: //删除文件
count++;
cout << count << setw(5) << "File Removed:" << setw(5) << file_Name << endl;
sql = "begin;";
mysql_query(&mysql, sql.c_str());
sql = "insert into file_info(action,name)\
values (\"File Deleted\",\"" + str + "\");";
if (mysql_query(&mysql, sql.c_str()))
{
cout << "line: " << __LINE__ << ";" << mysql_error(&mysql) << mysql_errno(&mysql) << endl;
}
sql = "commit;";
mysql_query(&mysql, sql.c_str());
break;
case FILE_ACTION_RENAMED_OLD_NAME: //重命名
cout << "File Renamed:" << setw(5) << file_Name << "->" << file_Name2 << endl;
sql = "begin;";
mysql_query(&mysql, sql.c_str());
sql = "insert into file_info(action,name)\
values (\"File Renamed\",\"" + str+link+str2 + "\");";
if (mysql_query(&mysql, sql.c_str()))
{
cout << "line: " << __LINE__ << ";" << mysql_error(&mysql) << mysql_errno(&mysql) << endl;
}
sql = "commit;";
mysql_query(&mysql, sql.c_str());
break;
default:
cout << "未知命令" << endl;
}
}
}
CloseHandle(dirHandle);
}
int _tmain(int argc, _TCHAR* argv[])
{
const TCHAR * disk1 = _T("C://");
const TCHAR * disk2 = _T("D://");
const TCHAR * disk3 = _T("E://");
MYSQL mysql;
mysql_init(&mysql);
// 连接远程数据库
if (NULL == mysql_real_connect(&mysql, "database_host", "username", "password", "mysql", 3306, NULL, 0))
{
cout << __LINE__ << mysql_error(&mysql) << mysql_errno(&mysql) << endl;
throw - 1;
}
//进入数据库hr_1
string sql = "use hr_1;";
if (mysql_query(&mysql, sql.c_str()))
{
cout << "line: " << __LINE__ << ";" << mysql_error(&mysql) << mysql_errno(&mysql) << endl;
throw - 1;
}
mysql_query(&mysql, "SET NAMES GBK"); //数据库编码格式
thread t1(DirectoryMonitoring, disk1,ref(mysql));
thread t2(DirectoryMonitoring, disk2,ref(mysql));
thread t3(DirectoryMonitoring, disk3,ref(mysql));
t1.join();
t2.join();
t3.join();
return 0;
}
三、后端的实现(Java)
后端框架:SpringBoot 依赖:mybatis、lombok
文件信息类:
package com.example.file_monitor;

import lombok.Data;

import lombok.NoArgsConstructor;

/*

文件信息实体对象

 */

@Data

@NoArgsConstructor

public class FileInfo {

    private int id;

    private String action;

    private String name;

    private String time;

    public FileInfo(int id,String action,String name,String time){

        this.id=id;

        this.action=action;

        this.name=name;

        this.time=time;

    }

}
数据库操作接口:
import org.apache.ibatis.annotations.Mapper;

import org.apache.ibatis.annotations.Param;

import org.apache.ibatis.annotations.Select;

import java.util.List;

/*

数据库操作接口

 */

@Mapper

public interface FileMapper {

    //获取文件监控信息列表

    @Select("SELECT * FROM file_info")

    List<FileInfo> findAllFile();

    //分页获取

    @Select("SELECT * FROM file_info LIMIT #{start},#{end}")

    List<FileInfo> findFile(@Param("start") int start,@Param("end") int end);

    //删除

    @Delete("DELETE FROM file_info WHERE id= #{id}")

    int deleteFile(@Param("id") int id);

    //统计各种操作

    @Select("SELECT COUNT(*) FROM file_info WHERE action= #{a}")

    int getCount(@Param("a") String action);

}
控制类
package com.example.file_monitor;

import org.springframework.beans.factory.annotation.Autowired;

import org.springframework.web.bind.annotation.*;

import java.util.ArrayList;

import java.util.List;

@RestController

@RequestMapping(value = "api")

public class FileController {

    @Autowired

    private FileMapper fileMapper;

    @Autowired

    private ApiJson apiJson;

    //分页

    @GetMapping("/data")

    public ApiJson getFileList(@RequestParam("curr") int page,@RequestParam("nums") int limit){

        int start=(page-1)*limit;

        int end= limit;

        List<FileInfo> data=fileMapper.findFile(start,end);

        apiJson.setCode(0);

        apiJson.setCount(100);

        apiJson.setMsg("test");

        apiJson.setData(data);

        return apiJson;

    }

    //统计

    @GetMapping("/count")

    public List<Integer> getCount(){

        int mod=fileMapper.getCount("File Modified");

        int add=fileMapper.getCount("File Added");

        int dele=fileMapper.getCount("File Deleted");

        int reName=fileMapper.getCount("File Renamed");

        List<Integer> res=new ArrayList<Integer>();

        res.add(mod);

        res.add(add);

        res.add(dele);

        res.add(reName);

        return res;

    }

    //删除

    @CrossOrigin

    @GetMapping("/delete")

    public int delFile(@RequestParam("id") int id){

        return fileMapper.deleteFile(id);

    }

    //获取所有信息

    @CrossOrigin

    @GetMapping("/all")

    public  List<FileInfo> getAllFileInfo(){

        return fileMapper.findAllFile();

    }

}
若前端使用 layui 框架,需要 json 格式的数据,所以利用该类生成 json 数据
package com.example.file_monitor;

import lombok.Data;

import lombok.NoArgsConstructor;

import org.springframework.stereotype.Component;

import java.util.List;

@Data

@NoArgsConstructor

@Component

public class ApiJson {

    private int code;

    private String msg;

    private int count;

    private List<FileInfo> data;

    public ApiJson(int code,String msg,int count,List<FileInfo> data){

        this.code=code;

        this.msg=msg;

        this.count=count;

        this.data=data;

    }

}
四、前端实现(layui)
借助 ajax 与后端进行数据交换
例如:
    function sendAjaxGet() {

        $.ajax({

            type: "GET",

            url: "/api/count",

            success: function(data){

                Chart(data[0],data[1],data[2],data[3]);

            },

            error: function (message) {

            }

        });

    }

    sendAjaxGet();
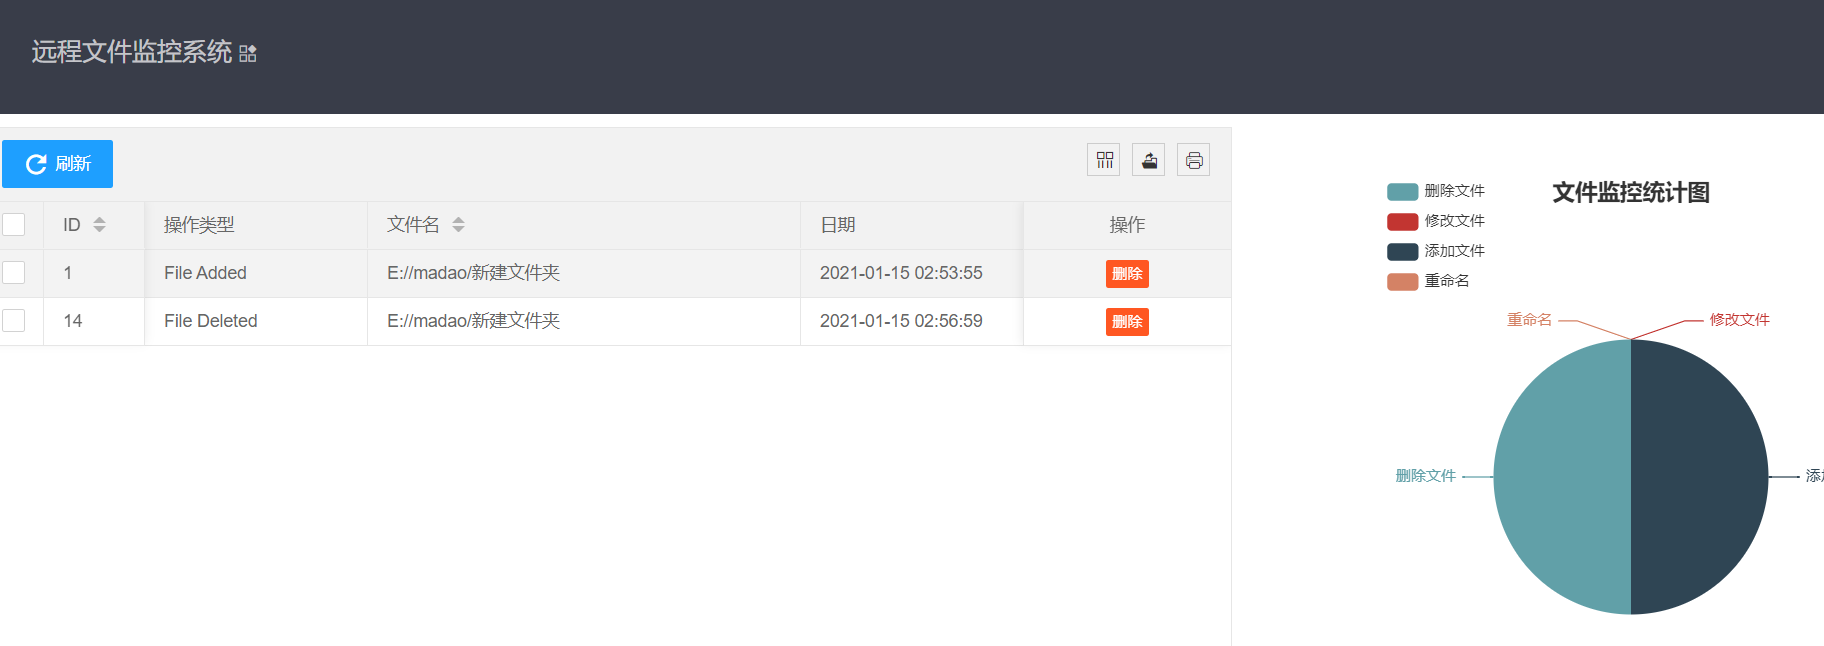
借助 layui table 实现表格的生成 layui 表格
借助 Echarts 实现统计图的生成 echarts
详情见 github 项目:(还没上传)
五、前端实现(Vue)
5.1 简介
之前使用的是 layui 搭建前端,最近在学 Vue,所以打算利用 Vue 前后端分离重写一下前端。
目录结构:
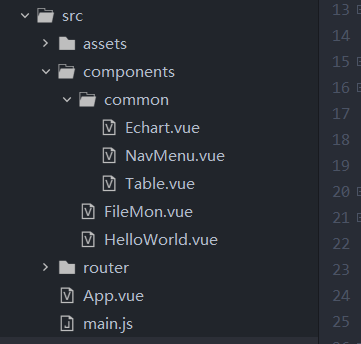
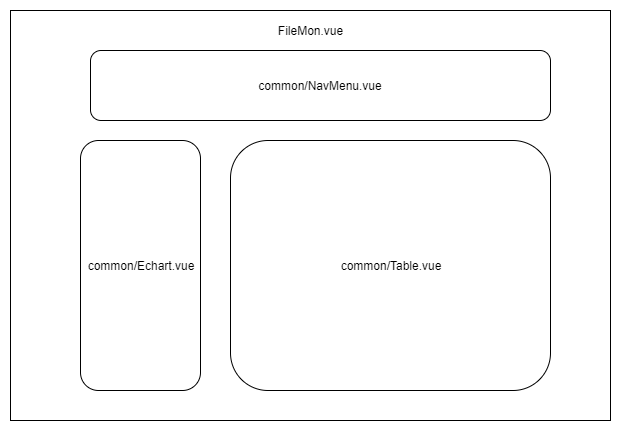
5.2 FileMon.vue
FileMon 中划分为三大部分:头部(导航栏NavMenu)、侧边栏(图Echart)、main (表格)。
<template>

  <el-container>

    <el-header>

      <NavMenu></NavMenu>

    </el-header>

    <el-container>

      <el-aside width="500px">

        <Echart ref="ac_e"></Echart>

      </el-aside>

      <el-container>

        <el-main>

          <Table ref="ac_t" @exchange="exchange()"></Table>

        </el-main>

      </el-container>

    </el-container>

  </el-container>

</template>

<script>

  import NavMenu from './common/NavMenu.vue'

  import Table from './common/Table.vue'

  import Echart from './common/Echart.vue'

  export default {

    name: 'FileMon',

    components:{ NavMenu,Table,Echart },

    methods: {

      exchange: function() {

        this.$refs.ac_e.$data.ac = this.$refs.ac_t.$data.ac

        this.$refs.ac_e.loads()

      }

    }

  }

</script>

<style>

</style>
5.3 NavMenu
<template>

  <el-menu

    :default-active="activeIndex2"

    class="el-menu-demo"

    mode="horizontal"

    background-color="#545c64"

    text-color="#fff"

    active-text-color="#ffd04b">

    <el-menu-item index="1"></el-menu-item>

    <div style="right: 650px;position: fixed; color: #EEEEEE;top: 4px;">

      <h2>远程文件监控系统</h2>

    </div>

  </el-menu>

</template>

<script>

  export default {

    name: 'NavMenu'

  }

</script>

<style>

</style>
5.4 表格
<template>

    <el-table

      height="500"

      :data="tableData.filter(data => !search || data.name.toLowerCase().includes(search.toLowerCase()))"

      style="width: 100%">

      <el-table-column

        label="ID"

        prop="id">

      </el-table-column>

      <el-table-column

        label="操作类型"

        prop="action">

      </el-table-column>

      <el-table-column

        label="文件名"

        prop="name">

      </el-table-column>

      <el-table-column

        label="日期"

        prop="time">

      </el-table-column>

      <el-table-column

        align="right">

        <template slot="header" slot-scope="scope">

          <el-input

            v-model="search"

            size="mini"

            placeholder="输入关键字搜索"/>

        </template>

        <template slot-scope="scope">

          <el-button

            size="mini"

            @click="handleEdit(scope.$index, scope.row)">Edit</el-button>

          <el-button

            size="mini"

            type="danger"

            @click="handleDelete(scope.$index, scope.row)">Delete</el-button>

        </template>

      </el-table-column>

    </el-table>

</template>

<script>

  export default {

    name: 'Table',

    data: function() {

      return {

        tableData: [],

        search: '',

        ac: [0,0,0,0]   //统计文件各类操作数量,供绘制饼图

      }

    },

    methods: {

      handleEdit(index, row) {

        console.log(index, row)

      },

      handleDelete(index, row) {

        this.$axios.get('delete?id='+row.id).then(resp =>{

          console.log(resp.data)

          if( resp.data != 0){

            this.$alert('删除成功')

            this.loads()    //每次删除后更新一下表格中的数据

          }

        })

      },

      loads(){

        this.$axios.get('/all').then(resp =>{

          if( resp){

            this.tableData = resp.data

            this.counts()     //每次更新表格数据后,统计各类操作数量

            this.$emit('exchange')

          }

        })

      },

      counts(){

        var i

        for( i in this.tableData){   //这个 for 循环 i 是列表tableData的索引

          if(this.tableData[i].action == 'File Added') {this.ac[0] = this.ac[0]+1}

          else if(this.tableData[i].action == 'File Deleted') {this.ac[1] = this.ac[1]+1}

          else if(this.tableData[i].action == 'File Modified') {this.ac[2] = this.ac[2]+1}

          else  {this.ac[3] = this.ac[3]+1}

        }

      }

    },

    mounted:function(){

      this.loads()

    }

  }

</script>

<style>

</style>
5.5 饼图
<template>

      <div>

      <!--卡片视图区域-->

      <el-card>

          <!-- 2、为ECharts准备一个具备大小(宽高)的Dom -->

          <div id="main" style="width: 600px;height:500px;"></div>

      </el-card>

      </div>

</template>

<script>

import * as echarts from 'echarts'   //引入 echarts

export default {

  name: 'Echart',

  data: function () {

      return {

        ac: [0,0,0,0]

      }

    },

  methods:{

    loads: function() {

      // 3、基于准备好的dom,初始化echarts实例

      var myChart = echarts.init(document.getElementById('main'))

      // 4、准备数据和配置项

      // 指定图表的配置项和数据

      var option = {

              title: {

                  text: '文件监控信息',

                  left: 'center'

              },

              tooltip: {

                  trigger: 'item'

              },

              legend: {

                  orient: 'vertical',

                  left: 'left',

              },

              series: [

                  {

                      name: '访问来源',

                      type: 'pie',

                      radius: '50%',

                      data: [

                          {value: this.ac[0], name: '添加文件'},

                          {value: this.ac[1], name: '删除文件'},

                          {value: this.ac[2], name: '修改文件'},

                          {value: this.ac[3], name: '重命名'},

                      ],

                      emphasis: {

                          itemStyle: {

                              shadowBlur: 10,

                              shadowOffsetX: 0,

                              shadowColor: 'rgba(0, 0, 0, 0.5)'

                          }

                      }

                  }

              ]

      }

      // 5、展示数据

      // 使用刚指定的配置项和数据显示图表。

      myChart.setOption(option);

    }

  },

  mounted: function() {

    this.loads()

  }

}

</script>
5.6 FileMon--表格--饼图 之间的关系
Table.vue 中的 loads 函数,每次执行时 counts() 函数更新 ac 变量的值,并定义触发 exchange 事件。
      loads(){

        this.$axios.get('/all').then(resp =>{

          if( resp){

            this.tableData = resp.data

            this.counts()

            this.$emit('exchange')

          }

        })

      },
FileMon.vue 监听 exchange 事件,触发时执行 exchange 函数
    <el-container>

      <el-aside width="500px">

        <Echart ref="ac_e"></Echart>

      </el-aside>

      <el-container>

        <el-main>

          <Table ref="ac_t" @exchange="exchange()"></Table>

        </el-main>

      </el-container>

    </el-container>
exchange 函数 取 Echart.vue 中的 ac 变量 赋值为 Table.vue 中的 ac 变量,调用 Echart.vue 变量的 load 方法。
    methods: {

      exchange: function() {

        this.$refs.ac_e.$data.ac = this.$refs.ac_t.$data.ac

        this.$refs.ac_e.loads()

      }

    }

  }
5.7 main.js
// The Vue build version to load with the `import` command

// (runtime-only or standalone) has been set in webpack.base.conf with an alias.

import Vue from 'vue'

import App from './App'

import router from './router'

import axios from 'axios'   //引入axios

//设置代理

axios.defaults.baseURL = 'http://localhost:8443/api'

//注册全局

Vue.prototype.$axios = axios

import ElementUI from 'element-ui';

import 'element-ui/lib/theme-chalk/index.css';

Vue.config.productionTip = false

Vue.use(ElementUI);

/* eslint-disable no-new */

new Vue({

  el: '#app',

  router,

  components: { App },

  template: '<App/>'

})
5.8 路由
import Vue from 'vue'

import Router from 'vue-router'

import HelloWorld from '@/components/HelloWorld'

import FileMon from '@/components/FileMon'

Vue.use(Router)

export default new Router({

  routes: [

    {

      path: '/',

      name: 'HelloWorld',

      component: HelloWorld

    },

    {

      path: '/fm',

      name: 'FileMon',

      component: FileMon

    }

  ]

})
远程文件管理系统(SpringBoot + Vue)的更多相关文章
- SpringBoot + Vue + ElementUI 实现后台管理系统模板 -- 后端篇(五): 数据表设计、使用 jwt、redis、sms 工具类完善注册登录逻辑
(1) 相关博文地址: SpringBoot + Vue + ElementUI 实现后台管理系统模板 -- 前端篇(一):搭建基本环境:https://www.cnblogs.com/l-y-h/p ...
- SpringBoot + Vue + ElementUI 实现后台管理系统模板 -- 后端篇(一): 搭建基本环境、整合 Swagger、MyBatisPlus、JSR303 以及国际化操作
相关 (1) 相关博文地址: SpringBoot + Vue + ElementUI 实现后台管理系统模板 -- 前端篇(一):搭建基本环境:https://www.cnblogs.com/l-y- ...
- JDFS:一款分布式文件管理系统,第四篇(流式云存储续篇)
一 前言 本篇博客是JDFS系列博客的第四篇,从最初简单的上传.下载,到后来加入分布式功能,背后经历了大量的调试,尤其当实验的虚拟计算结点数目增加后,一些潜在的隐藏很深的bug就陆续爆发.在此之前笔者 ...
- springboot+vue前后端分离,nginx代理配置 tomcat 部署war包详细配置
1.做一个小系统,使用了springboot+vue 基础框架参考这哥们的,直接拿过来用,链接https://github.com/smallsnail-wh/interest 前期的开发环境搭建就不 ...
- Springboot vue.js html 跨域 前后分离 shiro权限 集成代码生成器
本代码为 Springboot vue.js 前后分离 + 跨域 版本 (权限控制到菜单和按钮) 后台框架:springboot2.1.2+ mybaits+maven+接口 前端页面:html + ...
- SpringBoot+Vue前后端分离项目,maven package自动打包整合
起因:看过Dubbo管控台的都知道,人家是个前后端分离的项目,可是一条打包命令能让两个项目整合在一起,我早想这样玩玩了. 1. 建立个maven父项目 next 这个作为父工程,next Finish ...
- SpringBoot + Vue + nginx项目部署(零基础带你部署)
一.环境.工具 jdk1.8 maven spring-boot idea VSVode vue 百度网盘(vue+springboot+nginx源码): 链接:https://pan.baidu. ...
- 使用Docker部署Spring-Boot+Vue博客系统
在今年年初的时候,完成了自己的个Fame博客系统的实现,当时也做了一篇博文Spring-boot+Vue = Fame 写blog的一次小结作为记录和介绍.从完成实现到现在,也断断续续的根据实际的使用 ...
- 手把手教你用 FastDFS 构建分布式文件管理系统
说起分布式文件管理系统,大家可能很容易想到 HDFS.GFS 等系统,前者是 Hadoop 的一部分,后者则是 Google 提供的分布式文件管理系统.除了这些之外,国内淘宝和腾讯也有自己的分布式文件 ...
随机推荐
- Redis面试常见问题(一)
一.redis 简介简单来说 redis 就是一个数据库,不过与传统数据库不同的是 redis 的数据是存在内存中的,所以读写速度非常快,因此 redis 被广泛应用于缓存方向.另外,redis 也经 ...
- ERROR 1045 (28000): Access denied for user 'ODBC'@'localhost' (using password: NO)
cmd mysql -h localhost -u root -p r然后报错 ERROR 1045 (28000): Access denied for user 'ODBC'@'localhost ...
- redis运维与开发笔记
- .NET 面试题: C# override && overloading (C# 覆写 && 重载)
1 1 1 .NET 面试题, C# ,override , overloading, 覆写, 重载,.NET,ASP.NET, override (覆写/重写): 方法名相同,参数的个数和类型相同, ...
- bili & library bundler
bili & library bundler https://bili.egoist.sh/#/#quick-start # Node.js 8 or above: $ npm i -D bi ...
- GitHub Actions
GitHub Actions CI/CD & testing https://github.com/features/actions refs xgqfrms 2012-2020 www.cn ...
- Flutetr flutter_downloader 1.3.1
flutter_downloader 此库更新极慢,所以问题及多,可以看文档 安装 dependencies: flutter_downloader: ^1.3.1 配置 Java: // MyApp ...
- 2021 NGK生态所体验好、交易快 引人注目!
据悉,NGK计划于2021年2月15日正式上线自己的生态所(时间待定),目的在于满足NGK生态建设者对于NGK几大币种的交易等需求,如NGK.BGV.SPC.USDN.VAST等.只要上NGK生态所, ...
- SPC算力币异军突起,或将跑赢币圈全场
比特币在出现反弹以后,并没有向上突破,而是回调,目前已经跌破了35000美金.目前,整个市场都在关注着比特币的动向,毕竟,比特币的走势,关注着资本的流向.不过,也有一部分巨鲸们将目光对准了币圈的其它数 ...
- Vue 组件的通信方式都有哪些?
说一下 Vue 组件的通信方式都有哪些?(父子组件,兄弟组件,多级嵌套组件等等) 一.父组件向子组件传值 二.子组件向父组件传值 三.兄弟组件传值 四.跨组件 一.父组件向子组件传值 1.1props ...