Docker 安装 MySQL5.6
方法一、docker pull mysql
查找Docker Hub上的mysql镜像
#docker search mysql
这里我们拉取官方的镜像,标签为5.6
#docker pull mysql:5.6
(第一次启动Docker-MySql主要是查看Docker里面MySQL的默认配置,数据位置,日志位置,配置文件位置)
#docker run -it --entrypoint /bin/bash --rm mysql:5.6 (创建并进入容器里,方便查看容器里面的默认设置,--rm参数表示退出容器会自动删除当前容器)

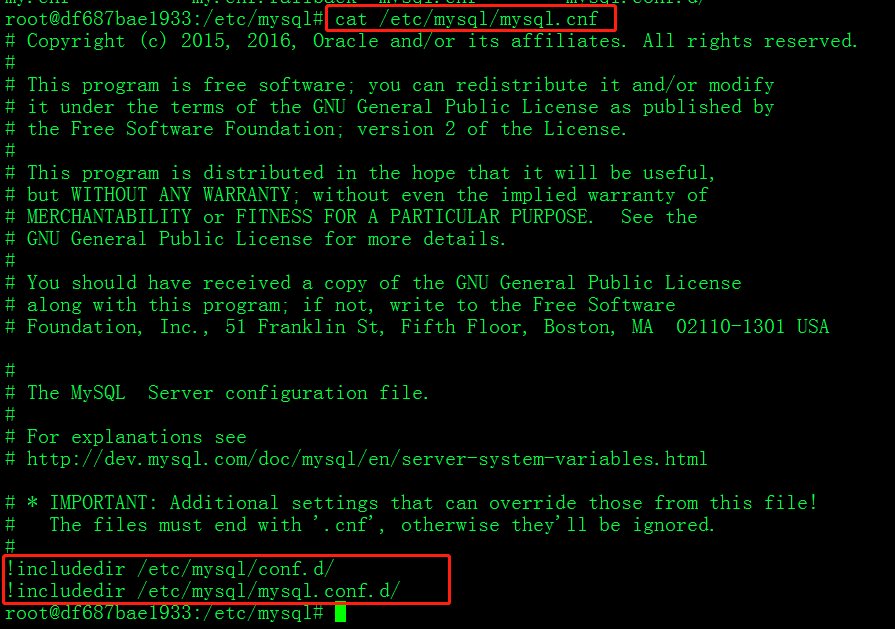
#cat /etc/mysql/mysql.cnf(查看默认配置文件)


(第二次启动Docker-MySql)
#docker run --detach \

    --publish 13306:3306 \

    --restart always \

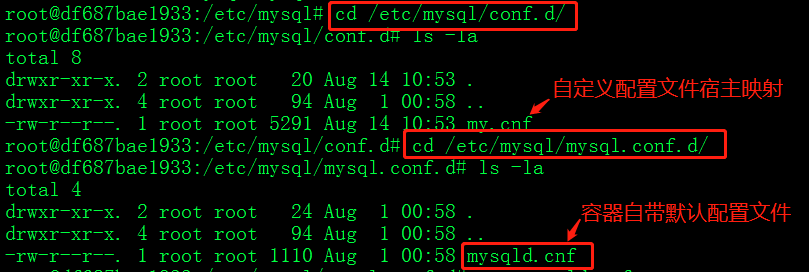
    --volume /data/mysql/conf:/etc/mysql/conf.d \

    --volume /data/mysql/mysqldata:/var/lib/mysql \

    --volume /data/mysql/backup:/data/backup \

    --volume /etc/localtime:/etc/localtime \

    --env MYSQL_ROOT_PASSWORD=1234 \

    mysql:5.6 --character-set-server=utf8mb4 --collation-server=utf8mb4_unicode_ci
停止容器,修改配置文件
#docker ps
#docker stop 4b6967498e1b
增加自定义配置文件,
vim /data/mysql/conf/my.cnf
my.cnf文件内容


# For advice on how to change settings please see

# http://dev.mysql.com/doc/refman/5.6/en/server-configuration-defaults.html

# *** DO NOT EDIT THIS FILE. It's a template which will be copied to the

# *** default location during install, and will be replaced if you

# *** upgrade to a newer version of MySQL.

[mysqld]

# Remove leading # and set to the amount of RAM for the most important data

# cache in MySQL. Start at 70% of total RAM for dedicated server, else 10%.

# innodb_buffer_pool_size = 128M

# Remove leading # to turn on a very important data integrity option: logging

# changes to the binary log between backups.

# log_bin

# These are commonly set, remove the # and set as required.

# basedir = .....

# datadir = .....

# port = .....

# server_id = .....

# socket = .....

[mysqld]

port=3306  # 指定MsSQL侦听的端口

socket=/var/lib/mysql/mysql3306.sock  # 为MySQL客户程序与服务器之间的本地通信指定一个套接字文件(Linux下默认是/var/lib/mysql/mysql.sock文件)

server_id=1

pid_file=/var/lib/mysql/mysql3306.pid

local_infile=1                                                     #开启Load

tmpdir=/tmp

datadir=/var/lib/mysql

back_log=250                                                       #max_connec外的连接数

#skip-grant-tables

max_connections=1024

#wait_timeout=86400

wait_timeout=300                                                   #非交互链接超时时间

#interactive_timeout= 1800

interactive_timeout= 300                                           #交互链接超时时间

max_connect_errors=10000

group_concat_max_len=2048                                          #字符串链接操作长度限制

open_files_limit=8192

skip_external_locking

skip_name_resolve

#skip_networking

max_allowed_packet=32M                                             #server接受数据包大小调整

#thread_cache_size=64

thread_cache_size=20

thread_stack=192K

transaction-isolation = REPEATABLE-READ

#tmp_table_size=128M

tmp_table_size=256M                                                  #临时表空间大小

#max_tmp_tables=100

#max_prepared_stmt_count=1048576

lower_case_table_names=1

log_bin_trust_function_creators=1

########log

log_error=/var/lib/mysql/mysql3306.err

slow_query_log=1                                                    #开启慢查询

long_query_time=1                                                   #单位是秒

slow_query_log_file=/var/lib/mysql/mysql_slow.log

log_bin=mysqlmaster-bin.log

binlog_cache_size=8M

binlog_format=MIXED

max_binlog_cache_size=1024M

max_binlog_size=1024M

sync_binlog=1

expire_logs_days=15

##########内存,优化,查询

#key_buffer_size=235M

key_buffer_size=512M                                                ##索引缓冲区大小

#read_buffer_size=2M

read_buffer_size=8M                                                 ##读buffer

read_rnd_buffer_size=16M

#join_buffer_size=2M

join_buffer_size=16M                                                ##join buffer大小

sort_buffer_size=16M                                                ##排序内存大小,基于链接,值过大会消耗大量内存,性能下降

max_heap_table_size=123M

#query_cache_min_res_unit=2K

#query_cache_limit=2M

#query_cache_size=410M

#query_cache_type=1                                                 #查询缓存0是关,1是开,会消耗性能

##############MYISAM

bulk_insert_buffer_size=64M

myisam_sort_buffer_size=128M

myisam_max_sort_file_size=10G

myisam_repair_threads=1

myisam_recover

##########language

init_connect='SET NAMES utf8'

#########innodb

innodb_file_per_table=1

#innodb_open_file=1678

innodb_open_files=65535                                              #innodb打开文件数

innodb_purge_threads=0

innodb_purge_batch_size=20

innodb_io_capacity=200

innodb_adaptive_flushing=on

innodb_change_buffering=all

innodb_stats_on_metadata=off

innodb_spin_wait_delay=6

innodb_buffer_pool_instances=12

#innodb_open_files=1024            #重复,注释

innodb_additional_mem_pool_size=16M

innodb_buffer_pool_size=24000M                                      #innodb buffer

innodb_sort_buffer_size=4M

innodb_data_file_path=ibdata1:12M:autoextend

innodb_autoextend_increment=8M

innodb_read_io_threads=16

innodb_write_io_threads=16

innodb_thread_concurrency=0

innodb_replication_delay=0

innodb_flush_log_at_trx_commit=2

#innodb_log_buffer_size=256M

innodb_log_buffer_size=32M                                           #inondb日志缓冲大小

innodb_log_file_size=256M

#innodb_log_file_size=1024M                                          #innodb日志大小   修改此值数据库无法启动

innodb_log_files_in_group=2

innodb_max_dirty_pages_pct=85

#innodb_log_group_home_dir=

innodb_lock_wait_timeout=300                                         #innodb事物锁时间

table_open_cache=16384

#table_definiton_cache=16384

[mysqldump]

quick

max_allowed_packet = 32M

[mysql]

no_auto_rehash

# Remove leading # to set options mainly useful for reporting servers.

# The server defaults are faster for transactions and fast SELECTs.

# Adjust sizes as needed, experiment to find the optimal values.

# join_buffer_size = 128M

# sort_buffer_size = 2M

# read_rnd_buffer_size = 2M

#sql_mode=STRICT_TRANS_TABLES,NO_AUTO_CREATE_USER,NO_ENGINE_SUBSTITUTION,NO_AUTO_VALUE_ON_ZERO
my.cnf
重新启动容器
#docker start 4b6967498e1b
进入容器,修改默认root用户的Host为%,否则在容器外面登录不进去mysql数据库。
#docker exec -it 4b6967498e1b /bin/bash
重启MySql服务
#service mysql restart
宿主执行MySQL备份
#docker exec df687bae1933 sh -c '/data/backup/mysqldump.sh'
宿主定时任务
#crontab -e

00 6 * * * /usr/bin/docker exec df687bae1933 sh -c '/data/backup/mysqldump.sh'


 1 #!/bin/sh

 2 find /data/backup/mysqldump -mtime +2  -exec rm -rf {} \;

 3 DATE=`date +%Y%m%d_%H%M%S`

 4 TAR_FILE_PATH="/data/backup/mysqldump/$DATE"

 5 if [ ! -f "$TAR_FILE_PATH" ]; then

 6    mkdir -p  "$TAR_FILE_PATH"

 7 fi

 8

 9 #备份结构

10 /usr/bin/mysqldump -uroot -p1234 -P3306 -d -q program_shopcart 2>>/data/backup/mysql_backup.log | gzip 1>$TAR_FILE_PATH/program_shopcart_d.sql.gz

11 /usr/bin/mysqldump -uroot -p1234 -P3306 -d -q program_website 2>>/data/backup/mysql_backup.log | gzip 1>$TAR_FILE_PATH/program_website_d.sql.gz

12

13

14 #备份数据

15 /usr/bin/mysqldump -uroot -p1234 -P3306 --default-character-set=utf8mb4 -R -q --master-data=2 --hex-blob --single-transaction program_shopcart 2>>/data/backup/mysql_backup.log | gzip 1>$TAR_FILE_PATH/program_shopcart.sql.gz

16 /usr/bin/mysqldump -uroot -p1234 -P3306 --default-character-set=utf8mb4 -R -q --master-data=2 --hex-blob --single-transaction program_website 2>>/data/backup/mysql_backup.log | gzip 1>$TAR_FILE_PATH/program_website.sql.gz
mysqldump.sh
Docker 安装 MySQL5.6的更多相关文章
- Docker 安装MySQL5.7(三)
Docker 安装MySQL5.7 1.搜索docker镜像(可以看到搜索的结果,这个结果是按照一定的星级评价规则排序的) docker search mysql 2.拉取docker的mysql镜像 ...
- docker安装mysql5.7 数据挂载
docker安装mysql5.7,并数据卷挂载到主机 # docker 中下载 mysql docker pull mysql:5.7 #启动 docker run --name mysql3306 ...
- docker安装mysql5.6和redis3.2
环境:centos 6.8, docker version 1.7.1 1.docker安装mysql5.6 第一步:拉取镜像 docker pull mysql:5.6 第二步:docker run ...
- docker安装MySQL5.7示例!!坑
docker pull mysql 一.错误的启动 [root@localhost ~]# docker run ‐‐name mysql01 ‐d mysql 42f0981990 ...
- CentOS7利用docker安装MySQL5.7
CentOS7利用docker安装MySQL5.7 前提条件 centos7 且内核版本高于3.10, 可通过以下命令查看内核版本 uname -r 利用yum 安装docker 安装一些必要的系统工 ...
- Docker安装mysql5.7并且配置主从复制
Docker安装mysql5.7并且配置主从复制 一.拉取mysql镜像 二.创建文件docker.cnf 2.1 mysql主机(192.168.21.55:3307) 2.1.1 创建文件夹 2. ...
- centos7用docker安装mysql5.7.24后配置主从
1)使用docker安装完成mysql5.7.24,我规划的是3台: 192.168.0.170(Master) 192.168.0.169(Slave) 192.168.0.168(Slave) 2 ...
- docker安装mysql5.6镜像并进行主从配置
docker安装mysql镜像并进行主从配置 1.去DaoCloud官网(dockerhub可能因为网速问题下载的慢)查找需要的mysql版本镜像 docker pull daocloud.io/li ...
- docker安装mysql5.6(win10家庭版)
闲话不多说,打开之前已经安装好的客户端Docker Quickstart Terminal,安装方法请看上一篇,链接地址:https://www.cnblogs.com/jimmyshan-study ...
- Mac Docker安装MySQL5.7
mkdir mysql 在~目录下创建mysql目录 docker run --restart=always --name mysql5.7 -p 3306:3306 -v ~/mysql:/var/ ...
随机推荐
- C++ //继承同名成员处理方式
1 #include <iostream> 2 #include <string> 3 using namespace std; 4 5 class Base 6 { 7 pu ...
- C++ 继承方式 与 普通方式 对比
1 //C++ 继承 2 //继承是面向对象三大特性之一 3 4 #include <iostream> 5 #include <string> 6 using namespa ...
- 中高级Android大厂面试秘籍,为你保驾护航金三银四,直通大厂(上)
前言 当下,正面临着近几年来的最严重的互联网寒冬,听得最多的一句话便是:相见于江湖~.缩减HC.裁员不绝于耳,大家都是人心惶惶,年前如此,年后想必肯定又是一场更为惨烈的江湖厮杀.但博主始终相信,寒冬之 ...
- docker 安装prometheus和grafna
一.拉取镜像 docker pull prom/prometheus 二.配置 sudo mkdir /etc/prometheus/ sudo vim /etc/prometheus/prometh ...
- noip36
开场先看一遍题面,凭着错误的感觉t3叫naive是一个原因,312开局.然后就死的很惨. T1 朴素暴力40pts,细想就有80pts,然而我只写了十分钟左右就爬回T3了,所以... 其实都是借口 正 ...
- node 报错 throw er; // Unhandled 'error' event 解决办法
node 报错 Starting child process with 'node web.js' events.js:183 throw er; // Unhandled 'error' event ...
- sql查询第10条到第20条数据
select top(10) * from T1 where Id >= (select MAX(Id) from (select top(20) * from T1 order by Id) ...
- Springboot中配置druid
pom文件信息: <!--引入druid数据源--> <!-- https://mvnrepository.com/artifact/com.alibaba/druid --> ...
- C程序设计学习笔记(完结)
时间:2015-4-16 09:17 不求甚解,每有会意,欣然忘食.学习的过程是痛苦的 第1章 程序设计和C语言 第2章 算法--程序的灵魂 -算法的五个特点 ...
- [转]VRRP协议详解
原文地址:VRRP协议详解 文中涉及缩略语 缩略语 英文全名 中文解释 VRRP Virtual Router Redundancy Protocol 虚拟路由器冗余协议 NQA Network Qu ...
