微信小程序云开发-云存储的应用-识别营业执照
一、准备工作
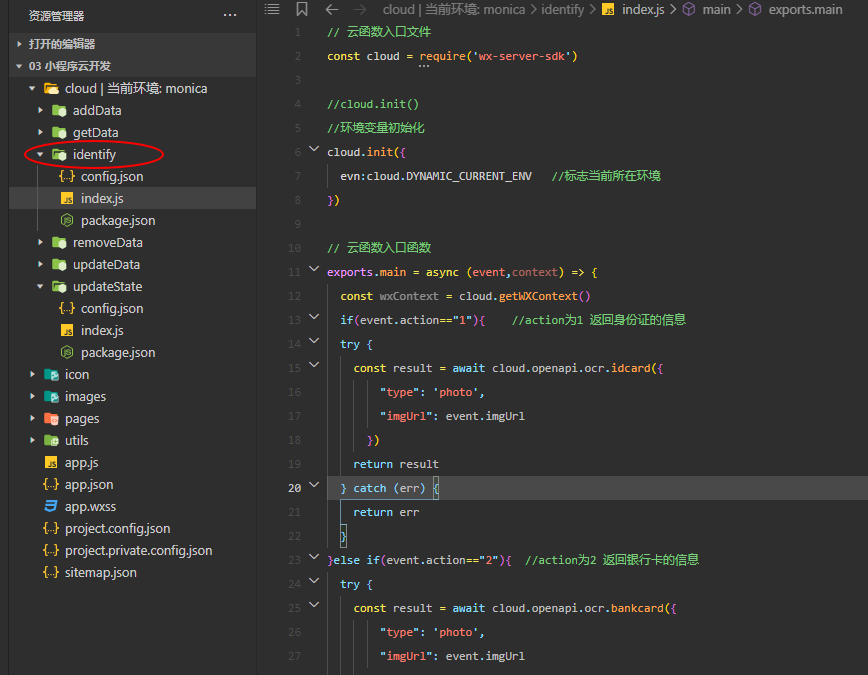
1、创建云函数identify
二、云函数identify中index.js代码
- 1 // 云函数入口文件
- 2 const cloud = require('wx-server-sdk')
- 3
- 4 //cloud.init()
- 5 //环境变量初始化
- 6 cloud.init({
- 7 evn:cloud.DYNAMIC_CURRENT_ENV //标志当前所在环境
- 8 })
- 9
- 10 // 云函数入口函数
- 11 exports.main = async (event,context) => {
- 12 const wxContext = cloud.getWXContext()
- 13 if(event.action=="1"){ //action为1 返回身份证的信息
- 14 try {
- 15 const result = await cloud.openapi.ocr.idcard({
- 16 "type": 'photo',
- 17 "imgUrl": event.imgUrl
- 18 })
- 19 return result
- 20 } catch (err) {
- 21 return err
- 22 }
- 23 }else if(event.action=="2"){ //action为2 返回银行卡的信息
- 24 try {
- 25 const result = await cloud.openapi.ocr.bankcard({
- 26 "type": 'photo',
- 27 "imgUrl": event.imgUrl
- 28 })
- 29 return result
- 30 } catch (err) {
- 31 return err
- 32 }
- 33 }else if(event.action=="3"){ //action为3 返回驾驶证的信息
- 34 try {
- 35 const result = await cloud.openapi.ocr.driverLicense({
- 36 "type": 'photo',
- 37 "imgUrl": event.imgUrl
- 38 })
- 39 return result
- 40 } catch (err) {
- 41 return err
- 42 }
- 43 }else if(event.action=="4"){ //action为4 返回行驶证的信息
- 44 try {
- 45 const result = await cloud.openapi.ocr.vehicleLicense({
- 46 "type": 'photo',
- 47 "imgUrl": event.imgUrl
- 48 })
- 49 return result
- 50 } catch (err) {
- 51 return err
- 52 }
- 53 }else if(event.action=="5"){ //action为5 返回营业执照的信息
- 54 try {
- 55 const result = await cloud.openapi.ocr.businessLicense({
- 56 "imgUrl": event.imgUrl
- 57 })
- 58 return result
- 59 } catch (err) {
- 60 return err
- 61 }
- 62 }else if(event.action=="6"){ //action为6 返回通用印刷体的信息
- 63 try {
- 64 const result = await cloud.openapi.ocr.businessLicense({
- 65 "imgUrl": event.imgUrl
- 66 })
- 67 return result
- 68 } catch (err) {
- 69 return err
- 70 }
- 71 }
- 72 }
二、创建页面并写相应代码
创建页面IdentifyBusinessLicense,用于OCR识别营业执照
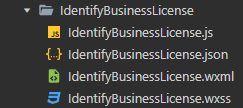
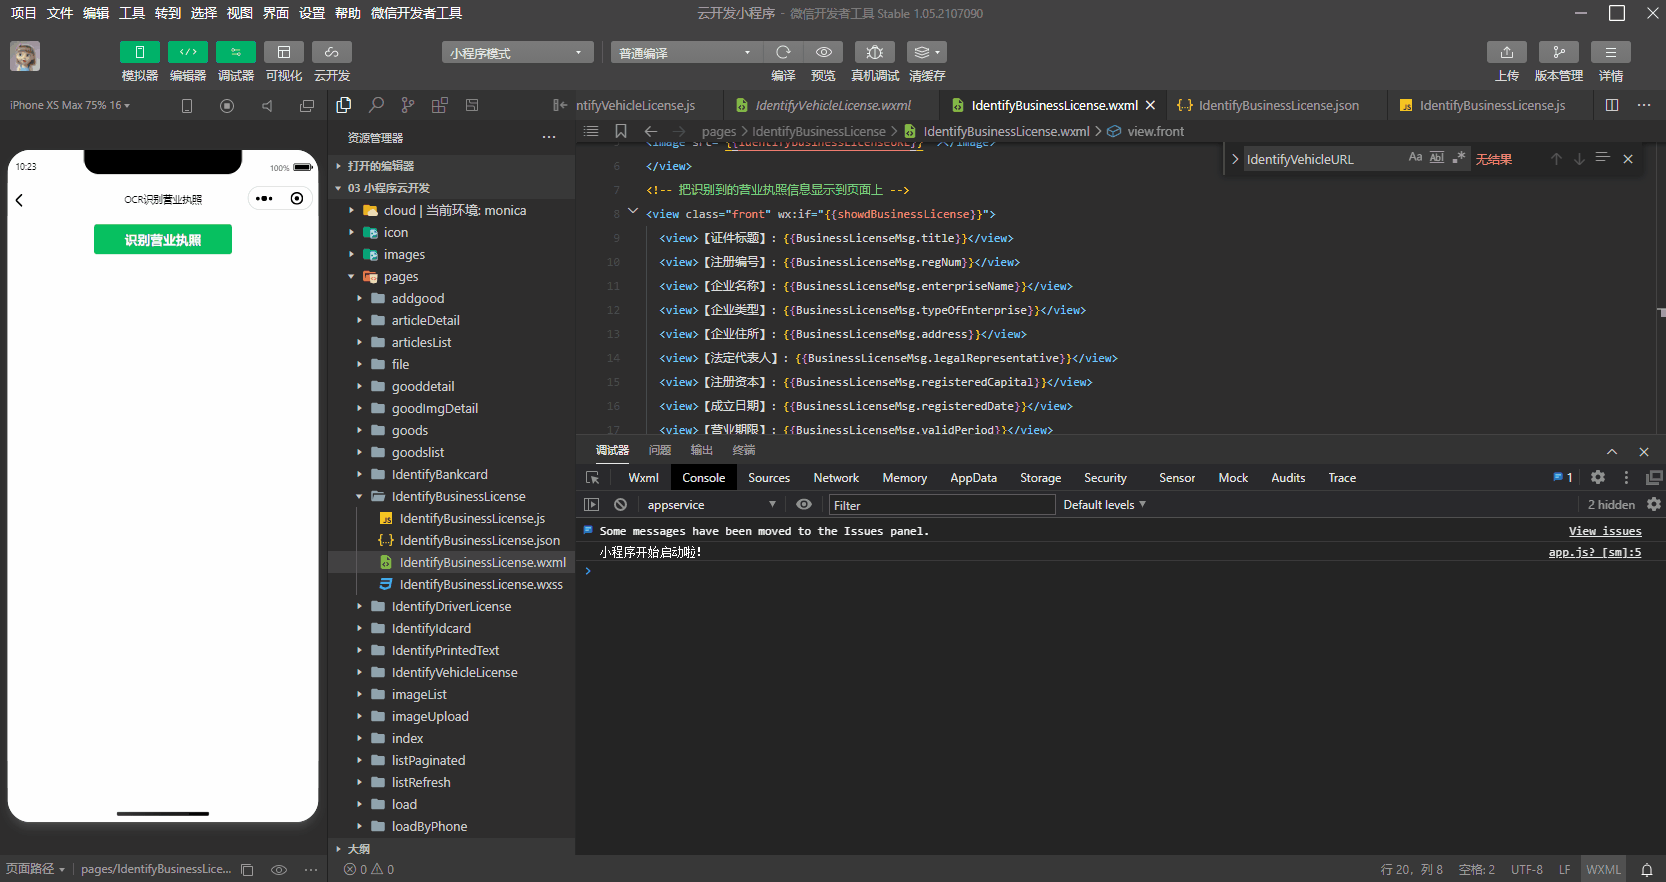
1、IdentifyBusinessLicense.wxml
- 1 <!-- 识别营业执照信息 -->
- 2 <button bindtap="IdentifyBusinessLicense" type="primary">识别营业执照</button>
- 3 <!-- 把识别到的营业执照图片显示到页面上 -->
- 4 <view class="idcard">
- 5 <image src="{{IdentifyBusinessLicenseURL}}" ></image>
- 6 </view>
- 7 <!-- 把识别到的营业执照信息显示到页面上 -->
- 8 <view class="front" wx:if="{{showdBusinessLicense}}">
- 9 <view>【证件标题】:{{BusinessLicenseMsg.title}}</view>
- 10 <view>【注册编号】:{{BusinessLicenseMsg.regNum}}</view>
- 11 <view>【企业名称】:{{BusinessLicenseMsg.enterpriseName}}</view>
- 12 <view>【企业类型】:{{BusinessLicenseMsg.typeOfEnterprise}}</view>
- 13 <view>【企业住所】:{{BusinessLicenseMsg.address}}</view>
- 14 <view>【法定代表人】:{{BusinessLicenseMsg.legalRepresentative}}</view>
- 15 <view>【注册资本】:{{BusinessLicenseMsg.registeredCapital}}</view>
- 16 <view>【成立日期】:{{BusinessLicenseMsg.registeredDate}}</view>
- 17 <view>【营业期限】:{{BusinessLicenseMsg.validPeriod}}</view>
- 18 <view>【经营范围】:{{BusinessLicenseMsg.businessScope}}</view>
- 19 <view>【外廓尺寸】:{{BusinessLicenseMsg.imgSize.h}}*{{BusinessLicenseMsg.imgSize.w}}</view>
- 20 </view>
2、IdentifyBusinessLicense.wxss
- 1 button{
- 2 margin: 20rpx;
- 3 }
- 4 .front{
- 5 margin: 20rpx;
- 6 }
- 7
- 8 .idcard{
- 9 text-align: center;
- 10 }
- 11 .idcard image{
- 12 width: 95%rpx;
- 13 height: 800rpx;
- 14 }
3、IdentifyBusinessLicense.js
- 1 // pages/IdentifyDriverLicense/IdentifyDriverLicense.js
- 2 Page({
- 3 //初始化数据
- 4 data:{
- 5 showdBusinessLicense:false,
- 6 BusinessLicenseMsg:{}
- 7 },
- 8
- 9 //识别驾驶证信息
- 10 IdentifyBusinessLicense(){
- 11 //选择图片
- 12 wx.chooseImage({
- 13 count: 1,
- 14 sizeType: ['original', 'compressed'],
- 15 sourceType: ['album', 'camera'],
- 16 }).then(res=>{
- 17 console.log("图片选择成功",res);
- 18 console.log("所选图片的临时链接",res.tempFilePaths[0]);
- 19 //上传图片
- 20 wx.cloud.uploadFile({
- 21 cloudPath: (new Date()).valueOf()+'.png',
- 22 filePath: res.tempFilePaths[0],
- 23 }).then(res=>{
- 24 console.log("图片上传到云存储成功",res);
- 25 console.log("图片在云存储里的fileID",res.fileID);
- 26 //将上传成功的图片显示到页面上
- 27 this.setData({
- 28 IdentifyBusinessLicenseURL:res.fileID,
- 29 })
- 30 //获取图片真实URL
- 31 wx.cloud.getTempFileURL({
- 32 fileList:[res.fileID]
- 33 }).then(res=>{
- 34 console.log("获取图片真实链接成功",res);
- 35 //识别身份证背面信息
- 36 wx.cloud.callFunction({
- 37 name:"identify",
- 38 data:{
- 39 imgUrl:res.fileList[0].tempFileURL, //传递参数给云函数
- 40 action:"5" //action为1表示身份证,2表示银行卡,3表示驾驶证,4表示行驶证,5表示营业执照,6表示通用印刷体(在云函数中自定义的)
- 41 }
- 42 }).then(res=>{
- 43 console.log("图片识别成功",res);
- 44 this.setData({
- 45 BusinessLicenseMsg:res.result,
- 46 showdBusinessLicense:true
- 47 })
- 48 }).catch(err=>{
- 49 console.log("图片识别失败",err);
- 50 })
- 51 }).catch(err=>{
- 52 console.log("获取图片真实链接失败",err);
- 53 })
- 54 }).catch(err=>{
- 55 console.log("图片上传到云存储失败",err);
- 56 })
- 57
- 58 }).catch(err=>{
- 59 console.log("图片选择失败",err);
- 60 })
- 61 }
- 62 })
三、效果展示
微信小程序云开发-云存储的应用-识别营业执照的更多相关文章
- 微信小程序+腾讯云直播的实时音视频实战笔记
欢迎访问我的GitHub https://github.com/zq2599/blog_demos 内容:所有原创文章分类汇总及配套源码,涉及Java.Docker.Kubernetes.DevOPS ...
- 微信小程序腾讯云php后台解决方案
微信小程序腾讯云php后台解决方案 微信小程序前段需要添加必要的文件以配合后端 (1)wafer2-client-sdk sdk提供了几种接口包括登陆,获取用户openid,图片上传等 (2)conf ...
- 微信小程序-视频教程-百度云-下载
链接: https://pan.baidu.com/s/16WGL3whutozx-UXqsDPhhA 提取码: 关注公众号[GitHubCN]回复获取 什么是微信小程序?小程序是一种不需要下载安 ...
- 小程序语音红包开发中 汉字转拼音的问题 微信小程序红包开发遇到的坑
公司最近在开发微信小程序的红包功能,语音红包需要用到文字转拼音的功能. 之前介绍过怎么将中文的汉字转为拼音的,具体看下面这篇文章. 微信语音红包小程序开发如何提高精准度 红包小程序语音识别精准度 微信 ...
- 《微信小程序商城开发实战》笔者的新书,欢迎各位粉丝上京东购买
作者图书京东链接,请点击------>>> **微信小程序商城开发实战** 附京东真实评价截图: 编辑推荐 在当今移动互联网大潮中,微信应用凭借其庞大的用户基数和极强的用户黏性 ...
- Django微信小程序后台开发教程
本文链接:https://blog.csdn.net/qq_43467898/article/details/83187698Django微信小程序后台开发教程1 申请小程序,创建hello worl ...
- vue+uni-app商城实战 | 第一篇:【有来小店】微信小程序快速开发接入Spring Cloud OAuth2认证中心完成授权登录
一. 前言 本篇通过实战来讲述如何使用uni-app快速进行商城微信小程序的开发以及小程序如何接入后台Spring Cloud微服务. 有来商城 youlai-mall 项目是一套全栈商城系统,技术栈 ...
- 微信小程序快速开发
微信小程序快速开发 一.注册小程序账号,下载IDE 1.官网注册https://mp.weixin.qq.com/,并下载IDE. 2.官方文档一向都是最好的学习资料. 注意:1)注册账号之后会有一个 ...
- 【微信小程序】开发实战 之 「配置项」与「逻辑层」
微信小程序作为微信生态重要的一环,在实际生活.工作.商业中的应用越来越广泛.想学习微信小程序开发的朋友也越来越多,本文将在小程序框架的基础上就微信小程序项目开发所必需的基础知识及语法特点进行了详细总结 ...
- BeautyWe.js 一套专注于微信小程序的开发范式
摘要: 小程序框架... 作者:JerryC 原文:BeautyWe.js 一套专注于微信小程序的开发范式 Fundebug经授权转载,版权归原作者所有. 官网:beautywejs.com Repo ...
随机推荐
- x86 cpu卷积网络的自动调谐
x86 cpu卷积网络的自动调谐 这是一个关于如何为x86cpu调整卷积神经网络的文档. 本文不会在Windows或最新版本的macOS上运行.要让它运行,需要将主体包装在 if __name__ = ...
- TensorRT 3:更快的TensorFlow推理和Volta支持
TensorRT 3:更快的TensorFlow推理和Volta支持 TensorRT 3: Faster TensorFlow Inference and Volta Support 英伟达Tens ...
- 使用现代C++如何避免bugs(下)
使用现代C++如何避免bugs(下) About virtual functions Virtual functions hinder a potential problem: the thing ...
- Single Shot Multibox Detection (SSD)实战(上)
Single Shot Multibox Detection (SSD)实战(上) 介绍了边界框.锚框.多尺度对象检测和数据集.现在,我们将利用这些背景知识构建一个目标检测模型:单次多盒检测(SSD) ...
- H5根据浏览器内核判断并区分微信、QQ和QQ浏览器
项目中碰到这样一个需求点,在h5页面区分当前所处客户端环境是QQ客户端.微信客户端还是QQ浏览器客户端,并做不同的逻辑处理 首先可以通过 window.navigator.userAgent 获取到当 ...
- 深入理解java虚拟机笔记Chapter12
(本节笔记的线程收录在线程/并发相关的笔记中,未在此处提及) Java内存模型 Java 内存模型主要由以下三部分构成:1 个主内存.n 个线程.n 个工作内存(与线程一一对应) 主内存与工作内存 J ...
- windows10环境下gcc环境变量的配置
1.首先打开控制面板-系统和安全-系统-高级系统设置,打开环境变量 2.在用户变量里找到Path,点击编辑,点击新建,找到Qt的tools安装目录并将目录复制进去保存,我的目录是C:\Qt\Qt5.9 ...
- WordPress安装篇(1):使用PHPStudy安装WordPress
我是"小白",既不会编程也不懂CSS能自己搭建网站吗?可以的!只要你会用鼠标,懂打字就能搭建出属于你自己的网站.要怎么样才能做到昵?让我们一起来看看如何实现的吧.在Windows环 ...
- centos 7 iotop 安装
安装指令:yum -y install iotop 指定查看aubunt 用户的读写状态:iotop -u aubunt -P -k -t 允许在非交互模式下每隔3秒刷新一次,只刷新6次:iotop ...
- VisualStudio自动添加注释
1.VisualStudio 新开页自动添加注释 a 在团队开发或者公司开发中,我们一般都喜欢给自己所创建的类或者接口以及其它模板设置版权说明,但是每个类一个一个的去加又是非常的费劲,所以一般情况下 ...