DoubleDQN---tensorflow实现
完整代码:https://github.com/zle1992/Reinforcement_Learning_Game

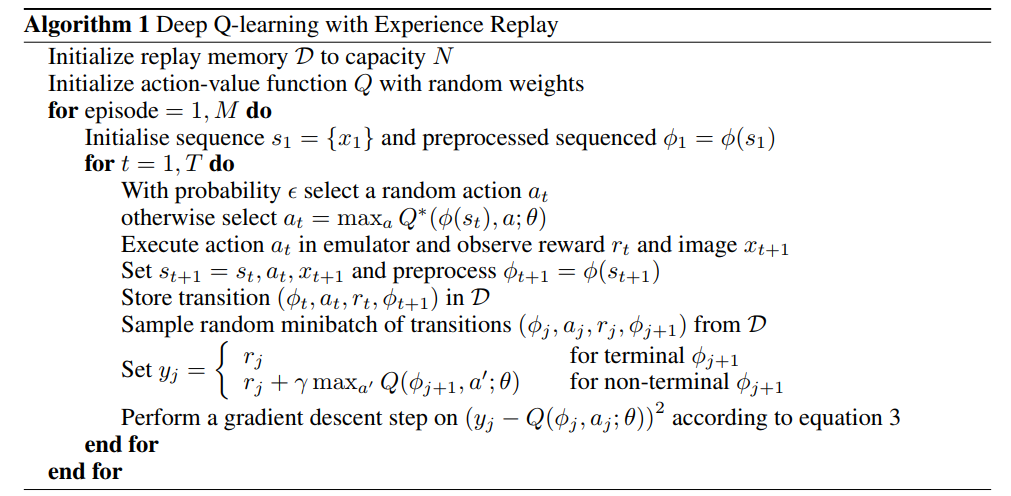
开山之作: 《Playing Atari with Deep Reinforcement Learning》(NIPS)
http://export.arxiv.org/pdf/1312.5602
《Human-level control through deep reinforcementlearnin》 https://www.cs.swarthmore.edu/~meeden/cs63/s15/nature15b.pdf
使用2个网络,减少了相关性,每隔一定时间,替换参数。
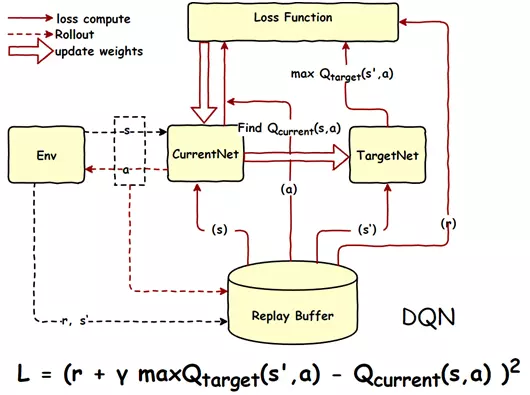
《Deep Reinforcement Learning with Double Q-learning》 https://arxiv.org/pdf/1509.06461.pdf

 import os

 import numpy as np

 import tensorflow as tf

 from abc import ABCMeta, abstractmethod

 np.random.seed(1)

 tf.set_random_seed(1)

 import logging  # 引入logging模块

 logging.basicConfig(level=logging.DEBUG,

                     format='%(asctime)s - %(filename)s[line:%(lineno)d] - %(levelname)s: %(message)s')  # logging.basicConfig函数对日志的输出格式及方式做相关配置

 # 由于日志基本配置中级别设置为DEBUG,所以一下打印信息将会全部显示在控制台上

 tfconfig = tf.ConfigProto()

 tfconfig.gpu_options.allow_growth = True

 session = tf.Session(config=tfconfig)

 class DoubleDQNet(object):

     __metaclass__ = ABCMeta

     """docstring for DeepQNetwork"""

     def __init__(self,

             n_actions,

             n_features,

             learning_rate,

             reward_decay,

             replace_target_iter,

             memory_size,

             e_greedy,

             e_greedy_increment,

             e_greedy_max,

             output_graph,

             log_dir,

             use_doubleQ ,

             model_dir,

             ):

         super(DoubleDQNet, self).__init__()

         self.n_actions = n_actions

         self.n_features = n_features

         self.learning_rate=learning_rate

         self.gamma=reward_decay

         self.replace_target_iter=replace_target_iter

         self.memory_size=memory_size

         self.epsilon=e_greedy

         self.epsilon_max=e_greedy_max

         self.epsilon_increment=e_greedy_increment

         self.output_graph=output_graph

         self.lr =learning_rate

         self.log_dir = log_dir

         self.use_doubleQ =use_doubleQ

         self.model_dir = model_dir

         # total learning step

         self.learn_step_counter = 0

         self.s = tf.placeholder(tf.float32,[None]+self.n_features,name='s')

         self.s_next = tf.placeholder(tf.float32,[None]+self.n_features,name='s_next')

         self.r = tf.placeholder(tf.float32,[None,],name='r')

         self.a = tf.placeholder(tf.int32,[None,],name='a')

         self.q_eval = self._build_q_net(self.s, scope='eval_net', trainable=True)

         self.q_next = self._build_q_net(self.s_next, scope='target_net', trainable=False)

         #self.q_eval4next  = tf.stop_gradient(self._build_q_net(self.s_next, scope='eval_net4next', trainable=True))

         self.q_eval4next  = self._build_q_net(self.s_next, scope='eval_net4next', trainable=False)

         if self.use_doubleQ:

             value_i = tf.to_int32(tf.argmax(self.q_eval4next,axis=1))

             range_i = tf.range(tf.shape(self.a)[0], dtype=tf.int32)

             index_a = tf.stack([range_i, value_i], axis=1)

             maxq =  tf.gather_nd(params=self.q_next,indices=index_a)

         else:

             maxq =  tf.reduce_max(self.q_next, axis=1, name='Qmax_s_')    # shape=(None, )

         with tf.variable_scope('q_target'):

             #只更新最大的那一列

             self.q_target = self.r + self.gamma * maxq

         with tf.variable_scope('q_eval'):

             a_indices = tf.stack([tf.range(tf.shape(self.a)[0], dtype=tf.int32), self.a], axis=1)

             self.q_eval_wrt_a = tf.gather_nd(params=self.q_eval, indices=a_indices)    # shape=(None, )

         with tf.variable_scope('loss'):

             self.loss = tf.reduce_mean(tf.squared_difference(self.q_target, self.q_eval_wrt_a, name='TD_error'))

         with tf.variable_scope('train'):

             self._train_op = tf.train.AdamOptimizer(self.lr).minimize(self.loss)

         t_params = tf.get_collection(tf.GraphKeys.GLOBAL_VARIABLES, scope='target_net')

         e_params = tf.get_collection(tf.GraphKeys.GLOBAL_VARIABLES, scope='eval_net')

         en_params = tf.get_collection(tf.GraphKeys.GLOBAL_VARIABLES, scope='eval_net4next')

         with tf.variable_scope("hard_replacement"):

             self.target_replace_op=[tf.assign(t,e) for t,e in zip(t_params,e_params)]

         with tf.variable_scope("hard_replacement2"):

             self.target_replace_op2=[tf.assign(t,e) for t,e in zip(en_params,e_params)]

         self.sess = tf.Session()

         if self.output_graph:

             tf.summary.FileWriter(self.log_dir,self.sess.graph)

         self.sess.run(tf.global_variables_initializer())

         self.cost_his =[0]

         self.cost = 0

         self.saver = tf.train.Saver()

         if not os.path.exists(self.model_dir):

             os.mkdir(self.model_dir)

         checkpoint = tf.train.get_checkpoint_state(self.model_dir)

         if checkpoint and checkpoint.model_checkpoint_path:

             self.saver.restore(self.sess, checkpoint.model_checkpoint_path)

             print ("Loading Successfully")

             self.learn_step_counter = int(checkpoint.model_checkpoint_path.split('-')[-1]) + 1

     @abstractmethod

     def _build_q_net(self,x,scope,trainable):

         raise NotImplementedError

     def learn(self,data):

         self.sess.run(self.target_replace_op2)

          # check to replace target parameters

         if self.learn_step_counter % self.replace_target_iter == 0:

             self.sess.run(self.target_replace_op)

             print('\ntarget_params_replaced\n')

         batch_memory_s = data['s']

         batch_memory_a =  data['a']

         batch_memory_r = data['r']

         batch_memory_s_ = data['s_']

         _, cost = self.sess.run(

             [self._train_op, self.loss],

             feed_dict={

                 self.s: batch_memory_s,

                 self.a: batch_memory_a,

                 self.r: batch_memory_r,

                 self.s_next: batch_memory_s_,

             })

         #self.cost_his.append(cost)

         self.cost = cost

         # increasing epsilon

         if self.epsilon < self.epsilon_max:

             self.epsilon += self.epsilon_increment

         else:

             self.epsilon = self.epsilon_max

         self.learn_step_counter += 1

             # save network every 100000 iteration

         if self.learn_step_counter % 10000 == 0:

             self.saver.save(self.sess,self.model_dir,global_step=self.learn_step_counter)

     def choose_action(self,s):

         s = s[np.newaxis,:]

         aa = np.random.uniform()

         #print("epsilon_max",self.epsilon_max)

         if aa < self.epsilon:

             action_value = self.sess.run(self.q_eval,feed_dict={self.s:s})

             action = np.argmax(action_value)

         else:

             action = np.random.randint(0,self.n_actions)

         return action
参考:
https://github.com/simoninithomas/Deep_reinforcement_learning_Course
https://github.com/spiglerg/DQN_DDQN_Dueling_and_DDPG_Tensorflow/blob/master/modules/dqn.py
DoubleDQN---tensorflow实现的更多相关文章
- Tensorflow 官方版教程中文版
2015年11月9日,Google发布人工智能系统TensorFlow并宣布开源,同日,极客学院组织在线TensorFlow中文文档翻译.一个月后,30章文档全部翻译校对完成,上线并提供电子书下载,该 ...
- tensorflow学习笔记二:入门基础
TensorFlow用张量这种数据结构来表示所有的数据.用一阶张量来表示向量,如:v = [1.2, 2.3, 3.5] ,如二阶张量表示矩阵,如:m = [[1, 2, 3], [4, 5, 6], ...
- 用Tensorflow让神经网络自动创造音乐
#————————————————————————本文禁止转载,禁止用于各类讲座及ppt中,违者必究————————————————————————# 前几天看到一个有意思的分享,大意是讲如何用Ten ...
- tensorflow 一些好的blog链接和tensorflow gpu版本安装
pading :SAME,VALID 区别 http://blog.csdn.net/mao_xiao_feng/article/details/53444333 tensorflow实现的各种算法 ...
- tensorflow中的基本概念
本文是在阅读官方文档后的一些个人理解. 官方文档地址:https://www.tensorflow.org/versions/r0.12/get_started/basic_usage.html#ba ...
- kubernetes&tensorflow
谷歌内部--Borg Google Brain跑在数十万台机器上 谷歌电商商品分类深度学习模型跑在1000+台机器上 谷歌外部--Kubernetes(https://github.com/kuber ...
- tensorflow学习
tensorflow安装时遇到gcc: error trying to exec 'as': execvp: No such file or directory. 截止到2016年11月13号,源码编 ...
- 【转】TensorFlow练习20: 使用深度学习破解字符验证码
验证码是根据随机字符生成一幅图片,然后在图片中加入干扰象素,用户必须手动填入,防止有人利用机器人自动批量注册.灌水.发垃圾广告等等 . 验证码的作用是验证用户是真人还是机器人:设计理念是对人友好,对机 ...
- 【转】机器学习教程 十四-利用tensorflow做手写数字识别
模式识别领域应用机器学习的场景非常多,手写识别就是其中一种,最简单的数字识别是一个多类分类问题,我们借这个多类分类问题来介绍一下google最新开源的tensorflow框架,后面深度学习的内容都会基 ...
- 【转】Ubuntu 16.04安装配置TensorFlow GPU版本
之前摸爬滚打总是各种坑,今天参考这篇文章终于解决了,甚是鸡冻\(≧▽≦)/,电脑不知道怎么的,安装不了16.04,就安装15.10再升级到16.04 requirements: Ubuntu 16.0 ...
随机推荐
- OraclePLSQL编程
PL/SQL编程 pl/sql(procedural language/sql)是Oracle在标准的sql语言上的扩展.pl/sql不仅允许嵌入式sql语言,还可以定义变量和常量,允许使用条件语句和 ...
- gsoap入门:C/C++代码生成及编译--包含soapcpp2 -qname添加命名空间后报错的解决方法--可用
gsoap是什么 先来一段百度百科,说说gsoap是什么: gSOAP一种跨平台的开源的C/C++软件开发工具包.生成C/C++的RPC代码,XML数据绑定,对SOAP Web服务和其他应用形成高效的 ...
- 深入浅出 1 - AI量化策略快速理解
我们在用AI来编写量化策略过程中,主要用到了机器学习,先来从一张图直观理解什么是机器学习:人类对新问题做出有效决策依靠的是过去积累的许多经验,并对经验进行利用,而对机器来说,“经验”以“数据”方式 ...
- php -- new self() 和 new static
看一段摘自网上的代码 class A { public static function get_self() { return new self(); } public static function ...
- linux配置 数据库主从同步
数据库的读写分离能很大程度上减轻数据库的压力,读写分离的前提就是主从数据同步,然后在主库做增删改,从库做查询. 例如: 主库:192.168.0.1 从库:192.168.0.2 两个数据库都安装了M ...
- 【HTML5】HTML5中video元素事件详解(实时监测当前播放时间)
html 代码..video后边几个元素,可处理ios 系统的兼容性 <video id="myVideo" controls="controls" po ...
- postgresql免密码登录
https://www.postgresql.org/docs/8.3/static/libpq-pgpass.html vi ~/.pgpass 输入以下内容 hostname:port:datab ...
- java学习之路--StringBuffer常见的功能和实例
---恢复内容开始--- 储存 StringBuffer append();将指定数据作为参数添加到已有数据尾处 StringBuffer insert(index,数据):可以将数据插到指定的ind ...
- STL之pair对组
#include<iostream> #include<algorithm> #include<cstring> #include<cstdlib> u ...
- python全栈开发 * 18 面向对象知识点汇总 * 180530
18 面向对象初识1class person: level="高级动物" mind="有思想" def __init__(self,name,age,gent, ...