New UWP Community Toolkit - XAML Brushes
概述
上一篇 New UWP Community Toolkit 文章中,我们对 V2.2.0 版本的重要更新做了简单回顾。接下来会针对每个重要更新,结合 SDK 源代码和调用代码详细讲解。
本篇我们会针对 XAML Brushes 做详细分享。
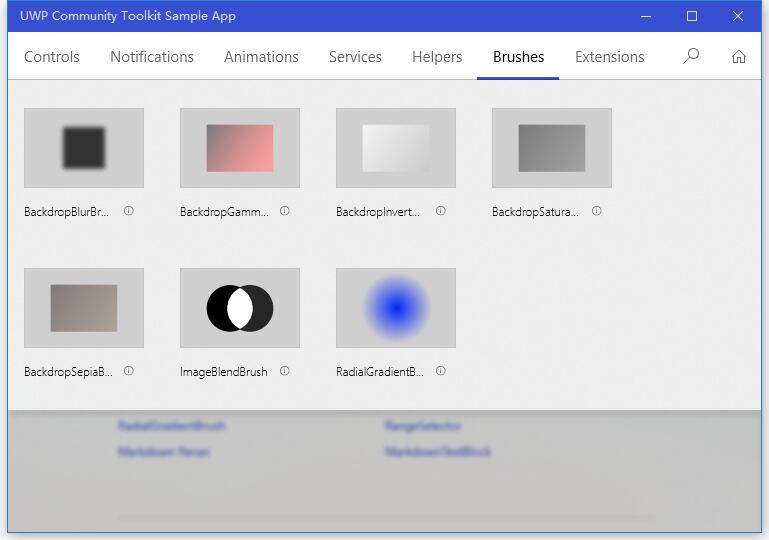
Source: https://github.com/Microsoft/UWPCommunityToolkit/tree/master/Microsoft.Toolkit.Uwp.UI/Media
Doc: https://docs.microsoft.com/zh-cn/windows/uwpcommunitytoolkit/
Namespace: Microsoft.Toolkit.Uwp.UI.Media; Nuget: Microsoft.Toolkit.Uwp.UI
下面是 Nuget 安装时的一些重要信息:
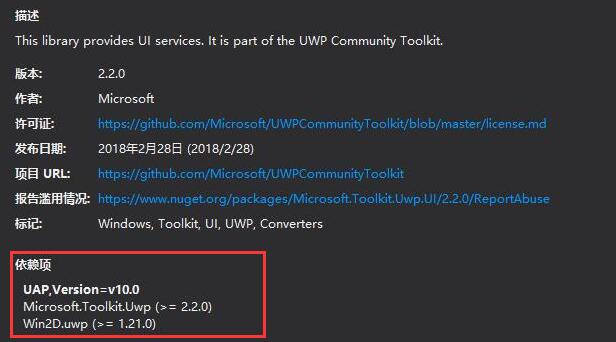
我们看到依赖项中,除了 UAP(Windows 10 SDK)和 Microsoft.Toolkit.Uwp,还有一个依赖项是 Win2D.uwp,这和我们今天分享的内容有很紧密的关联。
Win2D 相信广大 UWPer 都不陌生了,UWP 图形渲染方面非常常用的库,引用一段官方介绍吧:
Win2D is an easy-to-use Windows Runtime API for immediate mode 2D graphics rendering with GPU acceleration. It is available to C#, C++ and VB developers writing Windows apps for Windows 8.1, Windows Phone 8.1 and Windows 10. It utilizes the power of Direct2D, and integrates seamlessly with XAML and CoreWindow.
Source: https://github.com/Microsoft/Win2D
Doc: http://microsoft.github.io/Win2D/html/Introduction.htm
Sample App: https://www.microsoft.com/store/apps/9NBLGGGXWT9F
代码分析
XAML Brushes 是 V2.2.0 版本新增加的功能,目前共支持 7 种画刷,它们都继承自 XamlCompositionBrushBase,一个创建 XAML Brushes 的基类,使用 CompositionBrush 来绘制一个区域;而实现效果都是用了 Win2D 中不同的 Effect。
XamlCompositionBrushBase Doc: https://docs.microsoft.com/en-us/uwp/api/windows.ui.xaml.media.xamlcompositionbrushbase
下面我们依次做代码分析和功能体验。由于源代码篇幅较长,我们只截取关键部分。
1. BackdropBlurBrush
下面是 BackdropBlurBrush 中创建画刷的源代码,大家也可以在 Git 中查看:
BackdropBlurBrush 使用的是 Win2D 中的 GaussianBlurEffect
Doc: http://microsoft.github.io/Win2D/html/T_Microsoft_Graphics_Canvas_Effects_GaussianBlurEffect.htm
/// <summary>
/// Initializes the Composition Brush.
/// </summary>
protected override void OnConnected()
{
    // Delay creating composition resources until they're required.
    if (CompositionBrush == null)
    {
        // Abort if effects aren't supported.
        if (!CompositionCapabilities.GetForCurrentView().AreEffectsSupported())
        {
            return;
        }

        var backdrop = Window.Current.Compositor.CreateBackdropBrush();

        // Use a Win2D blur affect applied to a CompositionBackdropBrush.
        var graphicsEffect = new GaussianBlurEffect
        {
            Name = "Blur",
            BlurAmount = (float)Amount,
            Source = new CompositionEffectSourceParameter("backdrop")
        };

        var effectFactory = Window.Current.Compositor.CreateEffectFactory(graphicsEffect, new[] { "Blur.BlurAmount" });
        var effectBrush = effectFactory.CreateBrush();

        effectBrush.SetSourceParameter("backdrop", backdrop);

        CompositionBrush = effectBrush;
    }
}
BackdropBlurBrush 本身的源代码和使用方法都比较简单,来看一下使用方法和显示效果吧:
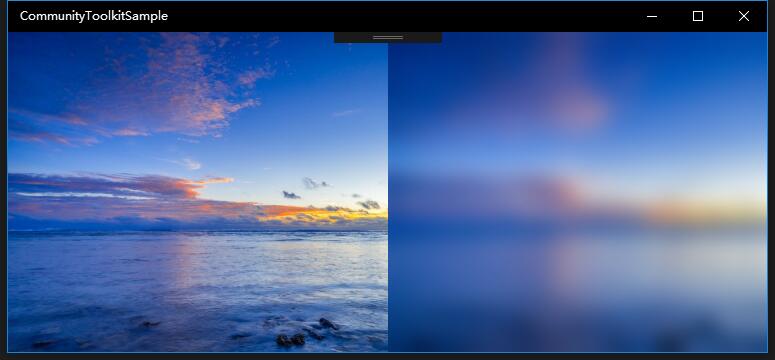
引入 BackdropBlurBrush 后,通过设置 Amount 来设置模糊的程度,Amount >= 0,默认值是 3.0,值越大模糊程度越高,为 0.0 时没有模糊效果。
我们把 Grid 分为两列,分别放了同样的图片,左侧是原图,右侧是实现了 BackdropBlurBrush 的图像;可以明显看出高斯模糊的画刷效果。
<Grid>
    <Grid.ColumnDefinitions>
        <ColumnDefinition Width="*"/>
        <ColumnDefinition Width="*"/>
    </Grid.ColumnDefinitions>
    <Image Source="Assets/02.jpg" Stretch="UniformToFill" Grid.Column="0"/>
    <Image Source="Assets/02.jpg" Stretch="UniformToFill" Grid.Column="1"/>
    <Border Grid.Column="1">
        <Border.Background>
            <controls:BackdropBlurBrush Amount="10"/>
        </Border.Background>
    </Border>
</Grid>
2. BackdropGammaTransferBrush
下面是 BackdropGammaTransferBrush 中创建画刷的源代码,大家也可以在 Git 中查看:
BackdropGammaTransferBrush 使用的是 Win2D 中的 GammaTransferEffect
Doc: http://microsoft.github.io/Win2D/html/T_Microsoft_Graphics_Canvas_Effects_GammaTransferEffect.htm
/// <summary>
/// Initializes the Composition Brush.
/// </summary>
protected override void OnConnected()
{
    // Delay creating composition resources until they're required.
    if (CompositionBrush == null)
    {
        // Abort if effects aren't supported.
        if (!CompositionCapabilities.GetForCurrentView().AreEffectsSupported())
        {
            return;
        }

        var backdrop = Window.Current.Compositor.CreateBackdropBrush();

        // Use a Win2D blur affect applied to a CompositionBackdropBrush.
        var graphicsEffect = new GammaTransferEffect
        {
            Name = "GammaTransfer",
            AlphaAmplitude = (float)AlphaAmplitude,
            ...
            Source = new CompositionEffectSourceParameter("backdrop")
        };

        var effectFactory = Window.Current.Compositor.CreateEffectFactory(graphicsEffect, new[]
        {
            "GammaTransfer.AlphaAmplitude",
            ...
        });
        var effectBrush = effectFactory.CreateBrush();

        effectBrush.SetSourceParameter("backdrop", backdrop);

        CompositionBrush = effectBrush;
    }
}
BackdropGammaTransferBrush 本身的源代码和使用方法也都比较简单,直接看一下使用方法和显示效果吧:
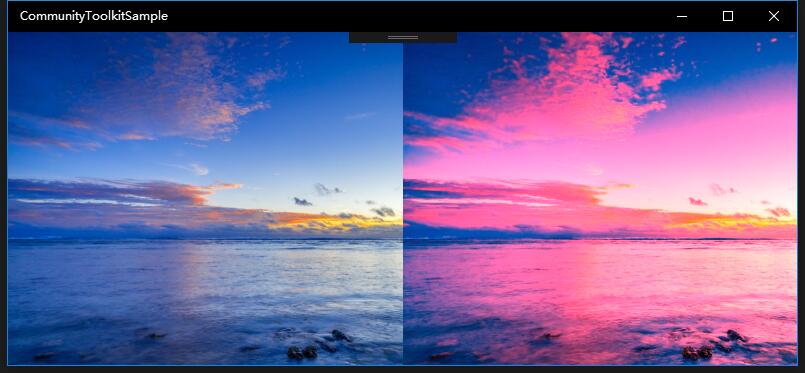
引入 BackdropGammaTransferBrush 后,通过分别设置 A R G B 四个通道的变换值来改变颜色显示;
我们把 Grid 分为两列,分别放了同样的图片,左侧是原图,右侧是实现了 BackdropGammaTransferBrush 的图像;可以明显看出伽玛变换画刷效果。
<Grid>
    <Grid.ColumnDefinitions>
        <ColumnDefinition Width="*"/>
        <ColumnDefinition Width="*"/>
    </Grid.ColumnDefinitions>
    <Image Source="Assets/02.jpg" Stretch="UniformToFill" Grid.Column="0"/>
    <Image Source="Assets/02.jpg" Stretch="UniformToFill" Grid.Column="1"/>
    <Border Grid.Column="1">
        <Border.Background>
                <controls:BackdropGammaTransferBrush RedAmplitude="3.25" GreenAmplitude="1" BlueAmplitude="1"/>
        </Border.Background>
    </Border>
</Grid>
3. BackdropInvertBrush
下面是 BackdropInvertBrush 中创建画刷的源代码,大家也可以在 Git 中查看:
BackdropInvertBrush 使用的是 Win2D 中的 InvertEffect
Doc: http://microsoft.github.io/Win2D/html/T_Microsoft_Graphics_Canvas_Effects_InvertEffect.htm
/// <summary>
/// Initializes the Composition Brush.
/// </summary>
protected override void OnConnected()
{
    // Delay creating composition resources until they're required.
    if (CompositionBrush == null)
    {
        // Abort if effects aren't supported.
        if (!CompositionCapabilities.GetForCurrentView().AreEffectsSupported())
        {
            return;
        }

        var backdrop = Window.Current.Compositor.CreateBackdropBrush();

        // Use a Win2D invert affect applied to a CompositionBackdropBrush.
        var graphicsEffect = new InvertEffect
        {
            Name = "Invert",
            Source = new CompositionEffectSourceParameter("backdrop")
        };

        var effectFactory = Window.Current.Compositor.CreateEffectFactory(graphicsEffect);
        var effectBrush = effectFactory.CreateBrush();

        effectBrush.SetSourceParameter("backdrop", backdrop);

        CompositionBrush = effectBrush;
    }
}
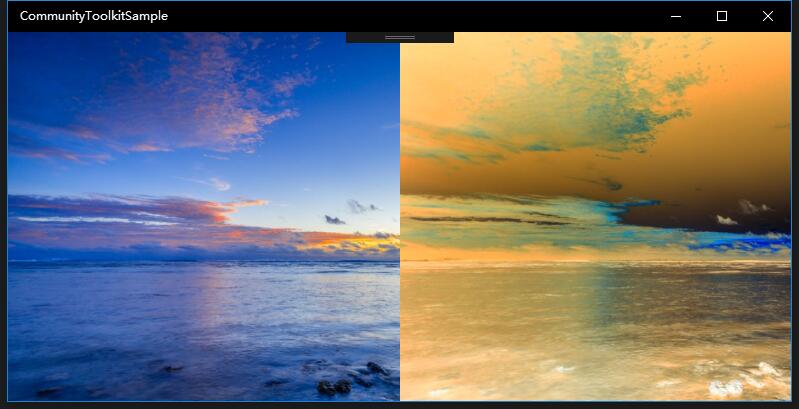
看一下使用方法和显示效果吧:
我们把 Grid 分为两列,分别放了同样的图片,左侧是原图,右侧是实现了 BackdropInvertBrush 的图像;可以明显看出反转画刷效果。
<Grid>
    <Grid.ColumnDefinitions>
        <ColumnDefinition Width="*"/>
        <ColumnDefinition Width="*"/>
    </Grid.ColumnDefinitions>
    <Image Source="Assets/02.jpg" Stretch="UniformToFill" Grid.Column="0"/>
    <Image Source="Assets/02.jpg" Stretch="UniformToFill" Grid.Column="1"/>
    <Border Grid.Column="1">
        <Border.Background>
                <controls:BackdropInvertBrush/>
        </Border.Background>
    </Border>
</Grid>
4. BackdropSaturaionBrush
下面是 BackdropSaturaionBrush 中创建画刷的源代码,大家也可以在 Git 中查看:
BackdropSaturaionBrush 使用的是 Win2D 中的 SaturationEffect
Doc: http://microsoft.github.io/Win2D/html/T_Microsoft_Graphics_Canvas_Effects_SaturationEffect.htm
/// <summary>
/// Initializes the Composition Brush.
/// </summary>
protected override void OnConnected()
{
    // Delay creating composition resources until they're required.
    if (CompositionBrush == null)
    {
        // Abort if effects aren't supported.
        if (!CompositionCapabilities.GetForCurrentView().AreEffectsSupported())
        {
            return;
        }

        var backdrop = Window.Current.Compositor.CreateBackdropBrush();

        // Use a Win2D blur affect applied to a CompositionBackdropBrush.
        var graphicsEffect = new SaturationEffect
        {
            Name = "Saturation",
            Saturation = (float)Saturation,
            Source = new CompositionEffectSourceParameter("backdrop")
        };

        var effectFactory = Window.Current.Compositor.CreateEffectFactory(graphicsEffect, new[] { "Saturation.Saturation" });
        var effectBrush = effectFactory.CreateBrush();

        effectBrush.SetSourceParameter("backdrop", backdrop);

        CompositionBrush = effectBrush;
    }
}
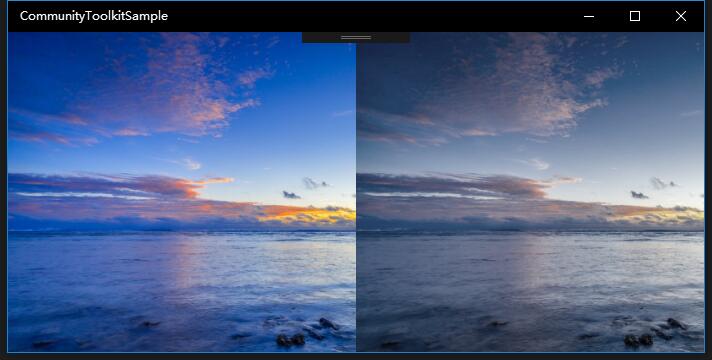
看一下使用方法和显示效果吧:
引入 BackdropSaturaionBrush 后,通过设置 Saturaion 的值来调整饱和度的值;取值范围是 [0, 1],默认是 0.5,值越大饱和度越高,为 0 时图像为黑色单色。
我们把 Grid 分为两列,分别放了同样的图片,左侧是原图,右侧是实现了 BackdropSaturaionBrush 的图像;可以明显看出饱和度画刷效果。
<Grid>
    <Grid.ColumnDefinitions>
        <ColumnDefinition Width="*"/>
        <ColumnDefinition Width="*"/>
    </Grid.ColumnDefinitions>
    <Image Source="Assets/02.jpg" Stretch="UniformToFill" Grid.Column="0"/>
    <Image Source="Assets/02.jpg" Stretch="UniformToFill" Grid.Column="1"/>
    <Border Grid.Column="1">
        <Border.Background>
                <controls:BackdropSaturationBrush Saturation="0.4"/>
        </Border.Background>
    </Border>
</Grid>
5. BackdropSepiaBrush
下面是 BackdropSepiaBrush 中创建画刷的源代码,大家也可以在 Git 中查看:
BackdropSepiaBrush 使用的是 Win2D 中的 SepiaEffect
Doc: http://microsoft.github.io/Win2D/html/T_Microsoft_Graphics_Canvas_Effects_SepiaEffect.htm
/// <summary>
/// Initializes the Composition Brush.
/// </summary>
protected override void OnConnected()
{
    // Delay creating composition resources until they're required.
    if (CompositionBrush == null)
    {
        // Abort if effects aren't supported.
        if (!CompositionCapabilities.GetForCurrentView().AreEffectsSupported())
        {
            return;
        }

        var backdrop = Window.Current.Compositor.CreateBackdropBrush();

        // Use a Win2D blur affect applied to a CompositionBackdropBrush.
        var graphicsEffect = new SepiaEffect
        {
            Name = "Sepia",
            Intensity = (float)Intensity,
            Source = new CompositionEffectSourceParameter("backdrop")
        };

        var effectFactory = Window.Current.Compositor.CreateEffectFactory(graphicsEffect, new[] { "Sepia.Intensity" });
        var effectBrush = effectFactory.CreateBrush();

        effectBrush.SetSourceParameter("backdrop", backdrop);

        CompositionBrush = effectBrush;
    }
}
看一下使用方法和显示效果吧:
引入 BackdropSepiaBrush 后,通过设置 Intensity 的值来调整深色的值;取值范围是 [0, 1],默认是 0.5,值越大深色度越高。
我们把 Grid 分为两列,分别放了同样的图片,左侧是原图,右侧是实现了 BackdropSepiaBrush 的图像;可以明显看出深色画刷效果。
<Grid>
    <Grid.ColumnDefinitions>
        <ColumnDefinition Width="*"/>
        <ColumnDefinition Width="*"/>
    </Grid.ColumnDefinitions>
    <Image Source="Assets/02.jpg" Stretch="UniformToFill" Grid.Column="0"/>
    <Image Source="Assets/02.jpg" Stretch="UniformToFill" Grid.Column="1"/>
    <Border Grid.Column="1">
        <Border.Background>
                <controls:BackdropSepiaBrush Intensity="0.8"/>
        </Border.Background>
    </Border>
</Grid>

6. ImageBlendBrush
下面是 ImageBlendBrush 中创建画刷的源代码,大家也可以在 Git 中查看:
ImageBlendBrush 使用的是 Win2D 中的 BlendEffect 去融合两张图片
Doc: http://microsoft.github.io/Win2D/html/T_Microsoft_Graphics_Canvas_Effects_BlendEffect.htm
protected override void OnConnected()
{
    // Delay creating composition resources until they're required.
    if (CompositionBrush == null && Source != null && Source is BitmapImage bitmap)
    {
        // Use LoadedImageSurface API to get ICompositionSurface from image uri provided
        // If UriSource is invalid, StartLoadFromUri will return a blank texture.
        _surface = LoadedImageSurface.StartLoadFromUri(bitmap.UriSource);

        // Load Surface onto SurfaceBrush
        _surfaceBrush = Window.Current.Compositor.CreateSurfaceBrush(_surface);
        _surfaceBrush.Stretch = CompositionStretchFromStretch(Stretch);

        // Abort if effects aren't supported.
        if (!CompositionCapabilities.GetForCurrentView().AreEffectsSupported())
        {
            // Just use image straight-up, if we don't support effects.
            CompositionBrush = _surfaceBrush;
            return;
        }

        var backdrop = Window.Current.Compositor.CreateBackdropBrush();

        // Use a Win2D invert affect applied to a CompositionBackdropBrush.
        var graphicsEffect = new BlendEffect
        {
            Name = "Invert",
            Mode = (BlendEffectMode)(int)Mode,
            Background = new CompositionEffectSourceParameter("backdrop"),
            Foreground = new CompositionEffectSourceParameter("image")
        };

        var effectFactory = Window.Current.Compositor.CreateEffectFactory(graphicsEffect);
        var effectBrush = effectFactory.CreateBrush();

        effectBrush.SetSourceParameter("backdrop", backdrop);
        effectBrush.SetSourceParameter("image", _surfaceBrush);

        CompositionBrush = effectBrush;
    }
}
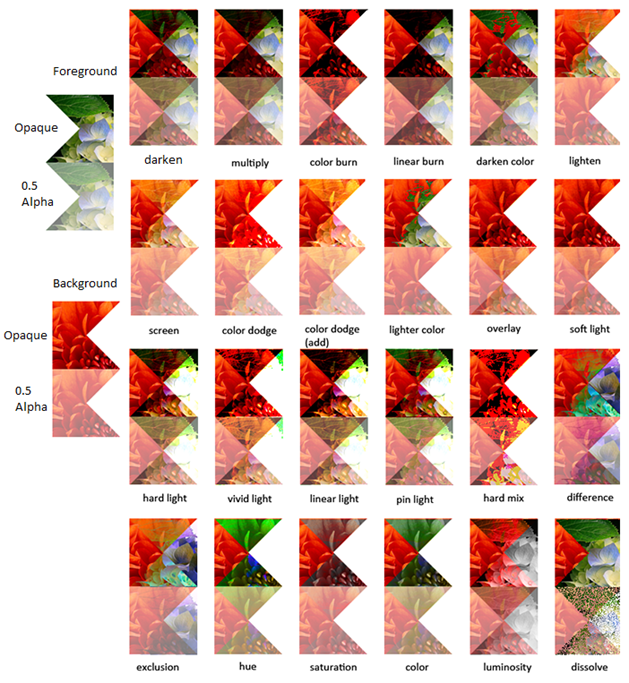
大致实现过程是:加载 ImageBlendBrush 画刷所用的 Bitmap,到 SurfaceBrush,使用 Win2D 的 BlendBrush,把 SurfaceBrush 设置进去。
我们看到这里的 BlendEffectMode 设置,会影响融合的方式和效果,效果如下图:
详见 Win2D Doc: http://microsoft.github.io/Win2D/html/T_Microsoft_Graphics_Canvas_Effects_BlendEffectMode.htm
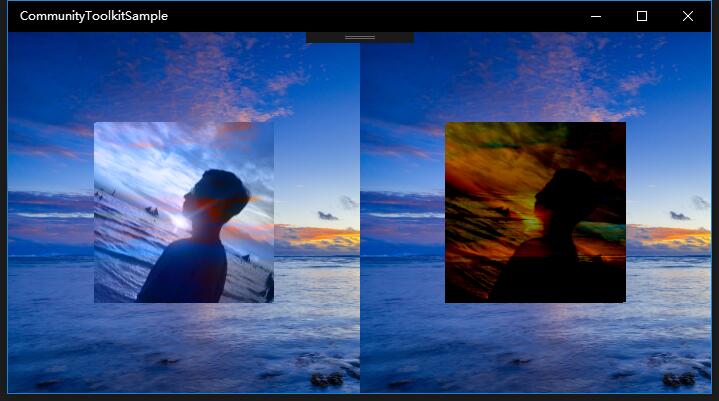
看一下使用方法和显示效果吧:
我们把 Grid 分为两列,分别放了同样的图片去实现 ImageBlendBrush,左侧 Mode=‘Color’,右侧 Mode='Subtract';大家可以多尝试不同的 Mode 去体验效果。
<Grid>
    <Grid.ColumnDefinitions>
        <ColumnDefinition Width="*"/>
        <ColumnDefinition Width="*"/>
    </Grid.ColumnDefinitions>
    <Image Source="Assets/02.jpg" Stretch="UniformToFill" Grid.Column="0"/>
    <Image Source="Assets/02.jpg" Stretch="UniformToFill" Grid.Column="1"/>
    <Border Grid.Column="0">
        <Border.Background>
            <controls:ImageBlendBrush Source="ms-appx:///Assets/shaomeng.jpg" Mode="Color"/>
        </Border.Background>
    </Border>
    <Border Grid.Column="1">
        <Border.Background>
            <controls:ImageBlendBrush Source="ms-appx:///Assets/shaomeng.jpg" Mode="Subtract"/>
        </Border.Background>
    </Border>
</Grid>
7. RadialGradientBrush
下面是 RadialGradientBrush 中创建画刷的源代码,大家也可以在 Git 中查看:
RadialGradientBrush 是 WPF RadialGradientBrush 的移植,使用 Win2D FillRectangle 的方式实现绘制过程.
Doc: https://msdn.microsoft.com/en-us/library/system.windows.media.radialgradientbrush(v=vs.110).aspx
/// <inheritdoc/>
protected override bool OnDraw(CanvasDevice device, CanvasDrawingSession session, Vector2 size)
{
    // Create our Brush
    if (GradientStops != null && GradientStops.Count > 0)
    {
        var gradientBrush = new CanvasRadialGradientBrush(
                                device,
                                GradientStops.ToWin2DGradientStops(),
                                SpreadMethod.ToEdgeBehavior(),
                                (CanvasAlphaMode)(int)AlphaMode,
                                ColorInterpolationMode.ToCanvasColorSpace(),
                                CanvasColorSpace.Srgb,
                                CanvasBufferPrecision.Precision8UIntNormalized)
        {
            // Calculate Surface coordinates from 0.0-1.0 range given in WPF brush
            RadiusX = size.X * (float)RadiusX,
            RadiusY = size.Y * (float)RadiusY,
            Center = size * Center.ToVector2(),

            // Calculate Win2D Offset from origin/center used in WPF brush
            OriginOffset = size * (GradientOrigin.ToVector2() - Center.ToVector2()),
        };

        // Use brush to draw on our canvas
        session.FillRectangle(size.ToRect(), gradientBrush);

        gradientBrush.Dispose();

        return true;
    }

    return false;
}
看一下使用方法和显示效果吧:
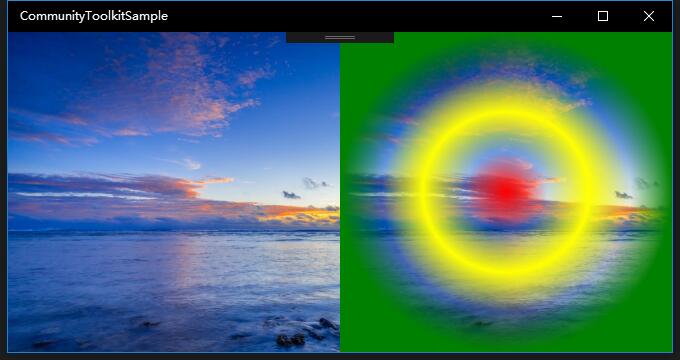
和 WPF 的 RadialGradientBrush 使用方式很类似,引入画刷后,设置径向渐变的中心,半径和渐变的停顿点等;
我们把 Grid 分为两列,分别放了同样的图片,左侧是原图,右侧是实现了 BackdropSepiaBrush 的图像;可以明显看出径向渐变画刷效果。
<Grid>
    <Grid.ColumnDefinitions>
        <ColumnDefinition Width="*"/>
        <ColumnDefinition Width="*"/>
    </Grid.ColumnDefinitions>
    <Image Source="Assets/02.jpg" Stretch="UniformToFill" Grid.Column="0"/>
        <Image Source="Assets/02.jpg" Stretch="UniformToFill" Grid.Column="1"/>
        <Border Grid.Column="1">
        <Border.Background>
                <controls:RadialGradientBrush
                AlphaMode="Premultiplied"
                Center="0.5,0.5"
                ColorInterpolationMode="SRgbLinearInterpolation"
                GradientOrigin="0.5,0.5"
                Opacity="1"
                RadiusX="0.5"
                RadiusY="0.5"
                SpreadMethod="Pad">
                    <GradientStop Color="Red" Offset="0" />
                    <GradientStop Color="Transparent" Offset="0.25" />
                    <GradientStop Color="Yellow" Offset="0.50" />
                    <GradientStop Color="Transparent" Offset="0.75" />
                    <GradientStop Color="Green" Offset="1.0" />
                </controls:RadialGradientBrush>
            </Border.Background>
    </Border>
</Grid>
总结
到这里我们就把 UWP Community Toolkit V2.2.0 中实现的 7 种画刷介绍完了,我们更多的从源代码的实现和 SDK 的简单实用角度来分析,如果大家有兴趣,可以多尝试每种画刷里的参数设置不同值时的效果;如果工作中上面 7 种画刷不满足需求,也可以在 Win2D 寻找更多种类的画刷去封装实现。
欢迎大家多多交流,有任何疑问或建议,欢迎留言告诉我,谢谢!
New UWP Community Toolkit - XAML Brushes的更多相关文章
- New UWP Community Toolkit
概述 UWP Community Toolkit 是一个 UWP App 自定义控件.应用服务和帮助方法的集合,能够很大程度的简化和指引开发者的开发工作,相信广大 UWPer 并不陌生. 下面是截取自 ...
- New UWP Community Toolkit - Markdown
概述 前面 New UWP Community Toolkit 文章中,我们对 V2.2.0 版本的重要更新做了简单回顾,其中简单介绍了 MarkdownTextBlock 和 MarkdownDoc ...
- New UWP Community Toolkit - Carousel
概述 New UWP Community Toolkit V2.2.0 的版本发布日志中提到了 Carousel 的调整,本篇我们结合代码详细讲解 Carousel 的实现. Carousel 是 ...
- New UWP Community Toolkit - RadialProgressBar
概述 UWP Community Toolkit 中有一个圆形的进度条控件 - RadialProgressBar,本篇我们结合代码详细讲解 RadialProgressBar 的实现. Radi ...
- New UWP Community Toolkit - RadialGauge
概述 New UWP Community Toolkit V2.2.0 的版本发布日志中提到了 RadialGauge 的调整,本篇我们结合代码详细讲解 RadialGauge 的实现. Radi ...
- New UWP Community Toolkit - RangeSelector
概述 前面 New UWP Community Toolkit 文章中,我们对 V2.2.0 版本的重要更新做了简单回顾,其中简单介绍了 RangeSelector,本篇我们结合代码详细讲解一下 Ra ...
- New UWP Community Toolkit - ImageEx
概述 UWP Community Toolkit 中有一个图片的扩展控件 - ImageEx,本篇我们结合代码详细讲解 ImageEx 的实现. ImageEx 是一个图片的扩展控件,包括 Ima ...
- New UWP Community Toolkit - DropShadowPanel
概述 UWP Community Toolkit 中有一个为 Frmework Element 提供投影效果的控件 - DropShadowPanel,本篇我们结合代码详细讲解 DropShado ...
- New UWP Community Toolkit - RotatorTile
概述 UWP Community Toolkit 中有一个为图片或磁贴提供轮播效果的控件 - RotatorTile,本篇我们结合代码详细讲解 RotatorTile 的实现. RotatorTi ...
随机推荐
- dojo省份地市级联之地市Dao接口类(四)
dojo省份地市级联之地市Dao接口类 CityDao.java: /** * 地市 */ package com.you.dao; import java.util.List; import com ...
- 用SPSS 画 人口金字塔(限SPSS 13.0以上)
现在网络上人口金字塔较多的是用excel来实现(可参考链接),但是用spss的步骤又很不明确,于是乎,想着自己试试. 在 SPSS 软件中,绘制人口金字塔是 SPSS13.0 新增的一种图形, 因此只 ...
- zTree实现地市县三级级联Service接口
zTree实现地市县三级级联Service接口 ProvinceService.java: /** * @Title:ProvinceService.java * @Package:com.gwtjs ...
- ATA接口寄存器描述
ATA接口寄存器描述 .ATA接口的三种数据传输方式 位. )MDMA(Multiword DMA)传输,用于数据传输.ATA主机控制器向ATA设备下达MDMA传输命令后,等待设备向主机发送DMARQ ...
- freemarker嵌入文件输出结果
freemarker嵌入文件输出结果 1.嵌入的文件代码 inc.ftl: <#assign username="李思思"> 2.父文件代码 inner.ftl: &l ...
- 列出JDK中常用的Java包
列出JDK中常用的Java包 1.java.lang 2.java.sql 3.java.io 4.java.math 5.java.text 6.java.net 7.java.util 8.jav ...
- org.hibernate.engine.jndi.JndiException:Error parsing JNDI name[foo]
1.错误描述 WARN:HHH00027:Could not bind factory to JNDI org.hibernate.engine.jndi.JndiException:Error pa ...
- Flex中TabNavigator隐藏和显示选项卡
1.问题背景 遇到这样一个问题:有四个Tab选项卡,根据不同的参数隐藏和显示选项卡 2.实现实例 (1)隐藏"春季" protected function springClickH ...
- cookie的初步认识
一.会话的概念 会话可简单理解为:用户开一个浏览器,点击多个超链接,访问服务器多个web资源,然后关闭浏览器,整个过程称之为一个会话. 有状态会话:一个同学来过教室,下次再来教室,我们会知道这个同学曾 ...
- C#图解教程 第八章 表达式和运算符
表达式和运算符 表达式字面量 整数字面量实数字面量字符字面量字符串字面量 求值顺序 优先级结合性 简单算术运算符求余运算符关系比较运算符和相等比较运算符递增运算符和递减运算符条件逻辑运算符逻辑运算符移 ...
