dlib下训练自己的物体检测器--手的检测
之前我们在Linux上安装了dlib(http://www.cnblogs.com/take-fetter/p/8318602.html),也成功的完成了之前的人脸检测程序,
今天我们来一起学习怎样使用dlib创建属于自己的简单的物体识别器(这里以手的检测为例,特别感谢https://handmap.github.io/dlib-classifier-for-object-detection/)
- imglab的介绍与安装
imglab是dlib提供的个工具,位于github dlib开源项目的tools目录下.imglab是一个简单的图形工具,用对象边界来标注图像盒子和可选的零件位置。 一般来说,你可以在需要时使用它
以训练物体检测器(例如脸部检测器),因为它允许你轻松创建所需的训练数据集。
(源码位于https://github.com/davisking/dlib/tree/master/tools/imglab 如果有兴趣使用的话建议先下载整个dlib项目并安装dlib后再对本工具进行编译)
编译依次使用
 cd dlib/tools/imglab

    mkdir build

    cd build

    cmake ..

    cmake --build . --config Release
不建议使用readme.txt中关于sudo make install的命令,因为我使用之后出现了无法显示图像的错误
- 训练自己的手检测器(关于手的图片的dataset可以参考Hand Images Databases - https://www.mutah.edu.jo/biometrix/hand-images-databases.html提供的数据集
或http://www.robots.ox.ac.uk/~vgg/data/hands/的相关数据集)
使用cmake后的build文件目录下(windows则位于release目录中)完成如下操作
使用
./imglab -c mydataset.xml 图片目录
创建mydataset.xml完成创建mydataset.xml 和image_metadata_stylesheet.xsl的样式表
使用
./imglab mydataset.xml
会打开一个窗口,这里就需要对每张图片进行位置的框选,在Next Label中输入框选信息,并对每张图片进行框选(按住shift并鼠标左键点击拖动画框)
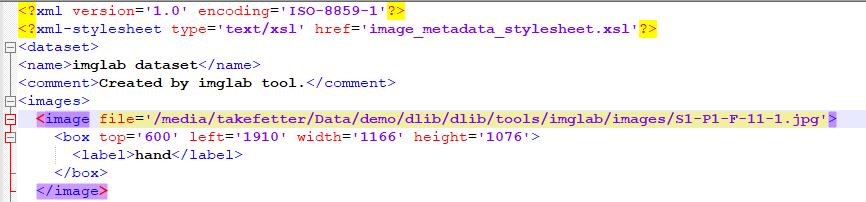
在将对图片全标注后,在files选项中点击save,我们便可以关闭窗口,此时打开mydataset.xml可以看到其中包含了图片信息,如图
之后将mydataset.xml 和image_metadata_stylesheet.xsl放入图片目录中,运行如下代码进行训练(可能会出现图片目录出错的情况,这里需要对mydataset.xml中的图片位置进行确认)
代码改自dlib的python_examples,如果要自己尝试,建议先认真看下github中的代码(https://github.com/davisking/dlib/blob/master/python_examples/train_object_detector.py)
运行程序需使用scikit-image使用pip install scikit-image 安装
import os

import sys

import glob

import dlib

from skimage import io

# In this example we are going to train a face detector based on the small

# faces dataset in the examples/faces directory.  This means you need to supply

# the path to this faces folder as a command line argument so we will know

# where it is.

if len(sys.argv) != 2:

    print(

        "Give the path to the examples/faces directory as the argument to this "

        "program. For example, if you are in the python_examples folder then "

        "execute this program by running:\n"

        "    ./train_object_detector.py ../examples/faces")

    exit()

faces_folder = sys.argv[1]

# Now let's do the training.  The train_simple_object_detector() function has a

# bunch of options, all of which come with reasonable default values.  The next

# few lines goes over some of these options.

options = dlib.simple_object_detector_training_options()

# Since faces are left/right symmetric we can tell the trainer to train a

# symmetric detector.  This helps it get the most value out of the training

# data.

options.add_left_right_image_flips = True

# The trainer is a kind of support vector machine and therefore has the usual

# SVM C parameter.  In general, a bigger C encourages it to fit the training

# data better but might lead to overfitting.  You must find the best C value

# empirically by checking how well the trained detector works on a test set of

# images you haven't trained on.  Don't just leave the value set at 5.  Try a

# few different C values and see what works best for your data.

options.C = 5

# Tell the code how many CPU cores your computer has for the fastest training.

options.num_threads = 4

options.be_verbose = True

training_xml_path = os.path.join(faces_folder, "palm-landmarks.xml")

testing_xml_path = os.path.join(faces_folder, "testing.xml")

# This function does the actual training.  It will save the final detector to

# detector.svm.  The input is an XML file that lists the images in the training

# dataset and also contains the positions of the face boxes.  To create your

# own XML files you can use the imglab tool which can be found in the

# tools/imglab folder.  It is a simple graphical tool for labeling objects in

# images with boxes.  To see how to use it read the tools/imglab/README.txt

# file.  But for this example, we just use the training.xml file included with

# dlib.

dlib.train_simple_object_detector(training_xml_path, "detector.svm", options)
接下来就是等待训练完成(当然在这里说下,数据集不宜过大,会导致内存不足而OS自动杀死线程/进程的情况),options中的参数很多需要自行根据情况调节的
训练完成后会生成detector.svm文件,使用如下程序进行一个简单的测试:
import imutils

import dlib

import cv2

import time

detector = dlib.simple_object_detector("detector_from_author.svm")

image = cv2.imread('test0.jpg')

image = imutils.resize(image, width=500)

gray = cv2.cvtColor(image, cv2.COLOR_BGR2GRAY)

rects = detector(gray, 1)

#win_det = dlib.image_window()

#win_det.set_image(detector)

#win = dlib.image_window()

for (k, d) in enumerate(rects):

    print("Detection {}: Left: {} Top: {} Right: {} Bottom: {}".format(

        k, d.left(), d.top(), d.right(), d.bottom()))

    cv2.rectangle(image, (d.left(), d.top()), (d.right(), d.bottom()), (0, 255, 0), 2)

#win.add_overlay(rects)

cv2.imshow("Output", image)

cv2.waitKey(0)
运行结果
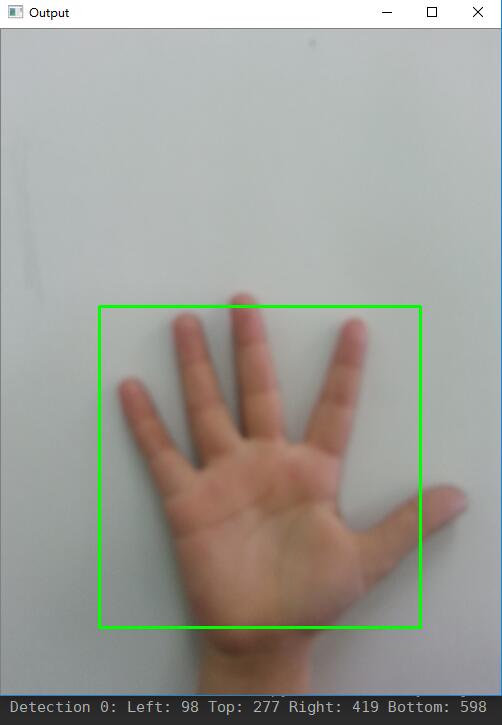
可以看到完成了手的检测。
后记:
- 训练时间很长,希望能耐心等待
- 再次特别感谢Nathan Glover以及他的教程https://handmap.github.io/dlib-classifier-for-object-detection/
- 如果要制作精度很高的检测器,并不建议使用本方法,因为我们最终生成的svm文件相比于dlib作者的人脸识别检测器而言相差甚远。
- 我认为dlib提供的imglab功能很少,不适用于大规模的需要高精度的识别情况(不过人脸识别还是很不错的)
- 对于需要高精度高准确率的物体识别,使用Tensorflow Object Detection API应该更为合适(https://github.com/tensorflow/models/tree/master/research/object_detection)
dlib下训练自己的物体检测器--手的检测的更多相关文章
- TensorFlow Object Detection API(Windows下训练)
本文为作者原创,转载请注明出处(http://www.cnblogs.com/mar-q/)by 负赑屃 最近事情比较多,前面坑挖的有点久,今天终于有时间总结一下,顺便把Windows下训练跑通.Li ...
- 《疯狂iOS讲义(下)——iPhone/iPad高级应用与手游开发(含CD光盘1张)》
<疯狂iOS讲义(下)——iPhone/iPad高级应用与手游开发(含CD光盘1张)> 基本信息 作者: 李刚 肖文吉 出版社:电子工业出版社 ISBN:9787121224379 ...
- faster r-cnn 在CPU配置下训练自己的数据
因为没有GPU,所以在CPU下训练自己的数据,中间遇到了各种各样的坑,还好没有放弃,特以此文记录此过程. 1.在CPU下配置faster r-cnn,参考博客:http://blog.csdn.net ...
- Dlib库中实现正脸人脸关键点(landmark)检测的测试代码
Dlib库中提供了正脸人脸关键点检测的接口,这里参考dlib/examples/face_landmark_detection_ex.cpp中的代码,通过调用Dlib中的接口,实现正脸人脸关键点检测的 ...
- Windows下Tesseract4.0识别与中文手写字体训练
一 . tesseract 4.0 安装及使用 1. tesseract 4.0 安装 安装包下载地址: http://digi.bib.uni-mannheim.de/tesseract/tesse ...
- 【macOS】 在OpenCV下训练Haar特征分类器
本教程基于以下环境 macOS 10.12.6,OpenCV 3.3.0,python 3.6.由于网上基于masOS系统的教程太少,想出一篇相关教程造福大家-本文旨在学习如何在opencv中基于ha ...
- 【神经网络与深度学习】深度学习实战——caffe windows 下训练自己的网络模型
1.相关准备 1.1 手写数字数据集 这篇博客上有.jpg格式的图片下载,附带标签信息,有需要的自行下载,博客附带百度云盘下载地址(手写数字.jpg 格式):http://blog.csdn.net/ ...
- caffe下训练时遇到的一些问题汇总
1.报错:“db_lmdb.hpp:14] Check failed:mdb_status ==0(112 vs.0)磁盘空间不足.” 这问题是由于lmdb在windows下无法使用lmdb的库,所以 ...
- 用C++调用tensorflow在python下训练好的模型(centos7)
本文主要参考博客https://blog.csdn.net/luoyexuge/article/details/80399265 [1] bazel安装参考:https://blog.csdn.net ...
随机推荐
- POJ 2209 The King(简单贪心)
The King Time Limit: 2000MS Memory Limit: 65536K Total Submissions: 7499 Accepted: 4060 Descript ...
- Zabbix安装客户端agent(windows和Centos7)
上一篇简单的介绍了怎么搭建Zabbix监控服务端,接下来给大家介绍怎么在windows和Centos7上安装zabbix_agent客户端. Zabbix是一个基于WEB界面的提供分布式系统监视以及网 ...
- python面向对象进阶
前言 上节大话python面向对象对面向对象有了一些了解,这次就不用大话风格了 (ps:真心不好扯啊) isinstance与issubclass isinstance(obj,cls)检查是否obj ...
- 对于hive使用的一点记录
最近一段时间因工作需要接触了一些hive上的使用!当然大部分都是比较基本的使用,仅当入门!各位看到有不足之处望多多指正! 废话不多说,开始: 首先是创建数据库 create database '数据库 ...
- windows 命令直接搜索局域网计算机的ip
以前都不知道还可以这样.....孤陋寡闻了... cmd 中 输入 net view ,搜索局域网或域中的计算机名. 找到要查询ip地址的计算机名后右键 标记,接着ping 一下,要用 -4 这个参数 ...
- centos 6.4 mysql rpm 离线安装【备忘】
离线状态下使用rpm的安装包进行mysql的安装,仅作备忘 准备工作: 官网下载mysql离线rpm安装包(这里就不演示了,拿现成的做演示) =================更新线 2018-01- ...
- css3中的关键帧技术分析应用
最近在研究网页加载进度效果的时候发现可以使用css3实现这个效果. 使用css3实现完全不需要图片,相比使用loading.gif的实现来说可能更快. 使用css3实现动态加载的效果,主要会涉及到几个 ...
- dedecms系统后台登陆提示用户名密码不存在
dedecms最近被曝有非常多的安全漏洞,最近有些用户反应后台管理员账号密码没有修改但无法正常登陆,提示用户名不存在,经研究发现是程序漏洞管理员被直接篡改,解决方案如下. 工具/原料 dedecms ...
- 一步步部署基于Windows系统的Jenkins持续集成环境
如题:本文将介绍如何在Windows环境下运用Jenkins部署持续集成环境.之所以写本文,是因为在最近工作当中,学习使用Jenkins时,确实遇到了一些问题,而大多数教程文档都是基于Mac或是Lin ...
- elasticsearch的集中常见操作
1.引入dependency <dependency> <groupId>org.springframework.data</groupId> <artifa ...