Step by step guide to set up master and slave machines on Windows
Note: There is no need to install Jenkins on the slave machine.
- On your master machine go to Manage Jenkins > Manage Nodes.

- New Node --> Enter Node Name.
- Select Dumb Slave --> Press OK.

- Fill out the following:
- Set a number of executors (one or more) as needed.
- Set a Remote FS Root, a home directory for the master on the slave machine.
- For a Windows slave, use something like: "C:\Jenkins\"
- TODO: add details.
- Select the appropriate Usage setting:
- For an additional worker: Utilize this slave as much as possible
- For specialized jobs: Leave this machine for tied jobs only
- Launch Method:
- An easy way to control a Windows slave is by using Launch slave agents via Java Web Start (Recommended for Windows)
- TODO: add steps for other methods.
- Availability --> Keep this slave online as much as possible
- TODO: add details for each option.
- Press OK.

- Now you need to connect your slave machine to the master using the following steps.
- Open a browser on the slave machine and go to the Jenkins master server url (http://yourjenkinsmaster:8080).
- Go to Manage Jenkins > Manage Nodes, Click on the newly created slave machine. You will need to login as someone that has the "Connect" Slave permission if you have configured global security.
- Click on the Launch button to launch agent from browser on slave.

- Run the program.
 ### If you encounter connection issue, then you could enlarge the popup windows to see the master port used and check your network configuration (firewall, port forward, ...)
- Now you should see the Slave machine connected under Nodes.
- If you want the service to run on start-up of the slave machine do the following (Windows only directions):
- In the Slave agent program running on your slave machine,
- click File --> Install as Windows Service.

Note that this feature requires ".Net Framework 3.5" - Start, type Services and Select the Services program.
- Find Jenkins Slave in the list, Double click to open.
- Select Startup type --> Automatic.
- Go to the Log On tab, change the Log on as to a user of your choice (Special user account Jenkins recommended).
- Make sure that auto login is set for the slave machine for the user account, then the VM (or physical computer) should connect and be available when needed.
Also: take a look at Distributed builds
https://wiki.jenkins-ci.org/display/JENKINS/Step+by+step+guide+to+set+up+master+and+slave+machines+on+Windows
slave节点机器配置
创建jenkins用户
用root用户登录slave节点,首先创建jenkins用户,并指定主目录
$ useradd -m jenkins -d /home/jenkins
查看jenkins用户及组的信息
$ id jenkinsuid=500(jenkins) gid=500(jenkins) 组=500(jenkins)
再修改jenkins密码,若不修改是未知的
$ passwd jenkins
再切换到jenkins用户,确保jdk已安装
$ su - jenkins
同时确保slave已安装jdk
$ java -version
且sshd正确运行
$ service --status-all | grep ssh
创建公钥私钥,实现免用户密码登录
使用jenkins用户登录到jenkins master机器
使用jenkins用户登录时若发现连接失败(lost connection),可以先用root用户登录,打开/etc/passwd,找到
jenkins:x:498:499:Jenkins Continuous Integration Server:/var/lib/jenkins:/bin/false
将最后的/bin/false改为/bin/bash,便可以登录。记得使用完改回去,猜测是安全限制。
jenkins用户登录后执行以下命令,生成公私钥
$ ssh-keygenGenerating public/private rsa key pair.Enter file in which to save the key (/root/.ssh/id_rsa): /var/lib/jenkins/.ssh/id_rsa
将公钥和私钥保存到jenkins主目录下,注意确保.ssh目录和id_rsa都是jenkins用户所拥有或者有可读写权限
然后会要求输入passphrase(密码),这里还是不设置,直接两次enter
进入/var/lib/jenkins/.ssh,使用scp命令将生成的公钥id_rsa.pub拷贝到各个slave节点,并命名为authorized_keys
$ scp id_rsa jenkins@xxx.xxx.xxx.xxx:~/.ssh/authorized_keys
同时要修改authorized_keys的权限,
$ chmod 700 authorized_keys
Jenkins控制台slave配置
回到jenkins控制台,打开以下页面,添加credentials,以下配置页面是添加slave的jenkins用户密码
另一种ssh免密码登录配置(基于公开密钥的认证),可指定jenkins master私钥的路径或者选择第三个From the Jenkins master ~./ssh,我们选择/var/lib/jenkins/.ssh/id_rsa,这是在上一节创建的私钥
创建slave
进入“系统管理>管理节点>新建节点”,输入节点名称,我已经建了一个节点,所以可以选择复制
进入配置页面,按要求填写,credentialsp这里选择用户密码登录,免密码登录需要指定一个属于它的id_rsa。
保存之后,点击Relaunch agent,启动节点
https://segmentfault.com/a/1190000008369457
作为slave的Linux机器为centos系统。
1) Linux 的 Slave机器设置
创建jenkins用户sudo /usr/sbin/useradd -m jenkins -d /home/jenkins;
查看jenkins用户及组的信息id jenkins :
uid=506(jenkins) gid=506(jenkins) groups=506(jenkins) ;
使用sudo /usr/bin/passwd jenkins来设置用户jenkins的密码为0;
切换到用户jenkins环境下su - jenkins;
确保java安装正确:java --version;
确保sshd正确运行: /sbin/service --status-all | grep ssh;
安装ant,在root下运行yum install ant;
2) 在Slave的linux机器上创建public/private key pair:
确保当前用户为jenkins;
执行ssh-keygen来创建public/private key pair,直接enter,表示key将存储在/home/jenkins/.ssh/id_rsa下,再直接enter,表示不设置密码,再次enter确认密码为空;
创建authorized_keys:
cd .ssh
cat id_rsa.pub > authorized_keys
chmod 700 authorized_keys
;
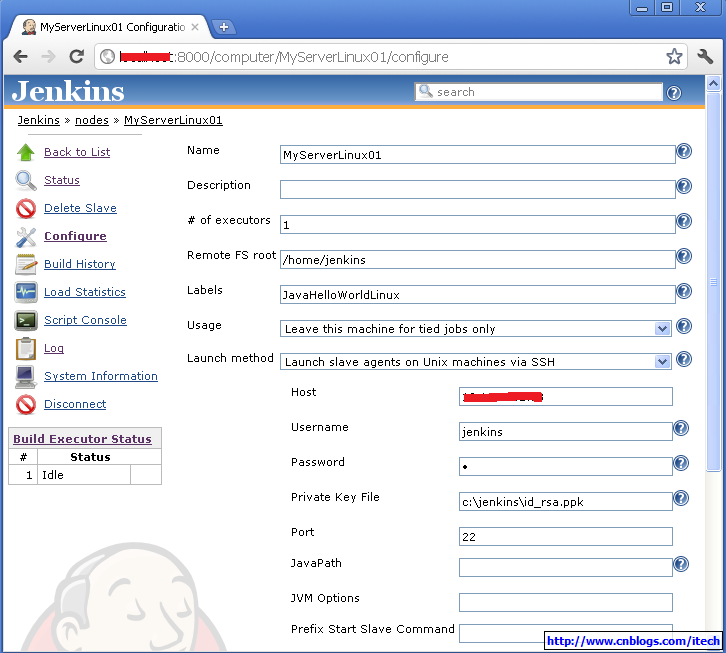
将id_rsa(相当于privatekey)拷贝到jenkins master机器上,例如c:\jenkins\id_rsa下。
3)创建Slave(note),配置如下:

确保jenkins 中ssh slave plugin正确安装,一般默认安装。
然后lunch slave,使得master和slave通过ssh成功连接。其实launch的时候jenkins自动地从http://yourserver:port/jnlpJars/slave.jar拷贝slave.jar到slave,然后运行通过命令java -jar slave.jar来运行slave。
4)在新建的Linux的Slave上运行上节中的JavaHelloWorld(Jenkins 构建JavaHelloWorld),且需要修改JavaHelloWorld job的Label为JavaHelloWorldLinux来使用此slave,运行如下:

完!
http://www.cnblogs.com/itech/archive/2011/11/10/2244690.html
Step by step guide to set up master and slave machines on Windows的更多相关文章
- Step by step guide to set up master and slave machines(转)
Note: There is no need to install Jenkins on the slave machine. On your master machine go to Manage ...
- Tomcat Clustering - A Step By Step Guide --转载
Tomcat Clustering - A Step By Step Guide Apache Tomcat is a great performer on its own, but if you'r ...
- Step by Step use OBD2 Scanner Guide
Learning to use a good automotive OBD2 code reader is one of the best ways you can continually inves ...
- Step by step Dynamics CRM 2011升级到Dynamics CRM 2013
原创地址:http://www.cnblogs.com/jfzhu/p/4018153.html 转载请注明出处 (一)检查Customizations 从2011升级到2013有一些legacy f ...
- [转]Bootstrap 3.0.0 with ASP.NET Web Forms – Step by Step – Without NuGet Package
本文转自:http://www.mytecbits.com/microsoft/dot-net/bootstrap-3-0-0-with-asp-net-web-forms In my earlier ...
- Devops step by step
接着上次分享的devops历程[Followme Devops实践之路], 大家希望能够出一个step by step手册, 那今天我就来和手把手来一起搭建这么一套环境, 演示整个过程! 实验环境需要 ...
- PyTorch in Action: A Step by Step Tutorial
PyTorch in Action: A Step by Step Tutorial PyTorch in Action: A Step by Step Tutorial Installation ...
- Git Step by Step – (8) Git的merge和rebase
前面一篇文章中提到了"git pull"等价于"git fetch"加上"git merge",然后还提到了pull命令支持rebase模式 ...
- Step by Step Process of Migrating non-CDBs and PDBs Using ASM for File Storage (Doc ID 1576755.1)
Step by Step Process of Migrating non-CDBs and PDBs Using ASM for File Storage (Doc ID 1576755.1) AP ...
随机推荐
- Android NDK开发三:java和C\C++交互
转自:http://www.cnblogs.com/shangdahao/archive/2013/05/02/3053971.html 1.定义native方法并加载动态链接库: public cl ...
- Volley解析之表单提交篇
要实现表单的提交,就要知道表单提交的数据格式是怎么样,这里我从某知名网站抓了一条数据,先来分析别人提交表单的数据格式. 数据包: Connection: keep-alive Content-Len ...
- XMPP系列(三)---获取好友列表、添加好友
1.心跳检测.掉线重连功能 客户端和服务器端都可以设置多久发送一次心跳包,如果对方没有返回正确的pong信息,则会断开连接,而添加掉线重连功能,则会自动进行连接. 如果自己写聊天功能还得自己做心跳检测 ...
- HBase BlockCache
1. Cache 读写 调用逻辑: hmaster.handleCreateTable->HRegion.createHRegion-> HRegion. initialize-> ...
- rails4 new没有生成prototype.js之类的脚本解决办法
早期版本的rails在新生成程序时会在/public/javascript目录中自动放入若干个js脚本.不过在rails4.2.0中无论是否加-j选项,都不会生成这些脚本文件了.解决办法是安装prot ...
- ASP.NET平台下从浏览器地址栏输入之后发生的事
浏览器一般内嵌两个模块: Socket通信模块 → 浏览器将地址栏的数据及其他的数据放入http协议的请求头文件中,Socket将此http请求数据发送到远程服务器端 浏览器引擎渲染模块 → 浏览器接 ...
- angular1.0 app
angular 1.0 简单的说一下就是ng启动阶段是 config-->run-->compile/link config阶段是给了ng上下文一个针对constant与provider修 ...
- 双机热备ROSE HA工作原理
双机热备ROSE HA工作原理 当双机热备软件启动后,ROSE HA首先启动HA Manager管理程序,根据高可靠性系统的配置结构初始化,然后启动必要的服务和代理程序来监控和管理系统服务.HA代理程 ...
- Vue 仿B站滑动导航
仿照B站制作的滑动导航功能,进行了部分优化,例如可定制默认选中元素,并将选中元素居中显示,可动态更改数据,可定制回调函数取的下标和选中元素内容,可根据需求制作N级联动 已开发成插件,使用方法与源码请前 ...
- 第一次作业 orm环境构建(hibernate)及基本的demo
一.数据库 1.创建数据库hibernate01-1514010311 2.创建表 customer CREATE TABLE customer( id int(11) not null auto_i ...


