MyBatis初始化
1. 准备工作
为了看清楚MyBatis的整个初始化过程,先创建一个简单的Java项目,目录结构如下图所示:

1.1 Product 产品实体类
public class Product {

    private long id;

    private String productName;

    private String productContent;

    private String price;

    private int sort;

    private int falseSales;

    private long category_id;

    private byte type;

    private byte state;

    // PS:省略setter、getter函数
1.2 ProductMapper 产品持久化接口
public interface ProductMapper {

    /**

     * 查询所有的产品

     * @return

     */

    List<Product> selectProductList();

}
1.3 ProductMapper.xml 产品映射文件
<?xml version="1.0" encoding="UTF-8" ?>

<!DOCTYPE mapper PUBLIC "-//mybatis.org//DTD Mapper 3.0//EN" "http://mybatis.org/dtd/mybatis-3-mapper.dtd" >

<mapper namespace="team.njupt.mapper.ProductMapper">

    <select id="selectProductList" resultType="team.njupt.entity.Product">

        select * from product

    </select>

</mapper>
1.4 db.properties 数据库配置文件
driver=com.mysql.jdbc.Driver

url=jdbc:mysql://127.0.0.1:3306/waimai?useUnicode=true&characterEncoding=utf8

username=root

password=xxxxxx
1.5 mybatis.xml MyBatis的配置文件
<?xml version="1.0" encoding="UTF-8" ?>

<!DOCTYPE configuration

        PUBLIC "-//mybatis.org//DTD Config 3.0//EN"

        "http://mybatis.org/dtd/mybatis-3-config.dtd">

<configuration>

    <properties resource="db.properties">

        <!--<property name="username" value="dev_user"/> -->

        <!--<property name="password" value="F2Fa3!33TYyg"/> -->

    </properties>

    <environments default="development">

        <environment id="development">

            <transactionManager type="JDBC" />

            <dataSource type="POOLED">

                <property name="driver" value="${driver}" />

                <property name="url" value="${url}" />

                <property name="username" value="${username}" />

                <property name="password" value="${password}" />

            </dataSource>

        </environment>

    </environments>

    <mappers>

        <mapper resource="com/jp/mapper/ProductMapper.xml" />

    </mappers>

</configuration>
1.6 Main 主函数
public class Main {

    public static void main(String[] args) throws IOException {

        String resource = "mybatis.xml";

        InputStream inputStream = Resources.getResourceAsStream(resource);

        SqlSessionFactory sqlSessionFactory = new SqlSessionFactoryBuilder().build(inputStream);

        SqlSession sqlSession = sqlSessionFactory.openSession();

        try {

            ProductMapper productMapper = sqlSession.getMapper(ProductMapper.class);

            List<Product> productList = productMapper.selectProductList();

            for (Product product : productList) {

                System.out.printf(product.toString());

            }

        } finally {

            sqlSession.close();

        }

    }

}
2. MyBatis初始化过程
2.1 获取配置文件
当系统初始化时,首先会读取配置文件,并将其解析成InputStream
String resource = "mybatis.xml";

InputStream inputStream = Resources.getResourceAsStream(resource);
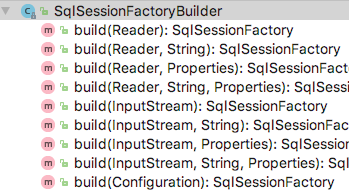
2.2 创建SqlSessionFactoryBuilder对象
从 SqlSessionFactoryBuilder 的名字中可以看出, SqlSessionFactoryBuilder 是用来创建 SqlSessionFactory 对象的。
来看一下SqlSessionFactoryBuilder源码:
2.3 SqlSessionFactory创建过程
下面具体来看一下,build函数是如何创建SqlSessionFactory对象的。
public SqlSessionFactory build(InputStream inputStream, String environment, Properties properties) {

    try {

        XMLConfigBuilder parser = new XMLConfigBuilder(inputStream, environment, properties);

        return build(parser.parse());

    } catch (Exception e) {

        throw ExceptionFactory.wrapException("Error building SqlSession.", e);

    } finally {

        ErrorContext.instance().reset();

        try {

            inputStream.close();

        } catch (IOException e) {

        // Intentionally ignore. Prefer previous error.

      }

    }

}
2.3.1 构造XMLConfigBuilder对象
build函数首先会构造一个XMLConfigBuilder对象,从名字上大致可以猜到,该对象是用来解析XML配置文件的。下面来看一下XMLConfigBuilder的体系结构。
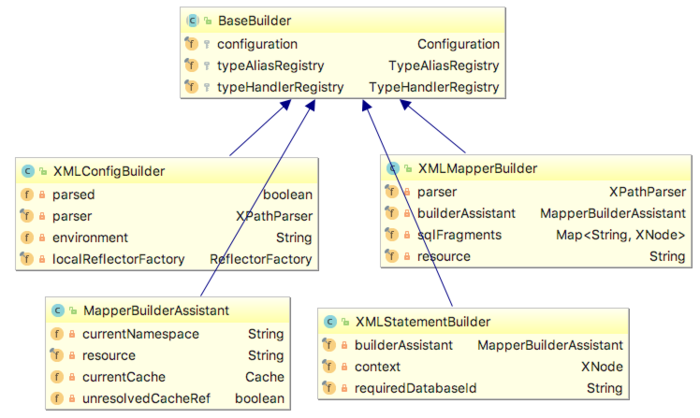
XMLxxxBuilder 是用来解析XML配置文件的,不同类型XMLxxxBuilder用来解析MyBatis配置文件的不同部位。比如:XMLConfigBuilder 用来解析MyBatis的配置文件,XMLMapperBuilder 用来解析MyBatis中的映射文件(如上文提到的ProductMapper.xml),XMLStatementBuilder 用来解析映射文件中的SQL语句。
这些XMLxxxBuilder都有一个共同的父类—— BaseBuilder。这个父类维护了一个全局的 Configuration 对象,MyBatis的配置文件解析后就以Configuration对象的形式存储。
当创建 XMLConfigBuilder对象时,就会初始化Configuration对象,并且在初始化Configuration对象的时候,一些别名会被注册到Configuration的typeAliasRegistry容器中。
private XMLConfigBuilder(XPathParser parser, String environment, Properties props) {

super(new Configuration());

ErrorContext.instance().resource("SQL Mapper Configuration");

this.configuration.setVariables(props);

this.parsed = false;

this.environment = environment;

this.parser = parser;

}
public Configuration() {

typeAliasRegistry.registerAlias("JDBC", JdbcTransactionFactory.class);

typeAliasRegistry.registerAlias("MANAGED", ManagedTransactionFactory.class);

typeAliasRegistry.registerAlias("JNDI", JndiDataSourceFactory.class);

typeAliasRegistry.registerAlias("POOLED", PooledDataSourceFactory.class);

typeAliasRegistry.registerAlias("UNPOOLED", UnpooledDataSourceFactory.class);

typeAliasRegistry.registerAlias("PERPETUAL", PerpetualCache.class);

typeAliasRegistry.registerAlias("FIFO", FifoCache.class);

typeAliasRegistry.registerAlias("LRU", LruCache.class);

typeAliasRegistry.registerAlias("SOFT", SoftCache.class);

typeAliasRegistry.registerAlias("WEAK", WeakCache.class);

……

}
2.3.2 解析配置文件
当有了XMLConfigBuilder对象之后,接下来就可以用它来解析配置文件了。
private void parseConfiguration(XNode root) {

  try {

    // 解析<properties>节点

    propertiesElement(root.evalNode("properties"));

    // 解析<settings>节点

    Properties settings = settingsAsProperties(root.evalNode("settings"));

    loadCustomVfs(settings);

    // 解析<typeAliases>节点

    typeAliasesElement(root.evalNode("typeAliases"));

    // 解析<plugins>节点

    pluginElement(root.evalNode("plugins"));

    // 解析<objectFactory>节点

    objectFactoryElement(root.evalNode("objectFactory"));

    objectWrapperFactoryElement(root.evalNode("objectWrapperFactory"));

    // 解析<reflectorFactory>节点

    reflectorFactoryElement(root.evalNode("reflectorFactory"));

    settingsElement(settings);

    // 解析<environments>节点

    environmentsElement(root.evalNode("environments"));

    databaseIdProviderElement(root.evalNode("databaseIdProvider"));

    typeHandlerElement(root.evalNode("typeHandlers"));

    // 解析<mappers>节点

    mapperElement(root.evalNode("mappers"));

  } catch (Exception e) {

    throw new BuilderException("Error parsing SQL Mapper Configuration. Cause: " + e, e);

  }

}
XMLConfigBuilder会依次解析配置文件中的<properties>、< settings >、< environments>、< typeAliases >、< plugins >、< mappers >等属性。下面介绍下几个重要属性的解析过程。<properties>节点的定义如下:
<properties resource="org/mybatis/example/config.properties">

  <property name="username" value="dev_user"/>

  <property name="password" value="F2Fa3!33TYyg"/>

</properties>
<properties>节点的解析过程:
/**

  * @Param context <properties>节点

  */

private void propertiesElement(XNode context) throws Exception {

  if (context != null) {

    // 获取<properties>节点的所有子节点

    Properties defaults = context.getChildrenAsProperties();

    // 获取<properties>节点上的resource属性

    String resource = context.getStringAttribute("resource");

    // 获取<properties>节点上的url属性

    String url = context.getStringAttribute("url");

    // resource和url不能同时存在

    if (resource != null && url != null) {

      throw new BuilderException("The properties element cannot specify both a URL and a resource based property file reference.  Please specify one or the other.");

    }

    if (resource != null) {

      // 获取resource属性值对应的properties文件中的键值对,并添加至defaults容器中

      defaults.putAll(Resources.getResourceAsProperties(resource));

    } else if (url != null) {

      // 获取url属性值对应的properties文件中的键值对,并添加至defaults容器中

      defaults.putAll(Resources.getUrlAsProperties(url));

    }

    // 获取configuration中原本的属性,并添加至defaults容器中

    Properties vars = configuration.getVariables();

    if (vars != null) {

      defaults.putAll(vars);

    }

    parser.setVariables(defaults);

    // 将defaults容器添加至configuration中

    configuration.setVariables(defaults);

  }

}
首先读取<resources>节点下的所有<resource>节点,并将每个节点的name和value属性存入Properties中。
然后读取<resources>节点上的resource、url属性,并获取指定配置文件中的name和value,也存入Properties中。(PS:由此可知,如果resource节点上定义的属性和properties文件中的属性重名,那么properties文件中的属性值会覆盖resource节点上定义的属性值。)
最终,携带所有属性的 Properties对象会被存储在 Configuration对象中。
2.3.2.2 <settings>节点的解析过程
<settings>节点的定义如下:
<settings>

  <setting name="cacheEnabled" value="true"/>

  <setting name="lazyLoadingEnabled" value="true"/>

  <setting name="multipleResultSetsEnabled" value="true"/>

</settings>
<settings>节点的解析过程:<settings>属性的解析过程和 <properties>属性的解析过程极为类似,这里不再赘述。最终,所有的setting属性都被存储在Configuration对象中。
2.3.2.3 <typeAliases>属性的解析过程
<typeAliases>属性的定义方式有如下两种:
方式1:
<typeAliases>

  <typeAlias alias="Author" type="domain.blog.Author"/>

  <typeAlias alias="Blog" type="domain.blog.Blog"/>

</typeAliases>
方式2:
<typeAliases>

  <package name="domain.blog"/>

</typeAliases>
采用这种方式时,MyBatis会为指定包下的所有类起一个别名,该别名为首字母小写的类名。
<typeAliases>节点的解析过程如下:
private void typeAliasesElement(XNode parent) {

  if (parent != null) {

    // 遍历<typeAliases>下的所有子节点

    for (XNode child : parent.getChildren()) {

      // 若当前结点为<package>

      if ("package".equals(child.getName())) {

        // 获取<package>上的name属性(包名)

        String typeAliasPackage = child.getStringAttribute("name");

        // 为该包下的所有类起个别名,并注册进configuration的typeAliasRegistry中

        configuration.getTypeAliasRegistry().registerAliases(typeAliasPackage);

      }

      // 如果当前结点为< typeAlias >

      else {

        // 获取alias和type属性

        String alias = child.getStringAttribute("alias");

        String type = child.getStringAttribute("type");

        // 注册进configuration的typeAliasRegistry中

        try {

          Class<?> clazz = Resources.classForName(type);

          if (alias == null) {

            typeAliasRegistry.registerAlias(clazz);

          } else {

            typeAliasRegistry.registerAlias(alias, clazz);

          }

        } catch (ClassNotFoundException e) {

          throw new BuilderException("Error registering typeAlias for '" + alias + "'. Cause: " + e, e);

        }

      }

    }

  }

}
如果<typeAliases>节点下定义了<package>节点,那么MyBatis会给该包下的所有类起一个别名(以类名首字母小写作为别名)
如果<typeAliases>节点下定义了<typeAlias>节点,那么MyBatis就会给指定的类起指定的别名。
这些别名都会被存入configuration的typeAliasRegistry容器中。
2.3.2.4 <mappers>节点的解析过程
<mappers>节点的定义方式有如下四种:
方式1:
<mappers>

  <package name="org.mybatis.builder"/>

</mappers>
方式2:
<mappers>

  <mapper resource="org/mybatis/builder/AuthorMapper.xml"/>

</mappers>
方式3:
<mappers>

  <mapper url="file:///var/mappers/AuthorMapper.xml"/>

</mappers>
方式4:
<mappers>

  <mapper class="org.mybatis.builder.AuthorMapper"/>

</mappers>
<mappers>节点的解析过程如下:
private void mapperElement(XNode parent) throws Exception {

  if (parent != null) {

    // 遍历<mappers>下所有子节点

    for (XNode child : parent.getChildren()) {

      // 如果当前节点为<package>

      if ("package".equals(child.getName())) {

        // 获取<package>的name属性(该属性值为mapper class所在的包名)

        String mapperPackage = child.getStringAttribute("name");

        // 将该包下的所有Mapper Class注册到configuration的mapperRegistry容器中

        configuration.addMappers(mapperPackage);

      }

      // 如果当前节点为<mapper>

      else {

        // 依次获取resource、url、class属性

        String resource = child.getStringAttribute("resource");

        String url = child.getStringAttribute("url");

        String mapperClass = child.getStringAttribute("class");

        // 解析resource属性(Mapper.xml文件的路径)

        if (resource != null && url == null && mapperClass == null) {

          ErrorContext.instance().resource(resource);

          // 将Mapper.xml文件解析成输入流

          InputStream inputStream = Resources.getResourceAsStream(resource);

          // 使用XMLMapperBuilder解析Mapper.xml,并将Mapper Class注册进configuration对象的mapperRegistry容器中

          XMLMapperBuilder mapperParser = new XMLMapperBuilder(inputStream, configuration, resource, configuration.getSqlFragments());

          mapperParser.parse();

        }

        // 解析url属性(Mapper.xml文件的路径)

        else if (resource == null && url != null && mapperClass == null) {

          ErrorContext.instance().resource(url);

          InputStream inputStream = Resources.getUrlAsStream(url);

          XMLMapperBuilder mapperParser = new XMLMapperBuilder(inputStream, configuration, url, configuration.getSqlFragments());

          mapperParser.parse();

        }

        // 解析class属性(Mapper Class的全限定名)

        else if (resource == null && url == null && mapperClass != null) {

          // 将Mapper Class的权限定名转化成Class对象

          Class<?> mapperInterface = Resources.classForName(mapperClass);

          // 注册进configuration对象的mapperRegistry容器中

          configuration.addMapper(mapperInterface);

        } else {

          throw new BuilderException("A mapper element may only specify a url, resource or class, but not more than one.");

        }

      }

    }

  }

}
MyBatis会遍历<mappers>下所有的子节点,如果当前遍历到的节点是<package>,则MyBatis会将该包下的所有Mapper Class注册到configuration的mapperRegistry容器中。
如果当前节点为<mapper>,则会依次获取resource、url、class属性,解析映射文件,并将映射文件对应的Mapper Class注册到configuration的mapperRegistry容器中。
其中,<mapper>节点的解析过程如下:
XMLMapperBuilder mapperParser = new XMLMapperBuilder(inputStream, configuration, resource, configuration.getSqlFragments());

mapperParser.parse();
在解析前,首先需要创建XMLMapperBuilder,创建过程如下:
private XMLMapperBuilder(XPathParser parser, Configuration configuration, String resource, Map<String, XNode> sqlFragments) {

  // 将configuration赋给BaseBuilder

  super(configuration);

  // 创建MapperBuilderAssistant对象(该对象为MapperBuilder的协助者)

  this.builderAssistant = new  MapperBuilderAssistant(configuration, resource);

  this.parser = parser;

  this.sqlFragments = sqlFragments;

  this.resource = resource;

}
首先会初始化父类BaseBuilder,并将configuration赋给BaseBuilder;
然后创建MapperBuilderAssistant对象,该对象为XMLMapperBuilder的协助者,用来协助XMLMapperBuilder完成一些解析映射文件的动作。
当有了XMLMapperBuilder后,便可进入解析<mapper>的过程:
public void parse() {

  // 若当前的Mapper.xml尚未被解析,则开始解析

  // PS:若<mappers>节点下有相同的<mapper>节点,那么就无需再次解析了

  if (!configuration.isResourceLoaded(resource)) {

    // 解析<mapper>节点

    configurationElement(parser.evalNode("/mapper"));

    // 将该Mapper.xml添加至configuration的LoadedResource容器中,下回无需再解析

    configuration.addLoadedResource(resource);

    // 将该Mapper.xml对应的Mapper Class注册进configuration的mapperRegistry容器中

    bindMapperForNamespace();

  }

  parsePendingResultMaps();

  parsePendingCacheRefs();

  parsePendingStatements();

}
configurationElement函数
private void configurationElement(XNode context) {

try {

  // 获取<mapper>节点上的namespace属性,该属性必须存在,表示当前映射文件对应的Mapper Class是谁

  String namespace = context.getStringAttribute("namespace");

  if (namespace == null || namespace.equals("")) {

    throw new BuilderException("Mapper's namespace cannot be empty");

  }

  // 将namespace属性值赋给builderAssistant

  builderAssistant.setCurrentNamespace(namespace);

  // 解析<cache-ref>节点

  cacheRefElement(context.evalNode("cache-ref"));

  // 解析<cache>节点

  cacheElement(context.evalNode("cache"));

  // 解析<parameterMap>节点

  parameterMapElement(context.evalNodes("/mapper/parameterMap"));

  // 解析<resultMap>节点

  resultMapElements(context.evalNodes("/mapper/resultMap"));

  // 解析<sql>节点

  sqlElement(context.evalNodes("/mapper/sql"));

  // 解析sql语句

  buildStatementFromContext(context.evalNodes("select|insert|update|delete"));

} catch (Exception e) {

  throw new BuilderException("Error parsing Mapper XML. Cause: " + e, e);

}

}
resultMapElements函数
该函数用于解析映射文件中所有的<resultMap>节点,这些节点会被解析成ResultMap对象,存储在Configuration对象的resultMaps容器中。
<resultMap>节点定义如下:
<resultMap id="userResultMap" type="User">

  <constructor>

     <idArg column="id" javaType="int"/>

     <arg column="username" javaType="String"/>

  </constructor>

  <result property="username" column="user_name"/>

  <result property="password" column="hashed_password"/>

</resultMap>
<resultMap>节点的解析过程:
private ResultMap resultMapElement(XNode resultMapNode, List<ResultMapping> additionalResultMappings) throws Exception {

  ErrorContext.instance().activity("processing " + resultMapNode.getValueBasedIdentifier());

  // 获取<ResultMap>上的id属性

  String id = resultMapNode.getStringAttribute("id",

    resultMapNode.getValueBasedIdentifier());

  // 获取<ResultMap>上的type属性(即resultMap的返回值类型)

  String type = resultMapNode.getStringAttribute("type",

    resultMapNode.getStringAttribute("ofType",

        resultMapNode.getStringAttribute("resultType",

            resultMapNode.getStringAttribute("javaType"))));

  // 获取extends属性

  String extend = resultMapNode.getStringAttribute("extends");

  // 获取autoMapping属性

  Boolean autoMapping = resultMapNode.getBooleanAttribute("autoMapping");

  // 将resultMap的返回值类型转换成Class对象

  Class<?> typeClass = resolveClass(type);

  Discriminator discriminator = null;

  // resultMappings用于存储<resultMap>下所有的子节点

  List<ResultMapping> resultMappings = new ArrayList<ResultMapping>();

  resultMappings.addAll(additionalResultMappings);

  // 获取并遍历<resultMap>下所有的子节点

  List<XNode> resultChildren = resultMapNode.getChildren();

  for (XNode resultChild : resultChildren) {

    // 若当前节点为<constructor>,则将它的子节点们添加到resultMappings中去

    if ("constructor".equals(resultChild.getName())) {

      processConstructorElement(resultChild, typeClass, resultMappings);

    }

    // 若当前节点为<discriminator>,则进行条件判断,并将命中的子节点添加到resultMappings中去

    else if ("discriminator".equals(resultChild.getName())) {

      discriminator = processDiscriminatorElement(resultChild, typeClass, resultMappings);

    }

    // 若当前节点为<result>、<association>、<collection>,则将其添加到resultMappings中去

    else {

      // PS:flags仅用于区分当前节点是否是<id>或<idArg>,因为这两个节点的属性名为name,而其他节点的属性名为property

      List<ResultFlag> flags = new ArrayList<ResultFlag>();

      if ("id".equals(resultChild.getName())) {

        flags.add(ResultFlag.ID);

      }

      resultMappings.add(buildResultMappingFromContext(resultChild, typeClass, flags));

    }

  }

  // ResultMapResolver的作用是生成ResultMap对象,并将其加入到Configuration对象的resultMaps容器中(具体过程见下)

  ResultMapResolver resultMapResolver = new ResultMapResolver(builderAssistant, id, typeClass, extend, discriminator, resultMappings, autoMapping);

  try {

    return resultMapResolver.resolve();

  } catch (IncompleteElementException  e) {

    configuration.addIncompleteResultMap(resultMapResolver);

    throw e;

  }

}
ResultMapResolver这个类很纯粹,有且仅有一个函数resolve,用于构造ResultMap对象,并将其存入Configuration对象的resultMaps容器中;而这个过程是借助于MapperBuilderAssistant.addResultMap完成的。
public ResultMap resolve() {

  return assistant.addResultMap(this.id, this.type, this.extend,  this.discriminator, this.resultMappings, this.autoMapping);

}
sqlElement函数
该函数用于解析映射文件中所有的<sql>节点,并将这些节点存储在当前映射文件所对应的XMLMapperBuilder对象的sqlFragments容器中,供解析sql语句时使用。
<sql id="userColumns"> ${alias}.id,${alias}.username,${alias}.password </sql>
buildStatementFromContext函数
该函数会将映射文件中的sql语句解析成MappedStatement对象,并存在configuration的mappedStatements。
2.3.3 创建SqlSessionFactory对象
public SqlSessionFactory build(InputStream inputStream, String environment, Properties properties) {

  try {

    XMLConfigBuilder parser = new XMLConfigBuilder(inputStream, environment, properties);

    return build(parser.parse());

  } catch (Exception e) {

    throw ExceptionFactory.wrapException("Error building SqlSession.", e);

  } finally {

    ErrorContext.instance().reset();

    try {

      inputStream.close();

    } catch (IOException e) {

      // Intentionally ignore. Prefer previous error.

    }

  }

}
SqlSessionFactory的build函数,刚才说了半天,介绍了XMLConfigBuilder解析映射文件的过程,解析完成之后parser.parse()函数会返回一个包含了映射文件解析结果的configuration对象,紧接着,这个对象将作为参数传递给另一个build函数,如下:public SqlSessionFactory build(Configuration config) {
return new DefaultSqlSessionFactory(config);
}
这个函数将configuration作为参数,创建了DefaultSqlSessionFactory对象。DefaultSqlSessionFactory是接口SqlSessionFactory的一个实现类,SqlSessionFactory的体系结构如下图所示:
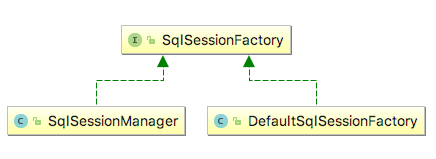
此时,SqlSessionFactory创建完毕!
转自:https://blog.csdn.net/u010425776/article/details/78207890
MyBatis初始化的更多相关文章
- MyBatis源码分析-MyBatis初始化流程
MyBatis 是支持定制化 SQL.存储过程以及高级映射的优秀的持久层框架.MyBatis 避免了几乎所有的 JDBC 代码和手动设置参数以及获取结果集.MyBatis 可以对配置和原生Map使用简 ...
- 《深入理解mybatis原理》 Mybatis初始化机制具体解释
对于不论什么框架而言.在使用前都要进行一系列的初始化,MyBatis也不例外. 本章将通过下面几点具体介绍MyBatis的初始化过程. 1.MyBatis的初始化做了什么 2. MyBatis基于XM ...
- mybatis初始化过程
mybatis初始化如下: //加载配置文件InputStream resourceAsStream = Resources.getResourceAsStream("testMybatis ...
- 如何完美回答面试官问的Mybatis初始化原理!!!
前言 对于任何框架而言,在使用前都要进行一系列的初始化,MyBatis也不例外.本章将通过以下几点详细介绍MyBatis的初始化过程. MyBatis的初始化做了什么 MyBatis基于XML配置文件 ...
- 深入理解mybatis原理, Mybatis初始化SqlSessionFactory机制详解(转)
文章转自http://blog.csdn.net/l454822901/article/details/51829785 对于任何框架而言,在使用前都要进行一系列的初始化,MyBatis也不例外.本章 ...
- 《深入理解mybatis原理2》 Mybatis初始化机制详解
<深入理解mybatis原理> Mybatis初始化机制详解 对于任何框架而言,在使用前都要进行一系列的初始化,MyBatis也不例外.本章将通过以下几点详细介绍MyBatis的初始化过程 ...
- 《深入理解mybatis原理》 Mybatis初始化机制详解
对于任何框架而言,在使用前都要进行一系列的初始化,MyBatis也不例外.本章将通过以下几点详细介绍MyBatis的初始化过程. 1.MyBatis的初始化做了什么 2. MyBatis基于XML配置 ...
- mybatis深入理解(一)-----Mybatis初始化机制详解
对于任何框架而言,在使用前都要进行一系列的初始化,MyBatis也不例外.本章将通过以下几点详细介绍MyBatis的初始化过程. 一. MyBatis的初始化做了什么 1.configuration ...
- 精尽 MyBatis 源码分析 - MyBatis 初始化(一)之加载 mybatis-config.xml
该系列文档是本人在学习 Mybatis 的源码过程中总结下来的,可能对读者不太友好,请结合我的源码注释(Mybatis源码分析 GitHub 地址.Mybatis-Spring 源码分析 GitHub ...
随机推荐
- Elasticsearch 三种分页方式
from + size 浅分页 "浅"分页可以理解为简单意义上的分页.它的原理很简单,就是查询前20条数据,然后截断前10条,只返回10-20的数据.这样其实白白浪费了前10条的查 ...
- HDU——T1231 最大连续子序列
http://acm.hdu.edu.cn/showproblem.php?pid=1231 Problem Description 给定K个整数的序列{ N1, N2, ..., NK },其任意连 ...
- iterator遍历list理解
1.iterator的next()方法返回值,就是你指定的iiterator<>泛型.所以你再强制转换,就可以得到list里的item了,直接是item对象了. 2.list这东西,你ne ...
- [C++设计模式] strategy 策略模式
依照陈硕老师的观点.c++里有面向过程编程.面向对象编程,基于对象编程(面向接口编程)和泛型编程.四种思路都各有其适用场景. 面向过程编程是沿袭C的结构化编程思路,OOP是C++的核心,也是现代高级编 ...
- AngularJS 下拉列表demo
<!DOCTYPE html> <html> <head> <meta charset="utf-8"> <script sr ...
- 两个TableView产生联动的一中方法
如何使用两个TableView产生联动:将两个tableView的滚动事件禁止掉,最外层scrollView滚动时将两个TableView跟着滚动,并且更改contentOffset,这样产生效果滚动 ...
- python中is与==的差别
# is:比较的是两个对象的id值是否相等,# 也就是比较俩对象是否为同一个实例对象,# 是否指向同一个内存地址 # s = "alex"# abc = id(s) # 得到内存地 ...
- form&input
<form action="http://www.baidu.com" method="post" autocomplete="on" ...
- SQL like查询条件中的通配符处理
1. SQL like对时间查询的处理方法 SQL数据表中有savetime(smalldatetime类型)字段,表中有两条记录,savetime值为:2005-3-8 12:12:00和2005- ...
- HDU 1052 Tian Ji -- The Horse Racing【贪心在动态规划中的运用】
算法分析: 这个问题很显然可以转化成一个二分图最佳匹配的问题.把田忌的马放左边,把齐王的马放右边.田忌的马A和齐王的B之间,如果田忌的马胜,则连一条权为200的边:如果平局,则连一条权为0的边:如果输 ...