RabbitMQ学习笔记(3)----RabbitMQ Worker的使用
1. Woker队列结构图
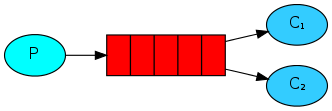
这里表示一个生产者生产了消息发送到队列中,但是确有两个消费者在消费同一个队列中的消息。
2. 创建一个生产者
Producer如下:
package com.wangx.rabbitmq.worker;

import com.rabbitmq.client.Channel;

import com.rabbitmq.client.Connection;

import com.rabbitmq.client.ConnectionFactory;

import java.io.IOException;

import java.util.concurrent.TimeoutException;

public class Producer {

    /**

     * 队列名字

     */

    private static final String QUEUE_NAME = "worker-queue";

    public static void main(String[] args) throws IOException, TimeoutException {

        //创建连接工厂

        ConnectionFactory factory = new ConnectionFactory();

        //设置服务器主机

        factory.setHost("127.0.0.1");

        //设置用户名

        factory.setUsername("wangx");

        //设置密码

        factory.setPassword("wangx");

        //设置VirtualHost

        factory.setVirtualHost("/wangx");

        Connection connection = null;

        Channel channel = null;

        try {

            //创建连接

            connection = factory.newConnection();

            //创建消息通道

            channel = connection.createChannel();

            //声明队列

            channel.queueDeclare(QUEUE_NAME, false, false, false, null);

            String message = "Hello World!";

            //发送消息

            for (int i = 0; i < 10; i++) {

                //发送消息

                channel.basicPublish("", QUEUE_NAME, null, (message + i).getBytes());

                System.out.println(" [x] Sent '" + message + i + "'");

            }

        }catch (Exception e) {

            e.printStackTrace();

        } finally {

            channel.close();

            connection.close();

        }

    }

}
这里同时向队列发送了十条消息。
3. 创建两个消费者
Consumer1如下:
package com.wangx.rabbitmq.worker;

import com.rabbitmq.client.*;

import java.io.IOException;

import java.util.concurrent.TimeoutException;

public class Consumer1 {

    /**

     * 队列名字

     */

    private static final String QUEUE_NAME = "worker-queue";

    public static void main(String[] args) throws IOException, TimeoutException {

        //创建连接工厂

        ConnectionFactory factory = new ConnectionFactory();

        //设置服务器主机

        factory.setHost("localhost");

        //设置用户

        factory.setUsername("wangx");

        //设置密码

        factory.setPassword("wangx");

        //设置VirtualHost

        factory.setVirtualHost("/wangx");

        Connection connection = null;

        try {

            //创建连接

            connection = factory.newConnection();

            //创建消息通道

            final Channel  channel = connection.createChannel();

            //声明队列

            channel.queueDeclare(QUEUE_NAME, false, false, false, null);

//            channel.basicQos(1);

            Consumer consumer = new DefaultConsumer(channel){

                //重写DefaultConsumer中handleDelivery方法,在方法中获取消息

                @Override

                public void handleDelivery(String consumerTag, Envelope envelope,

                                           AMQP.BasicProperties properties, byte[] body) throws IOException{

                    try {

                        //消息沉睡一秒

                        Thread.sleep(1000);

                        String message = new String(body, "UTF-8");

                        System.out.println("consumer1 收到消息 '" + message + "'");

                    } catch (InterruptedException e) {

                        e.printStackTrace();

                    }finally {

                        System.out.println("consumer1 消息消费完成....");

                        channel.basicAck(envelope.getDeliveryTag(),false);

                    }

                }

            };

            //监听消息

            channel.basicConsume(QUEUE_NAME, false,consumer);

        }catch (Exception e) {

            e.printStackTrace();

        }finally {

        }

    }

}
Consumer2
package com.wangx.rabbitmq.worker;

import com.rabbitmq.client.*;

import java.io.IOException;

import java.util.concurrent.TimeoutException;

public class Consumer2 {

    /**

     * 队列名字

     */

    private static final String QUEUE_NAME = "worker-queue";

    public static void main(String[] args) throws IOException, TimeoutException {

        //创建连接工厂

        ConnectionFactory factory = new ConnectionFactory();

        //设置服务器主机

        factory.setHost("localhost");

        //设置用户

        factory.setUsername("wangx");

        //设置密码

        factory.setPassword("wangx");

        //设置VirtualHost

        factory.setVirtualHost("/wangx");

        Connection connection = null;

        try {

            //创建连接

            connection = factory.newConnection();

            //创建消息通道

            final Channel  channel = connection.createChannel();

//            channel.basicQos(1);

            //声明队列

            channel.queueDeclare(QUEUE_NAME, false, false, false, null);

            Consumer consumer = new DefaultConsumer(channel){

                //重写DefaultConsumer中handleDelivery方法,在方法中获取消息

                @Override

                public void handleDelivery(String consumerTag, Envelope envelope,

                                           AMQP.BasicProperties properties, byte[] body) throws IOException{

                    try {

                        //消息沉睡100ms

                        Thread.sleep(100);

                        String message = new String(body, "UTF-8");

                        System.out.println("consumer2 收到消息 '" + message + "'");

                    } catch (InterruptedException e) {

                        e.printStackTrace();

                    }finally {

                        System.out.println("consumer2 消息消费完成....");

                        channel.basicAck(envelope.getDeliveryTag(),false);

                    }

                }

            };

            //监听消息

            channel.basicConsume(QUEUE_NAME, false,consumer);

        }catch (Exception e) {

            e.printStackTrace();

        }finally {

        }

    }

}
可以看到consumer1在消息处理的过程中,沉睡了1s,而consumer2沉睡了100ms,以前面的mq的惯性来说,应该是沉睡时间少的消费多一些消息,但是我们来看控制台:
Consumer1:

consumer1 收到消息 'Hello World!0'

consumer1 消息消费完成....

consumer1 收到消息 'Hello World!2'

consumer1 消息消费完成....

consumer1 收到消息 'Hello World!4'

consumer1 消息消费完成....

consumer1 收到消息 'Hello World!6'

consumer1 消息消费完成....

consumer1 收到消息 'Hello World!8'

consumer1 消息消费完成....

Consumer2:

consumer2 收到消息 'Hello World!1'

consumer2 消息消费完成....

consumer2 收到消息 'Hello World!3'

consumer2 消息消费完成....

consumer2 收到消息 'Hello World!5'

consumer2 消息消费完成....

consumer2 收到消息 'Hello World!7'

consumer2 消息消费完成....

consumer2 收到消息 'Hello World!9'

consumer2 消息消费完成....
可以看消息的消费是平均分发的,一个消费奇数,一个偶数消息。但是有时候我们并不希望说消息平均消费,而是让消费快的多消费,慢的少消费。
4. "能者多劳"模式
”能者多劳“即是消费速度快的消费者消费更多的消息,速度慢的消费少的消息。
使用这种模式只需要设置消费者的channel的basicQos即可。
如下:
channel.basicQos(1);表示消息服务器每次只向消费分发一条消息。可以设置多条,只需要在任意的消费者中设置就对所有consumer生效。
控制台打印结果:
Consumer1:

consumer1 收到消息 'Hello World!1'

consumer1 消息消费完成....

Consumer2:

consumer2 收到消息 'Hello World!0'

consumer2 消息消费完成....

consumer2 收到消息 'Hello World!2'

consumer2 消息消费完成....

consumer2 收到消息 'Hello World!3'

consumer2 消息消费完成....

consumer2 收到消息 'Hello World!4'

consumer2 消息消费完成....

consumer2 收到消息 'Hello World!5'

consumer2 消息消费完成....

consumer2 收到消息 'Hello World!6'

consumer2 消息消费完成....

consumer2 收到消息 'Hello World!7'

consumer2 消息消费完成....

consumer2 收到消息 'Hello World!8'

consumer2 消息消费完成....

consumer2 收到消息 'Hello World!9'

consumer2 消息消费完成....
此时Consumer1才消费了1条,Consumer2消费 了其余的九条,这就是”能者多劳“模式的体现。
5. 消息的确认模式
消费者从队列中获取消息,服务端是如何知道消息已经被消费完成了呢?
模式1:自动确认
只要消息从队列中被获取,无论消费者取到消息后是否成功消费消息,都认为消息已经成功消费。
使用方式为:将channel.basicConsume();方法的第二个参数设置为true,如下:
channel.basicConsume(QUEUE_NAME, true,consumer);
模式2: 手动确认模式
消费者从队列中获取消息之后,服务器会将该消息标记为不可用状态,等待消费者的反馈,如果消费者一直没有反馈,那么该消息将一直处于不可用状态。
使用方式为:将channel.basicConsume();方法的第二个参数设置为true,如下:
channel.basicConsume(QUEUE_NAME, false,consumer);
然后在消息的DefaultConsumer.handleDelivery中使用channel.basicAck();方法在消息消费完成时通知服务端消费已经完成。如下:
channel.basicAck(envelope.getDeliveryTag(),false);
RabbitMQ学习笔记(3)----RabbitMQ Worker的使用的更多相关文章
- [RabbitMQ学习笔记] - 初识RabbitMQ
RabbitMQ是一个由erlang开发的AMQP的开源实现. 核心概念 Message 消息,消息是不具名的,它由消息头和消息体组成,消息体是不透明的,而消息头则由 一系列的可选属性组成,这些属性包 ...
- RabbitMQ学习笔记(五) Topic
更多的问题 Direct Exchange帮助我们解决了分类发布与订阅消息的问题,但是Direct Exchange的问题是,它所使用的routingKey是一个简单字符串,这决定了它只能按照一个条件 ...
- RabbitMQ学习笔记1-hello world
安装过程略过,一搜一大把. rabbitmq管理控制台:http://localhost:15672/ 默认账户:guest/guest RabbitMQ默认监听端口:5672 JAVA API地 ...
- (转) Rabbitmq学习笔记
详见原文: http://blog.csdn.net/shatty/article/details/9529463 Rabbitmq学习笔记
- 官网英文版学习——RabbitMQ学习笔记(十)RabbitMQ集群
在第二节我们进行了RabbitMQ的安装,现在我们就RabbitMQ进行集群的搭建进行学习,参考官网地址是:http://www.rabbitmq.com/clustering.html 首先我们来看 ...
- 官网英文版学习——RabbitMQ学习笔记(一)认识RabbitMQ
鉴于目前中文的RabbitMQ教程很缺,本博主虽然买了一本rabbitMQ的书,遗憾的是该书的代码用的不是java语言,看起来也有些不爽,且网友们不同人学习所写不同,本博主看的有些地方不太理想,为此本 ...
- RabbitMQ学习笔记五:RabbitMQ之优先级消息队列
RabbitMQ优先级队列注意点: 1.只有当消费者不足,不能及时进行消费的情况下,优先级队列才会生效 2.RabbitMQ3.5以后才支持优先级队列 代码在博客:RabbitMQ学习笔记三:Java ...
- 官网英文版学习——RabbitMQ学习笔记(八)Remote procedure call (RPC)
在第四篇学习笔记中,我们学习了如何使用工作队列在多个工作者之间分配耗时的任务. 但是,如果我们需要在远程计算机上运行一个函数并等待结果呢?这是另一回事.这种模式通常称为远程过程调用或RPC. ...
- 消息队列——RabbitMQ学习笔记
消息队列--RabbitMQ学习笔记 1. 写在前面 昨天简单学习了一个消息队列项目--RabbitMQ,今天趁热打铁,将学到的东西记录下来. 学习的资料主要是官网给出的6个基本的消息发送/接收模型, ...
- RabbitMQ学习笔记(六) RPC
什么RPC? 这一段是从度娘摘抄的. RPC(Remote Procedure Call Protocol)——远程过程调用协议,它是一种通过网络从远程计算机程序上请求服务,而不需要了解底层网络技术的 ...
随机推荐
- 与PhotoZoom Classic 6相比,Classic 7新增了哪些?
PhotoZoom Classic 6凭借屡获殊荣的S-Spline XL的专利技术,以清晰和锐利的方式调整照片大小非常简单快捷甚至可以放大和改善互联网上的照片. PhotoZoom Classic ...
- 面试题-mysql
Sql :UPDATE test SET sex = CASE sex WHEN 'm' THEN 'f' ELSE 'm' END;
- rabbitmq基本原理(转载)
Rabbitmq基本原理(转载) MQ全称为Message Queue, 是一种分布式应用程序的的通信方法,它是消费-生产者模型的一个典型的代表,producer往消息队列中不断写入消息,而另一端co ...
- Java将数据以Excel文件形式导出后台代码实现
下面代码实现所需jar包: tomcat-embed-core-8.5.11.jar: commons-lang3-3.0.1.jar: commons-io-2.5.jar: poi-3.9.jar ...
- Python爬虫1-----urllib模块
1.加载urllib模块的request from urllib import request 2.相关函数: (1)urlopen函数:读取网页 webpage=request.urlopen(ur ...
- 内核如何检测SOFT LOCKUP与HARD LOCKUP?
内核如何检测SOFT LOCKUP与HARD LOCKUP? From article 所谓lockup,是指某段内核代码占着CPU不放.Lockup严重的情况下会导致整个系统失去响应.Lockup有 ...
- Ajax技术实战操练课堂学习笔记
ajax是什么 ? ajax(asynchronouse javascript and xml) 异步的javascript 和 xml 是7种技术的综合,它包含了七个技术( javascript x ...
- vim+astyle安装使用
astyle下载安装 wget https://sourceforge.net/projects/astyle/files/astyle/astyle%203.1/astyle_3.1_linux.t ...
- Django 中Admin站点的配置
Admin站点是django提供的一个后台管理页面,可以用来对用户与数据库表数据进行管理. Admin站点配置流程 1.在settings.py文件中INSTALL_APPS列表中添加django.c ...
- GOF23设计模式之建造者模式
GOF23设计模式之建造者模式 场景: 我们要建造一个复杂的产品.比如:神州飞船,Iphone.这个复杂的产品的创建.有这样的一个问题需要处理: 装配这些子组件是不是有个步骤问题? 实际开发中,我们所 ...