MySQL:记录的增删改查、单表查询、约束条件、多表查询、连表、子查询、pymysql模块、MySQL内置功能
数据操作
插入数据(记录): 用insert;
补充:插入查询结果: insert into 表名(字段1,字段2,...字段n) select (字段1,字段2,...字段n) where ...;
更新数据update
语法: update 表名 set 字段1=值1,字段2=值2 where condition;
删除数据delete:delete from 表名 where condition;
查询数据select:
单表查询:
语法:
 select distinct 字段1,字段2... from 表名

            where 条件

            group by field

            having 筛选

            order by field

            limit 限制条数;
关键字的执行优先级:
from

where

group by

having

select

distinct

order by

limit

# 1.找到表:from
# 2.通过where指定的约束条件,去文件/表中取出一条条记录
# 3.将取出的一条条记录进程分组 group by,如果没有group by,则整体作为一组
# 4.将分组的结果进行having过滤
# 5.执行 select
# 6.去重
# 7.将结果按顺序排序:order by
# 8.限制结果的显示条数
简单查询:
#创建表

create table employee(

id int not null unique auto_increment,

name varchar(20) not null,

sex enum('male','female') not null default 'male',  # 大部分是男的

age int(3) unsigned not null default 28,

hire_date date not null,

post varchar(50),

post_comment varchar(100),

salary double(15,2),

office int,

depart_id int

);
#插入记录

#三个部门:教学,销售,运营

insert into employee(name,sex,age,hire_date,post,salary,office,depart_id) values

('egon','male',18,'','老男孩驻沙河办事处外交大使',7300.33,401,1),

('alex','male',78,'','teacher',1000000.31,401,1),

('wupeiqi','male',81,'','teacher',8300,401,1),

('yuanhao','male',73,'','teacher',3500,401,1),

('liwenzhou','male',28,'','teacher',2100,401,1),

('jingliyang','female',18,'','teacher',9000,401,1),

('jinxin','male',18,'','teacher',30000,401,1),

('成龙','male',48,'','teacher',10000,401,1),

('歪歪','female',48,'','sale',3000.13,402,2),

('丫丫','female',38,'','sale',2000.35,402,2),

('丁丁','female',18,'','sale',1000.37,402,2),

('星星','female',18,'','sale',3000.29,402,2),

('格格','female',28,'','sale',4000.33,402,2),

('张野','male',28,'','operation',10000.13,403,3),

('程咬金','male',18,'','operation',20000,403,3),

('程咬银','female',18,'','operation',19000,403,3),

('程咬铜','male',18,'','operation',18000,403,3),

('程咬铁','female',18,'','operation',17000,403,3)

;
查询操作:
# 避免重复 distinct

select distinct post from employee;

# 通过四则运算查询

select name,salary*12 from employee;

select name,salary*12 as Annual_salary from employee;

select name,salary*12 Annual_salary from employee;  # as Annual_salary是给 salary*12 起了一个别名;as 可省略

# 定义显示格式 (只是改变了显示格式,不会改变数据在数据库的保存格式)

   concat() 函数用于链接字符串

select concat("员工号:",id,",","姓名:",name) as info,concat("年薪:",salary*12) as annual_salary from employee;

   concat_ws()  # 第一个参数可以作为分隔符

select concat_ws(":",name,salary*12) as annual_salary from employee;
where约束:
where语句中可以使用:

    1. 比较运算符:>、<、>=、<=、 !=、( <>也表示不等于)

    2. between 10 and 20   # 值在10到20之间

    3. in(80,90,100)  # 值是80或90或100

    4. like "neo%"

            pattern可以是%或_,

            %表示任意个任意字符

            _表示一个任意字符

    5. 逻辑运算符:在多个条件直接可以使用逻辑运算符 and, or, not
主要用法:
where约束:
# 单条件查询:

select name from employee where post="sale";

# 多条件查询:

select name,salary from employee where post="teacher" and salary>10000;

# 关键字between and

select name,salary from employee where salary between 10000 and 20000;

select name,salary from employee where salary not between 10000 and 20000;

# 关键字 is Null:(判断某个字段是否为NULL不能用等号,要用is)

select name,post_comment from employee where post_comment is Null;

select name,post_comment from employee where post_comment is not Null;
# MySQL中,空字符串不等于 NULL,NULL是单独的数据类型;判断Null的时候必须用 is,如: where id is Null;

# 关键字in集合查询:

select name,salary from employee where salary in (3000,4000,9000);

select name,salary from employee where salary not in (3000,4000,9000);

# 关键字like模糊查询:

通配符:%

select * from employee where name like "eg%";

通配符:_

select * from employee where name like "ale_";
分组查询:group by
# 分组发生在where之后,即分组是基于where之后得到的记录而进行的

# 分组指的是将所有记录按照某个相同字段进行归类,比如针对员工信息表的职位分组,或者按照性别进行分组等
ONLY_FULL_GROUP_BY
# 查看MySQL 5.7默认的sql_mode如下:

mysql> select @@global.sql_mode;

#ONLY_FULL_GROUP_BY,STRICT_TRANS_TABLES,NO_ZERO_IN_DATE,NO_ZERO_DATE,ERROR_FOR_DIVISION_BY_ZERO,NO_AUTO_CREATE_USER,NO_ENGINE_SUBSTITUTION

# 如果不设置ONLY_FULL_GROUP_BY,select的查询结果默认值是组内的第一条记录,这样显然是没有意义的;

# 设置 ONLY_FULL_GROUP_BY模式:

set global sql_mode="ONLY_FULL_GROUP_BY";

# 注意: ONLY_FULL_GROUP_BY 的语义就是确定 select target list中的多有的值都是明确语义,简单来说,在ONLY_FULL_GROUP_BY模式下,target list中的值要么来自聚合函数的结果,要么来自 group by list中的表达式的值(group_concat)

# 去掉ONLY_FULL_GROUP_BY模式的设置方法:

mysql> set global sql_mode='STRICT_TRANS_TABLES,NO_ZERO_IN_DATE,NO_ZERO_DATE,ERROR_FOR_DIVISION_BY_ZERO,NO_AUTO_CREATE_USER,NO_ENGINE_SUBSTITUTION';
聚合函数
# 聚合函数聚合的是组的内容;如果没有进行 group by分组,则默认所以记录是一组,所以此时也能用聚合函数

max()

min()

avg()

sum()

count()
示例:
select post,count(id) from employee group by post; # 只能查看分组依据的字段和使用聚合函数

# 注意:我们按照post字段分组,那么select查询的字段只能是post,想要获取组内的其他相关信息,需要借助函数

# group by关键字和 group_concat() 函数一起使用

select post,group_concat(name) as emp_members from employee group by post;  # 按照岗位分组,并查看组内成员名

# group by和聚合函数一起使用

select post,avg(salary) as average_salary from employee group by post; # 按照岗位分组,并查看每个组的平均工资

# 没有分组的聚合函数:

select count(*) from employee;

select avg(salary) from employee;
另外:如果我们用unique的字段作为分组的依据,则每条记录自成一组,这种分组也就没了意义;多条记录之间的某个字段值相同,该字段通常用来作为分组的依据
having过滤:
# having和where不一样的地方:

# 1. 执行优先级:where>group by >having

# 2. where 发生在分组 group by 之前,因而where中可以有任意字段,但是绝对不能使用聚合函数

# 3. having发生在分组group by之后,因而having中可以使用分组的字段,但却无法直接取到其他字段,其他字段需要使用聚合函数
having中也可以用where中的逻辑,例如 and,or 等;having 跟where 用法一样,只不过having是分组之后的过滤
错误用法示例:
mysql> select * from employee having salary > 100000;

ERROR 1463 (42000): Non-grouping field 'salary' is used in HAVING clause  # 报错; having前面必须要有 group by

mysql> select post,group_concat(name) from employee group by post having salary > 10000; #错误,分组后无法直接取到salary字段

ERROR 1054 (42S22): Unknown column 'salary' in 'having clause'
正确用法如下:
# 1. 查询各岗位平均薪资大于10000的岗位名、平均工资

select post,avg(salary) as average_salary from employee group by post having avg(salary) > 10000;

# 2. 查询各岗位平均薪资大于10000且小于20000的岗位名、平均工资

select post,avg(salary) as average_salary from employee group by post having avg(salary) between 10000 and 20000;

# having的用法就是英语里面的定语从句
order by排序:
select * from employee order by 字段 asc;  #升序排;默认

select * from employee order by 字段 desc;  #降序排

order by 字段1 asc,字段2 desc;  # 先按照字段1升序排,如果字段1的值相同则按照字段2降序排

e.g. select * from employee order by age asc,id desc;
执行顺序证明:
select distinct post,count(id) as emp_number from db1.employee

    where salary>1000

    group by post

    having count(id)>2  # having中的count(id)不能用 emp_number 来代替,因为是先执行 having后执行 distinct,所以此时还没有 emp_number这个东西

    order by emp_number desc  # order by 中的count(id) 可以用 emp_number来代替,因为是先执行distinct后执行的order,执行完distinct之后就已经有了 emp_number

    ;

# 所以,优先级顺序是: from > where > group by > having > distinct > order by
limit限制条数:不管是书写顺序还是执行顺序,limit都是在最后
select * from employee limit 3;  # 3是限制条数;默认初始位置为0

select * from employee limit 0,3;  # 从0开始打印3个 (不包含0)

# 工资最高的那三个人的信息:

select * from employee order by salary desc limit 3;

#  分页打印:

select * from employee limit 0,5;

select * from employee limit 5,5;

select * from employee limit 10,5;

select * from employee limit 15,5;
正则查询regexp: (regexp应该是regular expressioin的缩写吧)
# select * from employee where name regexp "^jin.*(g|n)$"; # jin开头,并且 g或者n结尾
多表查询:(本质就是连表,通过连表将多张有关系的表连接在一起,得到一张虚拟表)
先建两个表,用于下面所有的操作测试
# 建表

create table department(

id int,

name varchar(20)

);

create table employee(

id int primary key auto_increment,

name varchar(20),

sex enum('male','female') not null default 'male',

age int,

dep_id int

);

#插入数据

insert into department values

(200,'技术'),

(201,'人力资源'),

(202,'销售'),

(203,'运营');

insert into employee(name,sex,age,dep_id) values

('egon','male',18,200),

('alex','female',48,201),

('wupeiqi','male',38,201),

('yuanhao','female',28,202),

('liwenzhou','male',18,200),

('jingliyang','female',18,204)

;
连接方式:
# 1. 内连接: 只取两张表的共同部分

select * from employee inner join department on employee.dep_id = department.id;  # 表employee内连接到表department,按照表employee中dep_id字段等于表department中id字段的方式连接

# 2. 左链接:在内链接的基础上保留左表的记录

select * from employee left join department on employee.dep_id = department.id;

# 3. 右链接:在内链接的基础上保留右表的记录

select * from employee right join department on employee.dep_id = department.id;

# 4. 全外链接: 在内连接的基础上左右两表的记录都保存

select * from employee left join department on employee.dep_id = department.id union select * from employee right join department on employee.dep_id = department.id;
内连接:

左连接:
右连接:

全外连接:
多表查询示例:
笛卡尔积:
select * from employee,department;
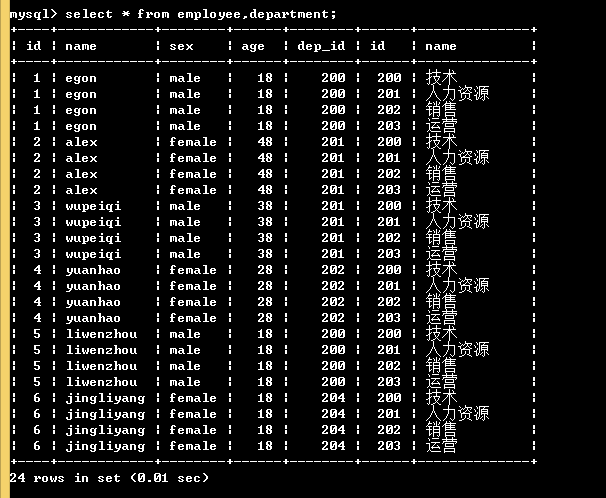
多表查询原理:
select * from employee inner join department on employee.dep_id = department.id;

# 通过这种方式能得到一个整合了表employee和表department的虚拟表

# 再对上面得到的虚拟表进行操作

select department.name,avg(age) from employee inner join department on employee.dep_id = department.id group by department.name having avg(age) > 30;

# 多表查询:把有关系的表通过连接的方式拼成一个整体(虚拟表),进而进行相应的关联查询(因为此时已经是一长表了)
SQL逻辑查询语句执行顺序:
一、SELECT语句关键字的定义顺序:
select distinct <select_list>

    from <left_table>

    <join type> join <right_table>

    on <join_condition>

    where <where_condition>

    group by <group_by_list>

    having <having_condition>

    order by <order_by_condition>

    limit <limit_number>;
二、SELECT语句关键字的执行顺序:
第一步: from <left_table>

第二步: on <join_condition>

第三步: <join_type> join  <right_table>

第四步: where <where_condition>

第五步: group by <group_by_list>

第六步: having <having_condition>

第七步: select

第八步: distinct <select_list>

第九步: order by <order_by_condition>

第十步: limit <limit_number>
具体可参考: http://www.cnblogs.com/linhaifeng/articles/7372774.html
子查询:
1. 带 in 关键字的查询:
# 查询平均年龄在25岁以上的部门名

select name from department where id in

(select dep_id from employee group by dep_id having avg(age) > 25);

# (select dep_id from employee group by dep_id having avg(age) > 25)会有一个返回值,符合过滤条件的 dep_id;where id in (select dep_id from employee group by dep_id having avg(age) > 25) 就类似于 where id in (1,2,3)

# 查看技术部员工姓名

select name from employee where dep_id =

(select id from department where name="技术");

# 查看不足一人的部门名

# 分析:不足1人就是没有人

select name from department where id not in

(select distinct dep_id from employee) ;

# (select distinct dep_id from employee) 通过去重得到有人的部门id, where id not in ...取反,即 department的id没有在有人的部门id里面
2. 带比较运算符的子查询
# 查询大于所有人平均年龄的员工名和年龄

select name,age from employee where age >

(select avg(age) from employee);

# where后面不能直接写成 where age > avg(age),因为where里面不能使用聚合函数;所以先通过 (select avg(age) from employee)拿到 avg(age)
3. 带exists关键字的子查询 (exists是用于判断是否存在的,返回的类似于bool值)
select * from employee where exists

(select id from department where name="技术");  # 如果(select id from department where name="技术")成立(存在,此时where exists语句返回True),就执行 select * from employee; 如果不存在,就不执行select * 语句
# exists也可以not 取反
select 查询语句可以用括号括起来,再用 as 起一个别名,就能当作一张表(临时表)来使用,如下:
select * from (select name,age,sex from employee) as t1;
以另外一张employee表为例说明:
# 查询每个部门最新入职的那名员工

报错:

select * from employee as t1

inner join

(select post,max(hire_date) from employee group by post) as t2

on t1.post=t2.post

where t1.hire_date=t2.max(hire_date);   # 报错原因:where中不能有聚合函数


正确:

select * from employee as t1

inner join

(select post,max(hire_date) as new_hire from employee group by post) as t2

on t1.post = t2.post

where t1.hire_date = t2.new_hire;  # 取别名后就是单纯的调用了
权限管理:略
Navicat工具:
批量加注释:ctrl+?键
批量去注释:ctrl+shift+?键
pymysql模块
pymysql基本使用:
通过pymysql模块能够在python程序中操作MySQL数据库;pymysql模块本质就是一个套接字客户端软件
import pymysql

username = input("username>>>:").strip()

password = input("password>>>:").strip()

# 建链接

conn = pymysql.connect(host="192.168.18.2",port=3306,user="root",password="",db="db4",charset="utf8")  # 得到一个链接对象; # charset中的utf8不能加 - ,因为mysql中没加

# 拿到一个游标(cursor)

cursor = conn.cursor()  # 得到一个游标对象

# 给游标提交命令,执行sql语句

sql = "select * from userinfo where username='%s' and password='%s' " %(username,password)  # sql语句中的username和password要和db4.userinfo这张表中的字段一样
print(sql)

rows = cursor.execute(sql) # 把sql语句提交给cursor去执行; #  execute() 不是执行的结果,而是受影响的行数(rows)

cursor.close()

conn.close()  # 把资源回收

# 进行判断

if rows:

    print("登录成功")

else:

    print("登录失败")
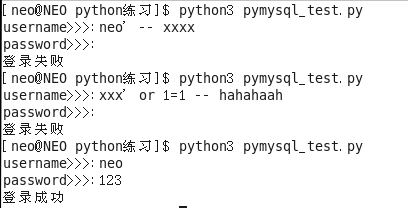
但上面的程序有一个漏洞:
# 在MySQL中, --空格 后面的内容都会被注释掉(两个横杠后面跟一个空格),所以在你的python程序中输入:

username>>>:neo' -- xxxx

不输密码,也能够成功登录
并且
# 输入:

username>>>:xxx' or 1=1 -- hahahaah

不输密码,也可以登录

解决办法:利用pymysql模块的sql注入
pymysql模块之sql注入:
import pymysql

username = input("username>>>:").strip()

password = input("password>>>:").strip()

# 建链接

conn = pymysql.connect(host="192.168.18.2",port=3306,user="root",password="",db="db4",charset="utf8")

# 拿到一个游标(cursor)

cursor = conn.cursor()  # 得到一个游标对象

# 给游标提交命令,执行sql语句

sql = “select * from userinfo where username=%s and password=%s”  # 不要自己拼接字符串,利用 pymysql的execute拼接字符串; # 占位符也不要再加引号

rows = cursor.execute(sql,(username,password))  # 第一个参数还是传入要执行的sql语句;第二个参数传入一个元组,元组里面放入sql语句里面的占位符,通过这种方式拼接字符串,能把其中的特殊字符处理掉

cursor.close()

conn.close()

# 进行判断

if rows:

    print("登录成功")

else:

    print("登录失败")
pymysql模块之增删改:
import pymysql

# 建链接

conn = pymysql.connect(host="192.168.18.2",port=3306,user="root",password="",db="db4",charset="utf8")

# 拿到游标

cursor = conn.cursor()

# 执行sql语句

# 增删改

sql = "insert userinfo(username,password) values(%s,%s)"

print(sql)

rows = cursor.execute(sql,("abc",""))

conn.commit()  # 修改的数据要生效,必须在cursor.conn关闭之前 conn.commit()

# 关闭

cursor.close()

conn.close()
插入多条记录:
# 插入多条记录

rows = cursor.executemany(sql,[("egon1",""),("egon2",""),("egon3","")])   # 利用executemany(),列表中放入多个元组
lastrowid用法:查询你即将插入的数据是从第几行开始的
import pymysql

# 建链接

conn = pymysql.connect(host="192.168.18.2",port=3306,user="root",password="",db="db4",charset="utf8")

# 拿到游标

cursor = conn.cursor()

# 执行sql语句

sql = "insert userinfo(username,password) values(%s,%s)"

# 插入多条记录

rows = cursor.executemany(sql,[("egon7",""),("egon8",""),("egon9","")])   # 利用executemany(),列表中放入多个元组

print(cursor.lastrowid)  # cursor.lastrowid 是你上面代码插入的时候,是从第几行开始插入的

conn.commit()  # 修改的数据要生效,必须在cursor,conn关闭之前 conn.commit()

# 关闭

cursor.close()

conn.close()


删改就是把上述例子中的sql语句改成删改的sql语句就行了
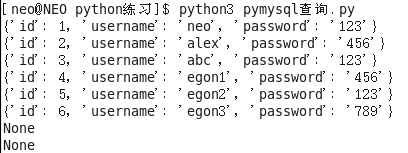
pymysql模块之查询
import pymysql

conn = pymysql.connect(host="192.168.18.2",port=3306,user="root",password="",db="db4",charset="utf8")

cursor = conn.cursor(pymysql.cursors.DictCursor)  # cursor()中如果什么都不写,查询出来的数据是元组的形式;如果指明了 pymysql.cursors.DictCursor,查询结果是字典的形式,字典的key是表的字段

rows = cursor.execute("select * from userinfo")

print(cursor.fetchone())

print(cursor.fetchone())

print(cursor.fetchone())

print(cursor.fetchone())

print(cursor.fetchone())

print(cursor.fetchone())

print(cursor.fetchone())

print(cursor.fetchone())

# 运行过程分析: cursor.execute("select * from userinfo")给MySQL服务端发送了查询语句,服务端查完之后把查询结果返回给服务端,服务端收到后把全部结果放到了管道里面,fetchone()一次就取出一条结果;取完之后再去就是None

# fetch还有两种用法:

# 1. cursor.fetchmany(3)  # 一次取3条;取出来的结果放到一个列表中,由于已经指定了 pymysql.cursors.DictCursor,所以列表中是一个个字典

# 2. cursor.fetchall()  # 一次全部取完,结果放到一个列表中;取完之后再fetchall会得到一个空列表

cursor.close()

conn.close()
fetchone:
fetchmany:

fetchall:

cursor.scroll用法:移动管道中的光标
import pymysql

conn = pymysql.connect(host="192.168.18.2",port=3306,user="root",password="",db="db4",charset="utf8")

cursor = conn.cursor(pymysql.cursors.DictCursor)

rows = cursor.execute("select * from userinfo")

# cursor.scroll(3,mode="absolute")  # 相对绝对位置移动:从管道最开始的位置跳过去3条

# cursor.scroll(3,mode="relative")  # 相对当前位置移动:从光标所在管道的当前位置跳过去3条

cursor.scroll(3,mode="absolute")

print(cursor.fetchone())  # 跳过前三条,直接从第四条开始取

cursor.close()

conn.close()
相对绝对位置移动

相对当前位置移动
print(cursor.fetchone())

cursor.scroll(3,mode="relative")

print(cursor.fetchone())   # 从第二条开始跳过取3个开始取

MySQL内置功能:
视图:
视图一个虚拟表(非真实存在),其本质是【根据SQL语句获取动态的数据集,并为其命名】,用户使用时只需使用【名称】即可获取结果集,可以将结果当作表来使用;但是不推荐使用视图,因为扩展SQL极不方便
创建视图:
# 语法: create view 视图名称 as sql语句

create view teacher_view as select tid from teacher where tname='李平老师';

#于是查询李平老师教授的课程名的sql可以改写为

mysql> select cname from course where teacher_id = (select tid from teacher_view);
修改视图(往视图中插入数据),原始表也跟着改
修改视图:
语法:ALTER VIEW 视图名称 AS SQL语句

mysql> alter view teacher_view as select * from course where cid>3;
删除视图:
# 语法:DROP VIEW 视图名称

DROP VIEW teacher_view
函数:
date_format(date相关字段,date格式) # 第一个参数写date的相关字段,第二个参数写所需要的date格式,如:"%Y-%m-%d";
datediff(current_date,sale_date) # current_date和sale_date之间的天数间隔
示例:
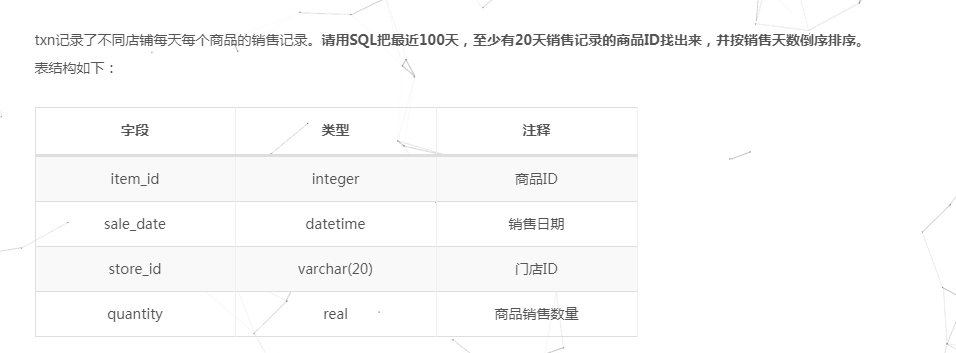
select item_id,count(distinct date_format(sale_date,"%Y-%m-%d")) as day_num from txn

where datediff(current_date,sale_date) <=10

group by item_id

having day_num >=5

order by day_num desc;

# current_date也是一个函数,表示当天的日期
控制流函数:
1、case when condition1 then result1 ... else default end
# 如果 conditionN是真,则返回 resultN,否则返回default
2、case test when value1 then result1... else default end
# 如果test 和valueN相等,则返回 resultN,否则返回default
如下:
查询班级信息,包括班级id、班级名称、年级、年级级别(1为低年级,2为中年级,3为高年级)
select cid as 班级id,caption as 班级名称,gname as 年级,

(case grade_id when 1 then "低" when 2 then "中" else "高" end) as "年级级别" from class inner join

class_grade on class.grade_id=class_grade.gid;
MySQL:记录的增删改查、单表查询、约束条件、多表查询、连表、子查询、pymysql模块、MySQL内置功能的更多相关文章
- mysql 记录的增删改查
MySQL数据操作: DML ======================================================== 在MySQL管理软件中,可以通过SQL语句中的DML语言 ...
- MySQL—记录的增删改查操作
1.插入记录: 方法一:INSERT [INTO] tbl_name [(col_name,···)] {VALUES|VALUE} ({expr |DEFAULT},···),(···),··· 例 ...
- Django项目的创建与介绍.应用的创建与介绍.启动项目.pycharm创建启动项目.生命周期.三件套.静态文件.请求及数据.配置Mysql完成数据迁移.单表ORM记录的增删改查
一.Django项目的创建与介绍 ''' 安装Django #在cmd中输入pip3 #出现这个错误Fatal error in launcher: Unable to create process ...
- mysql对库,表及记录的增删改查
破解密码 #1.关闭mysqlnet stop mysqlmysql还在运行时需要输入命令关闭,也可以手动去服务关闭 #2.重新启动mysqld --skip-grant-tables跳过权限 #3m ...
- java jdbc 连接mysql数据库 实现增删改查
好久没有写博文了,写个简单的东西热热身,分享给大家. jdbc相信大家都不陌生,只要是个搞java的,最初接触j2ee的时候都是要学习这么个东西的,谁叫程序得和数据库打交道呢!而jdbc就是和数据库打 ...
- shell编程系列22--shell操作数据库实战之shell脚本与MySQL数据库交互(增删改查)
shell编程系列22--shell操作数据库实战之shell脚本与MySQL数据库交互(增删改查) Shell脚本与MySQL数据库交互(增删改查) # 环境准备:安装mariadb 数据库 [ro ...
- 手撸Mysql原生语句--增删改查
mysql数据库的增删改查有以下的几种的情况, 1.DDL语句 数据库定义语言: 数据库.表.视图.索引.存储过程,例如CREATE DROP ALTER SHOW 2.DML语句 数据库操纵语言: ...
- (转)MySql中监视增删改查和查看日志记录
转载地址为:http://blog.51cto.com/hades02/1641652 首先在命令行输入 show global variables like '%general%' ,然后出现下面的 ...
- mysql简单使用增删改查
修改配置文件 在my.in配置文件 找到client 指的是mysql客户端 port3306 default -charachter-set=utf-8 default -charachter-se ...
随机推荐
- GC_CONCURRENT freed 循环不停打印日志
打印类似如下语句: 03-07 19:21:49.562: D/dalvikvm(1677): GC_CONCURRENT freed 2859K, 20% free 12020K/15011K, p ...
- 应用CSS样式表
首先应该分清楚应用CSS样式表到HTML页面中和将css样式表绑定到HTML页面的对象,是两个不同的概念.像之前说的通过不同的选择器将样式表绑定到HTML页面中的对象,但其实使用的都是同一种方法应用c ...
- 移动web开发填坑(一)
上周开始接触移动web开发,默默的掉进了很多坑里面.本文主要总结本周遇到的坑以及如何填坑. 1.px与rem换算. 设计稿的宽度一般是640px,而iphone是320px,所以测量设计稿的结果首先要 ...
- Petri网的工具
需要寻找 Petri 网的工具的朋友可以在 http://www.informatik.uni-hamburg.de/TGI/PetriNets/tools/complete_db.html 里面找一 ...
- 关于Qt模态框总汇
转载请注明出处:http://www.cnblogs.com/dachen408/p/7285710.html 父窗体为QMainWindow: 当子窗体为: 1.QWidget,需要设置 this- ...
- xamarin 学习笔记01-环境配置
1.安装AndroidSDK 参考 2.安装NDK NDK下载地址:http://dl.google.com/android/ndk/android-ndk-r10e-windows-x86_64.e ...
- laravel-admin常见错误处理
php artisan key:generate 新的laravle会有密钥不存在的问题,这时候我们执行这句话就可以生成秘钥了
- Javascript中的For循环
在开发的过程中,遍历是一个经常遇到的.而for循环则是Javascript工具箱里一个好用的,也常用的工具.每个人的习惯不同,for循环的写法也不尽相同. 1.不写声明变量的写法: for(var i ...
- 洛谷——P1602 Sramoc问题
P1602 Sramoc问题 $bfs$搜索 保证第一个搜到的符合条件的就是最小的 #include<bits/stdc++.h> #define N 110000 using names ...
- Ztree勾选节点后取消勾选其父子节点
前言: Ztree官方给的API可以设置勾选一个节点的同时勾选子节点或者父节点,也可以设置不影响父子节点,即将chkboxType设置为{"Y":"",&quo ...