spring_05装配bean
一.前言
- <bean id="user1" scope="singleton" init-method="myInit" destroy-method="myDestory" class="com.ahd.domain.User">
1.id作用设置对象名,scope为作用域,class是相关bean的完整路径.
2.使用原型bean会对性能产生影响,尽量不要设置成prototype,除非有必要,尽量使用scope=”singleton”
3.init-method和destroy-method为定制方法,前者为定制初始化bean的方法,后者为定制销毁bean及其他需要关闭对象的方法
4.定制方法也可以通过注解的方式配置
5.不推荐使用接口,使用接口后bean和springAPI绑定了
6.如果要把bean的属性设置成空,可以设置成<null/>
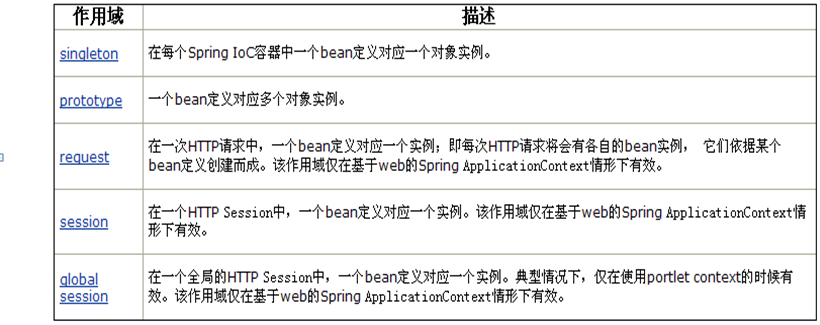
二.bean的作用域
三.如何给集合对象注入值(map,list,set,数组)?
1.list和数组类似:
- <property name="namelist">
- <list>
- <value>北京</value>
- <value>上海</value>
- <value>天津</value>
- </list>
- </property>
- <!--value元素改成ref即可引用其他bean对象 -->
- <property name="userlist">
- <list>
- <ref bean="user1"/>
- <ref bean="user2"/>
- </list>
- </property>
java测试遍历代码:
- //遍历list<String>
- for(String s:cu.getNamelist()){
- System.out.println(s);
- }
- //遍历list<User>
- System.out.println();
- for(User user:cu.getUserlist()){
- System.out.println(user.getId()+user.getName());
- System.out.println(user);
- }
2.配置set,set无序不重复,配置代码beans:
- <property name="userset">
- <set>
- <ref bean="user1"/>
- <ref bean="user2"/>
- </set>
- </property>
java测试遍历代码:
- //遍历set
- for(User user:cu.getUserset()){
- System.out.println("set"+user.getId()+user.getName());
- }
3.配置map,
- <property name="usermaps">
- <map>
- <entry key="111" value-ref="user1"/>
- <entry key="222" value-ref="user2"/>
- </map>
- </property>
java测试遍历代码:
- //遍历map,方式一
- Map<String,User> map=cu.getUsermaps();
- for(String key:map.keySet()){
- System.out.println(key+map.get(key)+"user:"+map.get(key).getId());
- }
- //遍历map,方式二(使用迭代器)
- Iterator<Map.Entry<String,User>> it=map.entrySet().iterator();
- while(it.hasNext()){
- Map.Entry<String, User> entry=it.next();
- System.out.println("key:"+entry.getKey()+" value:"+entry.getValue());
- }
- //遍历map,方式三,适合数据量特别大的时候
- for(Map.Entry<String, User> entry:map.entrySet()){
- System.out.println(entry.getKey()+entry.getValue());
- }
- //遍历map,方式四,只能遍历value,不能遍历key
- for(User user:map.values()){
- System.out.println(user);
- }
4.给属性集合配值:
- <property name="userpro">
- <props>
- <prop key="user">password</prop>
- <prop key="user1">password1</prop>
- </props>
- </property>
测试代码
- Properties prop=cu.getUserpro();
- Enumeration<Object> keys = prop.keys();
- while(keys.hasMoreElements()){
- String key=keys.nextElement().toString();
- System.out.println(key+" "+prop.getProperty(key));
- }
四.内部bean,
内部bean不能被其他对象所引用,只能供父bean使用
- <bean id="user1" class="com.ahd.domain.User">
- <property name="name">
- <bean id="user3" class="com.ahd.domain.Use">
- <property name="id" value="2" />
- <property name="name" value="李四" />
- </bean>
- </property>
- </bean>
五.继承
- <bean id="check3" parent="validateUser" class="com.ahd.serviceImpl.CheckUser3">
- <property name="phone">
- <value>13548965896</value>
- </property>
- </bean>
- CheckUser3 类.
- package com.ahd.serviceImpl;
- import com.ahd.service.ValidateUser;
- public class CheckUser3 extends CheckUser1{
- private String phone;
- public CheckUser3(){
- }
- public String getPhone() {
- return phone;
- }
- public void setPhone(String phone) {
- this.phone = phone;
- }
- }
spring_05装配bean的更多相关文章
- [spring]03_装配Bean
3.1 JavaBean 3.1.1 JavaBean 是什么 JavaBean 是一种JAVA语言写成的可重用组件. 为写成JavaBean,类必须是具体的和公共的,并且具有无参数的构造器. Jav ...
- Spring学习系列(三) 通过Java代码装配Bean
上面梳理了通过注解来隐式的完成了组件的扫描和自动装配,下面来学习下如何通过显式的配置的装配bean 二.通过Java类装配bean 在前面定义了HelloWorldConfig类,并使用@Compon ...
- 装配bean
spring有三种装配bean的方式:隐式装配.java代码装配.xml装配 隐式装配最为省事方便,也称为自动化装配 这三种装配方式可以混搭着来用 在这里通过一个例子来讲述配置 CD的两个实现,一个是 ...
- IOC装配Bean(注解方式)
Spring的注解装配Bean Spring2.5 引入使用注解去定义Bean @Component 描述Spring框架中Bean Spring的框架中提供了与@Component注解等效的三个注解 ...
- [原创]java WEB学习笔记103:Spring学习---Spring Bean配置:基于注解的方式(基于注解配置bean,基于注解来装配bean的属性)
本博客的目的:①总结自己的学习过程,相当于学习笔记 ②将自己的经验分享给大家,相互学习,互相交流,不可商用 内容难免出现问题,欢迎指正,交流,探讨,可以留言,也可以通过以下方式联系. 本人互联网技术爱 ...
- spring IOC装配Bean(注解方式)
1 Spring的注解装配Bean (1) Spring2.5 引入使用注解去定义Bean @Component 描述Spring框架中Bean (2) Spring的框架中提供了与@Componen ...
- Spring常用注解,自动扫描装配Bean
1 引入context命名空间(在Spring的配置文件中),配置文件如下: xmlns:context="http://www.springframework.org/schema/con ...
- Spring学习笔记—装配Bean
在Spring中,对象无需自己负责查找或创建与其关联的其他对象.相反,容器负责把需要相互协作的对象引用赋予各个对象.创建应用对象之间协作关系的行为通常称为装配(wiring),这也是依赖注入的本质. ...
- 自动装配Bean
Spring提供了几种技巧,可以减少XML的配置数量: 自动装配(autowiring):可以减少<property>(setter注入)和<constructor-arg>( ...
随机推荐
- eclipse maven install 报错 jdk rather than jre?
解决方案:window => Perference => java => install jre => 选中jre => edit => 选择文件夹为jdk的
- iproute2学习笔记
一.替代arp, ifconfig, route等命令 显示网卡和IP地址 root@openstack:~# ip link list 1: lo: <LOOPBACK,UP,LOWER_UP ...
- Batch_Size 详解
Batch_Size(批尺寸)是机器学习中一个重要参数,涉及诸多矛盾,下面逐一展开. 首先,为什么需要有 Batch_Size 这个参数? Batch 的选择,首先决定的是下降的方向.如果数据集比较小 ...
- Spring Boot 2 - 使用CommandLineRunner与ApplicationRunner
本篇文章我们将探讨CommandLineRunner和ApplicationRunner的使用. 在阅读本篇文章之前,你可以新建一个工程,写一些关于本篇内容代码,这样会加深你对本文内容的理解,关于如何 ...
- 前端切图神器-cutterman
之前我写过一篇关于前端切图的博客:https://www.cnblogs.com/tu-0718/p/9741058.html 但上面的方法在切图量大时依然很费时间,下面向大家推荐这款免费切图神器 c ...
- Mybatis框架五:动态SQL
1.if where 实现一个简单的需求: 根据性别和名字查询用户: 正常来写: <select id="selectUserBySexAndUsername" para ...
- 空手套白狼,硬阅java字节码class文件
如下,是一些java字节码也就是原始的class文件,当应用部署到线上之后,我们能够看到的也就是这样的字样了.那么怎样解呢?就让我们一起,来解读解读字节码吧! Offset A B C D E F C ...
- pocketsphinx 移植问题解决备案
一 编译问题: 1 _continuous: error while loading shared libraries: libpocketsphinx.so.3: cannot open share ...
- 知识扩展——Git和GitHub的区别
一直以为Git和GitHub是一个东西,直到我看到这个解释.... 转载自:git与github区别与简介 一开始接触git或是github的程序员可能搞不太清楚这些名词到底指代的是什么,所以在这里稍 ...
- Docker简介以及操作
Docker 简介 Docker 是一个开源项目,诞生于 2013 年初,最初是 dotCloud 公司内部的一个业余项目.它基于 Google 公司推出的 Go 语言实现. 项目后来加入了 Linu ...