Elasticsearch 5.0Head插件
Elasticsearch 5.0 —— Head插件部署指南
使用ES的基本都会使用过head,但是版本升级到5.0后,head插件就不好使了。下面就看看如何在5.0中启动Head插件吧!
官方粗略教程
Running with built in server
enable cors by adding http.cors.enabled: true in elasticsearch configuration. Don’t forget to also set http.cors.allow-origin because no origin allowed by default. http.cors.allow-origin: "*" is valid value, however it’s considered as a security risk as your cluster is open to cross origin from anywhere.
Check Elasticsearch documentation on this parameter:
git clone git://github.com/mobz/elasticsearch-head.git

cd elasticsearch-head

npm install

grunt server
open http://localhost:9100/
This will start a local webserver running on port 9100 serving elasticsearch-head
Best option if you are likely to connect to several different clusters
部署5.0版本的ES
5.0版本的ES跟之前的版本最大的不同之处就是多了很多环境的校验,比如jdk,max-files等等。
设置内核参数
vi /etc/sysctl.conf

# 增加下面的内容

fs.file-max=65536

vm.max_map_count=262144
设置资源参数
vi /etc/security/limits.conf

# 修改

* soft nofile 32768

* hard nofile 65536
修改进程数
ulimit -u 2048修改elasticsearch的参数
修改一下es使用的参数:
# 换个集群的名字,免得跟别人的集群混在一起
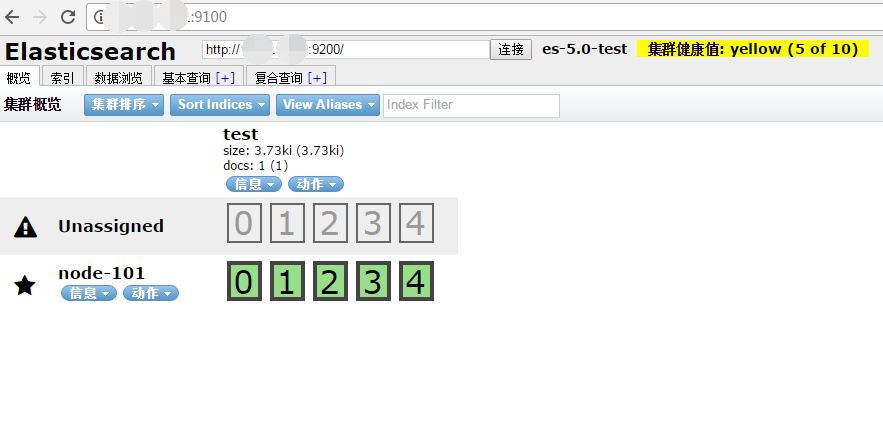
cluster.name: es-5.0-test
# 换个节点名字
node.name: node-101
# 修改一下ES的监听地址,这样别的机器也可以访问
network.host: 0.0.0.0
# 默认的就好
http.port: 9200
# 增加新的参数,这样head插件可以访问es
http.cors.enabled: true
http.cors.allow-origin: "*"注意,设置参数的时候:后面要有空格!
安装部署head
第一步,安装git
需要从github上面下载代码,因此先要安装git
yum -y install git安装完成后,就可以直接下载代码了:
git clone git://github.com/mobz/elasticsearch-head.git下载后,修改下777权限(简单粗暴),因为是独立启动head的,所以随便放一个位置就行了,参考:
/usr/elk/head/*****第二步,安装node
由于head插件本质上还是一个nodejs的工程,因此需要安装node,使用npm来安装依赖的包。(npm可以理解为maven)
去官网下载nodejs,https://nodejs.org/en/download/
下载下来的jar包是xz格式的,一般的linux可能不识别,还需要安装xz.
yum -y install xz然后解压nodejs的安装包:
xz -d node*.tar.xz

tar -xvf node*.tar
解压完node的安装文件后,需要配置下环境变量,编辑/etc/profile,添加
# set node environment

export NODE_HOME=/usr/elk/node-v6.9.1-linux-x64

export PATH=$PATH:$NODE_HOME/bin
别忘记立即执行以下
source /etc/profile这个时候可以测试一下node是否生效:
[root@localnode1 node-v6.9.1-linux-x64]# echo $NODE_HOME

/usr/elk/node-v6.9.1-linux-x64

[root@localnode1 node-v6.9.1-linux-x64]# node -v

v6.9.1

[root@localnode1 node-v6.9.1-linux-x64]# npm -v

3.10.8
第三步,安装grunt
grunt是一个很方便的构建工具,可以进行打包压缩、测试、执行等等的工作,5.0里的head插件就是通过grunt启动的。因此需要安装一下grunt:
npm install grunt-cli安装完成后检查一下:
[root@localnode1 elasticsearch-head]# grunt -version

grunt-cli v1.2.0

grunt v0.4.5
第四步,修改head源码
由于head的代码还是2.6版本的,直接执行有很多限制,比如无法跨机器访问。因此需要用户修改两个地方:
修改服务器监听地址
目录:head/Gruntfile.js
connect: {

    server: {

        options: {

            port: 9100,

            hostname: '*',

            base: '.',

            keepalive: true

        }

    }

}
增加hostname属性,设置为*
修改连接地址:
目录:head/_site/app.js
修改head的连接地址:
this.base_uri = this.config.base_uri || this.prefs.get("app-base_uri") || "http://localhost:9200";把localhost修改成你es的服务器地址,如:
this.base_uri = this.config.base_uri || this.prefs.get("app-base_uri") || "http://10.10.10.10:9200";第五步,运行head
首先开启5.0 ES。
然后在head目录中,执行npm install 下载以来的包:
npm install 最后,启动nodejs
grunt server访问:target:9100
这个时候,访问http://xxx:9100就可以访问head插件了.
参考
Elasticsearch 5.0Head插件的更多相关文章
- ElasticSearch 2 (6) - 插件安装Head、Kopf与Bigdesk
ElasticSearch 2 (6) - 插件安装Head.Kopf与Bigdesk 摘要 安装Elasticsearch插件Head.Kopf与Bigdesk 版本 elasticsearch版本 ...
- ElasticSearch安装拼音插件 elasticsearch-analysis-pinyin
elasticsearch-analysis-pinyin 是 ElasticSearch的拼音插件.强大的功能支持拼音等的搜索 1.下载源代码 源码地址https://github.com/medc ...
- ElasticSearch之常用插件安装命令
#head监控安装,推荐 bin/plugin -install mobz/elasticsearch-head #bigdesk集群状态,推荐 bin/plugin -install lukas-v ...
- Elasticsearch之Hadoop插件的安装(图文详解)
这个Hadoop插件的安装是非常重要. Hadoop插件安装 在es的安装目录下 bin/plugin install elasticsearch/elasticsearch-repository-h ...
- Elasticsearch之sense插件安装之后的浏览详解
前提博客是 Elasticsearch之sense插件的安装(图文详解) 立马,可以看到 http://192.168.80.145:5601/app/sense 以后更新
- ElasticSearch安装SQL插件
ElasticSearch安装SQL插件下载地址(中国大佬开发的,膜拜ing):https://github.com/NLPchina/elasticsearch-sql 1.记得选择和自己Elast ...
- 使用SQL语法来查询Elasticsearch:Elasticsearch-SQL插件
简介 Elasticsearch-SQL是Elasticsearch的一个插件,它可以让我们通过类似SQL的方式对Elasticsearch中的数据进行查询.项目地址是:https://github. ...
- Elasticsearch及相关插件的安装
Elasticsearch及相关插件的安装 1.安装Elasticsearch并启动服务 2.安装第三方插件 2.1.Head插件 是Elasticsearch的一个集群管理工具,可以通过它来查看和搜 ...
- Elasticsearch安装X-Pack插件
Elasticsearch安装X-Pack插件, 基于已经安装好的6.2.2版本的Elasticsearch, 安装6.2.2版本的X-Pack插件. 1.下载x-pack的zip包到本地 https ...
随机推荐
- Linux下0号进程的前世(init_task进程)今生(idle进程)----Linux进程的管理与调度(五)【转】
前言 Linux下有3个特殊的进程,idle进程(PID = 0), init进程(PID = 1)和kthreadd(PID = 2) idle进程由系统自动创建, 运行在内核态 idle进程其pi ...
- Lua table笔记
记录我在使用lua的过程中的一些笔记 默认key为数字递增 local tb={"A",[3]="C","B"} 这个tb通过下标1,2,3 ...
- 编写脚本实现DHCP服务与DHCP中继自动化执行
编写脚本实现DHCP服务与DHCP中继自动化执行 本脚本是在liunx搭建DHCP服务器以及DHCP中继服务器实验环境下实现的https://www.cnblogs.com/yuzly/p/10539 ...
- 关于激活Windows10专业版2018长期服务版
之前重装了一次系统,偷懒用了小白一键重装,装好之后显示的是Windows10专业版2018长期服务版,当时也没想太多就放着用了. 然后 ,这几天一直提示 “你的windows许可证即将过期” ,就按 ...
- LIGER UI GRID TREE解决打开子树的时候,母树图标全部变成+
1.为data增加Expanded.当打开时告知已打开 关闭时告知已关闭 2.修改ligergrid 如果是打开状态,则open
- lua 编译安装
官网http://www.lua.org/download.html Building Lua is implemented in pure ANSI C and compiles unmodifie ...
- 【CQOI2014】危桥
[CQOI2014]危桥 Description Alice和Bob居住在一个由N个岛屿组成的国家,岛屿被编号为\(0\)到\(N-1\).某些岛屿之间有桥相连,桥上的道路都是双向的,但是一次只能供一 ...
- 8.04-book
import requests from lxml import etree from bs4 import BeautifulSoup import json class BookSpider(ob ...
- UVA818-Cutting Chains(二进制枚举+dfs判环)
Problem UVA818-Cutting Chains Accept:393 Submit:2087 Time Limit: 3000 mSec Problem Description Wha ...
- jquery懒加载插件 jquery_lazyload 下载
每天学习一点点 编程PDF电子书.视频教程免费下载:http://www.shitanlife.com/code https://pan.baidu.com/s/1UbOeyL_AaSNN_KMA4M ...