【JDK】JDK源码分析-LinkedHashMap
概述
前文「JDK源码分析-HashMap(1)」分析了 HashMap 主要方法的实现原理(其他问题以后分析),本文分析下 LinkedHashMap。
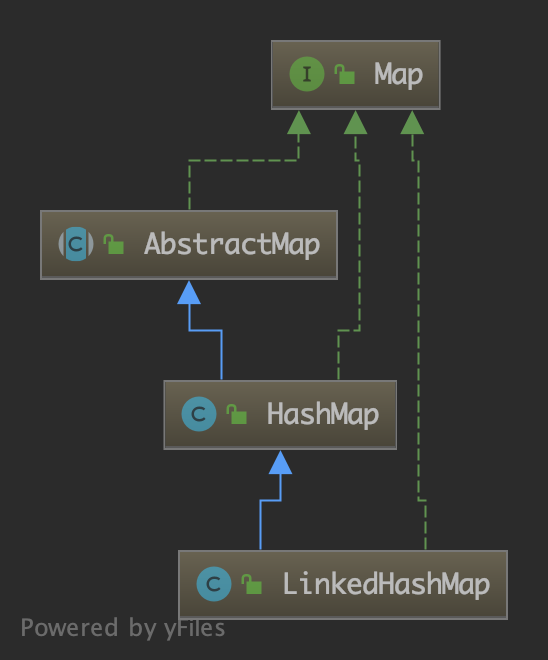
先看一下 LinkedHashMap 的类继承结构图:

可以看到 LinkedHashMap 继承了 HashMap。
我们知道 HashMap 是无序的,即迭代器的顺序与插入顺序没什么关系。而 LinkedHashMap 在 HashMap 的基础上增加了顺序:分别为「插入顺序」和「访问顺序」。即遍历 LinkedHashMap 时,可以保持与插入顺序一致的顺序;或者与访问顺序一致的顺序。
LinkedHashMap 内部如何实现这两种顺序的呢?它是通过一个双链表来维持的。因此可以将 LinkedHashMap 理解为「双链表 + 散列表」,或者“有序的散列表”。
代码分析
节点类 Entry
LinkedHashMap 内部有一个嵌套类 Entry,它继承自 HashMap 中的 Node 类,如下:
static class Entry<K,V> extends HashMap.Node<K,V> {

    Entry<K,V> before, after;

    Entry(int hash, K key, V value, Node<K,V> next) {

        super(hash, key, value, next);

    }

}
static class Node<K,V> implements Map.Entry<K,V> {

    final int hash;

    final K key;

    V value;

    Node<K,V> next;

    Node(int hash, K key, V value, Node<K,V> next) {

        this.hash = hash;

        this.key = key;

        this.value = value;

        this.next = next;

    }

    // ...

}
该 Entry 类就是 LinkedHashMap 中的节点类。可以看到,它在 Node 类的基础上又增加了 before 和 after 两个变量,它们保存的是节点的前驱和后继(从字面意思也可以进行推测),从而来维护 LinkedHashMap 的顺序。
成员变量
/**

 * The head (eldest) of the doubly linked list.

 */

transient LinkedHashMap.Entry<K,V> head;

/**

 * The tail (youngest) of the doubly linked list.

 */

transient LinkedHashMap.Entry<K,V> tail;

/**

 * The iteration ordering method for this linked hash map: true

 * for access-order, false for insertion-order.

 * LinkedHashMap 的迭代顺序:true 为访问顺序;false 为插入顺序。

 */

final boolean accessOrder;
构造器
构造器1:
/**

 * Constructs an empty insertion-ordered LinkedHashMap instance

 * with the default initial capacity (16) and load factor (0.75).

 */

public LinkedHashMap() {

    super();

    accessOrder = false;

}
这里的 super() 方法调用了 HashMap 的无参构造器。该构造器方法构造了一个容量为 16(默认初始容量)、负载因子为 0.75(默认负载因子)的空 LinkedHashMap,其顺序为插入顺序。
构造器 2、3、4、5:
public LinkedHashMap(int initialCapacity) {

    super(initialCapacity);

    accessOrder = false;

}

public LinkedHashMap(int initialCapacity, float loadFactor) {

    super(initialCapacity, loadFactor);

    accessOrder = false;

}

public LinkedHashMap(Map<? extends K, ? extends V> m) {

    super();

    accessOrder = false;

    putMapEntries(m, false);

}

public LinkedHashMap(int initialCapacity,

                     float loadFactor,

                     boolean accessOrder) {

    super(initialCapacity, loadFactor);

    this.accessOrder = accessOrder;

}
可以看到上面几个构造器都是通过调用父类(HashMap)的构造器方法初始化,对此不再进行分析。前面 4 个构造器的 accessOrder 变量默认值都为 false;最后一个稍微不一样,它的 accessOrder 可以在初始化时指定,即指定 LinkedHashMap 的顺序(插入或访问顺序)。
put 方法
LinkedHashMap 本身没有实现 put 方法,它通过调用父类(HashMap)的方法来进行读写操作。这里再贴下 HashMap 的 put 方法:
public V put(K key, V value) {

    return putVal(hash(key), key, value, false, true);

}

final V putVal(int hash, K key, V value, boolean onlyIfAbsent,

               boolean evict) {

    Node<K,V>[] tab; Node<K,V> p; int n, i;

    if ((tab = table) == null || (n = tab.length) == 0)

        n = (tab = resize()).length;

    if ((p = tab[i = (n - 1) & hash]) == null)

        // 新的 bin 节点

        tab[i] = newNode(hash, key, value, null);

    else {

        Node<K,V> e; K k;

        // key 已存在

        if (p.hash == hash &&

            ((k = p.key) == key || (key != null && key.equals(k))))

            e = p;

        // 散列冲突

        else if (p instanceof TreeNode)

            e = ((TreeNode<K,V>)p).putTreeVal(this, tab, hash, key, value);

        else {

            // 遍历链表

            for (int binCount = 0; ; ++binCount) {

                // 将新节点插入到链表末尾

                if ((e = p.next) == null) {

                    p.next = newNode(hash, key, value, null);

                    if (binCount >= TREEIFY_THRESHOLD - 1) // -1 for 1st

                        treeifyBin(tab, hash);

                    break;

                }

                if (e.hash == hash &&

                    ((k = e.key) == key || (key != null && key.equals(k))))

                    break;

                p = e;

            }

        }

        if (e != null) { // existing mapping for key

            V oldValue = e.value;

            if (!onlyIfAbsent || oldValue == null)

                e.value = value;

            afterNodeAccess(e);

            return oldValue;

        }

    }

    ++modCount;

    if (++size > threshold)

        resize();

    afterNodeInsertion(evict);

    return null;

}
这个方法哪个地方跟 LinkedHashMap 有联系呢?如何能保持 LinkedHashMap 的顺序呢?且看其中的 newNode() 方法,它在 HashMap 中的代码如下:Node<K,V> newNode(int hash, K key, V value, Node<K,V> next) {
return new Node<>(hash, key, value, next);
}
但是,LinkedHashMap 重写了该方法:
// 新建一个 LinkedHashMap.Entry 节点

Node<K,V> newNode(int hash, K key, V value, Node<K,V> e) {

    LinkedHashMap.Entry<K,V> p =

        new LinkedHashMap.Entry<K,V>(hash, key, value, e);

    // 将新节点连接到列表末尾

    linkNodeLast(p);

    return p;

}
// link at the end of list

private void linkNodeLast(LinkedHashMap.Entry<K,V> p) {

    LinkedHashMap.Entry<K,V> last = tail;

    tail = p;

    // list 为空

    if (last == null)

        head = p;

    else {

        // 将新节点插入到 list 末尾

        p.before = last;

        last.after = p;

    }

}
可以看到,每次插入新节点时,都会存到列表的末尾。原来如此,LinkedHashMap 的插入顺序就是在这里实现的。
此外,上文分析 HashMap 时提到两个回调方法:afterNodeAccess 和 afterNodeInsertion。它们在 HashMap 中是空的:
// Callbacks to allow LinkedHashMap post-actions

void afterNodeAccess(Node<K,V> p) { }

void afterNodeInsertion(boolean evict) { }
同样,LinkedHashMap 对它们进行了重写。先来分析 afterNodeAccess 方法:
void afterNodeAccess(Node<K,V> e) { // move node to last

    LinkedHashMap.Entry<K,V> last;

    // accessOrder 为 true 表示访问顺序

    if (accessOrder && (last = tail) != e) {

        // p 为访问的节点,b 为其前驱,a 为其后继

        LinkedHashMap.Entry<K,V> p =

            (LinkedHashMap.Entry<K,V>)e, b = p.before, a = p.after;

        p.after = null;

        // p 是头节点

        if (b == null)

            head = a;

        else

            b.after = a;

        if (a != null)

            a.before = b;

        else

            last = b;

        if (last == null)

            head = p;

        else {

            p.before = last;

            last.after = p;

        }

        tail = p;

        ++modCount;

    }

}
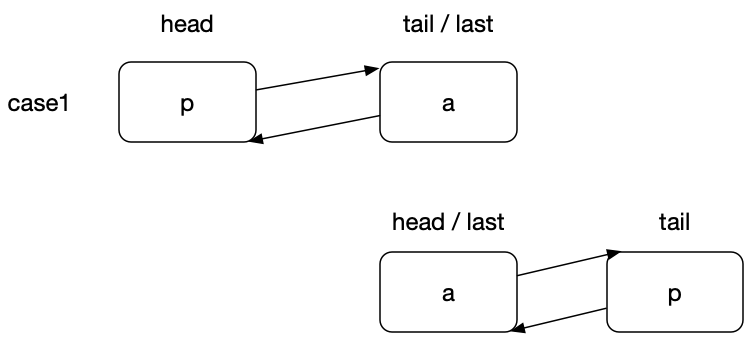
为了便于分析和理解,这里画出了两个操作示意图:
这里描述了进行该操作前后的两种情况。可以看到,该方法执行后,节点 p 被移到了 list 的末尾。
get 方法
LinkedHashMap 重写了 HashMap 的 get 方法,主要是为了维持访问顺序,代码如下:
public V get(Object key) {

    Node<K,V> e;

    if ((e = getNode(hash(key), key)) == null)

        return null;

    // 若为访问顺序,将访问的节点移到列表末尾

    if (accessOrder)

        afterNodeAccess(e);

    return e.value;

}
这里的 getNode 方法是父类的(HashMap)。若 accessOrder 为 true(即指定为访问顺序),则将访问的节点移到列表末尾。
LinkedHashMap 中重写的 afterNodeInsertion 方法:
void afterNodeInsertion(boolean evict) { // possibly remove eldest

    LinkedHashMap.Entry<K,V> first;

    if (evict && (first = head) != null && removeEldestEntry(first)) {

        K key = first.key;

        removeNode(hash(key), key, null, false, true);

    }

}

// LinkedHashMap 中默认的返回值为 false,即这里的 removeNode 方法不执行

protected boolean removeEldestEntry(Map.Entry<K,V> eldest) {

    return false;

}
removeNode 方法是父类 HashMap 中的。
final Node<K,V> removeNode(int hash, Object key, Object value,

                           boolean matchValue, boolean movable

) {

    Node<K,V>[] tab; Node<K,V> p; int n, index;

    // table 不为空,且给的的 hash 值所在位置不为空

    if ((tab = table) != null && (n = tab.length) > 0 &&

        (p = tab[index = (n - 1) & hash]) != null) {

        Node<K,V> node = null, e; K k; V v;

        // 给定 key 对应的节点,在数组中第一个位置

        if (p.hash == hash &&

            ((k = p.key) == key || (key != null && key.equals(k))))

            node = p;

        // 给定的 key 所在位置为红黑树或链表

        else if ((e = p.next) != null) {

            if (p instanceof TreeNode)

                node = ((TreeNode<K,V>)p).getTreeNode(hash, key);

            else {

                do {

                    if (e.hash == hash &&

                        ((k = e.key) == key ||

                         (key != null && key.equals(k)))) {

                        node = e;

                        break;

                    }

                    p = e;

                } while ((e = e.next) != null);

            }

        }

        // 删除节点

        if (node != null && (!matchValue || (v = node.value) == value ||

                             (value != null && value.equals(v)))) {

            if (node instanceof TreeNode)

                ((TreeNode<K,V>)node).removeTreeNode(this, tab, movable);

            else if (node == p)

                tab[index] = node.next;

            else

                p.next = node.next;

            ++modCount;

            --size;

            // 删除节点后的操作

            afterNodeRemoval(node);

            return node;

        }

    }

    return null;

}
afterNodeRemoval 方法在 HashMap 中的实现也是空的:
void afterNodeRemoval(Node<K,V> p) { }
LinkedHashMap 重写了该方法:
void afterNodeRemoval(Node<K,V> e) { // unlink

    LinkedHashMap.Entry<K,V> p =

        (LinkedHashMap.Entry<K,V>)e, b = p.before, a = p.after;

    p.before = p.after = null;

    if (b == null)

        head = a;

    else

        b.after = a;

    if (a == null)

        tail = b;

    else

        a.before = b;

}
该方法就是双链表删除一个节点的操作。
代码演练
LinkedHashMap 用法
我们知道 HashMap 是无序的,例如:
Map<String, String> map = new HashMap<>();

map.put("bush", "a");

map.put("obama", "b");

map.put("trump", "c");

map.put("lincoln", "d");

System.out.println(map);

// 输出结果(无序):

// {obama=b, trump=c, lincoln=d, bush=a}
而若换成 LinkedHashMap,则可以保持插入的顺序:
Map<String, String> map = new LinkedHashMap<>();

map.put("bush", "a");

map.put("obama", "b");

map.put("trump", "c");

map.put("lincoln", "d");

System.out.println(map);

// 输出结果(插入顺序):

// {bush=a, obama=b, trump=c, lincoln=d}
指定 LinkedHashMap 的顺序为访问顺序:
Map<String, String> map = new LinkedHashMap<>(2, 0.75f, true);

map.put("bush", "a");

map.put("obama", "b");

map.put("trump", "c");

map.put("lincoln", "d");

System.out.println(map);

map.get("obama");

System.out.println(map);

// 输出结果(插入顺序):

// {bush=a, obama=b, trump=c, lincoln=d}

// 访问 obama 后,obama 移到了末尾

// {bush=a, trump=c, lincoln=d, obama=b}
实现 LRU 缓存
private static class LRUCache<K, V> extends LinkedHashMap<K, V> {

  private int capacity;

  public LRUCache(int capacity) {

    super(16, 0.75f, true);

    this.capacity = capacity;

  }

  @Override

  protected boolean removeEldestEntry(Map.Entry<K, V> eldest) {

    return size() > capacity;

  }

}
使用举例:
LRUCache<String, String> lruCache = new LRUCache<>(2);

lruCache.put("bush", "a");

lruCache.put("obama", "b");

lruCache.put("trump", "c");

System.out.println(lruCache);

// 输出结果:

// {obama=b, trump=c}
这里定义的 LRUCache 类中,对 removeEldestEntry 方法进行了重写,当缓存中的容量大于 2,时会把最早插入的元素 "bush" 删除。因此只剩下两个值。
小结
1. LinkedHashMap 继承自 HashMap,其结构可以理解为「双链表 + 散列表」;
2. 可以维护两种顺序:插入顺序或访问顺序;
3. 可以方便的实现 LRU 缓存;
4. 线程不安全。
Stay hungry, stay foolish.

PS: 本文首发于微信公众号【WriteOnRead】。
【JDK】JDK源码分析-LinkedHashMap的更多相关文章
- JDK Collection 源码分析(2)—— List
JDK List源码分析 List接口定义了有序集合(序列).在Collection的基础上,增加了可以通过下标索引访问,以及线性查找等功能. 整体类结构 1.AbstractList 该类作为L ...
- JDK AtomicInteger 源码分析
@(JDK)[AtomicInteger] JDK AtomicInteger 源码分析 Unsafe 实例化 Unsafe在创建实例的时候,不能仅仅通过new Unsafe()或者Unsafe.ge ...
- 设计模式(十八)——观察者模式(JDK Observable源码分析)
1 天气预报项目需求,具体要求如下: 1) 气象站可以将每天测量到的温度,湿度,气压等等以公告的形式发布出去(比如发布到自己的网站或第三方). 2) 需要设计开放型 API,便于其他第三方也能接入气象 ...
- JDK Collection 源码分析(3)—— Queue
@(JDK)[Queue] JDK Queue Queue:队列接口,对于数据的存取,提供了两种方式,一种失败会抛出异常,另一种则返回null或者false. 抛出异常的接口:add,remove ...
- JDK Collection 源码分析(1)—— Collection
JDK Collection JDK Collection作为一个最顶层的接口(root interface),JDK并不提供该接口的直接实现,而是通过更加具体的子接口(sub interface ...
- [源码分析]LinkedHashMap
一个键有序的 HashMap 可以将 LinkedHashMap 理解为 LinkList + HashMap,所以研究LinkedHashMap之前要先看HashMap代码.这里不再赘述.其实L ...
- JDK 源码分析(4)—— HashMap/LinkedHashMap/Hashtable
JDK 源码分析(4)-- HashMap/LinkedHashMap/Hashtable HashMap HashMap采用的是哈希算法+链表冲突解决,table的大小永远为2次幂,因为在初始化的时 ...
- JDK源码分析(6)之 LinkedHashMap 相关
LinkedHashMap实质是HashMap+LinkedList,提供了顺序访问的功能:所以在看这篇博客之前最好先看一下我之前的两篇博客,HashMap 相关 和 LinkedList 相关: 一 ...
- JDK(六)JDK1.8源码分析【集合】LinkedHashMap
本文转载自joemsu,原文连接 [JDK1.8]JDK1.8集合源码阅读——LinkedHashMap LinkedHashMap的数据结构 可以从上图中看到,LinkedHashMap数据结构相比 ...
随机推荐
- Spark学习之路(九)—— Spark SQL 之 Structured API
一.创建DataFrame和Dataset 1.1 创建DataFrame Spark中所有功能的入口点是SparkSession,可以使用SparkSession.builder()创建.创建后应用 ...
- 一道关于String的面试题,新鲜出炉,刚被坑过,趁热!!
很多人都会答错的一道关于String的题目,究竟有什么难度? 我们一起来看一道关于String的面试题,准确说是改编的面试题! 准备好啦?在放大招之前先来一个小招式 String s1 = new S ...
- IO解惑:cephfs、libaio与io瓶颈
最近笔者在对kernel cephfs客户端进行fio direct随机大io读测试时发现,在numjobs不变的情况下,使用libaio作为ioengine,无论怎么调节iodepth,测试结果都变 ...
- mysql重复数据下,删除一条重复数据
delete from information where id in (select id from (select max(id) as id,count(*) as ccc from infor ...
- VB非常见知识总结
1.VB.Net设置Excel中单元格字体 sheet.Range(sheet.Cells(row, stp), sheet.Cells(row, stp)).Font.Name = "Wi ...
- kuangbin专题 专题一 简单搜索 非常可乐 HDU - 1495
题目链接:https://vjudge.net/problem/HDU-1495 题意:有两个空杯(分别是N升和M升)和一罐满的可乐S升,S = N + M,三个容器可以互相倾倒,如果A倒入B,只有两 ...
- zookeeper的客户端应用
什么zookeeper? ZooKeeper是一个分布式的,开放源码的分布式应用程序协调服务,是Google的Chubby一个开源的实现,是Hadoop和Hbase的重要组件.它是一个为分布式应用提供 ...
- C++学习书籍推荐《C++编程思想第二版第二卷》下载
百度云及其他网盘下载地址:点我 编辑推荐 “经典原版书库”是响应教育部提出的使用原版国外教材的号召,为国内高校的计算机教学度身订造的.<C++编程思想>(英文版第2版)是书库中的一本,在广 ...
- EnjoyingSoft之Mule ESB开发教程第一篇:初识Mule ESB
目录 1. Mule ESB基本介绍 2. Mule ESB社区版和企业版 3. Mule ESB常用场景 4. Mule ESB软件安装 客户端安装 服务端安装 5. 第一个Mule ESB应用- ...
- 比赛:小奔的矩形solution
分析: 交叉相乘,然后除以最大公因数(为了减少爆常数的可能性std做了两次,数据很大),得到的两个数相加减二就是答案 代码: var p,q,n,m,a,b,i:int64; begin readln ...

