Docker运行dotnetcore
- windows下安装docker
参考:
https://www.jianshu.com/p/502b4ac536ef
https://docs.docker.com/install/windows/docker-ee/
强烈 推荐 使用windows server 2019
____
1、安装
@@@code

安装Hyper-V

>Install-WindowsFeature -Name Hyper-V


 安装容器功能

>Install-WindowsFeature -Name containers


 安装完成后需重启服务器

>Restart-computer


 >Install-Module DockerMSFTProvider

提示:不受信任的存储库

(选"Y"确认)


 >Install-Package Docker -ProviderName DockerMSFTProvider -Force

(可能会提示包验证错误,安装失败,多试几次即可)


 提示:程序来自未标记为"受信任"的程序包源

(选"Y"确认)


 @@#
注:上述安装很慢的话或者经常出错,可以在C:\Users\Administrator\AppData\Local\Temp\2\DockerMsftProvider下找到DockerDefault_DockerSearchIndex.json,其中有各版本的下 载地址 ,如19.03.2为https://dockermsft.blob.core.windows.net/dockercontainer/docker-19-03-2.zip,手工下载这个文件,放回到DockerMsftProvider目录下,然后执行指令,出现提示后选择"全部(A)"
@@@code

Install-Package Docker -ProviderName DockerMSFTProvider

@@#
2、切换linux内核
默认使用windows内核,docker的镜像只能基于nano和servercore,而且 依赖于操作系统的内核,1803,1809,1903等,当然运行一些早期程序会比较适合,推荐的方案是windows 内核的docker搭配一个linux 虚拟 机,在虚拟 机内另外运行一套docker。或者两台服务器各自运行一种内核
如果一定想使用LINUX内核,参考:https://docs.microsoft.com/zh-cn/virtualization/windowscontainers/quick-start/using-insider-container-images
下列代码以管理员身份 运行powershell逐行复制执行,确保每个指令有明确的输出,如提示被操作 的版本号 。
@@@code

Stop-Service docker

Uninstall-Package docker

Uninstall-Module DockerMsftProvider

Uninstall-Module DockerProvider

#有必要的话上述 代码多执行一遍

Install-Module -Name DockerProvider -Repository PSGallery

Install-Package -Name docker -ProviderName DockerProvider -RequiredVersion Preview

# 或Install-Package -Name docker -ProviderName DockerProvider -RequiredVersion 17.10.0-ee-preview-2

Restart-Computer


 切换到Linux内核容器

>[Environment]::SetEnvironmentVariable("LCOW_SUPPORTED", "1", "Machine")

>Restart-Service Docker


 切换到Windows内核容器

>[Environment]::SetEnvironmentVariable("LCOW_SUPPORTED", $null, "Machine")

>Restart-Service Docker


 @@#
切换后重启docker,使用docker info
@@@code

PS C:\Users\Administrator> docker version

Client:

Version: 17.10.0-ee-preview-3

API version: 1.33

Go version: go1.8.4

Git commit: 1649af8

Built: Fri Oct 6 17:52:28 2017

OS/Arch: windows/amd64


 Server:

Version: 17.10.0-ee-preview-3

API version: 1.34 (minimum version 1.24)

Go version: go1.8.4

Git commit: b8571fd

Built: Fri Oct 6 18:01:48 2017

OS/Arch: windows/amd64

Experimental: true

PS C:\Users\Administrator>


 @@#
3、修改docker配置
启动docker服务后,会生成docker目录 ,文件为C:\ProgramData\docker\config\ daemon.json
@@@code

{

"data-root":"d:\\Docker",

"registry-mirrors": [ "https://i1el1i0w.mirror.aliyuncs.com","https://registry.docker-cn.com"],

"experimental":true

}

@@#
4、windows内核模式下常用的镜像
拉取非常慢
Windows 2016
docker pull mcr.microsoft.com/windows/servercore:10.0.14393.3204-amd64
Windows2019 提示版本不对就换TAG
docker pull mcr.microsoft.com/dotnet/framework/sdk:4.8
docker pull mcr.microsoft.com/dotnet/core/runtime:2.2-nanoserver-1809
docker pull mcr.microsoft.com/dotnet/core/runtime:2.2-nanoserver-1903
docker pull mcr.microsoft.com/dotnet/core/sdk:2.2.402-nanoserver-1903
docker pull mcr.microsoft.com/dotnet/core/sdk:2.2-nanoserver-1903
docker pull mcr.microsoft.com/dotnet/core/aspnet:2.2-nanoserver-1809
docker pull mcr.microsoft.com/windows/servercore:ltsc2019-amd64
- Linux下安装docker
- 安装centos7 mini
安装 docker,参考 https://www.cnblogs.com/qgc1995/p/9553572.html
@@@code

yum install docker-ce

#安装 19.0.3

@@#
- 拉取测试镜像
@@@code

docker pull hello-world

[root@docker ~]# docker run hello-world


 Hello from Docker!

This message shows that your installation appears to be working correctly.


 To generate this message, Docker took the following steps:

1. The Docker client contacted the Docker daemon.

2. The Docker daemon pulled the "hello-world" image from the Docker Hub.

(amd64)

3. The Docker daemon created a new container from that image which runs the

executable that produces the output you are currently reading.

4. The Docker daemon streamed that output to the Docker client, which sent it

to your terminal.


 To try something more ambitious, you can run an Ubuntu container with:

$ docker run -it ubuntu bash


 Share images, automate workflows, and more with a free Docker ID:

https://hub.docker.com/


 For more examples and ideas, visit:

https://docs.docker.com/get-started/


 @@#
拉取镜像 https://hub.docker.com/publishers/microsoftowner
参考https://www.bbsmax.com/A/RnJW1E0Bdq/
@@@code
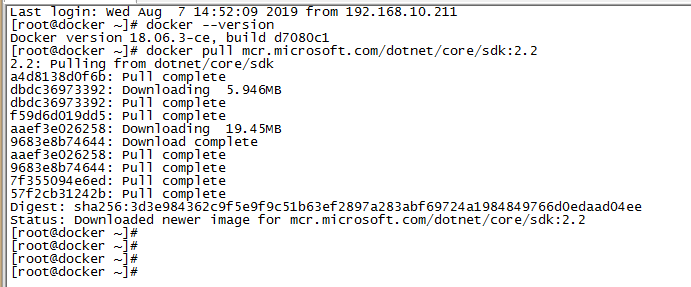
docker pull mcr.microsoft.com/dotnet/core/sdk:2.2
docker images
docker run -itd --rm -p 80:80 --name core_test mcr.microsoft.com/dotnet/core/sdk:2.2
docker ps
docker attach core_test
# 删除tag docker rm core_test 血和泪告诉我们,不要轻易删除tag,这就是一个实例,其中所有文件变动都会删除,如果随后又同名run的话,可以跑路了
# 删除文件 sudo docker rmi imageid
@@#
- 容器持久化与移除

- 进入docker执行命令

或使用
@@@code

docker inspect -f {{.State.Pid}} 5a406185953b

nsenter --target 20190 --mount --uts --ipc --net --pid

@@#
- Docker互访
参考
https://www.cnblogs.com/shenh/p/9714547.html
@@@code

docker network create LanDocker

docker network ls

docker run -itd --rm --name redis --network LanDocker --network-alias redis redis

@@#
- 在vs2017中发布应用
https://www.cnblogs.com/rufus-hua/p/6742836.html
https://blog.csdn.net/sd7o95o/article/details/80809734
@@@code
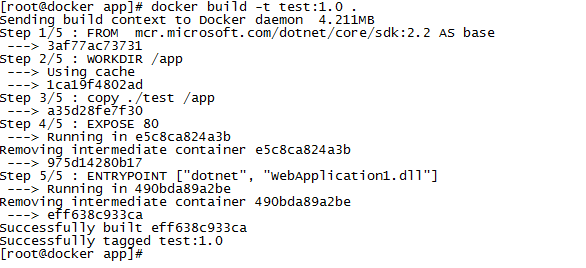
docker build -t test:1.0 . # 注意最后有一个小点.
docker run -itd -p 80:80 --name test test:1.0 #在浏览器中打开
@@#
Dockerfile
@@@code

FROM mcr.microsoft.com/dotnet/core/sdk:2.2 AS base

WORKDIR /app

copy ./test /app

EXPOSE 80


 ENTRYPOINT ["dotnet", "WebApplication1.dll"]

@@#


可能发生的错误

防火墙操作 参考 https://blog.csdn.net/u013514928/article/details/80411110
@@@code

firewall-cmd --zone=public --add-port=3410-3420/tcp --permanent

firewall-cmd --zone=public --add-port=80/tcp --permanent

firewall-cmd --zone=public --add-port=5880/udp --permanent

firewall-cmd --zone=public --add-port=5881/tcp --permanent

firewall-cmd --zone=public --add-port=5000-5005/tcp --permanent

firewall-cmd --zone=public --add-port=7200/tcp --permanent

firewall-cmd --zone=public --add-port=6379/tcp --permanent

firewall-cmd –reload

firewall-cmd --permanent --list-port

@@#
附录windows docker常用的管理命令
https://wenku.baidu.com/view/868c47c36e1aff00bed5b9f3f90f76c661374ce7.html (推荐看一哈通信原理)
1. 查看docker信息(version、info)
# 查看docker版本
docker version
# 显示docker系统的信息
docker info
2. 对image的操作(search、pull、images、rmi、history)
# 检索image
docker search image_name
# 下载image
docker pull image_name
#列出镜像列表; -a, --all=false Show all images; --no-trunc=false Don't truncate output; -q, --quiet=false Only show numeric IDs
docker images
# 删除一个或者多个镜像; -f, --force=false Force; --no-prune=false Do not delete untagged parents
docker rmi image_name
# 显示一个镜像的历史; --no-trunc=false Don't truncate output; -q, --quiet=false Only show numeric IDs docker his
3. 启动容器(run)
docker容器可以理解为在沙盒中运行的进程。这个沙盒包 含了该进程运行所必须的资源,包括文件系统、系统类库、shell 环境等等。但这个沙盒默认是不会运行任何程序的。你需要在沙盒中运行一个进程来启动某一个容器。这个进程是该容器的唯一进程,所以当该进程结束的时候,容 器也会完全的停止。
# 在容器中运行"echo"命令,输出"hello word"
docker run image_name echo "hello word"
# 交互式进入容器中
docker run -i -t image_name /bin/bash
# 在容器中安装新的程序
docker run image_name apt-get install -y app_name
# 在一次进刚才进入的容器
docker exec -i -t [容器ID]
Note: 在执行apt-get 命令的时候,要带上-y参数。如果不指定-y参数的话,apt-get命令会进入交互模式,需要用户输入命令来进行确认,但在docker环境中是无法响 应这种交互的。apt-get 命令执行完毕之后,容器就会停止,但对容器的改动不会丢失。
4. 查看容器(ps)
# 列出当前所有正在运行的container
docker ps
# 列出所有的container
docker ps -a
# 列出最近一次启动的container
docker ps -l
5. 保存对容器的修改(commit)
当你对某一个容器做了修改之后(通过在容器中运行某一个命令),可以把对容器的修改保存下来,这样下次可以从保存后的最新状态运行该容器。
# 保存对容器的修改; -a, --author="" Author; -m, --message="" Commit message
docker commit ID new_image_name
6. 对容器的操作(rm、stop、start、kill、logs、diff、top、cp、restart、attach)
# 删除所有容器
docker rm `docker ps -a -q`
# 删除单个容器; -f, --force=false; -l, --link=false Remove the specified link and not the underlying container; -v, --volumes=false Remove the volumes associated to the container
docker rm Name/ID
# 停止、启动、杀死一个容器
docker stop Name/ID
docker start Name/ID
docker kill Name/ID
# 从一个容器中取日志; -f, --follow=false Follow log output; -t, --timestamps=false Show timestamps
docker logs Name/ID
# 列出一个容器里面被改变的文件或者目录,list列表会显示出三种事件,A 增加的,D 删除的,C 被改变的
docker diff Name/ID
# 显示一个运行的容器里面的进程信息
docker top Name/ID
# 从容器里面拷贝文件/目录到本地一个路径
docker cp Name:/container_path to_path
docker cp ID:/container_path to_path
# 重启一个正在运行的容器; -t, --time=10 Number of seconds to try to stop for before killing the container, Default=10
docker restart Name/ID
# 附加到一个运行的容器上面; --no-stdin=false Do not attach stdin; --sig-proxy=true Proxify all received signal to the process
docker attach ID
Note: attach命令允许你查看或者影响一个运行的容器。你可以在同一时间attach同一个容器。你也可以从一个容器中脱离出来,是从CTRL-C。
7. 保存和加载镜像(save、load)
当需要把一台机器上的镜像迁移到另一台机器的时候,需要保存镜像与加载镜像。
# 保存镜像到一个tar包; -o, --output="" Write to an file
docker save image_name -o file_path
# 加载一个tar包格式的镜像; -i, --input="" Read from a tar archive file
docker load -i file_path
# 机器a
docker save image_name > /home/save.tar
# 使用scp将save.tar拷到机器b上,然后:
docker load < /home/save.tar
8、 登录registry server(login)
# 登陆registry server; -e, --email="" Email; -p, --password="" Password; -u, --username="" Usernamedocker login
9. 发布image(push)
# 发布docker镜像
docker push new_image_name
10. 根据Dockerfile 构建出一个容器
#build
--no-cache=false Do not use cache when building the image
-q, --quiet=false Suppress the verbose output generated by the containers
--rm=true Remove intermediate containers after a successful build
-t, --tag="" Repository name (and optionally a tag) to be applied to the resulting image in case of success
docker build -t image_name Dockerfile_path
————————————————
版权声明:本文为CSDN博主「天府云创」的原创文章,遵循 CC 4.0 BY-SA 版权协议,转载请附上原文出处链接及本声明。
原文链接:https://blog.csdn.net/enweitech/article/details/80689387
Docker运行dotnetcore的更多相关文章
- 使用docker运行dotnetcore站点
使用docker运行netcore站点 1.新建一.netcore测试站点,dotnet publish 发布到publish目录下 2.编写Dockerfile文件 3.打包上传到centos服务器 ...
- Docker在Linux上运行NetCore系列(一)配置运行DotNetCore控制台
转发请注明此文章作者与路径,请尊重原著,违者必究. 系列文章:https://www.cnblogs.com/alunchen/p/10121379.html 本篇文章操作系统信息 Linux:ubu ...
- 在 Azure 上使用 Docker运行 Mono
Docker 是最近相当热门的一个名词,它是一个基于 Linux Container 的轻量化的虚拟技术,而微软也相当积极与 Docker 合作,在 Azure 上支持这个火热的技术,并且提供简单的方 ...
- Docker运行 Mono
Docker运行 Mono Docker 是最近相当热门的一个名词,它是一个基于 Linux Container 的轻量化的虚拟技术,而微软也相当积极与 Docker 合作,在 Azure 上支持这个 ...
- 如何使用windows版Docker并在IntelliJ IDEA使用Docker运行Spring Cloud项目
如何使用windows版Docker并在IntelliJ IDEA使用Docker运行Spring Cloud项目 #1:前提准备 1.1 首先请确认你的电脑是windows10专业版或企业版,只有这 ...
- Docker 运行Tensorboard 和 jupyter的正确方法
Docker 运行Tensorboard 和 jupyter的正确方法 网上找了很多方法都是jupyter 运行正常但不知道如何打开Tensorboard.折腾了很久,实验很多中方法最终找到了一个正确 ...
- 在Linux(Centos7)上使用Docker运行.NetCore
在上一篇中我们写了如何在windows中使用docker运行.netcore,既然我们了解了windows下的运行发布,我们也可以试试linux下使用docker运行.netcore项目,那么今天我们 ...
- 在Windows上使用Docker运行.NetCore
今天我们来说下如何在windows下使用docker运行.net core,既然是docker,那么我们首先得在windows上安装docker. 在Windows安装 docker 有两种选择 :1 ...
- ASP.NET Core 2.1 使用Docker运行
重要提示,本文为 ASP.NET Core 2.1 如果你是 2.2 那么请将文中的镜像换为 microsoft/dotnet:2.2.0-aspnetcore-runtime 即可,其他操作一样 1 ...
随机推荐
- Java修炼——面向对象_抽象类和抽象方法
抽象类和抽象方法 什么是抽象类? 使用 abstract 修饰的类称为抽象类 public abstract class Person { } 抽象类的特征 1) 抽象类不可以创建对象 2) 抽象类可 ...
- MyBatis三个查询方法_selectList_selectOne_selectMap
mybatis-cfg.xml的配置: <?xml version="1.0" encoding="UTF-8"?> <!DOCTYPE co ...
- 上次阿里面试问到Redis主从复制原理,这次终于搞明白了!
1.前言 Redis单节点存在单点故障,为解决单点问题,需要对Redis节点配置从节点.使用哨兵来监听主节点存活状态,若主节点挂掉,从节点能继续提供缓存功能.从节点怎样和主节点间完成数据传递?就是Re ...
- WPF之图片处理系列
WPF 中的一些图片处理方法 一,视觉处理(控件展示) 1,显示图片 Image控件展示 Xaml代码: <Image source="/Resources/Images/1.png& ...
- NodeJS4-4静态资源服务器实战_优化引入模板引擎
引入模板引擎(handlebars) cnpm i handlebars 结构大概是这样子的,新建模板dir.tpl文件和route.js dir.tpl <!DOCTYPE html> ...
- 《Java基础知识》Java类的基本运行顺序
我们以下面的类来说明一个基本的 Java 类的运行顺序: public class Demo { private String name; private int age; public Demo() ...
- [ASP.NET Core 3框架揭秘] 配置[6]:多样化的配置源[上篇]
.NET Core采用的这个全新的配置模型的一个主要的特点就是对多种不同配置源的支持.我们可以将内存变量.命令行参数.环境变量和物理文件作为原始配置数据的来源.如果采用物理文件作为配置源,我们可以选择 ...
- JS---案例:图标跟着鼠标飞(有bug)
案例:图标跟着鼠标飞(有bug) <!DOCTYPE html> <html lang="en"> <head> <meta charse ...
- sql server重建全库索引和更新全库统计信息通用脚本
重建全库索引: exec sp_msforeachtable 'DBCC DBREINDEX(''?'')' 更新全库统计信息: --更新全部统计信息 exec sp_updatestats 实例反馈 ...
- ReactNative: 使用AppReistry注册类
一.简介 每一个应用程序的运行都有一个入口文件或者入口函数,例如iOS中的使用UIApplicationMain类完成入口函数的实现,在React-Native中,AppRegistry类就肩负着这个 ...