详谈springboot启动类的@SpringBootApplication注解
前几天我们学会了如何创建springboot项目今天我们说一下他是怎么运行的为什么不需要我们再去编写繁重的配置文件的
@SpringBootApplication
首先我们看一下这个注解,他是用来标注在主程序的,表明他是一个springboot项目
@Target({ElementType.TYPE})

  @Retention(RetentionPolicy.RUNTIME)

  @Documented

  @Inherited

  @SpringBootConfiguration

  @EnableAutoConfiguration

  @ComponentScan(

      excludeFilters = {

        @Filter(type = FilterType.CUSTOM,classes = {TypeExcludeFilter.class}),

        @Filter( type = FilterType.CUSTOM,classes = {AutoConfigurationExcludeFilter.class})

      }

  )

  public @interface SpringBootApplication {
}
点进@SpringBootApplication注解后我们重点关注最后三个注解
@ComponentScan(包扫描)
component是组件,scan是扫描,所以这个注解的含义就是用来扫描组件的,
componentScan就是扫描所标注的类所在包下的所有需要注入的组件,将其注入,这里他是在@SpringBootApplication 中体现的,所以这个注解会自动注入所有在主程序所在包下的组件
以前在ssm项目中我们需要去配置我们的包扫描
<context:component-scan base-package="com.xxx"></context:component-scan>
@EnableAutoConfiguration(开启自动装配)
@Target({ElementType.TYPE})
@Retention(RetentionPolicy.RUNTIME)
@Documented
@Inherited
@AutoConfigurationPackage
@Import({AutoConfigurationImportSelector.class})
public @interface EnableAutoConfiguration {
String ENABLED_OVERRIDE_PROPERTY = "spring.boot.enableautoconfiguration";
Class<?>[] exclude() default {};
String[] excludeName() default {};
}
这里我们关注两个注解
一、@AutoConfigurationPackage
 @Target({ElementType.TYPE})

  @Retention(RetentionPolicy.RUNTIME)

  @Documented

  @Inherited

  @Import({Registrar.class})

  public @interface AutoConfigurationPackage {

  }
在这个注解中,主要是获取我们注解所在包下的组件去进行注册
static class Registrar implements ImportBeanDefinitionRegistrar, DeterminableImports {
Registrar() {
}
//metadata是我们注解所在的元信息
public void registerBeanDefinitions(AnnotationMetadata metadata, BeanDefinitionRegistry registry) {
//看这里 将我们注解所在包下所有的组件去进行注册
AutoConfigurationPackages.register(registry, (new AutoConfigurationPackages.PackageImport(metadata)).getPackageName());
}
public Set<Object> determineImports(AnnotationMetadata metadata) {
return Collections.singleton(new AutoConfigurationPackages.PackageImport(metadata));
}
}
register方法:通过AutoConfigurationPackages去对包下的组件进行注册
private static final String BEAN = AutoConfigurationPackages.class.getName();
public static void register(BeanDefinitionRegistry registry, String... packageNames) {
//先判断整个BEAN有没有被注册
if (registry.containsBeanDefinition(BEAN)) {
//获取bean的定义
BeanDefinition beanDefinition = registry.getBeanDefinition(BEAN);
//通过bean获取构造函数的参数值
ConstructorArgumentValues constructorArguments = beanDefinition.getConstructorArgumentValues();
//添加参数值,
constructorArguments.addIndexedArgumentValue(0, addBasePackages(constructorArguments, packageNames));
} else {
//创建一个新的bean的定义
GenericBeanDefinition beanDefinition = new GenericBeanDefinition();
//设置bean的类型为AutoConfigurationPackages类型
beanDefinition.setBeanClass(AutoConfigurationPackages.BasePackages.class);
beanDefinition.getConstructorArgumentValues().addIndexedArgumentValue(0, packageNames);
beanDefinition.setRole(2);
//进行bean的注册
registry.registerBeanDefinition(BEAN, beanDefinition);
}
}
二、@Import({AutoConfigurationImportSelector.class})
装配我们的 自动配置导入选择器
我们点进去这个类,下面有一个方法getAutoConfigurationEntry 获取自动装配的入口、
protected AutoConfigurationImportSelector.AutoConfigurationEntry getAutoConfigurationEntry(AutoConfigurationMetadata autoConfigurationMetadata, AnnotationMetadata annotationMetadata) {

          if (!this.isEnabled(annotationMetadata)) {

              return EMPTY_ENTRY;

          } else {

              AnnotationAttributes attributes = this.getAttributes(annotationMetadata);

              List<String> configurations = this.getCandidateConfigurations(annotationMetadata, attributes);

              configurations = this.removeDuplicates(configurations);

              Set<String> exclusions = this.getExclusions(annotationMetadata, attributes);

              this.checkExcludedClasses(configurations, exclusions);

              configurations.removeAll(exclusions);

              configurations = this.filter(configurations, autoConfigurationMetadata);

              this.fireAutoConfigurationImportEvents(configurations, exclusions);

              return new AutoConfigurationImportSelector.AutoConfigurationEntry(configurations, exclusions);

          }

      }
这个方法他主要是获取了configurations的一个集合在这我们点进去getCandidateConfigurations方法
protected List<String> getCandidateConfigurations(AnnotationMetadata metadata, AnnotationAttributes attributes) {

          List<String> configurations = SpringFactoriesLoader.loadFactoryNames(this.getSpringFactoriesLoaderFactoryClass(), this.getBeanClassLoader());

          Assert.notEmpty(configurations, "No auto configuration classes found in META-INF/spring.factories. If you are using a custom packaging, make sure that file is correct.");

          return configurations;

      }
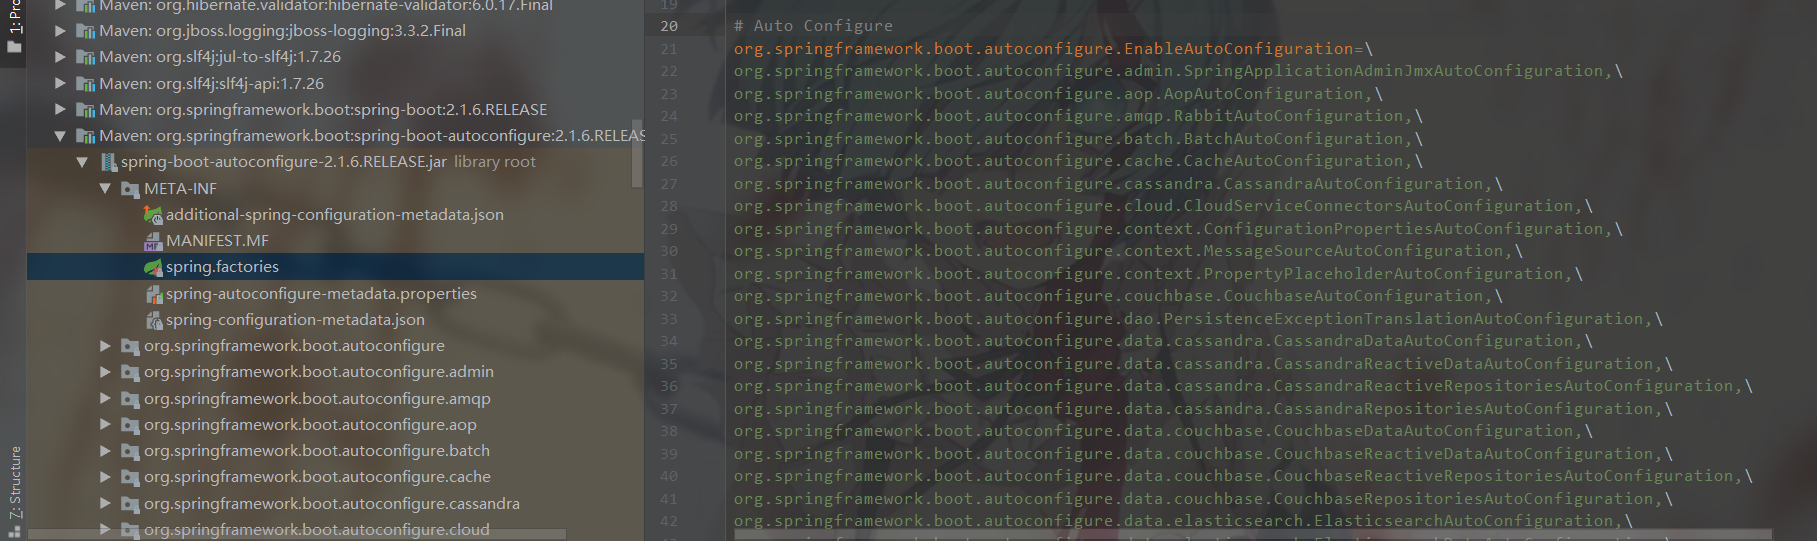
我们首先看他这个红色报错信息:在META-INF/spring.factories中没有找到自动配置类。根据他的错误信息我们可以得出他是从META-INF/spring.factories获取我们的自动配置信息的
我们也可以在点进这个loadFactoryNames这个方法
public static List<String> loadFactoryNames(Class<?> factoryClass, @Nullable ClassLoader classLoader) {
String factoryClassName = factoryClass.getName();
//调用了下面的方法loadSpringFactories
return (List)loadSpringFactories(classLoader).getOrDefault(factoryClassName, Collections.emptyList());
}
private static Map<String, List<String>> loadSpringFactories(@Nullable ClassLoader classLoader) {
MultiValueMap<String, String> result = (MultiValueMap)cache.get(classLoader);
if (result != null) {
return result;
} else {
try {
//根据类加载器去获取配置文件里的信息
Enumeration<URL> urls = classLoader != null ? classLoader.getResources("META-INF/spring.factories") : ClassLoader.getSystemResources("META-INF/spring.factories");
LinkedMultiValueMap result = new LinkedMultiValueMap();
while(urls.hasMoreElements()) {
URL url = (URL)urls.nextElement();
UrlResource resource = new UrlResource(url);
//配置信息经过多次转换最终成为properties形式
Properties properties = PropertiesLoaderUtils.loadProperties(resource);
Iterator var6 = properties.entrySet().iterator();
//循环获取所有的配置信息
while(var6.hasNext()) {
Entry<?, ?> entry = (Entry)var6.next();
String factoryClassName = ((String)entry.getKey()).trim();
String[] var9 = StringUtils.commaDelimitedListToStringArray((String)entry.getValue());
int var10 = var9.length;
for(int var11 = 0; var11 < var10; ++var11) {
String factoryName = var9[var11];
result.add(factoryClassName, factoryName.trim());
}
}
}
cache.put(classLoader, result);
return result;
} catch (IOException var13) {
throw new IllegalArgumentException("Unable to load factories from location [META-INF/spring.factories]", var13);
}
}
}
而这个配置文件在哪里呢
在我们项目的External Libraries中找到我们的spring-boot-autoconfigure中

这样就完成我们默认的一些自动装配了
@SpringBootConfiguration
这个方法就比较简单了,表明了这是一个配置类
  @Target({ElementType.TYPE})

  @Retention(RetentionPolicy.RUNTIME)

  @Documented

  @Configuration

  public @interface SpringBootConfiguration {

  }
到这我们三个注解就讲完了,有什么问题请大佬们指明谢谢。
有过挣扎,有过失败,但仍然会爬起来继续战斗
详谈springboot启动类的@SpringBootApplication注解的更多相关文章
- springboot系列(三) 启动类中关键注解作用解析
一.Springboot:请求入口 @SpringBootApplication @EnableAspectJAutoProxy @EnableScheduling @EnableTransactio ...
- springboot 启动类CommandLineRunner(转载)
在Spring boot项目的实际开发中,我们有时需要项目服务启动时加载一些数据或预先完成某些动作.为了解决这样的问题,Spring boot 为我们提供了一个方法:通过实现接口 CommandLin ...
- springboot 启动类启动跳转到前端网页404问题的两个解决方案
前段时间研究springboot 发现使用Application类启动的话, 可以进入Controller方法并且返回数据,但是不能跳转到WEB-INF目录下网页, 前置配置 server: port ...
- Springboot启动类及注解说明
Spring boot的启动是基于main方法的,其主要注解为: 1. @springBootApplication:项目的启动注解,是一个组合注解,包含@SpringbootConfiguratio ...
- Springboot测试类之@RunWith注解
@runWith注解作用: --@RunWith就是一个运行器 --@RunWith(JUnit4.class)就是指用JUnit4来运行 --@RunWith(SpringJUnit4ClassRu ...
- SpringBoot学习之@SpringBootApplication注解
下面是我们经常见到SpringBoot启动类代码: @SpringBootApplicationpublic class DemoApplication extends SpringBootServl ...
- SpringBoot启动tomcat源码解读
一.SpringBoot自动拉起Tomcat 原文链接:http://www.studyshare.cn/blog-front/blog/details/1136 SpringBoot框架是当前比较流 ...
- Springboot中使用自定义参数注解获取 token 中用户数据
使用自定义参数注解获取 token 中User数据 使用背景 在springboot项目开发中需要从token中获取用户信息时通常的方式要经历几个步骤 拦截器中截获token TokenUtil工具类 ...
- SpringBoot启动嵌入式tomcat源码解读
一.SpringBoot自动拉起Tomcat SpringBoot框架是当前比较流行的java后端开发框架,与maven结合大大简化了开发人员项目搭建的步骤,我们知道SpringBoot的启动类启动后 ...
随机推荐
- C#怎么实现文件下载功能的四种方法
using System; using System.Data; using System.Configuration; using System.Web; using System.Web.Secu ...
- 如何在当前文件夹打开cmd(基于win10)
如何在当前文件夹打开cmd(基于win10) 方法一: 1.先打开你要进入的文件夹 2.在标记的位置输入cmd,就可以进入当前文件的cmd 方法二: 1.打开你要进入的文件夹 2.通过shift + ...
- 【PostMan】批量参数化的用法 之 text/csv
目的:批量参数化,单个循环多次使用不同的参数请求. 测试数据准备 新建txt文件,输入格式: 首行 --->参数名 其他行 --->测试数据(不同测试数据需要换行) 如下所示,Number ...
- 【搞定 Java 并发面试】面试最常问的 Java 并发进阶常见面试题总结!
本文为 SnailClimb 的原创,目前已经收录自我开源的 JavaGuide 中(61.5 k Star![Java学习+面试指南] 一份涵盖大部分Java程序员所需要掌握的核心知识.觉得内容不错 ...
- 【前端知识体系-JS相关】10分钟搞定JavaScript正则表达式高频考点
1.正则表达式基础 1.1 创建正则表达式 1.1.1 使用一个正则表达式字面量 const regex = /^[a-zA-Z]+[0-9]*\W?_$/gi; 1.1.2 调用RegExp对象的构 ...
- Java工作流系统-驰骋BPM工作流 引擎的工作模式
关键字:驰骋工作流引擎 流程引擎工作模式 流程中间件工作模式 工作流快速开发平台 工作流流设计 业务流程管理 asp.net 开源工作流bpm工作流系统 java工作流主流框架 自定义工 ...
- 关于Java中2.0-1.1!=0.9的问题
关于Java中2.0-1.1!=0.9的问题 问题引出: 在<Java核心技术>中关于浮点数值计算部分提到,System.out.println(2.0-1.1)这条语句并不是想当然的0. ...
- <编译原理 - 函数绘图语言解释器(2)语法分析器 - python>
<编译原理 - 函数绘图语言解释器(2)语法分析器 - python> 背景 编译原理上机实现一个对函数绘图语言的解释器 - 用除C外的不同种语言实现 设计思路: 设计函数绘图语言的文法, ...
- JVM(2)--深入理解java对象创建始终
java对象探秘 java是一门面向对象的语言,我们无时无刻不在创建对象和使用对象,那么java虚拟机是如何创建对象的?又是如何访问对象的?java对象中究竟存储了什么运行时所必需的数据?在学习了ja ...
- word2vec:主要概念和流程
1.单词的向量化表示 一般来讲,词向量主要有两种形式,分别是稀疏向量和密集向量. 所谓稀疏向量,又称为one-hot representation,就是用一个很长的向量来表示一个词,向量的长度为词典的 ...