elasticsearch安装教程
1 java8 环境
elasticsearch需要安装java 8 环境,配置JAVA_HOME
查看是否有旧版本的java
java -verison
如果没有安装,可以进入官方选择适合自己的版本,下载地址:http://www.oracle.com/technetwork/java/javase/downloads/jdk8-downloads-2133151.html
下载并解压
$ cd /usr/local/src

$ wget --no-cookies --no-check-certificate --header "Cookie: gpw_e24=http%3A%2F%2Fwww.oracle.com%2F; oraclelicense=accept-securebackup-cookie" http://download.oracle.com/otn-pub/java/jdk/8u171-b11/512cd62ec5174c3487ac17c61aaa89e8/jdk-8u171-linux-x64.tar.gz

$ tar zxvf jdk-8u171-linux-x64.tar.gz
配置环境变量
# export PATH USER LOGNAME MAIL HOSTNAME HISTSIZE HISTCONTROL 之后加入下面内容

#jdk

export JAVA_HOME=/usr/local/src/jdk1.8.0_171

export PATH=$JAVA_HOME/bin:$PATH

export CLASSPATH=.:$JAVA_HOME/lib/dt.jar:$JAVA_HOME/lib/tools.jar
使配置生效
source /etc/profile
再次验证是否安装成功
java -version
java version "1.8.0_171"

Java(TM) SE Runtime Environment (build 1.8.0_171-b11)

Java HotSpot(TM) 64-Bit Server VM (build 25.171-b11, mixed mode)
查看变量
[root@VM_35_1_centos ~]# echo $JAVA_HOME

/usr/local/src/jdk1.8.0_171
2 安装elasticsearch
安装教程位置:
https://www.elastic.co/guide/en/elasticsearch/reference/5.6/install-elasticsearch.html
这里我们使用tar包
cd /usr/local/src

wget https://artifacts.elastic.co/downloads/elasticsearch/elasticsearch-5.6.9.tar.gz

tar zxvf elasticsearch-5.6.9.tar.gz

cd elasticsearch-5.6.9/
内存配置
默认的内存配置是2g,我学习用的机子内存较小(实际2g)会挂掉,所以我将内存改成1g(机子实际内存的一半)
vim /etc/elasticsearch/jvm.options
内容
-Xms1g

-Xmx1g
启动
./bin/elasticsearch
如果你使用root用户启动,则会出现下面的报错
[2018-05-23T15:00:43,762][WARN ][o.e.b.ElasticsearchUncaughtExceptionHandler] [] uncaught exception in thread [main]

org.elasticsearch.bootstrap.StartupException: java.lang.RuntimeException: can not run elasticsearch as root

	at org.elasticsearch.bootstrap.Elasticsearch.init(Elasticsearch.java:136) ~[elasticsearch-5.6.9.jar:5.6.9]

	at org.elasticsearch.bootstrap.Elasticsearch.execute(Elasticsearch.java:123) ~[elasticsearch-5.6.9.jar:5.6.9]

	at org.elasticsearch.cli.EnvironmentAwareCommand.execute(EnvironmentAwareCommand.java:70) ~[elasticsearch-5.6.9.jar:5.6.9]

	at org.elasticsearch.cli.Command.mainWithoutErrorHandling(Command.java:134) ~[elasticsearch-5.6.9.jar:5.6.9]

	at org.elasticsearch.cli.Command.main(Command.java:90) ~[elasticsearch-5.6.9.jar:5.6.9]

	at org.elasticsearch.bootstrap.Elasticsearch.main(Elasticsearch.java:91) ~[elasticsearch-5.6.9.jar:5.6.9]

	at org.elasticsearch.bootstrap.Elasticsearch.main(Elasticsearch.java:84) ~[elasticsearch-5.6.9.jar:5.6.9]

Caused by: java.lang.RuntimeException: can not run elasticsearch as root

	at org.elasticsearch.bootstrap.Bootstrap.initializeNatives(Bootstrap.java:106) ~[elasticsearch-5.6.9.jar:5.6.9]

	at org.elasticsearch.bootstrap.Bootstrap.setup(Bootstrap.java:195) ~[elasticsearch-5.6.9.jar:5.6.9]

	at org.elasticsearch.bootstrap.Bootstrap.init(Bootstrap.java:342) ~[elasticsearch-5.6.9.jar:5.6.9]

	at org.elasticsearch.bootstrap.Elasticsearch.init(Elasticsearch.java:132) ~[elasticsearch-5.6.9.jar:5.6.9]

	... 6 more
这是出于系统安全考虑设置的条件。由于ElasticSearch可以接收用户输入的脚本并且执行,为了系统安全考虑,
建议创建一个单独的用户用来运行ElasticSearch
创建elsearch用户组及elsearch用户
groupadd elsearch

useradd elsearch -g elsearch -p elasticsearch

cd /usr/local/src

chown -R elsearch:elsearch  elasticsearch-5.6.9
切换到elsearch用户再启动
su elsearch

./elasticsearch
这时你可能还会遇到下面的报错,max virtual memory areas vm.max_map_count [65530] is too low, increase to at least [262144]
解决方法是:
sudo sysctl -w vm.max_map_count=262144
再次启动
[elsearch@VM_35_1_centos elasticsearch-5.6.9]$ ./bin/elasticsearch

[2018-05-23T15:09:55,323][INFO ][o.e.n.Node               ] [] initializing ...

[2018-05-23T15:09:55,546][INFO ][o.e.e.NodeEnvironment    ] [ndB4c4F] using [1] data paths, mounts [[/ (rootfs)]], net usable_space [44.7gb], net total_space [49gb], spins? [unknown], types [rootfs]

[2018-05-23T15:09:55,546][INFO ][o.e.e.NodeEnvironment    ] [ndB4c4F] heap size [1015.6mb], compressed ordinary object pointers [true]

[2018-05-23T15:09:55,547][INFO ][o.e.n.Node               ] node name [ndB4c4F] derived from node ID [ndB4c4FLRxWlhH_94CN70Q]; set [node.name] to override

[2018-05-23T15:09:55,548][INFO ][o.e.n.Node               ] version[5.6.9], pid[3857], build[877a590/2018-04-12T16:25:14.838Z], OS[Linux/3.10.0-514.21.1.el7.x86_64/amd64], JVM[Oracle Corporation/Java HotSpot(TM) 64-Bit Server VM/1.8.0_171/25.171-b11]

[2018-05-23T15:09:55,548][INFO ][o.e.n.Node               ] JVM arguments [-Xms1g, -Xmx1g, -XX:+UseConcMarkSweepGC, -XX:CMSInitiatingOccupancyFraction=75, -XX:+UseCMSInitiatingOccupancyOnly, -XX:+AlwaysPreTouch, -Xss1m, -Djava.awt.headless=true, -Dfile.encoding=UTF-8, -Djna.nosys=true, -Djdk.io.permissionsUseCanonicalPath=true, -Dio.netty.noUnsafe=true, -Dio.netty.noKeySetOptimization=true, -Dio.netty.recycler.maxCapacityPerThread=0, -Dlog4j.shutdownHookEnabled=false, -Dlog4j2.disable.jmx=true, -Dlog4j.skipJansi=true, -XX:+HeapDumpOnOutOfMemoryError, -Des.path.home=/usr/local/src/elasticsearch-5.6.9]

[2018-05-23T15:09:57,152][INFO ][o.e.p.PluginsService     ] [ndB4c4F] loaded module [aggs-matrix-stats]

[2018-05-23T15:09:57,152][INFO ][o.e.p.PluginsService     ] [ndB4c4F] loaded module [ingest-common]

[2018-05-23T15:09:57,152][INFO ][o.e.p.PluginsService     ] [ndB4c4F] loaded module [lang-expression]

[2018-05-23T15:09:57,152][INFO ][o.e.p.PluginsService     ] [ndB4c4F] loaded module [lang-groovy]

[2018-05-23T15:09:57,153][INFO ][o.e.p.PluginsService     ] [ndB4c4F] loaded module [lang-mustache]

[2018-05-23T15:09:57,153][INFO ][o.e.p.PluginsService     ] [ndB4c4F] loaded module [lang-painless]

[2018-05-23T15:09:57,153][INFO ][o.e.p.PluginsService     ] [ndB4c4F] loaded module [parent-join]

[2018-05-23T15:09:57,153][INFO ][o.e.p.PluginsService     ] [ndB4c4F] loaded module [percolator]

[2018-05-23T15:09:57,153][INFO ][o.e.p.PluginsService     ] [ndB4c4F] loaded module [reindex]

[2018-05-23T15:09:57,153][INFO ][o.e.p.PluginsService     ] [ndB4c4F] loaded module [transport-netty3]

[2018-05-23T15:09:57,153][INFO ][o.e.p.PluginsService     ] [ndB4c4F] loaded module [transport-netty4]

[2018-05-23T15:09:57,153][INFO ][o.e.p.PluginsService     ] [ndB4c4F] no plugins loaded

[2018-05-23T15:10:00,188][INFO ][o.e.d.DiscoveryModule    ] [ndB4c4F] using discovery type [zen]

[2018-05-23T15:10:01,225][INFO ][o.e.n.Node               ] initialized

[2018-05-23T15:10:01,225][INFO ][o.e.n.Node               ] [ndB4c4F] starting ...

[2018-05-23T15:10:01,505][INFO ][o.e.t.TransportService   ] [ndB4c4F] publish_address {127.0.0.1:9300}, bound_addresses {127.0.0.1:9300}

[2018-05-23T15:10:04,656][INFO ][o.e.c.s.ClusterService   ] [ndB4c4F] new_master {ndB4c4F}{ndB4c4FLRxWlhH_94CN70Q}{HfnS160SQP2XrgYtuEKX0w}{127.0.0.1}{127.0.0.1:9300}, reason: zen-disco-elected-as-master ([0] nodes joined)[, ]

[2018-05-23T15:10:04,728][INFO ][o.e.h.n.Netty4HttpServerTransport] [ndB4c4F] publish_address {127.0.0.1:9200}, bound_addresses {127.0.0.1:9200}

[2018-05-23T15:10:04,728][INFO ][o.e.n.Node               ] [ndB4c4F] started

[2018-05-23T15:10:04,809][INFO ][o.e.g.GatewayService     ] [ndB4c4F] recovered [0] indices into cluster_state
发现started关键字,并且发现监听127.0.0.1:9200端口,elasticsearch默认监听9200端口
使用curl测试是否安装成功
[root@VM_35_1_centos log]# curl localhost:9200

{

  "name" : "ndB4c4F",

  "cluster_name" : "elasticsearch",

  "cluster_uuid" : "X0k8EhwGThCjnf-cTkSpTg",

  "version" : {

    "number" : "5.6.9",

    "build_hash" : "877a590",

    "build_date" : "2018-04-12T16:25:14.838Z",

    "build_snapshot" : false,

    "lucene_version" : "6.6.1"

  },

  "tagline" : "You Know, for Search"

}
3 安装kibana
Kibana是一个为 ElasticSearch 提供的数据分析的 Web 接口。可使用它对日志进行高效的搜索、可视化、分析等各种操作。
https://www.elastic.co/guide/en/kibana/5.6/install.html
cd /usr/local/src

wget https://artifacts.elastic.co/downloads/kibana/kibana-5.6.9-linux-x86_64.tar.gz

tar zxvf kibana-5.6.9-linux-x86_64.tar.gz

cd kibana-5.6.9-linux-x86_64/
修改kibana配置,可以外网访问
vim ./config/kibana.yml
内容
server.port: 5601

server.host: "0.0.0.0"
可以浏览器访问xxx.xxx.xxx.xxx:5601
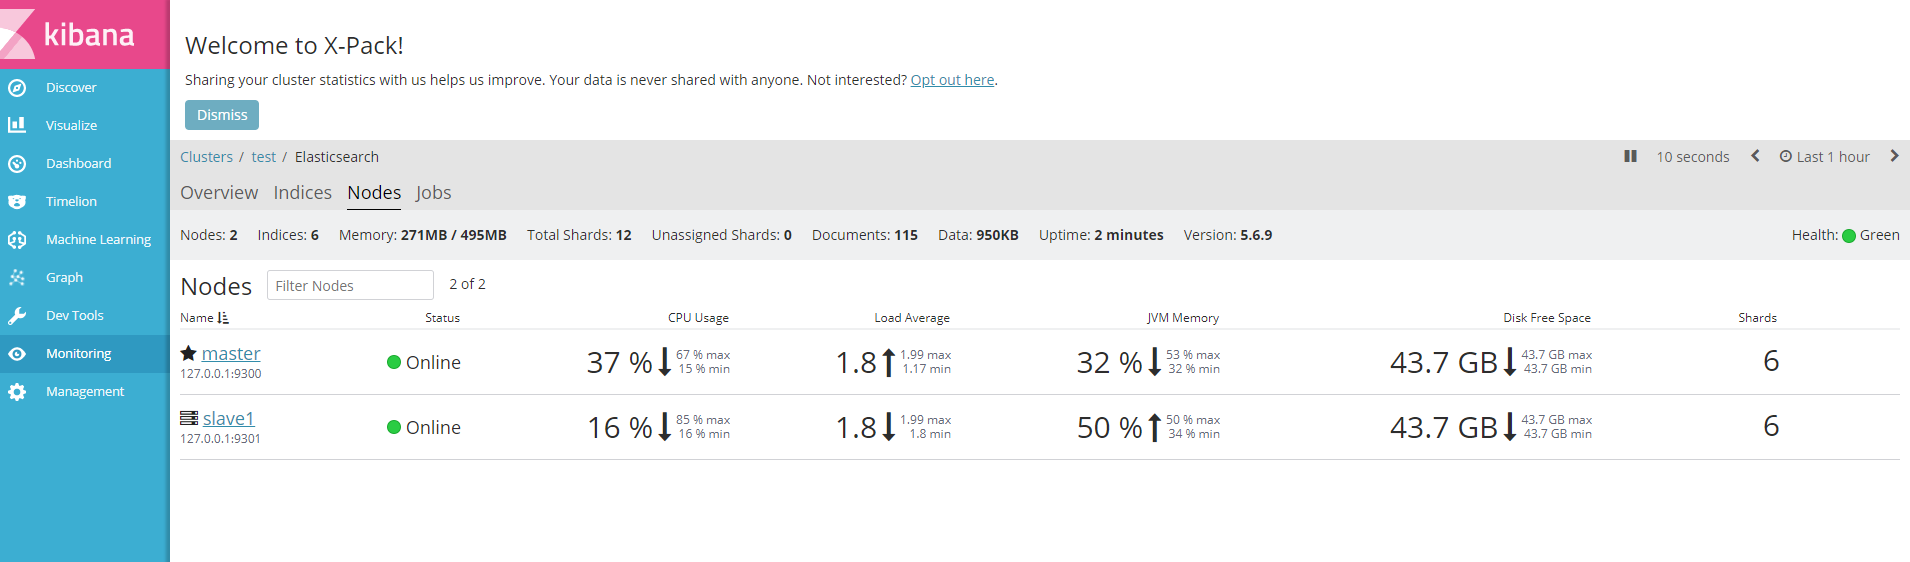
注意其中的Monitoring 默认是没有的,是由X-Pack集成提供的。该X-pack监控组件使您可以通过Kibana轻松地监控ElasticSearch。您可以实时查看集群的健康和性能,以及分析过去的集群、索引和节点度量。此外,可以监视Kibana本身性能。
Elasticsearch下载X-Pack
在Es的根目录(每个节点),运行 bin/elasticsearch-plugin进行安装。
bin/elasticsearch-plugin install x-pack
如果你在Elasticsearch已禁用自动索引的创建,在elasticsearch.yml配置action.auto_create_index允许X-pack创造以下指标:
action.auto_create_index: ".security*,.monitoring*,.watches,.triggered_watches,.watcher-history*"
Kibana下载X-Pack
在Kibana根目录运行 bin/kibana-plugin 进行安装。
bin/kibana-plugin install x-pack
4. 单服务器部署多个节点
实际上一个服务器只会部署一个节点,但是为了学习elasticsearch的分布特性,这里探索启动多个节点。
使用elasticsearch-5.6.9再复制一份,然后更改用户组
cd /usr/local/src

cp -r elasticsearch-5.6.9  elastic-slave1

chown -R elsearch:elsearch  elastic-slave1
由于内存太小,所以再次调整了master和slave的配置
/usr/local/src/elasticsearch-5.6.9/config/jvm.options
/usr/local/src/elastic-slave1/config/jvm.options
-Xms256m

-Xmx256m
/usr/local/src/elasticsearch-5.6.9/config/elasticsearch.yml
cluster.name: test

node.name: master

node.master: true

network.host: 127.0.0.1

action.auto_create_index: ".security*,.monitoring*,.watches,.triggered_watches,.watcher-history*"
/usr/local/src/elastic-slave1/config/elasticsearch.yml
cluster.name: test

node.name: slave1

network.host: 127.0.0.1

http.port: 8200

discovery.zen.ping.unicast.hosts: ["127.0.0.1"]

action.auto_create_index: ".security*,.monitoring*,.watches,.triggered_watches,.watcher-history*"
分别运行master和slave的程序
./bin/elasticsearch
运行kibana
./bin/kibana
在浏览器上输入: http://xxx.xxx.xxx.xxx:5601/ ,打开Kibana,要输入用户名和密码登录,默认分别是 elastic 和 changeme,可以很方便的看到节点的情况
注意:复制的elastic-salve1文件夹下包含了data文件中源文件节点数据,需要把elastic-salve1文件夹下data文件下的文件清空,否则会出现下面类似错误。
[2018-05-23T17:52:48,839][INFO ][o.e.d.z.ZenDiscovery ] [slave-2] failed to send join request to master [{master}{iErWGFrwSuCTjXaOD9jE5g}{JHJNb1U_TVaqdNVoJmEBZw}{127.0.0.1}{127.0.0.1:9300}{ml.max_open_jobs=10, ml.enabled=true}], reason [RemoteTransportException[[master][127.0.0.1:9300][internal:discovery/zen/join]]; nested: IllegalArgumentException[can't add node {slave-2}{iErWGFrwSuCTjXaOD9jE5g}{uo1SvmJyTESE_Z6bcQrOeg}{127.0.0.1}{127.0.0.1:9301}{ml.max_open_jobs=10, ml.enabled=true}, found existing node {master}{iErWGFrwSuCTjXaOD9jE5g}{JHJNb1U_TVaqdNVoJmEBZw}{127.0.0.1}{127.0.0.1:9300}{ml.max_open_jobs=10, ml.enabled=true} with the same id but is a different node instance]; ]
参考:
http://www.ruanyifeng.com/blog/2017/08/elasticsearch.html
https://www.cnblogs.com/wxw16/p/6156335.html
elasticsearch安装教程的更多相关文章
- windows环境下elasticsearch安装教程(超详细)
一.安装jdk ElasticSearch是基于lucence开发的,也就是运行需要java jdk支持.所以要先安装JAVA环境. 由于ElasticSearch 5.x 往后依赖于JDK 1.8的 ...
- linux下elasticsearch安装教程
centos 7.5安装 elasticsearch 第一步,安装elasticsearch需要Java8 首先使用 yum list installed | grep java 查看安装的Java版 ...
- (转载)Centos下Elasticsearch安装详细教程
原文地址:http://www.cnblogs.com/sunny1009/articles/7874251.html Centos下Elasticsearch安装详细教程 1.Elasticsear ...
- Centos下Elasticsearch安装详细教程
Centos下Elasticsearch安装详细教程 1.Elasticsearch简介 ElasticSearch是一个基于Lucene的搜索服务器.它提供了一个分布式多用户能力的全文搜索引擎,基于 ...
- ElasticSearch实战系列一: ElasticSearch集群+Kinaba安装教程
前言 本文主要介绍的是ElasticSearch集群和kinaba的安装教程. ElasticSearch介绍 ElasticSearch是一个基于Lucene的搜索服务器,其实就是对Lucene进行 ...
- Elasticsearch入门教程(一):Elasticsearch及插件安装
原文:Elasticsearch入门教程(一):Elasticsearch及插件安装 版权声明:本文为博主原创文章,遵循CC 4.0 BY-SA版权协议,转载请附上原文出处链接和本声明. 本文链接:h ...
- Elasticsearch1.x 和Elasticsearch2.x 拼音分词插件lc-pinyin安装教程
Elasticsearch1.x 基于lc-pinyin和ik分词实现 中文.拼音.同义词搜索 https://blog.csdn.net/chennanymy/article/category/60 ...
- Elasticsearch入门教程(二):Elasticsearch核心概念
原文:Elasticsearch入门教程(二):Elasticsearch核心概念 版权声明:本文为博主原创文章,遵循CC 4.0 BY-SA版权协议,转载请附上原文出处链接和本声明. 本文链接:ht ...
- SonarQube 7.7 安装教程
SonarQube 7.7 安装教程 一. CentOS设置 1. 更换阿里源 curl -o /etc/yum.repos.d/CentOS-Base.repo http://mirrors.ali ...
随机推荐
- CentOS6.5安装Jenkins
环境: Jenkins官网选择对应的操作系统,会有相应操作系统的安装方法. 我选择的是CentOS系统. 安装Jenkins: sudo wget -O /etc/yum.repos.d/jenkin ...
- centos 7(1611)安装笔记
麻烦 前天我把双系统笔记本里的 deepin 的磁盘分区直接从 Windows 7 磁盘管理里格式化了,结果悲催了,开不了机了,显示: 我以为是 Windows 7 的引导没了,就进 PE 修复了 ...
- golang 2行代码在基于arm linux的树莓派、orangepi上运行http web服务
go语言(golang)简化了跨平台交叉编译步骤,支持在windows系统下交叉编译基于arm+linux平台的应用,运行时无需其它依赖库.以下以一个简单的http server为例,先上源码: ** ...
- POJ-2352 && hdu-1541 Stars---树状数组的运用
题目链接: http://acm.hdu.edu.cn/showproblem.php?pid=1541 题目大意 : 在坐标上有n个星星,如果某个星星坐标为(x, y), 它的左下位置为:(x0,y ...
- IOC、注入
转:https://blog.csdn.net/lutianfeiml/article/details/51731219 实际开发中使用XML还是注解 XML: bean管理 注解: 注入属性的时候比 ...
- 开源项目托管github步骤
一.在github新建项目,复制到本地更改之后命令提交. 1.进入github主页新建项目:https://github.com/ccyinghua 2.复制项目地址 3.打开git Bash 命令行 ...
- 访问数据库需要注意的问题 c#
在操作数据库的过程中,必然要产生数据库连接,这就要求在使用的时候要及时关闭连接.以避免数据库会话过多的问题. 以Oracle数据库为例: Oracle数据库查看会话,进程的语句 --查询数据库当前进程 ...
- Python 初始—(迭代器和生成器)
生成器也是一个迭代器,通过next()函数实现按需计算下一个数据列表生成器,使代码变得更加简洁,只记录当前的位置,只有__next__(), (i*2 for i in range(10)) 生成器( ...
- vue学习之路 - 0.背景
1 单页面应用程序 Single Page Application (SPA) 从字面意义来看就是一个网站就一个页面,如: coding 网易云音乐 极致的用户体验,就像nativeapp一样 优点: ...
- ECMAscript6(ES6)新特性语法总结(一)
ES6/ES2015,,在ES5的基础上扩展了很多新的功能,在使用的时候要慎重,因为有一部分js代码在部分浏览器是不兼容的,但是所有写在服务器端的代码基本上都支持ES6的写法. 新特性: 一.开启严格 ...