JDK(十)JDK1.7&1.8源码对比分析【集合】ConcurrentHashMap
前言
在JDK1.7&1.8源码对比分析【集合】HashMap中我们对比分析了JDK1.7和1.8版本的HashMap源码,趁热打铁,这篇文章就来看看JDK1.7和1.8版本的ConcurrentHashMap有哪些区别。
目录
一、对比分析
1. 1.7版本
2. 1.8版本
一、对比分析
1. 1.7版本
先来看看 1.7 的实现,下面是他的结构图:
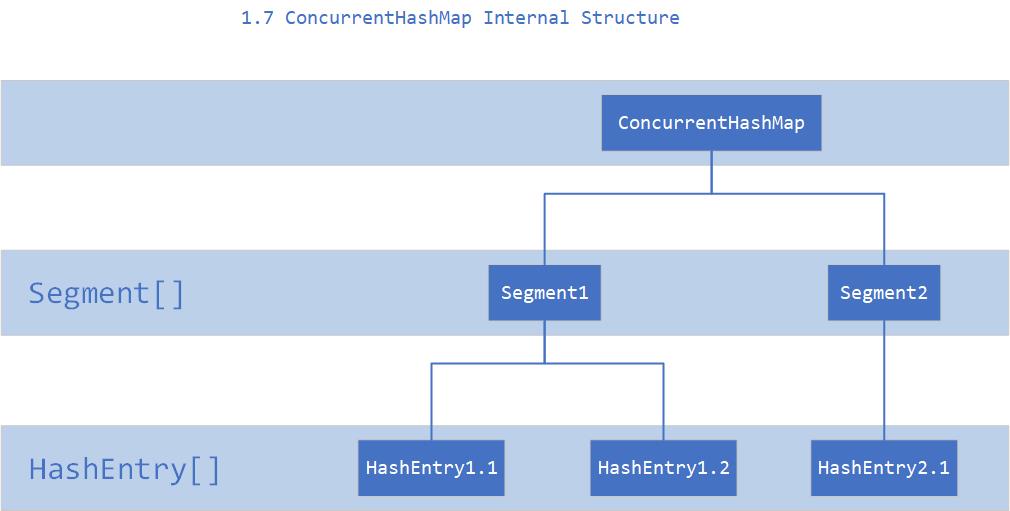
如上图所示,是由 Segment 数组、HashEntry 组成,和 HashMap 一样,仍然是数组 + 链表。
它的核心成员变量:
/**

 * The segments, each of which is a specialized hash table.

 * Segment 数组,存放数据时首先需要定位到具体的 Segment 中

 */

final Segment<K,V>[] segments;

transient Set<K> keySet;

transient Set<Map.Entry<K,V>> entrySet;
Segment 是 ConcurrentHashMap 的一个内部类,主要的组成如下:
static final class Segment<K,V> extends ReentrantLock implements Serializable {

    private static final long serialVersionUID = 2249069246763182397L;

    /**

     * The maximum number of times to tryLock in a prescan before

     * possibly blocking on acquire in preparation for a locked

     * segment operation. On multiprocessors, using a bounded

     * number of retries maintains cache acquired while locating

     * nodes.

     */

    static final int MAX_SCAN_RETRIES =

        Runtime.getRuntime().availableProcessors() > 1 ? 64 : 1;

    /**

     * The per-segment table. Elements are accessed via

     * entryAt/setEntryAt providing volatile semantics.

     * 和 HashMap 中的 HashEntry 作用一样,真正存放数据的桶

     */

    transient volatile HashEntry<K,V>[] table;

    /**

     * The number of elements. Accessed only either within locks

     * or among other volatile reads that maintain visibility.

     */

    transient int count;

    /**

     * The total number of mutative operations in this segment.

     * Even though this may overflows 32 bits, it provides

     * sufficient accuracy for stability checks in CHM isEmpty()

     * and size() methods.  Accessed only either within locks or

     * among other volatile reads that maintain visibility.

     */

    transient int modCount;

    /**

     * The table is rehashed when its size exceeds this threshold.

     * (The value of this field is always <tt>(int)(capacity *

     * loadFactor)</tt>.)

     */

    transient int threshold;

    /**

     * The load factor for the hash table.  Even though this value

     * is same for all segments, it is replicated to avoid needing

     * links to outer object.

     * @serial

     */

    final float loadFactor;

}
看看其中 HashEntry 的组成:
/**

 * ConcurrentHashMap list entry. Note that this is never exported

 * out as a user-visible Map.Entry.

 */

static final class HashEntry<K,V> {

    final int hash;

    final K key;

    volatile V value;

    volatile HashEntry<K,V> next;

    HashEntry(int hash, K key, V value, HashEntry<K,V> next) {

        this.hash = hash;

        this.key = key;

        this.value = value;

        this.next = next;

    }

}
和 HashMap 非常类似,唯一的区别就是其中的核心数据如 value ,以及链表都是 volatile 修饰的,保证了获取时的可见性。
原理上来说:ConcurrentHashMap 采用了分段锁技术,其中 Segment 继承于 ReentrantLock。不会像 HashTable 那样不管是 put 还是 get 操作都需要做同步处理,理论上 ConcurrentHashMap 支持 CurrencyLevel (Segment 数组数量)的线程并发。每当一个线程占用锁访问一个 Segment 时,不会影响到其他的 Segment。
下面也来看看核心的put、get方法。
put方法
@SuppressWarnings("unchecked")

public V put(K key, V value) {

    Segment<K,V> s;

    if (value == null)

        throw new NullPointerException();

    int hash = hash(key);

    int j = (hash >>> segmentShift) & segmentMask;

    if ((s = (Segment<K,V>)UNSAFE.getObject          // nonvolatile; recheck

         (segments, (j << SSHIFT) + SBASE)) == null) //  in ensureSegment

        s = ensureSegment(j);

    return s.put(key, hash, value, false);

}

final V put(K key, int hash, V value, boolean onlyIfAbsent) {

    HashEntry<K,V> node = tryLock() ? null :

        scanAndLockForPut(key, hash, value);

    V oldValue;

    try {

        HashEntry<K,V>[] tab = table;

        int index = (tab.length - 1) & hash;

        HashEntry<K,V> first = entryAt(tab, index);

        for (HashEntry<K,V> e = first;;) {

            if (e != null) {

                K k;

                if ((k = e.key) == key ||

                    (e.hash == hash && key.equals(k))) {

                    oldValue = e.value;

                    if (!onlyIfAbsent) {

                        e.value = value;

                        ++modCount;

                    }

                    break;

                }

                e = e.next;

            }

            else {

                if (node != null)

                    node.setNext(first);

                else

                    node = new HashEntry<K,V>(hash, key, value, first);

                int c = count + 1;

                if (c > threshold && tab.length < MAXIMUM_CAPACITY)

                    rehash(node);

                else

                    setEntryAt(tab, index, node);

                ++modCount;

                count = c;

                oldValue = null;

                break;

            }

        }

    } finally {

        unlock();

    }

    return oldValue;

}
虽然 HashEntry 中的 value 是用 volatile 关键词修饰的,但是并不能保证并发的原子性,所以 put 操作时仍然需要加锁处理。
首先第一步的时候会尝试获取锁,如果获取失败肯定就有其他线程存在竞争,则利用scanAndLockForPut()自旋获取锁。
private HashEntry<K,V> scanAndLockForPut(K key, int hash, V value) {

    HashEntry<K,V> first = entryForHash(this, hash);

    HashEntry<K,V> e = first;

    HashEntry<K,V> node = null;

    int retries = -1; // negative while locating node

    while (!tryLock()) {    // 尝试自旋获取锁

        HashEntry<K,V> f; // to recheck first below

        if (retries < 0) {

            if (e == null) {

                if (node == null) // speculatively create node

                    node = new HashEntry<K,V>(hash, key, value, null);

                retries = 0;

            }

            else if (key.equals(e.key))

                retries = 0;

            else

                e = e.next;

        }

        else if (++retries > MAX_SCAN_RETRIES) {

            // 如果重试的次数达到了 MAX_SCAN_RETRIES 则改为阻塞锁获取,保证能获取成功

            lock();

            break;

        }

        else if ((retries & 1) == 0 &&

                 (f = entryForHash(this, hash)) != first) {

            e = first = f; // re-traverse if entry changed

            retries = -1;

        }

    }

    return node;

}
再看看put的流程:
final V put(K key, int hash, V value, boolean onlyIfAbsent) {

    HashEntry<K,V> node = tryLock() ? null :

        // 1. 将当前 Segment 中的 table 通过 key 的 hashcode 定位到 HashEntry

        scanAndLockForPut(key, hash, value);

    V oldValue;

    try {

        HashEntry<K,V>[] tab = table;

        int index = (tab.length - 1) & hash;

        HashEntry<K,V> first = entryAt(tab, index);

        for (HashEntry<K,V> e = first;;) {

            if (e != null) {

                K k;

                // 2. 遍历该 HashEntry,如果不为空则判断传入的 key 和当前遍历的 key 是否相等,相等则覆盖旧的 value

                if ((k = e.key) == key ||

                    (e.hash == hash && key.equals(k))) {

                    oldValue = e.value;

                    if (!onlyIfAbsent) {

                        e.value = value;

                        ++modCount;

                    }

                    break;

                }

                e = e.next;

            }

            // 3. 不为空则需要新建一个 HashEntry 并加入到 Segment 中,同时会先判断是否需要扩容

            else {

                if (node != null)

                    node.setNext(first);

                else

                    node = new HashEntry<K,V>(hash, key, value, first);

                int c = count + 1;

                if (c > threshold && tab.length < MAXIMUM_CAPACITY)

                    rehash(node);

                else

                    setEntryAt(tab, index, node);

                ++modCount;

                count = c;

                oldValue = null;

                break;

            }

        }

    } finally {

        // 4. 最后会解除在 1 中所获取当前 Segment 的锁

        unlock();

    }

    return oldValue;

}
get方法
public V get(Object key) {

    Segment<K,V> s; // manually integrate access methods to reduce overhead

    HashEntry<K,V>[] tab;

    int h = hash(key);

    long u = (((h >>> segmentShift) & segmentMask) << SSHIFT) + SBASE;

    if ((s = (Segment<K,V>)UNSAFE.getObjectVolatile(segments, u)) != null &&

        (tab = s.table) != null) {

        for (HashEntry<K,V> e = (HashEntry<K,V>) UNSAFE.getObjectVolatile

                 (tab, ((long)(((tab.length - 1) & h)) << TSHIFT) + TBASE);

             e != null; e = e.next) {

            K k;

            if ((k = e.key) == key || (e.hash == h && key.equals(k)))

                return e.value;

        }

    }

    return null;

}
get 逻辑比较简单:
只需要将 Key 通过 Hash 之后定位到具体的 Segment ,再通过一次 Hash 定位到具体的元素上。
由于 HashEntry 中的 value 属性是用 volatile 关键词修饰的,保证了内存可见性,所以每次获取时都是最新值。
ConcurrentHashMap 的 get 方法是非常高效的,因为整个过程都不需要加锁。
2. 1.8版本
1.7 已经解决了并发问题,并且能支持 N 个 Segment 这么多次数的并发,但依然存在 HashMap 在 1.7 版本中的问题。那就是查询遍历链表效率太低。
因此 1.8 做了一些数据结构上的调整。首先来看下底层的组成结构:

看起来是不是和 1.8 HashMap 结构类似?
其中抛弃了原有的 Segment 分段锁,而采用了CAS + synchronized来保证并发安全性。
static class Node<K,V> implements Map.Entry<K,V> {

    final int hash;

    final K key;

    volatile V val;

    volatile Node<K,V> next;

    Node(int hash, K key, V val, Node<K,V> next) {

        this.hash = hash;

        this.key = key;

        this.val = val;

        this.next = next;

    }

    public final K getKey()       { return key; }

    public final V getValue()     { return val; }

    public final int hashCode()   { return key.hashCode() ^ val.hashCode(); }

    public final String toString(){ return key + "=" + val; }

    public final V setValue(V value) {

        throw new UnsupportedOperationException();

    }

    public final boolean equals(Object o) {

        Object k, v, u; Map.Entry<?,?> e;

        return ((o instanceof Map.Entry) &&

                (k = (e = (Map.Entry<?,?>)o).getKey()) != null &&

                (v = e.getValue()) != null &&

                (k == key || k.equals(key)) &&

                (v == (u = val) || v.equals(u)));

    }

    /**

     * Virtualized support for map.get(); overridden in subclasses.

     */

    Node<K,V> find(int h, Object k) {

        Node<K,V> e = this;

        if (k != null) {

            do {

                K ek;

                if (e.hash == h &&

                    ((ek = e.key) == k || (ek != null && k.equals(ek))))

                    return e;

            } while ((e = e.next) != null);

        }

        return null;

    }

}
也将 1.7 中存放数据的 HashEntry 改为 Node,但作用都是相同的。其中的val、next都用了 volatile 修饰,保证了可见性。
put方法
重点来看看 put 函数:
public V put(K key, V value) {

    return putVal(key, value, false);

}

/** Implementation for put and putIfAbsent */

final V putVal(K key, V value, boolean onlyIfAbsent) {

    if (key == null || value == null) throw new NullPointerException();

    // 根据 key 计算出 hashcode

    int hash = spread(key.hashCode());

    int binCount = 0;

    for (Node<K,V>[] tab = table;;) {

        Node<K,V> f; int n, i, fh;

        // 判断是否需要进行初始化

        if (tab == null || (n = tab.length) == 0)

            tab = initTable();

        // f 即为当前 key 定位出的 Node,如果为空表示当前位置可以写入数据,利用 CAS 尝试写入,失败则自旋保证成功

        else if ((f = tabAt(tab, i = (n - 1) & hash)) == null) {

            if (casTabAt(tab, i, null,

                         new Node<K,V>(hash, key, value, null)))

                break;                   // no lock when adding to empty bin

        }

        // 如果当前位置的 hashcode == MOVED == -1,则需要进行扩容

        else if ((fh = f.hash) == MOVED)

            tab = helpTransfer(tab, f);

        else {

            V oldVal = null;

            synchronized (f) {// 如果都不满足,则利用 synchronized 锁写入数据

                if (tabAt(tab, i) == f) {

                    if (fh >= 0) {

                        binCount = 1;

                        for (Node<K,V> e = f;; ++binCount) {

                            K ek;

                            if (e.hash == hash &&

                                ((ek = e.key) == key ||

                                 (ek != null && key.equals(ek)))) {

                                oldVal = e.val;

                                if (!onlyIfAbsent)

                                    e.val = value;

                                break;

                            }

                            Node<K,V> pred = e;

                            if ((e = e.next) == null) {

                                pred.next = new Node<K,V>(hash, key,

                                                          value, null);

                                break;

                            }

                        }

                    }

                    else if (f instanceof TreeBin) {

                        Node<K,V> p;

                        binCount = 2;

                        if ((p = ((TreeBin<K,V>)f).putTreeVal(hash, key,

                                                       value)) != null) {

                            oldVal = p.val;

                            if (!onlyIfAbsent)

                                p.val = value;

                        }

                    }

                }

            }

            if (binCount != 0) {

                // 如果数量大于 TREEIFY_THRESHOLD 则要转换为红黑树

                if (binCount >= TREEIFY_THRESHOLD)

                    treeifyBin(tab, i);

                if (oldVal != null)

                    return oldVal;

                break;

            }

        }

    }

    addCount(1L, binCount);

    return null;

}
get方法
public V get(Object key) {

    Node<K,V>[] tab; Node<K,V> e, p; int n, eh; K ek;

    int h = spread(key.hashCode());

    if ((tab = table) != null && (n = tab.length) > 0 &&

        (e = tabAt(tab, (n - 1) & h)) != null) {

        // 根据计算出来的 hashcode 寻址,如果就在桶上那么直接返回值

        if ((eh = e.hash) == h) {

            if ((ek = e.key) == key || (ek != null && key.equals(ek)))

                return e.val;

        }

        // 如果是红黑树那就按照树的方式获取值

        else if (eh < 0)

            return (p = e.find(h, key)) != null ? p.val : null;

        // 都不满足那就按照链表的方式遍历获取值

        while ((e = e.next) != null) {

            if (e.hash == h &&

                ((ek = e.key) == key || (ek != null && key.equals(ek))))

                return e.val;

        }

    }

    return null;

}
1.8 在 1.7 的数据结构上做了大的改动,采用红黑树之后可以保证查询效率(O(logn)),甚至取消了 ReentrantLock 改为了 synchronized,这样可以看出在新版的 JDK 中对 synchronized 优化是很到位的。
JDK(十)JDK1.7&1.8源码对比分析【集合】ConcurrentHashMap的更多相关文章
- JDK(八)JDK1.7&1.8源码对比分析【集合】HashMap
前言 在JDK1.8源码分析[集合]HashMap文章中,我们分析了HashMap在JDK1.8中新增的特性(引进了红黑树数据结构),但是为什么要进行这个优化呢?这篇文章我们通过对比JDK1.7和1. ...
- LinkedHashMap 源码详细分析(JDK1.8)
1. 概述 LinkedHashMap 继承自 HashMap,在 HashMap 基础上,通过维护一条双向链表,解决了 HashMap 不能随时保持遍历顺序和插入顺序一致的问题.除此之外,Linke ...
- 阿里P7终于讲完了JDK+Spring+mybatis+Dubbo+SpringMvc+Netty源码
前言 这里普及一下,每个公司都有职别定级系统,阿里也是,技术岗以 P 定级,一般校招 P5, 社招 P6 起.其实阅读源码也是有很多诀窍的,这里分享几点心得: 首先要会用.你要知道这个库是干什么的,掌 ...
- Java -- 基于JDK1.8的ArrayList源码分析
1,前言 很久没有写博客了,很想念大家,18年都快过完了,才开始写第一篇,争取后面每周写点,权当是记录,因为最近在看JDK的Collection,而且ArrayList源码这一块也经常被面试官问道,所 ...
- HashMap 与 ConcrrentHashMap 使用以及源码原理分析
前奏一:HashMap面试中常见问题汇总 HashMap的工作原理是近年来常见的Java面试题,几乎每个Java程序员都知道HashMap,都知道哪里要用HashMap,知道HashTable和Has ...
- JUC同步器框架AbstractQueuedSynchronizer源码图文分析
JUC同步器框架AbstractQueuedSynchronizer源码图文分析 前提 Doug Lea大神在编写JUC(java.util.concurrent)包的时候引入了java.util.c ...
- MyBatis源码骨架分析
源码包分析 MyBatis 源码下载地址:https://github.com/MyBatis/MyBatis-3 MyBatis源码导入过程: 下载MyBatis的源码 检查maven的版本,必须是 ...
- TaskTracker任务初始化及启动task源码级分析
在监听器初始化Job.JobTracker相应TaskTracker心跳.调度器分配task源码级分析中我们分析的Tasktracker发送心跳的机制,这一节我们分析TaskTracker接受JobT ...
- [Java] Hashtable 源码简要分析
Hashtable /HashMap / LinkedHashMap 概述 * Hashtable比较早,是线程安全的哈希映射表.内部采用Entry[]数组,每个Entry均可作为链表的头,用来解决冲 ...
随机推荐
- vue-quill-editor 富文本集成quill-image-extend-module插件实例,以及UglifyJsPlugin打包抱错问题处理
官网 vue-quill-editor Toolbar Module - Quill vue-quill-image-upload 图片支持上传服务器并调整大小 1.在 package.json 中加 ...
- grafana 安装- 曲线图展示每秒新增数据量
下载: https://dl.grafana.com/oss/release/grafana-5.4.2.windows-amd64.zip 解压就能用 添加数据源 添加查询条件 sql 模式编写查询 ...
- ArcGis实现画矩形(RectangleFeedBack)
private void axMapControl1_OnMouseDown(object sender, IMapControlEvents2_OnMouseDownEvent e) ...
- python读取shp
sf = shapefile.Reader("res2_4m.shp") records = sf.records() print sf.fields for record in ...
- react实例:理解dva构建项目的原理
请点击相应的步骤查看详情 我们首先搭建一个 dva Demo 项目(请参考react快速构建一个应用项目),然后逐步完成以下内容: 结构划分 设计 Model 组件设计方法 组件设计实践 添加 Re ...
- Sublime Text 的使用笔记
Sublime Text 是一个代码编辑器(Sublime Text 2,3是收费软件,但可以无限期试用),也是HTML和散文先进的文本编辑器.Sublime Text是由程序员Jon Skinner ...
- 转:oracle:win7手工卸载oracle数据库11g
环境:oracle 11g,win7,64bit 问题:oracle不正常安装.重新安装等情况需要卸载软件,然而oracle11g取消了界面卸载,改为deinstall.bat文件执行卸载.具体关于d ...
- [翻译] LiquidFloatingActionButton
LiquidFloatingActionButton https://github.com/yoavlt/LiquidFloatingActionButton LiquidFloatingAction ...
- LocationCoder 地图经纬度解析
LocationCoder 地图经纬度解析 其实,在地图里面将地图解析成有意义的地址,或者把地址转换成有意义的经纬度都是很容易的事情,只是我将其封装了支持KVO,通知中心,block取结果,代理取结果 ...
- 北美Developer生存发展攻略
http://www.followmedoit.com/bbs/forum.php?mod=viewthread&tid=49&extra=page%3D1 在北美,做PM不易,而做D ...