安装zabbix3.4的过程(一)
目录
zabbix服务端安装(centos7.4)
zabbix客户端安装 (centos6.9)
注释:本次安装为官方推荐的yum安装方式,如果需要编译安装,请查看下边的博文:
博文地址:https://www.yuhuashi.info/post/75.html
包下载地址:https://sourceforge.net/projects/zabbix/files/ZABBIX%20Latest%20Stable/
1、系统环境
#系统版本:

[root@zabbix ~]# cat /etc/redhat-release

CentOS Linux release 7.4.1708 (Core)

[root@zabbix ~]# uname -r

3.10.0-693.el7.x86_64

#关闭sellinux

[root@zabbix ~]# sed -i "s#SELINUX=enforcing#SELINUX=disabled#g" /etc/selinux/config

[root@zabbix ~]# setenforce 0

[root@zabbix ~]# getenforce

Permissive

#同步时间
yum -y install ntpdate

ntpdate time.windows.com
#同步时间到硬件,防止系统重启时间不一致
hwclock --systohc
注释:如果时区为12小时制,需要操作如下
 scp -P  50000 122.114.200.186:/usr/share/zoneinfo/Asia/Shanghai /usr/share/zoneinfo/Asia/  拷贝本地正常的文件到对方服务器上覆盖

ln -sf /usr/share/zoneinfo/Asia/Shanghai /etc/localtime
#设置定时任务
[root@zabbix ~]# crontab -e
no crontab for root - using an empty one
59 23 * * * /usr/sbin/ntpdate time.windows.com && /usr/sbin/hwclock -w
#关闭防火墙

systemctl stop firewalld.service

systemctl disable firewalld.service

systemctl status firewalld.service

#开放所需端口
firewall-cmd --zone=public --add-port=80/tcp --permanent
firewall-cmd --zone=public --add-port=10050/tcp --permanent
firewall-cmd --zone=public --add-port=10051/tcp --permanent
firewall-cmd --reload
#查看
firewall-cmd --zone= public --query-port=80/tcp
#删除
firewall-cmd --zone= public --remove-port=80/tcp --permanent
2、软件安装
yum install mariadb-server mariadb -y

mariadb数据库的相关命令是:

systemctl start mariadb  #启动MariaDB

systemctl stop mariadb  #停止MariaDB

systemctl restart mariadb  #重启MariaDB

systemctl enable mariadb  #设置开机启动
3、安装zabbix
https://www.zabbix.com/download
这里选择yum安装方式
、安装阿里epel源

wget -O /etc/yum.repos.d/epel.repo http://mirrors.aliyun.com/repo/epel-7.repo

、安装zabbix源

rpm -ivh http://repo.zabbix.com/zabbix/3.4/rhel/7/x86_64/zabbix-release-3.4-2.el7.noarch.rpm

、安装zabbix服务软件

yum -y install zabbix-server-mysql zabbix-web-mysql zabbix-agent

注释:server和web链接数据库的文件

、创建初始数据库:

 mysql -uroot -p

 mysql> create database zabbix character set utf8 collate utf8_bin;

 mysql> grant all privileges on zabbix.* to zabbix@localhost identified by 'yanqi';

 mysql> quit;

注释:如果数据库不在本地需要添加如下

 mysql> grant all on zabbix.* to zabbix@172.16.%.% identified by 'yanqi';

注释:mysql8.0的添加方式不一样,添加过程如下:

create database zabbix character set utf8 collate utf8_bin;

create user 'zabbix'@'localhost' identified by 'yanqi';

grant all privileges on zabbix.* to 'zabbix'@'localhost' with grant option;

、导入模板和数据(密码为 yanqi )

 zcat /usr/share/doc/zabbix-server-mysql*/create.sql.gz | mysql -uzabbix -p zabbix

、为zabbix服务配置数据库

[root@zabbix ~]# grep -Ev -n '^$|#' /etc/zabbix/zabbix_server.conf

:LogFile=/var/log/zabbix/zabbix_server.log

:LogFileSize=

:PidFile=/var/run/zabbix/zabbix_server.pid

:SocketDir=/var/run/zabbix

:DBName=zabbix

:DBUser=zabbix

:DBPassword=yanqi

或

sed -i.ori '126a DBPassword=yanqi' /etc/zabbix/zabbix_server.conf

、为zabbix前端配置php

Zabbix前端的Apache配置文件位于/etc/httpd/conf.d/zabbix.conf中。一些PHP设置已经配置好。但有必要取消注释“date.timezone”设置并为您设置正确的时区。

php_value max_execution_time

php_value memory_limit 128M

php_value post_max_size 16M

php_value upload_max_filesize 2M

php_value max_input_time

php_value always_populate_raw_post_data -

php_value date.timezone Asia/Shanghai

或

sed -i.ori '19a php_value date.timezone  Asia/Shanghai' /etc/httpd/conf.d/zabbix.conf

、解决中文乱码

yum -y install wqy-microhei-fonts

\cp /usr/share/fonts/wqy-microhei/wqy-microhei.ttc /usr/share/fonts/dejavu/DejaVuSans.ttf

、启动zabbix服务并开机自启

systemctl start zabbix-server zabbix-agent httpd

systemctl enable zabbix-server zabbix-agent httpd
注:服务器重启后可以正常使用
4、配置zabbix前端
https://www.zabbix.com/documentation/3.4/manual/installation/install#installing_frontend
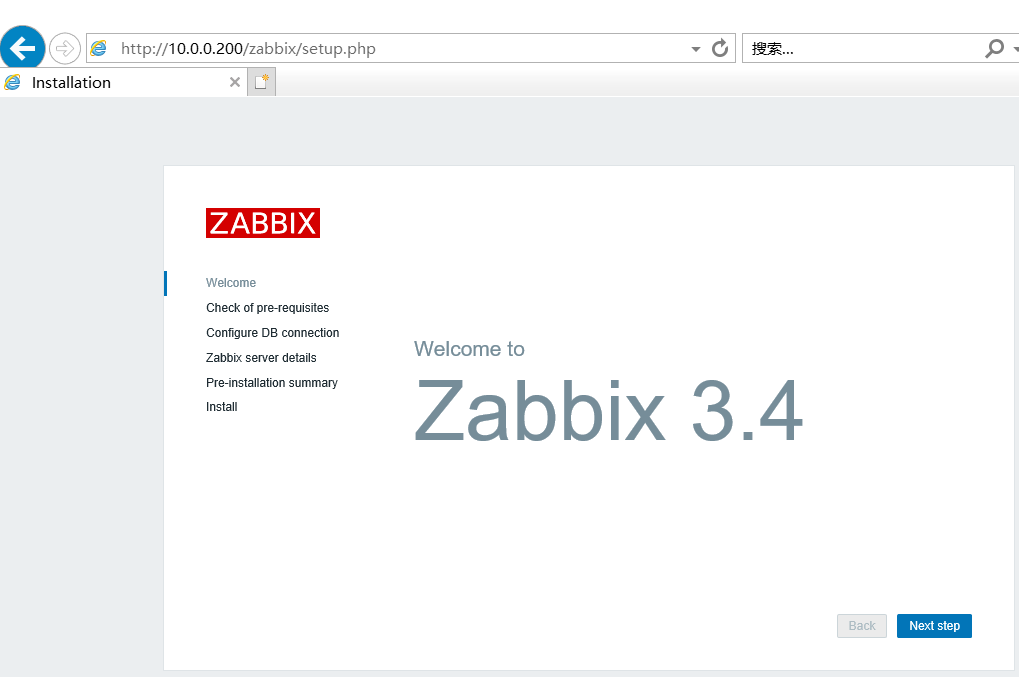
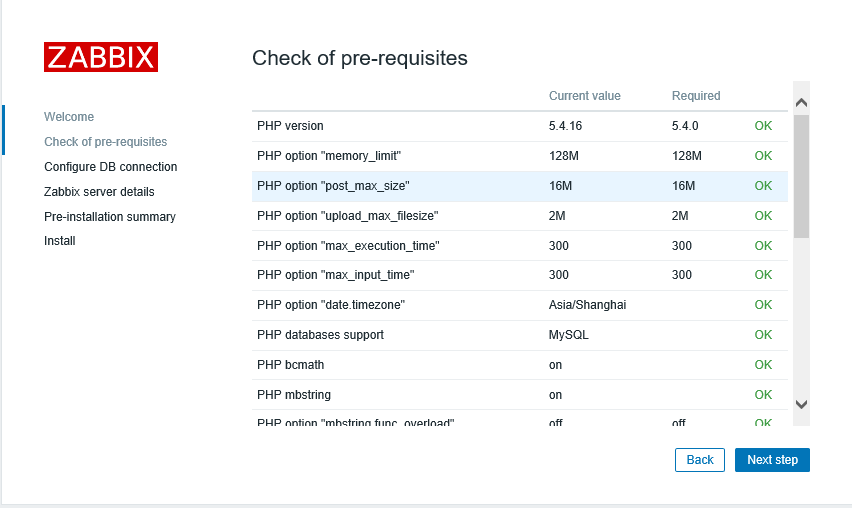
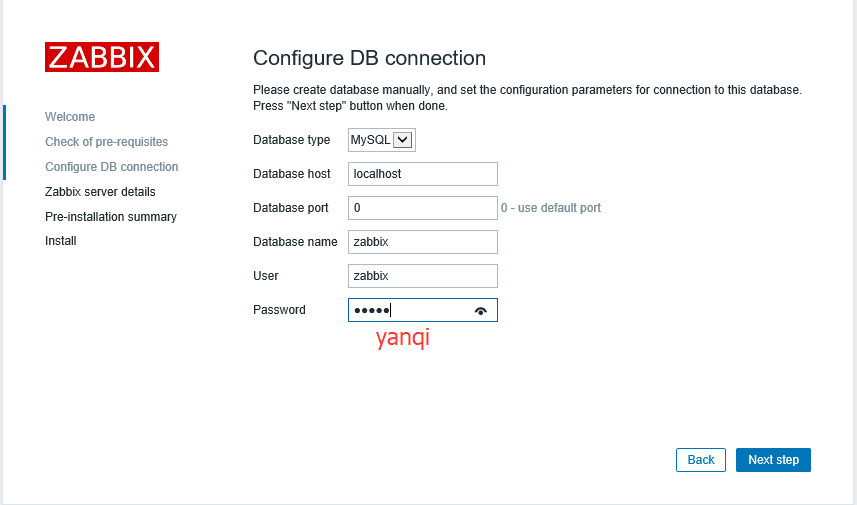
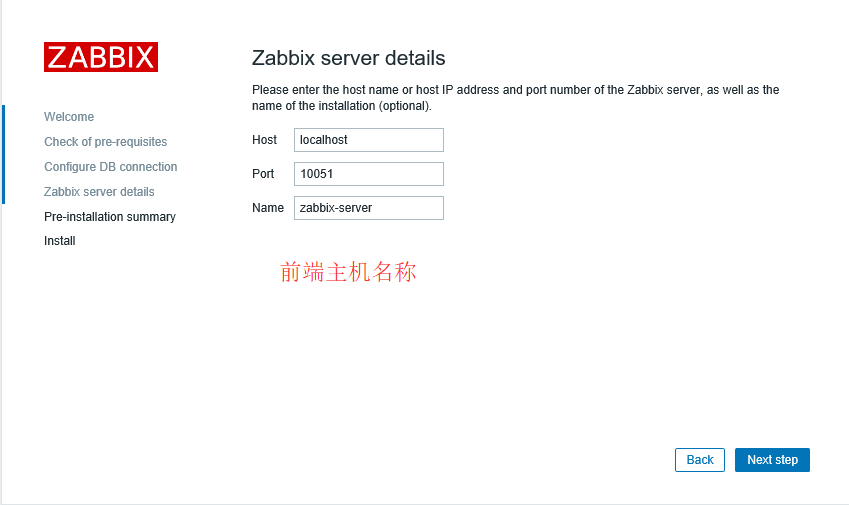
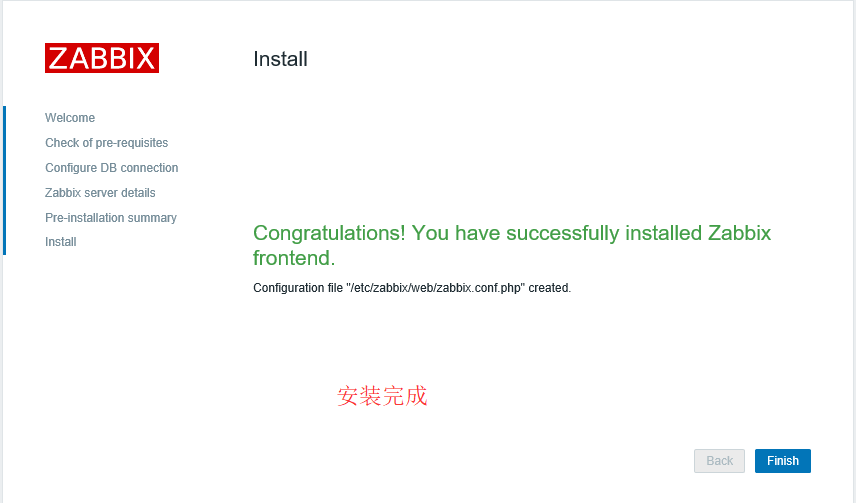

好啦,安装到此结束!!!
zabbix客户端安装
客户端的软件包可以单独下载:直接安装的包:http://repo.zabbix.com/zabbix/3.4/rhel/7/x86_64/zabbix-agent-3.4.15-1.el7.x86_64.rpm
wget -O /etc/yum.repos.d/epel.repo http://mirrors.aliyun.com/repo/epel-6.repo

rpm -ivh http://repo.zabbix.com/zabbix/3.0/rhel/6/x86_64/zabbix-release-3.0-1.el6.noarch.rpm

yum -y install zabbix-agent

sed -i.ori "s#Server=127.0.0.1#Server=10.0.0.200#g" /etc/zabbix/zabbix_agentd.conf    #更换成server端的IP地址

/etc/init.d/zabbix-agent start
注释:
1、在客户端,如果有多个Servr可以使用逗号隔开
2、server端需要安装agent用于监控自己,Server和ServerActive参数必须是127.0.0.1,如果是多个IP可以使用逗号隔开;

#写入开机启动

cat >>/etc/rc.d/rc.local<<EOF

/etc/init.d/zabbix-agent start

EOF
检查连通性
#服务器端安装zabbix-get检查工具

yum install zabbix-get -y

#只能在服务端测试

[root@zabbix ~]# zabbix_get -s 10.0.0.199 -p 10050 -k "system.cpu.load[all,avg1]"

0.300000
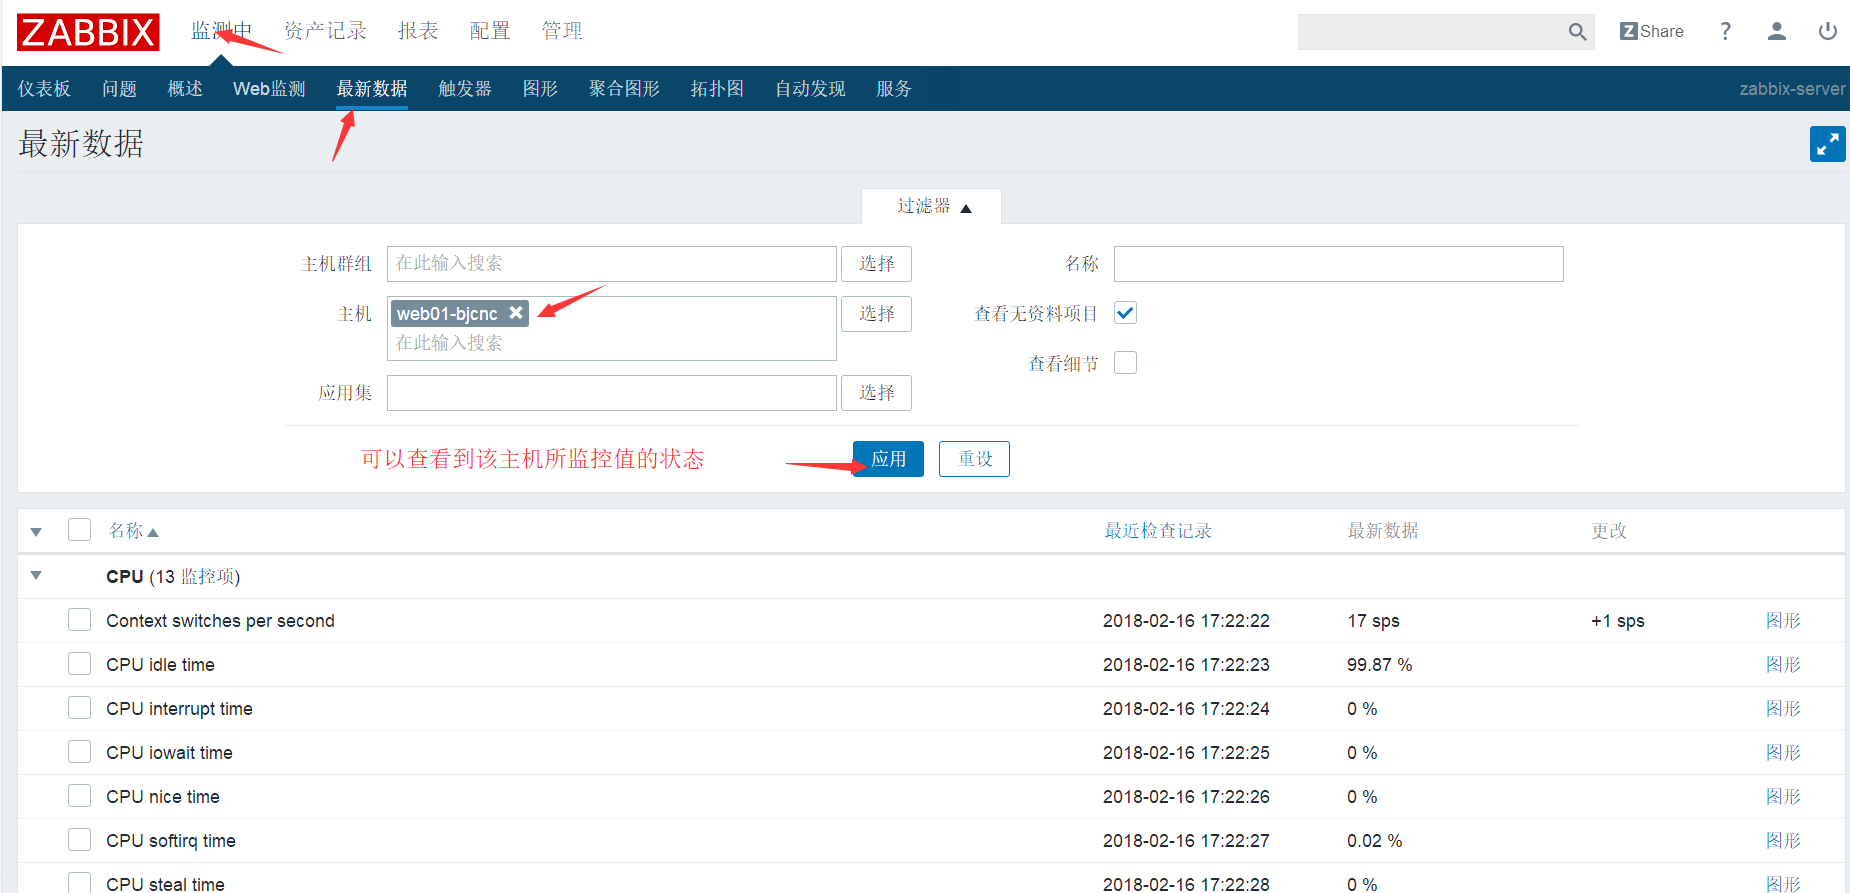
在server端添加监控
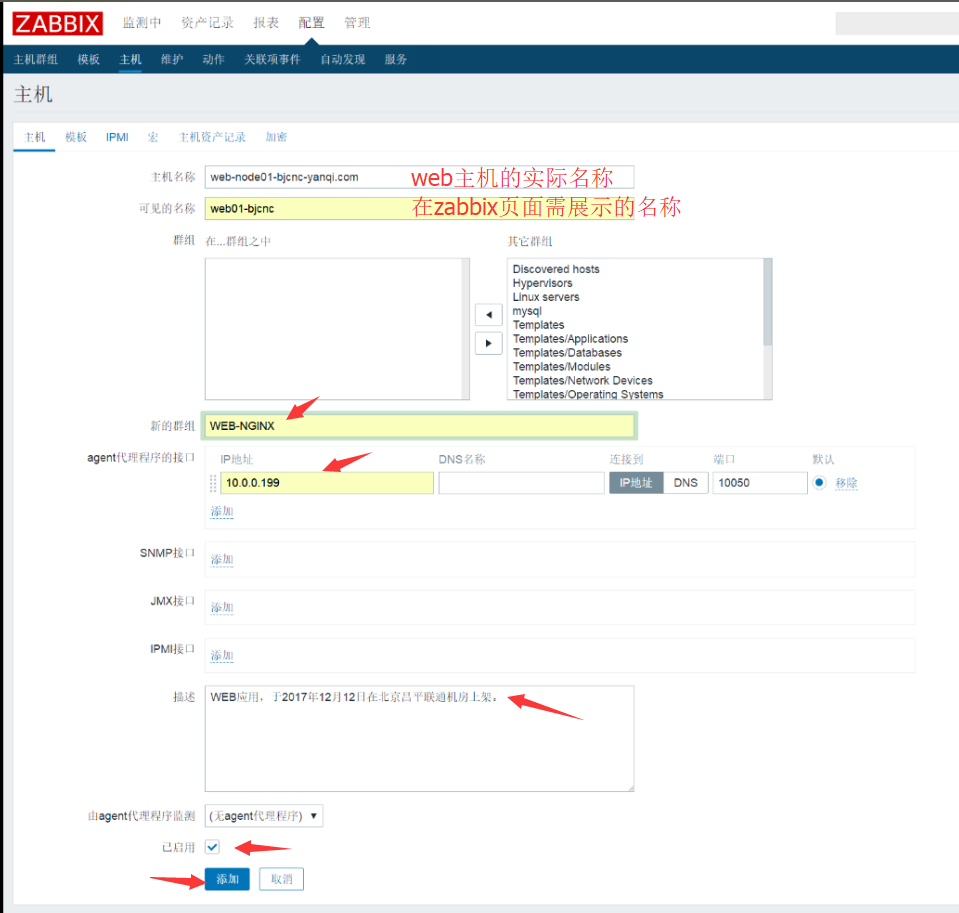
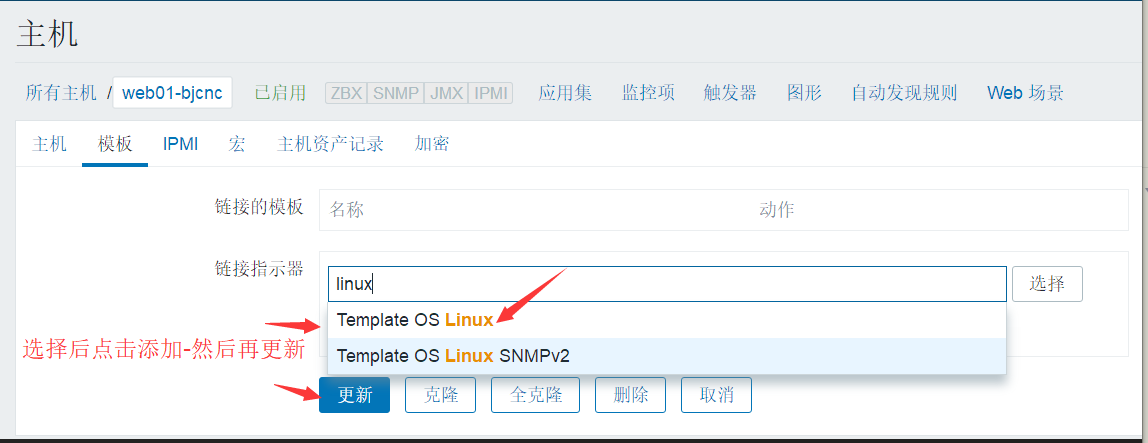

添加主机完成!
查看文章:
官网安装文档:https://www.zabbix.com/download
博主文章:https://www.cnblogs.com/clsn/p/7885990.html#auto_id_0

zabbix修改mariadb的数据存储位置
#创建

mkdir /公司缩写/mysql

#停止数据库服务

systemctl status mariadb.service

systemctl stop mariadb.service

#把数据库文件移动到新的存储位置

cp -rp /var/lib/mysql/ /公司缩写/mysql/

#修改后的数据库配置文件

[root@iZkdZ ~]# cat /etc/my.cnf

[mysqld]

datadir=/公司缩写/mysql

socket=/公司缩写/mysql/mysql.sock

lower_case_table_names         =

# Disabling symbolic-links is recommended to prevent assorted security risks

symbolic-links=

# Settings user and group are ignored when systemd is used.

# If you need to run mysqld under a different user or group,

# customize your systemd unit file for mariadb according to the

# instructions in http://fedoraproject.org/wiki/Systemd

[mysqld_safe]

log-error=/var/log/mariadb/mariadb.log

pid-file=/var/run/mariadb/mariadb.pid

#

# include all files from the config directory

#

!includedir /etc/my.cnf.d

#启动数据库

systemctl start mariadb.service

systemctl status mariadb.service

#新的登录数据库的命令,需要指定mysql.sock

mysql -uzabbix -p123456 -S /公司缩写/mysql/mysql.sock

#创建软链接,否则,zabbix页面无法打开

mkdir /var/lib/mysql

ln -s /公司缩写/mysql/mysql.sock /var/lib/mysql/mysql.sock

  在这一步之前,我是把原始的/var/lib/mysql目录改名为/var/lib/mysql_ori。所以,会有创建/var/lib/mysql的命令。在下面确认重启zabbix服务端没有问题,web界面可以正常打开。我才把原始的/var/lib/mysql目录移动到/tmp目录,后来又移动到公司默认的目录,作为备份存放。

#重启zabbix

systemctl restart zabbix-server.service

参考资料:

http://www.cnblogs.com/seasonsstory/archive/2013/07/24/3209785.html——zabbix连不上数据库

http://blog.chinaunix.net/uid-20749043-id-1878317.html——更换mysql存储路径
安装zabbix3.4的过程(一)的更多相关文章
- 安装zabbix3.0以及升级到5.0过程
关闭防火墙: systemctl stop firewalld.service systemctl disable firewalld.service 需要关闭 selinux,一定要关闭这个,开启s ...
- Centos6.9 安装zabbix3.4 过程
Centos6.9 安装zabbix3.4 过程 1.安装apache httpd 一开始忘记截图(略...) # yun install httpd 完成后,启动httpd服务 # service ...
- centos7 安装zabbix3.0 安装zabbix4.0 yum安装zabbix 国内源安装zabbix 阿里云服务器安装zabbix
首先,此篇文章是有原因的. 刚开始也和大家一样来学习安装zabbix 奈何网上的教程和现实出现不一样的情况 在安装zabbix过程中,因为zabbix下载源是在国外,下载途中会出现终止下载的情况 tr ...
- elasticsearch5.0.0 安装插件及配置过程
elasticsearch5.0.0 安装插件及配置过程 由于es5.0是里程碑式的更新,所以很多变化的地方,暂时我就插件安装遇到的问题记录一下. 插件安装命令 2.3版本的安装命令 安装Marvel ...
- Deepin下phpunit安装,以及执行过程中所遇到的问题
Deepin下phpunit安装,以及执行过程中所遇到的问题 安装phpunit步骤 wget https://phar.phpunit.de/phpunit.phar chmod +x phpuni ...
- CentOS 5.5 下安装Countly Web Server过程记录
CentOS 5.5 下安装Countly Web Server过程记录 1. 系统更新与中文语言包安装 2. 基本环境配置: 2.1. NodeJS安装 依赖项安装 yum -y install g ...
- Centos7 安装 zabbix3.2
简介: Zabbix的一个很优秀的分布式监控服务器, 它有两部分组成: 1. “zabbix-server”用来收集并且在web端展示数据 2. “zabbix-agent”用来采集数据,发送给ser ...
- 在CentOS7上通过RPM安装实现LAMP+phpMyAdmin过程全记录
在CentOS7上通过RPM安装实现LAMP+phpMyAdmin过程全记录 时间:2017年9月20日 一.软件环境: IP:192.168.1.71 Hostname:centos73-2.sur ...
- centos7安装zabbix3.2.4
系统:CentOS Linux release 7.2.1511 (Core) zabbix:3.2.4 一.yum -y install httpd mysql mysql-server mysql ...
随机推荐
- layui框架使用总结
最近一个后台系统使用layui框架做的,遇到好多坑在这里总结一下. 1.layui的基本使用,下面的在他下面写,其他的事件也要在这个里面写 行内onclick事件是监听不到写在下面这种代码中的 ...
- Eclipse编辑JS响应慢,复制粘贴卡顿的解决方案
我使用的是官网标准版的eclipse4.3 for javaEE, 写JS时卡的简直无法忍受,尝试去掉所有的validate,包括菜单和项目属性中的都没作用. 整个人都急疯了~ 后来在项目根目录.pr ...
- Spring-----AOP深度理解
AOP定义了一些新的概念,要想深入的理解AOP的原理,就必须掌握这些概念的具体含义,本人菜鸡一枚,一下是自己对一些概念的理解,如果哪里不对,欢迎评论区指正 AOP核心概念AOP即Aspect-Orie ...
- 单击GridView进入编辑模式
一直以来,Insus.NET在实现GridView编辑时,均是在每笔记录第一列或是最后一列放置编辑铵钮,点击编辑铵钮之后,进行编辑模式.本博文是使用另外方式,即是点击GridView记录行任一位置,进 ...
- jQuery源码分析-03构造jQuery对象-源码结构和核心函数
3. 构造jQuery对象 3.1源码结构 先看看总体结构,再做分解: (function( window, undefined ) { var jQuery = (function() { // 构 ...
- win10 uwp unix timestamp 时间戳 转 DateTime
有时候需要把网络的 unix timestamp 转为 C# 的 DateTime ,在 UWP 可以如何转换? 转换函数可以使用下面的代码 private static DateTime UnixT ...
- CLR via C# 读书笔记-26.线程基础
前言 这俩个月没怎么写文章做记录分享,一直在忙项目上线的事情,但是学习这件事情,停下来就感觉难受,clr线程这章也是反复看了好多遍,书读百遍其义自见,今天我们来聊下线程基础 1.进程是什么,以及线程起 ...
- mac系统终端sudo免输入密码技能get
1.需要在/etc/sudoers中配置. 这个文件的权限是r/r/n,配置之前需要加写权限. sudo chmod u-w /etc/sudoers 2.打开命令窗口sudo visudo 或者 s ...
- SQL语句的增删改查(详细)--转载
转载源: http://blog.csdn.net/a88055517/article/details/6736284/ 一.增:有2种方法 1.使用insert插入单行数据: 语法:insert [ ...
- 传输层协议TCP和UDP分析
分析所用软件下载:Wireshark-win32-1.10.2.exe 阅读导览 1. 分析应用TCP协议,以及TCP链接管理 2. 分析应用UDP协议 分析要求 (1)TCP部分: 学习3CDaem ...
