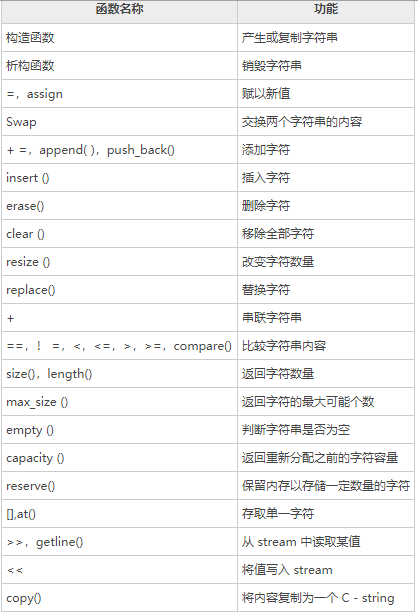
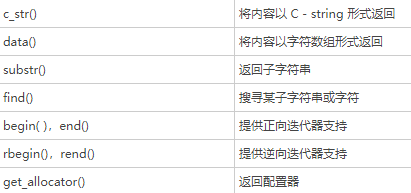
string类的用法总结
string中常见的成员函数
示例代码:
string s= string("abcdefg");
char ch[] = "abcdefgd";
//调用构造函数全部复制
string str1 = string(s);
//构造函数,从字符串str的第2个元素开始,复制5个元素,赋值给str2
string str2 = string(s,2,5);
//复制ch前5个字符串
string str3 = string(ch,5);
//将5个'6'赋给字符串
string str4 = string(5,'6');
//
string str5 = string(s.begin(),s.end());
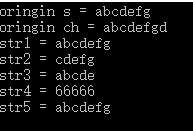
cout << "oringin s = " + s << endl;
cout << "oringin ch = " <<ch << endl;
cout << "str1 = " + str1<< endl;
cout << "str2 = " + str2<<endl;
cout << "str3 = " + str3<<endl;
cout << "str4 = " + str4<<endl;
cout << "str5 = " + str5<<endl;
输出结果:
string的常用方法
取string中元素
使用at()或[]去字符串的元素
string s = "hello";

char c = s.at(2);

char ch = s[2];
上面两行的效果是一样的,都是将l取出。
字符串比较
compare函数
函数原型如下所示:int compare (const basic_string& s) const;
int compare (const Ch* p) const;
int compare (size_type pos, size_type n, const basic_string& s) const;
int compare (size_type pos, size_type n, const basic_string& s,size_type pos2, size_type n2) const;
int compare (size_type pos, size_type n, const Ch* p, size_type = npos) const;
函数返回值介绍:若参与比较的两个串值相同,则函数返回 0;若字符串 S 按字典顺序要先于 S2,则返回负值;反之,则返回正值。下面举例说明如何使用 string 类的 compare() 函数。
具体示例如下:
string s1 = "Hello";

string s2 = "Ok";

string s3 = "abdcds";

string s4("abdcds");

cout << "s1 = " + s1 <<endl;

cout << "s2 = " + s2 <<endl;

cout << "s3 = " + s3 <<endl;

cout << "s4 = " + s4 <<endl;

cout<<"s1.comapre(s2) = " << s1.compare(s2) <<endl;

cout<<"s2.comapre(s3) = " << s2.compare(s3) <<endl;

cout<<"s3.comapre(s4) = " << s3.compare(s4) <<endl;
输出结果如下:
s1 = Hello

s2 = Ok

s3 = abdcds

s4 = abdcds

s1.comapre(s2) = -1

s2.comapre(s3) = -1

s3.comapre(s4) = 0
- 比较运算符
String 类的常见运算符包括 >、<、==、>=、<=、!=。其意义分别为"大于"、"小于"、"等于"、"大于等于"、"小于等于"、"不等于"
示例用法:
#include <iostream>

#include <string>

using namespace std;

void TrueOrFalse (int x)

{

cout << (x?"True":"False")<<endl;

}

int main ()

{

string S1 = "DEF";

string CP1 = "ABC";

string CP2 = "DEF";

string CP3 = "DEFG";

string CP4 ="def";

cout << "S1= " << S1 << endl;

cout << "CP1 = " << CP1 <<endl;

cout << "CP2 = " << CP2 <<endl;

cout << "CP3 = " << CP3 <<endl;

cout << "CP4 = " << CP4 <<endl;

cout << "S1 <= CP1 returned ";

TrueOrFalse (S1 <=CP1);

cout << "S1 <= CP2 returned ";

TrueOrFalse (S1 <= CP2);

cout << "S1 <= CP3 returned ";

TrueOrFalse (S1 <= CP3);

cout << "CP1 <= S1 returned ";

TrueOrFalse (CP1 <= S1);

cout << "CP2 <= S1 returned ";

TrueOrFalse (CP2 <= S1);

cout << "CP4 <= S1 returned ";

TrueOrFalse (CP4 <= S1);

cin.get();

return 0;

}
输出结果:
S1= DEF

CP1 = ABC

CP2 = DEF

CP3 = DEFG

CP4 = def

S1 <= CP1 returned False

S1 <= CP2 returned True

S1 <= CP3 returned True

CP1 <= S1 returned True

CP2 <= S1 returned True

CP4 <= S1 returned False
字符串内容的修改
使用append()函数
basic_string& append (const E * s); //在原始字符串后面追加字符串s
basic_string& append (const E * s, size_type n);//在原始字符串后面追加字符串 s 的前 n 个字符
basic_string& append (const basic_string& str, size_type pos,size_type n);//在原始字符串后面追加字符串 s 的子串 s [ pos,…,pos +n -1]
basic_string& append (const basic_string& str);
basic_string& append (size_type n, E c); //追加 n 个重复字符
basic_string& append (const_iterator first, const_iterator last); //使用迭代器追加
示例代码如下:
string s1 = "123456";

string s2 = "abcdefgh";

string str;

str.assign(s1);

cout <<"after use assign: str = " << str << endl;
使用insert函数
basic_string& insert (size_type p0 , const E * s); //插人 1 个字符至字符串 s 前面
basic_string& insert (size_type p0 , const E * s, size_type n); // 将 s 的前 3 个字符插入p0 位置
basic_string& insert (size_type p0, const basic_string& str);
basic_string& insert (size_type p0, const basic_string& str,size_type pos, size_type n); //选取 str 的子串
basic_string& insert (size_type p0, size_type n, E c); //在下标 p0 位置插入 n 个字符 c
iterator insert (iterator it, E c); //在 it 位置插入字符 c
void insert (iterator it, const_iterator first, const_iterator last); //在字符串前插入字符
void insert (iterator it, size_type n, E c) ; //在 it 位置重复插入 n 个字符 c
示例代码如下:
string A("ello");

string B ;

B.insert(1,A);

cout << B << endl;

A = "ello";

B = "H";

B.insert (1,"yanchy ",3);

cout<< B <<endl;

A = "ello";

B = "H";

B.insert (1,A,2,2);

cout << B << endl;

A="ello";

B.insert (1 , 5 , 'C');

cout << B << endl;
字符串替换函数
方法原型:
basic_string& replace (size_type p0, size_type n0, const E * s); //使用字符串 s 中的 n 个字符,从源串的位置 P0 处开始替换

basic_string& replace (size_type p0, size_type n0, const E *s, size_type n); //使用字符串 s 中的 n 个字符,从源串的位置 P0 处开始替换 1 个字符

basic_string& replace (size_type p0, size_type n0, const basic_string& str); //使用字符串 s 中的 n 个字符,从源串的位置 P0 处开始替换

basic_string& replace (size_type p0, size_type n0, const basic_string& str, size_type pos, size_type n); //使用串 str 的子串 str [pos, pos + n-1] 替换源串中的内容,从位置 p0 处开

始替换,替换字符 n0 个

basic_string& replace (size_type p0, size_type n0, size_type n, E c); //使用 n 个字符 'c' 替换源串中位置 p0 处开始的 n0 个字符

basic_string& replace (iterator first0, iterator last0, const E * s);//使用迭代器替换,和 1) 用法类似

basic_string& replace (iterator first0, iterator last0, const E * s, size_type n);//和 2) 类似

basic_string& replace (iterator first0, iterator last0, const basic_string& str); //和 3) 类似

basic_string& replace (iterator first0, iterator last0, size_type n, E c); //和 5) 类似

basic_string& replace (iterator first0, iterator last0, const_iterator first, const_iterator last); //使用迭代器替换
示例代码如下:
#include <iostream>

#include <string>

using namespace std;

int main ()

{

string var ("abcdefghijklmn");

const string dest ("1234");

string dest2 ("567891234");

var.replace (3,3, dest);

cout << "1: " << var << endl;

var = "abcdefghijklmn";

var.replace (3,1, dest.c_str(), 1, 3);

cout << "2: " << var << endl;

var ="abcdefghijklmn";

var.replace (3, 1, 5, 'x');

cout << "3: " << var << endl;

string::iterator itA, itB;

string::iterator itC, itD;

itA = var.begin();

itB = var.end();

var = "abcdefghijklmn";

var.replace (itA, itB, dest);

cout << "4: " << var << endl;

itA = var.begin ();

itB = var.end();

itC = dest2.begin () +1;

itD = dest2.end ();

var = "abodefghijklmn";

var.replace (itA, itB, itC, itD);

cout << "5: " << var << endl;

var = "abcdefghijklmn";

var.replace (3, 1, dest.c_str(), 4); //这种方式会限定字符串替换的最大长度

cout <<"6: " << var << endl;

return 0;

}
输出结果 :
1: abc1234ghijklmn

2: abc234efghijklmn

3: abcxxxxxefghijklmn

4: 1234

5: 67891234efghijklmn

6: abc1234efghijklmn
字符串查找find
string类的用法总结的更多相关文章
- 标准C++中的string类的用法总结
标准C++中的string类的用法总结 相信使用过MFC编程的朋友对CString这个类的印象应该非常深刻吧?的确,MFC中的CString类使用起来真的非常的方便好用.但是如果离开了MFC框架,还有 ...
- VC++ 标准C++中的string类的用法总结
相信使用过MFC编程的朋友对CString这个类的印象应该非常深刻吧?的确,MFC中的CString类使用起来真的非常的方便好用.但是如果离开了MFC框架,还有没有这样使用起来非常方便的类呢?答案是肯 ...
- [C++][语言语法]标准C++中的string类的用法总结
转自:http://www.cnblogs.com/xFreedom/archive/2011/05/16/2048037.html 要想使用标准C++中string类,必须要包含 #include ...
- 标准C++中string类的用法
转自博客园:http://www.cnblogs.com/xFreedom/archive/2011/05/16/2048037.html 相信使用过MFC编程的朋友对CString这个类的印象应该非 ...
- 标准C++中的string类的用法总结(转)
http://www.cnblogs.com/xFreedom/archive/2011/05/16/2048037.html 相信使用过MFC编程的朋友对CString这个类的印象应该非常深刻吧?的 ...
- 【C++】C++中的string类的用法总结
相信使用过MFC编程的朋友对CString这个类的印象应该非常深刻吧?的确,MFC中的CString类使用起来真的非常的方便好用.但是如果离开了MFC框架,还有没有这样使用起来非常方便的类呢?答案是肯 ...
- string类的用法笔记
要想使用标准C++中string类,必须要包含 #include <string>// 注意是<string>,不是<string.h>,带.h的是C语言中的头文件 ...
- [转]标准C++中的string类的用法总结
原文地址:http://www.cnblogs.com/xFreedom/archive/2011/05/16/2048037.html 相信使用过MFC编程的朋友对CString这个类的印象应该非常 ...
- String类的用法
练习如何创建一个类. package create; public class Newstring { String aa; public Newstring() { // TODO Auto-gen ...
- 标准C++中string类的用法总结
相信使用过MFC编程的朋友对CString这个类的印象应该非常深刻吧?的确,MFC中的CString类使用起来真的非常的方便好用.但是如果离开了MFC框架,还有没有这样使用起来非常方便的类呢?答案是肯 ...
随机推荐
- @interface __ annotation 子类可以继承到父类上的注解吗--有结论了
博客分类: Java/J2se 作者:赵磊 博客:http://elf8848.iteye.com 不了解注解基础知识的请先看<JDK 5 Annotation\注解\注释\自定义注解> ...
- Jwt身份验证
转载自博友(TerryTon) 1.因为json是通用的,所以jwt可以在绝大部分平台可以通用,如java,python,php,.net等 2.基于jwt是无状态的,jwt可以用于分布式等现在比 ...
- Visual Studio的语法着色终于调得赏心悦目
代码可读性瞬间大大提升.Reshaper真的强大.
- [其它]iOS 13 正式版发布 iPhone 6s或更新型号均可升级
苹果今天(2019.09.20)发布了 iOS 13 正式版,可以升级的设备包括 iPhone 6s 或更新型号.第七代 iPod Touch. iOS 13 推出深色模式,为 iPhone 带来截然 ...
- 基于python的图像傅里叶处理
import numpy as npimport matplotlib.pyplot as plt x = np.linspace(-10, 10, 1000)a = np.cos(x)b = a + ...
- Python面向对象封装案例
01. 封装 封装 是面向对象编程的一大特点 面向对象编程的 第一步 —— 将 属性 和 方法 封装 到一个抽象的 类 中 外界 使用 类 创建 对象,然后 让对象调用方法 对象方法的细节 都被 封装 ...
- 5.Javascript闭包得实现原理和作用
闭包的实现原理和作用 1.闭包的概念:指有权访问另一个函数作用域中的变量的函数,一般情况就是在一个函数中包含另一个函数. 2.闭包的作用:访问函数内部变量.保持函数在环境中一直存在,不会被垃圾回收机制 ...
- Nginx学习(二)
------------恢复内容开始------------ Nginx配置文件 主配置文件结构:四部分 main block:主配置段,既全局配置段,对Http,mail都有效 event{ }事件 ...
- postgresql怎么导入数据库
1.切换到postgres用户 : sudo su - postgres 2.在shell命令行下,创建数据库exampledb,并指定所有者为dbuser : sudo -u postgres - ...
- APP安全测试
app 常见风险 一. clinet端 1.反编译 2.签名破解 3.调试 4.导出组件 5.拒绝服务 6.输入记录 二.传输 1.信息泄露,未使用加密服务(ssl) 2.篡改 三.服务端 1.SQL ...