scrapy框架--?乱码unicode
安装
- pip install scrapy
建立一个爬虫项目
scrapy startproject 项目名称
- scrapy startproject itcast
进入itcast文件夹 生成一个爬虫
scrapy genspider 爬虫名称 "爬虫范围"
- scrapy genspider itcast "itcast.cn"
爬虫生成位置
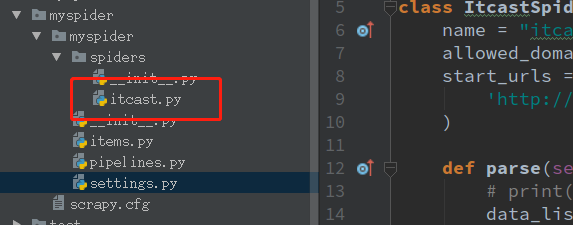
编写itcast.py
- # -*- coding: utf-8 -*-
- import scrapy
- class ItcastSpider(scrapy.Spider):
- name = "itcast"
- allowed_domains = ["itcast.cn"]
- start_urls = (
- 'http://www.itcast.cn/channel/teacher.shtml',
- )
- def parse(self, response):
- # print(response)
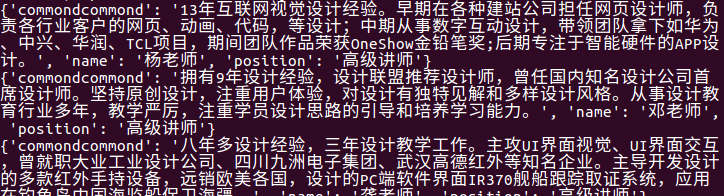
- data_list = response.xpath("//div[@class='tea_con']//h3/text()").extract() # extract() 返回一个含有字符串数据的列表 如果没用这个方法 返回一个包含选择器的列表
- print(data_list) # 乱码 u\u5218.... setting.py中添加了 FEED_EXPORT_ENCODING = 'utf-8' 还是不行 不知道原因 ???
- for i in data_list:
- print(i) # 此处打印的是中文
乱码是由于ubuntu终端没有中文安装包
安装中文包
- apt-get install language-pack-zh
修改 /tec/environment
- sudo gedit /etc/environment
在下面添加两行
- PATH="/usr/local/sbin:/usr/local/bin:/usr/sbin:/usr/bin:/sbin:/bin:/usr/games"
- LANG="zh_CN.UTF-8"
- LANGUAGE="zh_CN:zh:en_US:en"
第二行即是默认的中文字符编码。注:可以通过这里修改默认的中文编 码字符,比如修改为:zh_CN.GBK
修改/var/lib/locales/supported.d/local文件
- sudo gedit /var/lib/locales/supported.d/local
添加
- zh_CN.UTF-8 UTF-8
- en_US.UTF-8 UTF-8
保存后,执行命令
- sudo locale-gen
重启
- sudo reboot
解决 乱码没有了,可以显示中文了
终端打印出来后有其它数据
setting.py中配置log的等级
- LOG_LEVEL = "WARNING"
xapath分组 数据传到pipline itcast.py中
- # -*- coding: utf-8 -*-
- import scrapy
- class ItcastSpider(scrapy.Spider):
- name = "itcast"
- allowed_domains = ["itcast.cn"]
- start_urls = (
- 'http://www.itcast.cn/channel/teacher.shtml',
- )
- def parse(self, response):
- # # print(response)
- # data_list = response.xpath("//div[@class='tea_con']//h3/text()").extract() # extract() 返回一个含有字符串数据的列表 如果没用这个方法 返回一个包含选择器的列表
- # print(data_list) # 乱码 u\u5218.... setting.py中添加了 FEED_EXPORT_ENCODING = 'utf-8' 还是不行 不知道原因 ???
- # for i in data_list:
- # print(i) # 此处打印的是中文
- ret = response.xpath("//div[@class='tea_con']//li") # xpath分组提取
- # print(ret)
- for i in ret:
- item = {}
- item['name'] = i.xpath(".//h3/text()").extract_first() # extract_first()相当于 extract()[0] 取列表的第一条数据
- # extrack_first() 如果没有数据则返回空列表
- # extrack()[0] 如果没有数据会报错
- item['position'] = i.xpath(".//h4/text()").extract_first()
- item['commondcommond'] = i.xpath(".//p/text()").extract_first()
- yield item # 把数据传给pipline
pipline如果想显示接收数据 先要在设置setting.py中开启

- # -*- coding:utf-8 -*-
- # Define your item pipelines here
- #
- # Don't forget to add your pipeline to the ITEM_PIPELINES setting
- # See: http://doc.scrapy.org/en/latest/topics/item-pipeline.html
- import json
- import codecs
- class MyspiderPipeline(object):
- # def __init__(self):
- # # 定义文件编码及名称
- # self.file = codecs.open('中文乱码.json', 'wb', encoding='utf-8')
- def process_item(self, item, spider): # 实现存储方法
- # line = json.dumps(dict(item)) + '\n'
- # print(line.decode("unicode_escape"))
- # 写入一行,每行为一个抓取项
- # self.file.write(line.decode("unicode_escape"))
- # return item
- print(item)
return item
查看效果,控制端输入代码
- scrapy crawl itcast
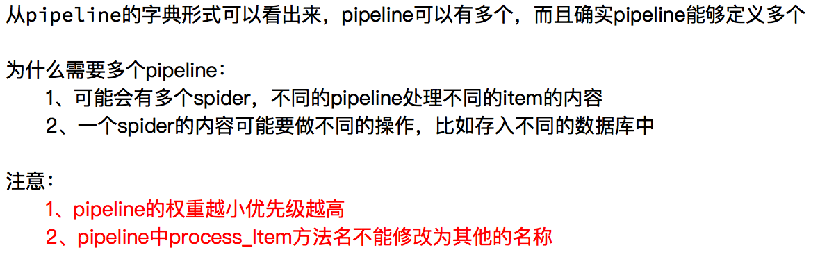
使用多个pipline
- # -*- coding:utf-8 -*-
- # Define your item pipelines here
- #
- # Don't forget to add your pipeline to the ITEM_PIPELINES setting
- # See: http://doc.scrapy.org/en/latest/topics/item-pipeline.html
- import json
- import codecs
- class MyspiderPipeline(object):
- # def __init__(self):
- # # 定义文件编码及名称
- # self.file = codecs.open('中文乱码.json', 'wb', encoding='utf-8')
- def process_item(self, item, spider):
- # line = json.dumps(dict(item)) + '\n'
- # print(line.decode("unicode_escape"))
- # 写入一行,每行为一个抓取项
- # self.file.write(line.decode("unicode_escape"))
- # return item
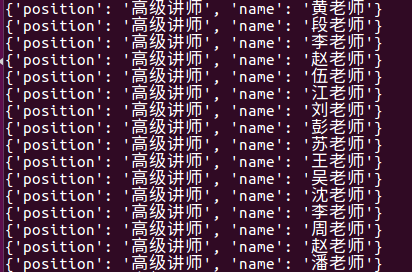
- del item["commondcommond"] # 删除详细介绍
- return item
- class MyspiderPipeline2(object):
- def process_item(self, item, spider):
- print(item) # 此时item是从上面方法处理后的item
- return item
配置setting.py
- # Configure item pipelines
- # See http://scrapy.readthedocs.org/en/latest/topics/item-pipeline.html
- ITEM_PIPELINES = {
- 'myspider.pipelines.MyspiderPipeline': 300,
- 'myspider.pipelines.MyspiderPipeline2': 301,
- }
查看效果
创建多个爬虫
一个爬虫项目是包含多个爬虫的
- scrapy genspider itcast2 itcast.cn
- scrapy genspider itcast3 itcast.cn


关于多个爬虫的pipline处理方式:
爬虫itcast.py返回值里添加comfrom
- def parse(self, response):
- # # print(response)
- # data_list = response.xpath("//div[@class='tea_con']//h3/text()").extract() # extract() 返回一个含有字符串数据的列表 如果没用这个方法 返回一个包含选择器的列表
- # print(data_list) # 乱码 u\u5218.... setting.py中添加了 FEED_EXPORT_ENCODING = 'utf-8' 还是不行 不知道原因 ???
- # for i in data_list:
- # print(i) # 此处打印的是中文
- ret = response.xpath("//div[@class='tea_con']//li") # xpath分组提取
- # print(ret)
- for i in ret:
- item = {}
- item['comfrom'] = 'itcast' # 便于pipline区分
- item['name'] = i.xpath(".//h3/text()").extract_first() # extract_first()相当于 extract()[0] 取列表的第一条数据
- # extrack_first() 如果没有数据则返回空列表
- # extrack()[0] 如果没有数据会报错
- item['position'] = i.xpath(".//h4/text()").extract_first()
- item['commond'] = i.xpath(".//p/text()").extract_first()
- yield item # 把数据传给pipline
1.多个爬虫使用一个pipline
piplind处理方法
- class MyspiderPipeline(object):
- def process_item(self, item, spider):
- if item['comfrom'] == 'itcast':
- pass # itcast的处理方式
- elif item['comfrom'] == 'itcast2':
- pass # itcast2 的处理方式
- else:
- pass # itcast3 的处理方式
2.多个爬虫使用多个pipline区分
- class MyspiderPipeline(object):
- def process_item(self, item, spider):
- if item['comfrom'] == 'itcast':
- pass # itcast的处理方式
- class MyspiderPipeline2(object):
- def process_item(self, item, spider):
- if item['comfrom'] == 'itcast2':
- pass # itcast2 的处理方式
- class MyspiderPipeline3(object):
- def process_item(self, item, spider):
- if item['comfrom'] == 'itcast3':
- pass # itcast3 的处理方式
配置seting.py里注册pipline2、pipline3的权重
- ITEM_PIPELINES = {
- 'myspider.pipelines.MyspiderPipeline': 300,
- 'myspider.pipelines.MyspiderPipeline2': 301,
- 'myspider.pipelines.MyspiderPipeline3': 302,
- }
3.根据spider.name区分
- # -*- coding: utf-8 -*-
- import scrapy
- class ItcastSpider(scrapy.Spider):
- name = "itcast" # 类属性name 便于piplinde区分
- allowed_domains = ["itcast.cn"]
- start_urls = (
- 'http://www.itcast.cn/channel/teacher.shtml',
- )
- def parse(self, response):
- # # print(response)
- # data_list = response.xpath("//div[@class='tea_con']//h3/text()").extract() # extract() 返回一个含有字符串数据的列表 如果没用这个方法 返回一个包含选择器的列表
- # print(data_list) # 乱码 u\u5218.... setting.py中添加了 FEED_EXPORT_ENCODING = 'utf-8' 还是不行 不知道原因 ???
- # for i in data_list:
- # print(i) # 此处打印的是中文
- ret = response.xpath("//div[@class='tea_con']//li") # xpath分组提取
- # print(ret)
- for i in ret:
- item = {}
- item['comfrom'] = 'itcast'
- item['name'] = i.xpath(".//h3/text()").extract_first() # extract_first()相当于 extract()[0] 取列表的第一条数据
- # extrack_first() 如果没有数据则返回空列表
- # extrack()[0] 如果没有数据会报错
- item['position'] = i.xpath(".//h4/text()").extract_first()
- item['commond'] = i.xpath(".//p/text()").extract_first()
- yield item # 把数据传给pipline
pipline中
- class MyspiderPipeline(object):
- def process_item(self, item, spider):
- if spider.name == 'itcast':
- pass # 当spider的类属性name是itcast时的处理方式
使用loggin日志
开启日志输出到文件配置sitting.py
- LOG_LEVEL = "WARNING" # 日志级别
- LOG_FILE = "./log.log" # 把日志保存到文件, 文件保存位置
itcast.py或者pipline中
- # -*- coding: utf-8 -*-
- import scrapy
- import logging
- logger = logging.getLogger(__name__) # 获取logger对象 可以以spider名称存入log日志
- class ItcastSpider(scrapy.Spider):
- name = "itcast"
- allowed_domains = ["itcast.cn"]
- start_urls = (
- 'http://www.itcast.cn/channel/teacher.shtml',
- )
- def parse(self, response):
- # # print(response)
- # data_list = response.xpath("//div[@class='tea_con']//h3/text()").extract() # extract() 返回一个含有字符串数据的列表 如果没用这个方法 返回一个包含选择器的列表
- # print(data_list) # 乱码 u\u5218.... setting.py中添加了 FEED_EXPORT_ENCODING = 'utf-8' 还是不行 不知道原因 ???
- # for i in data_list:
- # print(i) # 此处打印的是中文
- ret = response.xpath("//div[@class='tea_con']//li") # xpath分组提取
- # print(ret)
- for i in ret:
- item = {}
- item['comfrom'] = 'itcast'
- item['name'] = i.xpath(".//h3/text()").extract_first() # extract_first()相当于 extract()[0] 取列表的第一条数据
- # extrack_first() 如果没有数据则返回空列表
- # extrack()[0] 如果没有数据会报错
- item['position'] = i.xpath(".//h4/text()").extract_first()
- item['commond'] = i.xpath(".//p/text()").extract_first()
- logger.warning(item) # 对应setting配置的LOG_LEVEL级别,把日志输出到日志文件
- yield item # 把数据传给pipline
实现翻页请求

实例
- # 获取总页数
- pageNum=math.ceil(data_lists['Data']['Count']/10)
- # 设置第二页页码
- pageIndex = 2
- while pageIndex<=pageNum:
- next_url = "https://careers.tencent.com/tencentcareer/api/post/Query?pageIndex={}&pageSize=10".format(pageIndex)
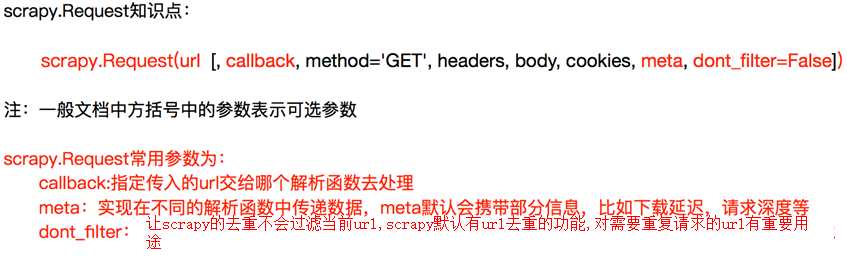
- yield scrapy.Request(
- next_url,
- callback=self.parse
- )
- pageIndex += 1
meta用途
- def parse(self, response):
- data_lists = json.loads(response.text)
- data_list = data_lists['Data']['Posts']
- for data in data_list:
- item = {}
- item['RecruitPostName'] = data['RecruitPostName']
- item['CountryName'] = data['CountryName']
- item['PostURL'] = data['PostURL']
- item['LastUpdateTime'] = data['LastUpdateTime']
- print(item)
- # 获取总页数
- pageNum=math.ceil(data_lists['Data']['Count']/10)
- # 设置第二页页码
- pageIndex = 2
- while pageIndex<=pageNum:
- next_url = "https://careers.tencent.com/tencentcareer/api/post/Query?pageIndex={}&pageSize=10".format(pageIndex)
- yield scrapy.Request(
- next_url,
- callback=self.parse,
- meta={"item":item} # meta用法 在不同的解析函数中传递数据
- )
- pageIndex += 1
- def parse1(self, response):
- item = response.meta["item"]
Scrapy深入之定义Item
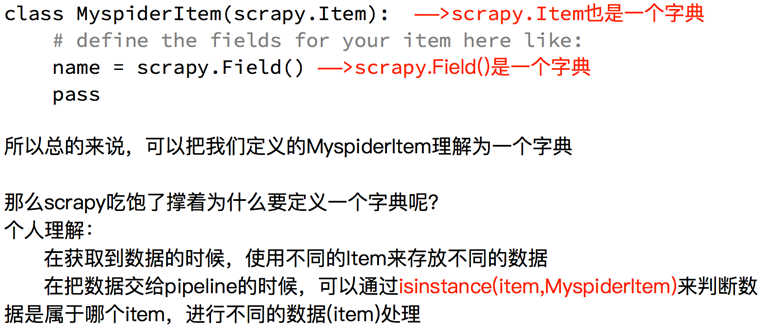
可以在items.py中把要爬取的字段定义好
- # -*- coding: utf-8 -*-
- # Define here the models for your scraped items
- #
- # See documentation in:
- # http://doc.scrapy.org/en/latest/topics/items.html
- import scrapy
- class HrItem(scrapy.Item):
- # define the fields for your item here like:
- # name = scrapy.Field()
- RecruitPostName = scrapy.Field()
- CountryName = scrapy.Field()
- PostURL = scrapy.Field()
- LastUpdateTime = scrapy.Field()
此时要把爬虫tencent.py中关于item字典改动一下
- # -*- coding: utf-8 -*-
- import scrapy
- import json
- import math
- from hr.items import HrItem
- class TencentSpider(scrapy.Spider):
- name = "tencent"
- allowed_domains = ["tencent.com"]
- start_urls = (
- 'https://careers.tencent.com/tencentcareer/api/post/Query?pageIndex=1&pageSize=10',
- )
- def parse(self, response):
- data_lists = json.loads(response.text)
- data_list = data_lists['Data']['Posts']
- for data in data_list:
- item = HrItem()
- item['RecruitPostName1'] = data['RecruitPostName'] # 与items.py中定义的字段不一致 会报错
- item['CountryName'] = data['CountryName']
- item['PostURL'] = data['PostURL']
- item['LastUpdateTime'] = data['LastUpdateTime']
- yield item # 数据传给piplines# 获取总页数
- pageNum=math.ceil(data_lists['Data']['Count']/10)
- # 设置第二页页码
- pageIndex = 2
- while pageIndex<=pageNum:
- next_url = "https://careers.tencent.com/tencentcareer/api/post/Query?pageIndex={}&pageSize=10".format(pageIndex)
- yield scrapy.Request(
- next_url,
- callback=self.parse,
- meta={"item":item} # meta用法 在不同的解析函数中传递数据
- )
- pageIndex += 1
- def parse2(self, response):
- item = response.meta["item"]
pipelines.py中处理数据
- # -*- coding: utf-8 -*-
- # Define your item pipelines here
- #
- # Don't forget to add your pipeline to the ITEM_PIPELINES setting
- # See: http://doc.scrapy.org/en/latest/topics/item-pipeline.html
- from pymongo import MongoClient
- from hr.items import HrItem
- client = MongoClient()
- collection = client["hr"]["tencent"]
- class HrPipeline(object):
- def process_item(self, item, spider):
- if isinstance(item, HrItem): # 判断item是否属于Hritem
- print(item)
- collection.insert(dict(item)) # 导入到mongoDb前要先转化成字典
- return item
scrapy配置信息settings.py
- # -*- coding: utf-8 -*-
- # Scrapy settings for yangguang project
- #
- # For simplicity, this file contains only settings considered important or
- # commonly used. You can find more settings consulting the documentation:
- #
- # https://docs.scrapy.org/en/latest/topics/settings.html
- # https://docs.scrapy.org/en/latest/topics/downloader-middleware.html
- # https://docs.scrapy.org/en/latest/topics/spider-middleware.html
- BOT_NAME = 'yangguang' # 项目名
- SPIDER_MODULES = ['yangguang.spiders'] # 爬虫所在的位置
- NEWSPIDER_MODULE = 'yangguang.spiders' # 新建爬虫所在位置
- # Crawl responsibly by identifying yourself (and your website) on the user-agent
- USER_AGENT = 'Mozilla/5.0 (Windows NT 10.0; WOW64) AppleWebKit/537.36 (KHTML, like Gecko) Chrome/71.0.3578.80 Safari/537.36'
- # Obey robots.txt rules
- ROBOTSTXT_OBEY = True # True遵守robots协议 False不遵守协议
- LOG_LEVEL = "WARNING" # LOG日志等级
- FEED_EXPORT_ENCODING = 'UTF-8'
- # Configure maximum concurrent requests performed by Scrapy (default: 16)
- #CONCURRENT_REQUESTS = 32 # 并发 同时最大数目为32
- # Configure a delay for requests for the same website (default: 0)
- # See https://docs.scrapy.org/en/latest/topics/settings.html#download-delay
- # See also autothrottle settings and docs
- #DOWNLOAD_DELAY = 3 # 下载延迟 每次下载前睡3秒 让爬虫更慢性
- # The download delay setting will honor only one of:
- #CONCURRENT_REQUESTS_PER_DOMAIN = 16 # 每个域名的最大并发请求数
- #CONCURRENT_REQUESTS_PER_IP = 16 # 没个IP的最大并发请求数
- # Disable cookies (enabled by default)
- #COOKIES_ENABLED = False # 是否开启COOKIE 默认是开启的
- # Disable Telnet Console (enabled by default)
- #TELNETCONSOLE_ENABLED = False # 是否配置插件 默认是开启的
- # Override the default request headers: # 默认请求头
- #DEFAULT_REQUEST_HEADERS = {
- # 'Accept': 'text/html,application/xhtml+xml,application/xml;q=0.9,*/*;q=0.8',
- # 'Accept-Language': 'en',
- #}
- # Enable or disable spider middlewares
- # See https://docs.scrapy.org/en/latest/topics/spider-middleware.html
- #SPIDER_MIDDLEWARES = { # 爬虫中间件
- # 'yangguang.middlewares.YangguangSpiderMiddleware': 543,
- #}
- # Enable or disable downloader middlewares
- # See https://docs.scrapy.org/en/latest/topics/downloader-middleware.html
- #DOWNLOADER_MIDDLEWARES = { # 下载中间件
- # 'yangguang.middlewares.YangguangDownloaderMiddleware': 543,
- #}
- # Enable or disable extensions
- # See https://docs.scrapy.org/en/latest/topics/extensions.html
- #EXTENSIONS = { # 插件
- # 'scrapy.extensions.telnet.TelnetConsole': None,
- #}
- # Configure item pipelines
- # See https://docs.scrapy.org/en/latest/topics/item-pipeline.html
- ITEM_PIPELINES = { # pipelines 位置和权重
- 'yangguang.pipelines.YangguangPipeline': 300,
- }
- # Enable and configure the AutoThrottle extension (disabled by default) # AutoThrottle自动限速
- # See https://docs.scrapy.org/en/latest/topics/autothrottle.html
- #AUTOTHROTTLE_ENABLED = True
- # The initial download delay
- #AUTOTHROTTLE_START_DELAY = 5
- # The maximum download delay to be set in case of high latencies
- #AUTOTHROTTLE_MAX_DELAY = 60
- # The average number of requests Scrapy should be sending in parallel to
- # each remote server
- #AUTOTHROTTLE_TARGET_CONCURRENCY = 1.0
- # Enable showing throttling stats for every response received:
- #AUTOTHROTTLE_DEBUG = False
- # Enable and configure HTTP caching (disabled by default) # 缓存
- # See https://docs.scrapy.org/en/latest/topics/downloader-middleware.html#httpcache-middleware-settings
- #HTTPCACHE_ENABLED = True
- #HTTPCACHE_EXPIRATION_SECS = 0
- #HTTPCACHE_DIR = 'httpcache'
- #HTTPCACHE_IGNORE_HTTP_CODES = []
- #HTTPCACHE_STORAGE = 'scrapy.extensions.httpcache.FilesystemCacheStorage'
scrapy框架--?乱码unicode的更多相关文章
- 爬了个爬(三)Scrapy框架
参考博客:武Sir Scrapy是一个为了爬取网站数据,提取结构性数据而编写的应用框架. 其可以应用在数据挖掘,信息处理或存储历史数据等一系列的程序中.其最初是为了页面抓取 (更确切来说, 网络抓取 ...
- python爬虫入门(六) Scrapy框架之原理介绍
Scrapy框架 Scrapy简介 Scrapy是用纯Python实现一个为了爬取网站数据.提取结构性数据而编写的应用框架,用途非常广泛. 框架的力量,用户只需要定制开发几个模块就可以轻松的实现一个爬 ...
- 爬虫入门(四)——Scrapy框架入门:使用Scrapy框架爬取全书网小说数据
为了入门scrapy框架,昨天写了一个爬取静态小说网站的小程序 下面我们尝试爬取全书网中网游动漫类小说的书籍信息. 一.准备阶段 明确一下爬虫页面分析的思路: 对于书籍列表页:我们需要知道打开单本书籍 ...
- 解读Scrapy框架
Scrapy框架基础:Twsited Scrapy内部基于事件循环的机制实现爬虫的并发.原来: url_list = ['http://www.baidu.com','http://www.baidu ...
- scrapy框架使用教程
scrapy框架真的是很强大.非常值得学习一下.本身py就追求简洁,所以本身代码量很少却能写出很强大的功能.对比java来说.不过py的语法有些操蛋,比如没有智能提示.动态语言的通病.我也刚学习不到1 ...
- python 全栈开发,Day138(scrapy框架的下载中间件,settings配置)
昨日内容拾遗 打开昨天写的DianShang项目,查看items.py class AmazonItem(scrapy.Item): name = scrapy.Field() # 商品名 price ...
- python 全栈开发,Day137(爬虫系列之第4章-scrapy框架)
一.scrapy框架简介 1. 介绍 Scrapy一个开源和协作的框架,其最初是为了页面抓取 (更确切来说, 网络抓取 )所设计的,使用它可以以快速.简单.可扩展的方式从网站中提取所需的数据.但目前S ...
- Scrapy框架——CrawlSpider类爬虫案例
Scrapy--CrawlSpider Scrapy框架中分两类爬虫,Spider类和CrawlSpider类. 此案例采用的是CrawlSpider类实现爬虫. 它是Spider的派生类,Spide ...
- Scrapy框架爬虫
一.sprapy爬虫框架 pip install pypiwin32 1) 创建爬虫框架 scrapy startproject Project # 创建爬虫项目 You can start your ...
- python高级之scrapy框架
目录: 爬虫性能原理 scrapy框架解析 一.爬虫性能原理 在编写爬虫时,性能的消耗主要在IO请求中,当单进程单线程模式下请求URL时必然会引起等待,从而使得请求整体变慢. 1.同步执行 impor ...
随机推荐
- Elasticsearch由浅入深(八)搜索引擎:mapping、精确匹配与全文搜索、分词器、mapping总结
下面先简单描述一下mapping是什么? 自动或手动为index中的type建立的一种数据结构和相关配置,简称为mappingdynamic mapping,自动为我们建立index,创建type,以 ...
- 推荐一款移动端小视频App玲珑视频
推荐一款移动端小视频App玲珑视频 一 应用描述 玲珑小视频,边看边聊![海量视频,刷个不停,还能找妹子语音聊天哦][随手拍一拍,记录美好生活,还能拿金币哦][看视频领金币.登录领金币.拍视频领金币. ...
- swagger Unable to render this definition
Unable to render this definition The provided definition does not specify a valid version field. Ple ...
- Kubernetes 学习(十)Kubernetes 容器持久化存储
0. 前言 最近在学习张磊老师的 深入剖析Kubernetes 系列课程,最近学到了 Kubernetes 容器持久化存储部分 现对这一部分的相关学习和体会做一下整理,内容参考 深入剖析Kuberne ...
- 解决Spring Cloud中Feign第一次请求失败的问题
在Spring Cloud中,Feign和Ribbon在整合了Hystrix后,可能会出现首次调用失败的问题 com.netflix.hystrix.exception.HystrixTimeoutE ...
- flutter RN taro选型思考
当前RN已经成熟,但是依赖于大平台(JD.携程),小公司想开箱即用还是有困难的 纯Flutter还远未成熟,更多的是和原生进行混合 但是作为个体又想要在某一个点切入市场,就是需要作选择,基于当下及未来 ...
- spring bean的三种管理方式·
1.无参构造函数 1.xml文件配置内容 <!--无参构造函数--> <bean id="bean1" class="com.imooc.ioc.dem ...
- Linux内核中的并发与竞态概述
1.前言 众所周知,Linux系统是一个多任务的操作系统,当多个任务同时访问同一片内存区域的时候,这些任务可能会相互覆盖内存中数据,从而造成内存中的数据混乱,问题严重的话,还可能会导致系统崩溃. 2. ...
- 转 Java jar (SpringBoot Jar)转为win可执行的exe程序
原文链接:http://voidm.com/2018/12/29/java-jar-transform-exe/打包Jar工程 将java项目打包成jar工程,可以是文章以SpringBoot为例po ...
- [转] Performance_js中计算网站性能监控利器
1.Performance方法 Performance提供的方法可以灵活使用,获取到页面加载等标记的耗时情况. performance.now() //返回当前到页面打开时刻的耗时,精确到千分之一毫秒 ...