Spring MVC-表单(Form)标签-错误处理(Error Handling)示例(转载实践)
以下内容翻译自:https://www.tutorialspoint.com/springmvc/springmvc_errors.htm
说明:示例基于Spring MVC 4.1.6。
以下示例显示了如何在使用Spring Web MVC框架的窗体中使用错误处理和验证器。首先,让我们使用Eclipse IDE,并按照以下步骤使用Spring Web Framework开发基于动态窗体的Web应用程序:
| 步骤 | 描述 |
|---|---|
| 1 | 创建一个名为HelloWeb的项目,在一个包com.tutorialspoint下,如Spring MVC - Hello World Example章节所述。 |
| 2 | 在com.tutorialspoint包下创建一个Java类Student,StudentController和StudentValidator。 |
| 3 | 创建一个视图文件addStudent.jsp,result.jsp中下JSP子文件夹中。 |
| 4 | 最后一步是创建所有源和配置文件的内容并导出应用程序,如下所述。 |
Student.java
package com.tutorialspoint;

public class Student {

   private Integer age;

   private String name;

   private Integer id;

   public void setAge(Integer age) {

      this.age = age;

   }

   public Integer getAge() {

      return age;

   }

   public void setName(String name) {

      this.name = name;

   }

   public String getName() {

      return name;

   }

   public void setId(Integer id) {

      this.id = id;

   }

   public Integer getId() {

      return id;

   }

}
StudentValidator.java
package com.tutorialspoint;

import org.springframework.validation.Errors;

import org.springframework.validation.ValidationUtils;

import org.springframework.validation.Validator;

public class StudentValidator implements Validator {

   @Override

   public boolean supports(Class<?> clazz) {

      return Student.class.isAssignableFrom(clazz);

   }

   @Override

   public void validate(Object target, Errors errors) {

      ValidationUtils.rejectIfEmptyOrWhitespace(errors,

         "name", "required.name","Field name is required.");

   }

}
StudentController.java
package com.tutorialspoint;

import org.springframework.beans.factory.annotation.Autowired;

import org.springframework.beans.factory.annotation.Qualifier;

import org.springframework.stereotype.Controller;

import org.springframework.ui.Model;

import org.springframework.validation.BindingResult;

import org.springframework.validation.Validator;

import org.springframework.validation.annotation.Validated;

import org.springframework.web.bind.WebDataBinder;

import org.springframework.web.bind.annotation.InitBinder;

import org.springframework.web.bind.annotation.ModelAttribute;

import org.springframework.web.bind.annotation.RequestMapping;

import org.springframework.web.bind.annotation.RequestMethod;

import org.springframework.web.servlet.ModelAndView;

@Controller

public class StudentController {

   @Autowired

   @Qualifier("studentValidator")

   private Validator validator;

   @InitBinder

   private void initBinder(WebDataBinder binder) {

      binder.setValidator(validator);

   }

   @RequestMapping(value = "/addStudent", method = RequestMethod.GET)

   public ModelAndView student() {

      return new ModelAndView("addStudent", "command", new Student());

   }

   @ModelAttribute("student")

   public Student createStudentModel() {

      return new Student();

   }

   @RequestMapping(value = "/addStudent", method = RequestMethod.POST)

   public String addStudent(@ModelAttribute("student") @Validated Student student,

      BindingResult bindingResult, Model model) {

      if (bindingResult.hasErrors()) {

         return "addStudent";

      }

      model.addAttribute("name", student.getName());

      model.addAttribute("age", student.getAge());

      model.addAttribute("id", student.getId());

      return "result";

   }

}
HelloWeb-servlet.xml
<beans xmlns="http://www.springframework.org/schema/beans"

   xmlns:context="http://www.springframework.org/schema/context"

   xmlns:xsi="http://www.w3.org/2001/XMLSchema-instance"

   xsi:schemaLocation="

   http://www.springframework.org/schema/beans

   http://www.springframework.org/schema/beans/spring-beans-3.0.xsd

   http://www.springframework.org/schema/context

   http://www.springframework.org/schema/context/spring-context-3.0.xsd">

   <context:component-scan base-package="com.tutorialspoint" />

   <bean class="org.springframework.web.servlet.view.InternalResourceViewResolver">

      <property name="prefix" value="/WEB-INF/jsp/" />

      <property name="suffix" value=".jsp" />

   </bean>

   <bean id="studentValidator" class="com.tutorialspoint.StudentValidator" />

</beans>
这里第一个服务方法student(),我们已经在ModelAndView对象中传递了一个空白的Student对象,名称为“command”,因为如果您在JSP中使用<form:form>标签,Spring框架会期望一个名为“command”的对象文件。所以当调用student()方法时,返回addStudent.jsp视图。
将在HelloWeb/addStudent URL 上针对POST方法调用第二个服务方法addStudent()。您将根据提交的信息准备您的模型对象。最后,将从服务方法返回“result”视图,这将导致渲染result.jsp。如果使用验证器生成错误,则返回相同视图“addStudent”,Spring会自动从BindingResult注入错误消息。
addStudent.jsp
<%@taglib uri="http://www.springframework.org/tags/form" prefix="form"%>

<html>

<head>

    <title>Spring MVC Form Handling</title>

</head>

<style>

.error {

   color: #ff0000;

}

.errorblock {

   color: #000;

   background-color: #ffEEEE;

   border: 3px solid #ff0000;

   padding: 8px;

   margin: 16px;

}

</style>

<body>

<h2>Student Information</h2>

<form:form method="POST" action="/HelloWeb/addStudent" commandName="student">

   <form:errors path="*" cssClass="errorblock" element="div" />

   <table>

    <tr>

        <td><form:label path="name">Name</form:label></td>

        <td><form:input path="name" /></td>

        <td><form:errors path="name" cssClass="error" /></td>

    </tr>

    <tr>

        <td><form:label path="age">Age</form:label></td>

        <td><form:input path="age" /></td>

    </tr>

    <tr>

        <td><form:label path="id">id</form:label></td>

        <td><form:input path="id" /></td>

    </tr>

    <tr>

        <td colspan="2">

            <input type="submit" value="Submit"/>

        </td>

    </tr>

</table>

</form:form>

</body>

</html>
这里我们使用带有path ="*"的<form:errors />标签来显示错误消息。例如
<form:errors path="*" cssClass="errorblock" element="div" />
它将为所有输入验证提供错误消息。
而且我们使用path="name"的<form:errors />标签来显示name字段的错误消息。例如
<form:errors path="name" cssClass="error" />
它会显示名称字段验证的错误消息。
result.jsp
<%@taglib uri="http://www.springframework.org/tags/form" prefix="form"%>

<html>

<head>

    <title>Spring MVC Form Handling</title>

</head>

<body>

<h2>Submitted Student Information</h2>

   <table>

    <tr>

        <td>Name</td>

        <td>${name}</td>

    </tr>

    <tr>

        <td>Age</td>

        <td>${age}</td>

    </tr>

    <tr>

        <td>ID</td>

        <td>${id}</td>

    </tr>

</table>

</body>

</html>
完成创建源文件和配置文件后,导出应用程序。右键单击应用程序并使用Export->WAR File选项,并将您的HelloWeb.war文件保存在Tomcat的webapps文件夹中。
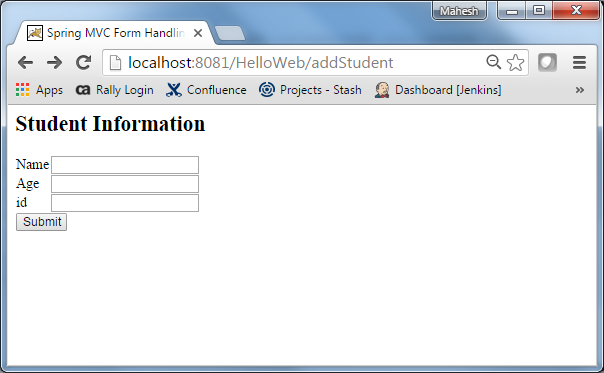
现在启动您的Tomcat服务器,并确保您可以使用标准浏览器从webapps文件夹访问其他网页。现在尝试URL http://localhost:8080/HelloWeb/addStudent,如果Spring Web应用程序的一切都很好,您应该会看到以下结果:
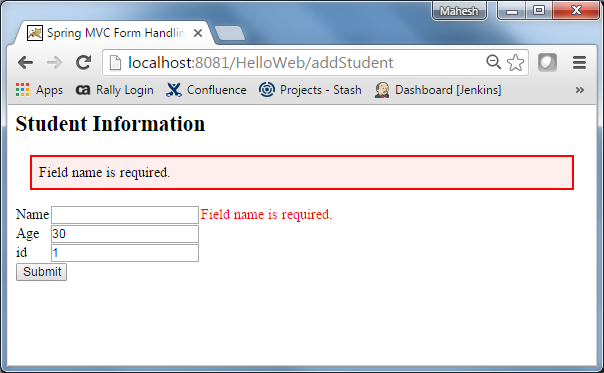
提交所需信息后,点击提交按钮提交表单。如果您的Spring Web应用程序的一切都很好,您应该会看到以下结果:
Maven示例:
https://github.com/easonjim/5_java_example/tree/master/springmvc/tutorialspoint/test14
Spring MVC-表单(Form)标签-错误处理(Error Handling)示例(转载实践)的更多相关文章
- spring mvc表单form值自动传到javabean-注解@ModelAttribute
直接通过Form Bean进行表单可以简化表单提交的处理,特别是对于复杂表单,过于简单的表单就不建议了,因为毕竟需要额外创建一个Form Bean.前段时间项目中有一个比较复杂的表单,有多层次而且涉及 ...
- Spring MVC表单标签
从Spring 2.0开始,Spring MVC开始全面支持表单标签,通过Spring MVC表单标签,我们可以很容易地将控制器相关的表单对象绑定到HTML表单元素中. form标签 和使用任 ...
- Spring MVC - 表单处理示例
环境搭建 环境: Intellij IDEA Spring MVC 完整的项目文件结构如下所示: Student.java package com.ktao.controller; public cl ...
- 使用Spring MVC表单标(转)
概述 在低版本的Spring中,你必须通过JSTL或<spring:bind>将表单对象绑定到HTML表单页面中,对于习惯了Struts表单标签的开发者来说,Spring MVC的 ...
- Spring MVC表单处理
以下示例演示如何编写一个简单的基于Web的应用程序,它使用Spring Web MVC框架使用HTML表单. 首先使用Eclipse IDE,并按照以下步骤使用Spring Web Framework ...
- Spring MVC表单提交
实际应用中,列表中的单条记录的修改,可能需要传很多对象参数到后台服务器,Spring MVC表单标签<form:> 提供了一种简洁的提交方式. <form id="form ...
- HTML中的表单<form>标签
一.HTML表单 HTML 表单用于搜集不同类型的用户输入. HTML 表单包含表单元素,表单元素指的是不同类型的 input 元素.复选框.单选按钮.提交按钮等等. 关于表单的更多内容可以参考htt ...
- [Spring MVC] - 表单提交
Spring MVC自带的表单标签比较简单,很多时候需要借助EL和JSTL来完成. 下面是一个比较简单的表单提交页面功能: 1.User model package com.my.controller ...
- Spring MVC 表单校验 (七)
完整的项目案例: springmvc.zip 目录 实例 除了依赖spring-webmvc还需要依赖jackson-databind(用于转换json数据格式)和hibernate-validato ...
- spring mvc表单的展现、输入处理、校验的实现
之前已经实现了spring mvc的入门例子及如何处理带参数的请求Controller编写.本文主要记录: 1)重定向请求 2)处理路径中含有变量的请求 3)使用JSR-303进行校验 ① 首先,编写 ...
随机推荐
- [App Store Connect帮助]二、 添加、编辑和删除用户(4)更改用户的 App 访问权限
您可以限制具有“App 管理”.“客户支持”.“开发者”.“营销”或“销售”职能的用户(均不具有“访问报告”职能)拥有哪些 App 的访问权限.如果您不更改他们的用户 App 访问权限,他们将默认拥有 ...
- Django day32 跨域问题,创建vue项目,axios的使用
一:跨域问题 1.同源策略(浏览器的安全策略) 只允许当前页面朝当前域下发请求,如果向其他域发请求,请求可以正常发送,数据也可以拿回,但是被浏览器拦截了 2.cors:只要服务器实现了CORS,就可以 ...
- flex中align-content属性
在flex弹性盒模型中align-content属性控制容器内多行在交叉轴上的排列方式 默认值:stretch 可用值: 属性值:flex-start 属性值:flex-end 属性值:center ...
- 【翻译】- EffectiveAkka-第二章(一)
Actor使用模式 现在我们已经了解了可以创建的actor系统的不同类型,那么我们在编写基于actor的应用程序时,可以采用什么样的使用模式,以便避免出现常见错误呢? 下面就让我们看看其中使用模式. ...
- 【学习笔记】线段树—扫描线补充 (IC_QQQ)
[学习笔记]线段树-扫描线补充 (IC_QQQ) (感谢 \(IC\)_\(QQQ\) 大佬授以本内容的著作权.此人超然于世外,仅有 \(Luogu\) 账号 尚可膜拜) [学习笔记]线段树详解(全) ...
- openpyxl python操作Excel表格,
这里openpyxl只支持xlsx格式的Excel,openpyxl使用起来会更方便一些,所以如果只操作小流水线文件的话,那么可以优先选择openpyxl,如果要兼容xls的话,就使用xlrd/xlw ...
- JSP执行原理图
- Spring Boot (23) Lettuce Redis
Spring Boot除了支持常见的ORM框架外,更是对常用的中间件提供了非常好的封装,随着SpringBoot2.x的到来,支持的组件也越来越丰富,也越来越成熟,其中对Redis的支持不仅仅是它丰富 ...
- JVM 垃圾回收器详解
小结: 新生代 串行Serial 并行 Parallel(关注吞吐量) 并行ParNew 老年代 串行 Serial Old 并行Para ...
- RHEL7配置中文输入法-智能拼音
RHEL7配置中文输入法-智能拼音 RHEL7.x(CentOS7.x)系统相对之前的6.x系统变化较大,虽然安装时选择了中文环境,但是进入系统后,在控制台及编辑器中仍无法切换输入法进行中文输入. 原 ...