096实战 在windows下新建maven项目
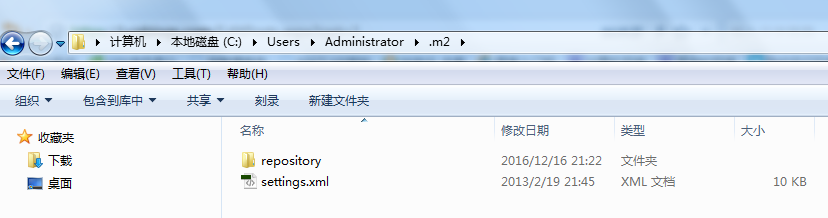
1.拷贝settings到.m2文件下
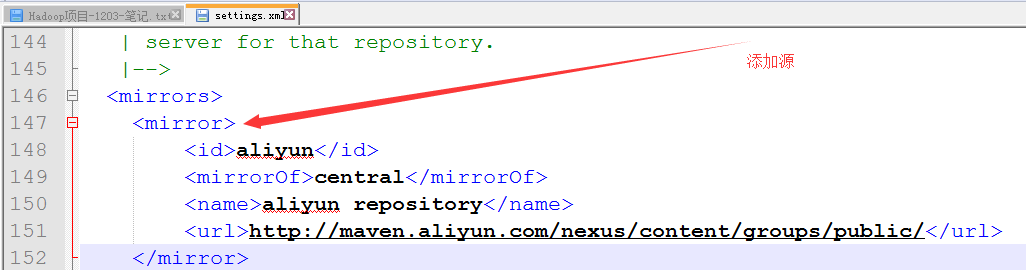
2.修改文件
3.新建Project项目
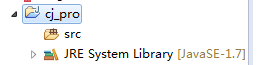
4.转换为maven项目
config下转换
5.拷贝pom文件
 <project xmlns="http://maven.apache.org/POM/4.0.0" xmlns:xsi="http://www.w3.org/2001/XMLSchema-instance" xsi:schemaLocation="http://maven.apache.org/POM/4.0.0 http://maven.apache.org/xsd/maven-4.0.0.xsd">

   <modelVersion>4.0.0</modelVersion>

   <groupId>com.ibeifeng</groupId>

   <artifactId>transformer</artifactId>

   <version>0.0.1</version>

   <properties>

     <hadoop.version>2.5.0-cdh5.3.6</hadoop.version>

     <hbase.version>0.98.6-cdh5.3.6</hbase.version>

     <hive.version>0.13.1-cdh5.3.6</hive.version>

     <mysql.version>5.1.18</mysql.version>

     <gson.version>2.6.2</gson.version>

     <uasparser.version>0.6.1</uasparser.version>

   </properties>

   <repositories>

     <!-- 指定该项目可以从哪些地方下载依赖包 -->

     <repository>

       <id>aliyun</id>

       <url>http://maven.aliyun.com/nexus/content/groups/public/</url>

     </repository>

     <repository>

       <id>cloudera</id>

       <url>https://repository.cloudera.com/artifactory/cloudera-repos/</url>

     </repository>

     <repository>

       <id>jboss</id>

       <url>http://repository.jboss.org/nexus/content/groups/public</url>

     </repository>

   </repositories>

   <dependencies>

     <dependency>

       <groupId>org.apache.hadoop</groupId>

       <artifactId>hadoop-client</artifactId>

       <version>${hadoop.version}</version>

     </dependency>

     <dependency>

       <groupId>org.apache.hbase</groupId>

       <artifactId>hbase-client</artifactId>

       <version>${hbase.version}</version>

     </dependency>

     <dependency>

       <groupId>org.apache.hbase</groupId>

       <artifactId>hbase-server</artifactId>

       <version>${hbase.version}</version>

     </dependency>

     <dependency>

       <groupId>org.apache.hive</groupId>

       <artifactId>hive-exec</artifactId>

       <version>${hive.version}</version>

     </dependency>

     <!-- mysql start -->

     <dependency>

       <groupId>mysql</groupId>

       <artifactId>mysql-connector-java</artifactId>

       <version>${mysql.version}</version>

     </dependency>

     <!-- mysql end -->

     <dependency>

       <groupId>cz.mallat.uasparser</groupId>

       <artifactId>uasparser</artifactId>

       <version>${uasparser.version}</version>

     </dependency>

     <dependency>

       <groupId>com.google.code.gson</groupId>

       <artifactId>gson</artifactId>

       <version>${gson.version}</version>

     </dependency>

   </dependencies>

   <profiles>

     <!-- 指定环境 -->

     <profile>

       <!-- 指定本地运行环境,windows环境 -->

       <id>local</id>

       <activation>

         <!-- 指定默认环境是local -->

         <activeByDefault>true</activeByDefault>

       </activation>

       <build>

         <plugins>

           <plugin>

             <!-- 支持多个不同文件夹中的java代码进行编译 -->

             <groupId>org.codehaus.mojo</groupId>

             <artifactId>build-helper-maven-plugin</artifactId>

             <version>1.4</version>

             <executions>

               <execution>

                 <id>add-source</id>

                 <phase>generate-sources</phase>

                 <goals>

                   <goal>add-source</goal>

                 </goals>

                 <configuration>

                   <sources>

                     <source>${basedir}/src/main/java</source>

                     <source>${basedir}/src/main/extr</source>

                   </sources>

                 </configuration>

               </execution>

             </executions>

           </plugin>

         </plugins>

       </build>

     </profile>

     <profile>

       <!-- hadoop环境运行, linux环境 -->

       <id>dev</id>

       <build>

         <plugins>

           <plugin>

             <groupId>org.codehaus.mojo</groupId>

             <artifactId>build-helper-maven-plugin</artifactId>

             <version>1.4</version>

             <executions>

               <execution>

                 <id>add-source</id>

                 <phase>generate-sources</phase>

                 <goals>

                   <goal>add-source</goal>

                 </goals>

                 <configuration>

                   <sources>

                     <source>${basedir}/src/main/java</source>

                   </sources>

                 </configuration>

               </execution>

             </executions>

           </plugin>

           <plugin>

             <!-- 该插件的作用是将jar文件打包到最终形成的项目jar文件中 -->

             <groupId>org.apache.maven.plugins</groupId>

             <artifactId>maven-shade-plugin</artifactId>

             <version>2.1</version>

             <executions>

               <execution>

                 <phase>package</phase>

                 <goals>

                   <goal>shade</goal>

                 </goals>

                 <configuration>

                   <artifactSet>

                     <includes>

                       <include>cz.mallat.uasparser:uasparser</include>

                       <include>net.sourceforge.jregex:jregex</include>

                       <include>mysql:mysql-connector-java</include>

                     </includes>

                   </artifactSet>

                 </configuration>

               </execution>

             </executions>

           </plugin>

         </plugins>

       </build>

     </profile>

   </profiles>

   <build>

     <testSourceDirectory>src/test/java</testSourceDirectory>

     <plugins>

       <plugin>

         <artifactId>maven-compiler-plugin</artifactId>

         <version>3.3</version>

         <configuration>

           <source>1.7</source>

           <target>1.7</target>

           <encoding>utf8</encoding> <!-- 默认是gbk -->

         </configuration>

       </plugin>

     </plugins>

   </build>

 </project>
6.新建目录
src/main/java
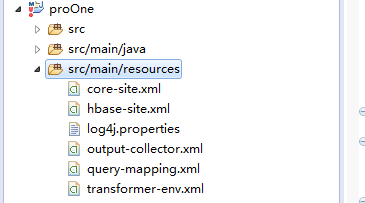
src/main/resources
src/test/java
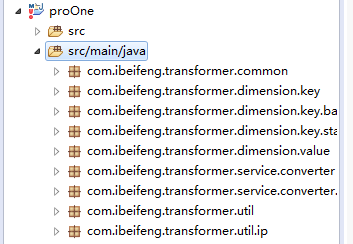
7.拷贝java下的所有程序到src/main/java
8.拷贝resources配置到src/main/resources
9.拷贝ip到主目录

二:测试
1.程序
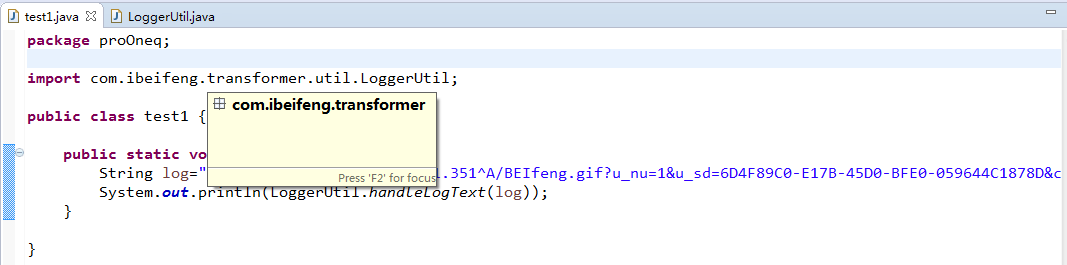
2.结果
{os=Windows, u_sd=6D4F89C0-E17B-45D0-BFE0-059644C1878D, b_iev=Mozilla/5.0 (Windows NT 5.1) AppleWebKit/537.36 (KHTML, like Gecko) Chrome/45.0.2454.101 Safari/537.36, bf_sid=33cbf257-3b11-4abd-ac70-c5fc47afb797_11177014, os_v=Windows XP, c_time=1450569596991, b_rst=1440*900, l=zh-CN, s_time=1450569601351, ver=1, u_ud=4B16B8BB-D6AA-4118-87F8-C58680D22657, city=宝山区, country=中国, ip=114.92.217.149, u_nu=1, browser=Chrome, province=上海市, pl=website, browser_v=45.0.2454.101, en=e_l, sdk=js}
096实战 在windows下新建maven项目的更多相关文章
- 在windows下新建maven项目
1.拷贝settings到.m2文件下 2.修改文件 3.新建Project项目 4.转换为maven项目 config下转换 5.拷贝pom文件 6.新建目录 src/main/java src/m ...
- Eclipse下新建Maven项目、自动打依赖jar包
当我们无法从本地仓库找到需要的构件的时候,就会从远程仓库下载构件至本地仓库.一般地,对于每个人来说,书房只有一个,但外面的书店有很多,类似第,对于Maven来说,每个用户只有一个本地仓库,但可以配置访 ...
- eclipse下新建maven项目
eclipse下新建maven项目 1.1下载maven安装包 进入Maven官网的下载页面:http://maven.apache.org/download.cgi,如下图所示:\ 选择当前最新版本 ...
- Windows下安装Maven
上篇文章刚说到Linux下安装maven的过程,有时候为了适合在本地构建项目开发,然后上传到远程服务器执行,需要在本地构建maven项目,那么一般就是在Windows下构建maven项目并导入到我们的 ...
- 【IDEA】本地新建Maven项目+配置Git和GitHub+代码上传和拉取到GitHub+其他IDEA和GitHub实战
一.本地新建Maven项目并启动成功 1. 按照IDEA提供的模板,构建一个maven webapp的模板项目. 一路Next,到最后的finish.如下图. 2. 新建Tomcat,启动刚建立的项目 ...
- maven课程 项目管理利器-maven 3-4 eclipse安装maven插件和新建maven项目
本节主要讲了两个主要内容, 1 eclipse安装maven插件 2 新建maven项目 3 本人实操 1 eclipse安装maven插件 eclipse4.0以上和myec ...
- [Eclipse的Maven项目搭建,仅为测试Maven功能]如何在Eclipse下搭建Maven项目
[Eclipse的Maven项目搭建,仅为测试Maven功能]如何在Eclipse下搭建Maven项目 你可能需要了解以下才能更好的阅读以下: 在 Windows 中配置Maven: http:/ ...
- eclipse 新建 maven 项目 步骤(初级入门新手)
安装 maven(百度) 和在eclipse 中svn(上一篇) 修改 maven 本地仓库 eclipse 属性 maven--> installations-->添加新的 自定义安装的 ...
- 解决新建maven项目速度慢的问题
问题描述 通过idea新建maven项目,参数设置好后,idea自动构建maven项目时,速度很慢. 参数设置如图: 执行时间如下图: Total time为8:49,花了将近十分钟时间. 连续尝试了 ...
随机推荐
- 给父元素与子元素分别设置visibility注意点
由于机顶盒的终端特性原因,不能用display:hidden去做隐藏,就选择了visibility:hidden. 在这里遇到一个现象: 给父元素设置了hidden,但是里面的子元素依然可见.以为只是 ...
- 根据href给当前导航添加样式
var href = window.location.href.split('/')[window.location.href.split('/').length-1].substr(0,20); i ...
- ROS 多台计算机联网控制机器人
0. 时间同步 sudo apt-get install chrony 1. ubuntu自带的有openssh-client 可以通过如下指令 ssh username@host 来连接同一局域网内 ...
- 使用Groovy的mixin方法注入,和mixedIn属性实现过滤链
mixin方法注入不多说,这里只是用这个属性搞一个过滤器链的功能 假设我现在有个方法,输入一个字符串,然后需求提出需要进行大写转换输出, 过了一天又要加个前缀,再过了一天,需要把一些字符过滤掉.... ...
- MySQL在线更改binlog格式
今天变更jboss报错如下: SQLWarning ignored: SQL state ', message [Unsafe statement written to the binary log ...
- spring mvc 返回类型
spring mvc处理方法支持如下的返回方式:ModelAndView, Model, ModelMap, Map,View, String, void 小结:1.使用 String 作为请求处理方 ...
- 16-client、offset、scroll系列
1.client系列 代码如下: <!DOCTYPE html> <html> <head> <meta charset="UTF-8"& ...
- MyEclipse2014安装插件的几种方式(适用于Eclipse或MyEclipse其他版本)
农历 乙未 羊年 十一月初九 周六 2015年12月19日 14:29 编辑者:刘军 标题: 服务器的搭建请参考该文:<Win7 x64 svn 服务器搭建> ============== ...
- charles mock方法及问题
一. 抓包后修改返回数据1.生成一个完成的请求返回信息1.charles抓取一个完整的请求,返回数据2.然后找到该请求,右键“save response”,将该完整请求返回文件保存至本地3.修改本地需 ...
- jQuery性能优化指南
总是从ID选择器开始继承在jQuery中最快的选择器是ID选择器,因为它直接来自于JavaScript的getElementById()方法. 例如有一段HTML代码:代码 <div id=&q ...