spring boot开发笔记——mybatis
概述
mybatis框架的优点,就不用多说了,今天这边干货主要讲mybatis的逆向工程,以及springboot的集成技巧,和分页的使用
因为在日常的开发中,当碰到特殊需求之类会手动写一下sql语句,大部分的时候完全可以用mybatis的逆向工程替代。
mybatis逆向工程
相比较而言,代码形式的逆向工程,更加灵活方便,简单,易于管理,而且可以上传到git中存储。而且也只需要简单的三步就能完成自动生成代码。下面介绍如果搭建并生成xml和代码
第一步:搭建工程
本项目使用的是maven搭建的工程,在你的pom文件中加入以下依赖:(这里以mysql数据库为例)
        <!-- https://mvnrepository.com/artifact/org.mybatis/mybatis -->

        <dependency>

            <groupId>org.mybatis</groupId>

            <artifactId>mybatis</artifactId>

            <version>3.4.0</version>

        </dependency>

        <!-- https://mvnrepository.com/artifact/mysql/mysql-connector-java -->

        <dependency>

            <groupId>mysql</groupId>

            <artifactId>mysql-connector-java</artifactId>

            <version>5.1.34</version>

        </dependency>

        <!-- https://mvnrepository.com/artifact/log4j/log4j -->

        <dependency>

            <groupId>log4j</groupId>

            <artifactId>log4j</artifactId>

            <version>1.2.17</version>

        </dependency>

        <!-- https://mvnrepository.com/artifact/org.mybatis.generator/mybatis-generator-core -->

        <dependency>

            <groupId>org.mybatis.generator</groupId>

            <artifactId>mybatis-generator-core</artifactId>

            <version>1.3.5</version>

        </dependency>

    </dependencies>
第二步:配置generatorConfig.xml
该xml文件是mybatis的配置项 这里记录了数据库连接的配置,
<?xml version="1.0" encoding="UTF-8"?>

<!DOCTYPE generatorConfiguration

        PUBLIC "-//mybatis.org//DTD MyBatis Generator Configuration 1.0//EN"

        "http://mybatis.org/dtd/mybatis-generator-config_1_0.dtd">

<generatorConfiguration>

    <context id="testTables" targetRuntime="MyBatis3">

        <commentGenerator>

            <!-- 是否去除自动生成的注释 true:是 : false:否 -->

            <property name="suppressAllComments" value="true" />

        </commentGenerator>

        <!--数据库连接的信息:驱动类、连接地址、用户名、密码 -->

        <jdbcConnection driverClass="com.mysql.jdbc.Driver"

                        connectionURL="jdbc:mysql://localhost:3306/database" userId="root"

                        password="123456">

        </jdbcConnection>

        <!-- 默认false,把JDBC DECIMAL 和 NUMERIC 类型解析为 Integer,为 true时把JDBC DECIMAL和NUMERIC类型解析为java.math.BigDecimal -->

        <javaTypeResolver>

            <property name="forceBigDecimals" value="false" />

        </javaTypeResolver>

        <!-- targetProject:生成PO类的位置,重要!! -->

        <javaModelGenerator targetPackage="springboot.modal.vo"

                            targetProject=".\src">

            <!-- enableSubPackages:是否让schema作为包的后缀 -->

            <property name="enableSubPackages" value="false" />

            <!-- 从数据库返回的值被清理前后的空格 -->

            <property name="trimStrings" value="true" />

        </javaModelGenerator>

        <!-- targetProject:mapper映射文件生成的位置,重要!! -->

        <sqlMapGenerator targetPackage="springboot.dao"

                         targetProject=".\src">

            <property name="enableSubPackages" value="false" />

        </sqlMapGenerator>

        <!-- targetPackage:mapper接口生成的位置,重要!! -->

        <javaClientGenerator type="XMLMAPPER"

                             targetPackage="springboot.dao"

                             targetProject=".\src">

            <property name="enableSubPackages" value="false" />

        </javaClientGenerator>

        <!-- 指定数据库表,要生成哪些表,就写哪些表,要和数据库中对应,不能写错! -->

        <table tableName="t_contents" domainObjectName="ContentVo" mapperName="ContentVoMapper" ></table>

    </context>

</generatorConfiguration>
第三步:启动类
启动类主要设置main方法以及,制定配置文件generatorConfig.xml的路径
import org.mybatis.generator.api.MyBatisGenerator;

import org.mybatis.generator.config.Configuration;

import org.mybatis.generator.config.xml.ConfigurationParser;

import org.mybatis.generator.internal.DefaultShellCallback;

import java.io.File;

import java.util.ArrayList;

import java.util.List;

public class Generator {

    public static void main(String args[]) throws  Exception{

        List<String> warnings = new ArrayList<String>();

        boolean overwrite  = true;

        File configFile = new File("./src/main/resources/generatorconfig.xml");

        System.out.println(configFile.exists());

        ConfigurationParser cp = new ConfigurationParser(warnings);

        Configuration config = cp.parseConfiguration(configFile);

        DefaultShellCallback callback = new DefaultShellCallback(overwrite);

        MyBatisGenerator myBatisGenerator = new MyBatisGenerator(config, callback, warnings);

        myBatisGenerator.generate(null);

    }

}
当然如果有你想要设置日志输出的话,可以加一个log4j.properties,简单配置一下日志输出:
# Global logging configuration

log4j.rootLogger=DEBUG, stdout

# MyBatis logging configuration...

log4j.logger.org.mybatis.example.BlogMapper=TRACE

# Console output...

log4j.appender.stdout=org.apache.log4j.ConsoleAppender

log4j.appender.stdout.layout=org.apache.log4j.PatternLayout

log4j.appender.stdout.layout.ConversionPattern=%5p [%t] - %m%n
最后运行启动类Generator,运行之前得确保,在数据库中先创建好表
工程已经搭建好了,可以参考github上:
mybatis逆向工程GitHub
逆向工程如何使用
mapper中的方法
逆向工程生成完毕后,mybatis会在mapper中提供一些默认的接口和参数,下面就介绍一下这些方法的使用:
| 方法 | 功能说明 |
|---|---|
| int countByExample(UserExample example) | 按条件计数 |
| int deleteByPrimaryKey(Integer id) | 按主键删除 |
| int deleteByExample(UserExample example) | 按条件删除 |
| String/Integer insert(User record) | 插入数据,返回值的ID |
| String/Integer insertSelective(User record) | 插入一条数据,只插入不为null的字段 |
| User selectByPrimaryKey(Integer id) | 按主键查询 |
| List selectByExample(UserExample example) | 按条件查询 |
| List selectByExampleWithBLOGs(UserExample example) | 按条件查询(包括BLOB字段)。只有当数据表中的字段类型有为二进制的才会产生。 |
| int updateByPrimaryKey(User record) | 按主键更新 |
| int updateByPrimaryKeySelective(User record) | 按主键更新值不为null的字段 |
| int updateByExample(User record, UserExample example) | 按条件更新 |
| int updateByExampleSelective(User record, UserExample example) | 按条件更新值不为null的字段 |
example类中的方法
mybatis的逆向工程中会生成实例及实例对应的example,example用于添加条件,相当where后面的部分
xxxExample example = new xxxExample();

Criteria criteria = new Example().createCriteria();
下表是常用方法
| 方法 | 说明 |
|---|---|
| example.setOrderByClause(“字段名 ASC”); | 添加升序排列条件,DESC为降序 |
| example.setDistinct(false) | 去除重复,boolean型,true为选择不重复的记录。 |
| criteria.andXxxIsNull | 添加字段xxx为null的条件 |
| criteria.andXxxIsNotNull | 添加字段xxx不为null的条件 |
| criteria.andXxxNotEqualTo(value) | 添加xxx字段不等于value条件 |
| criteria.andXxxGreaterThan(value) | 添加xxx字段大于value条件 |
| criteria.andXxxGreaterThanOrEqualTo(value) | 添加xxx字段大于等于value条件 |
| criteria.andXxxLessThan(value) | 添加xxx字段小于value条件 |
| criteria.andXxxLessThanOrEqualTo(value) | 添加xxx字段小于等于value条件 |
| criteria.andXxxIn(List<?>) | 添加xxx字段值在List<?>条件 |
| criteria.andXxxNotIn(List<?>) | 添加xxx字段值不在List<?>条件 |
| criteria.andXxxLike(“%”+value+”%”) | 添加xxx字段值为value的模糊查询条件 |
| criteria.andXxxNotLike(“%”+value+”%”) | 添加xxx字段值不为value的模糊查询条件 |
| criteria.andXxxBetween(value1,value2) | 添加xxx字段值在value1和value2之间条件 |
| criteria.andXxxNotBetween(value1,value2) | 添加xxx字段值不在value1和value2之间条件 |
sringboot整合mybatis
springboot整合mybatis很简单 只需要简单的配置即可以。
这里使用时xml方式,注解方式相对而言是清爽一些,但是sql全都堆砌在java文件中,并不利于阅读,而且也没有xml方式灵活。
项目构建
这里使用的是maven来构建项目,下面是pom文件:
  <properties>

        <java.version>1.8</java.version>

    </properties>

    <parent>

        <groupId>org.springframework.boot</groupId>

        <artifactId>spring-boot-starter-parent</artifactId>

        <version>1.5.1.RELEASE</version>

        <relativePath/>

    </parent>

    <dependencies>

        <!-- 数据库连接池-->

        <dependency>

            <groupId>com.alibaba</groupId>

            <artifactId>druid</artifactId>

            <version>1.0.18</version>

        </dependency>

        <!-- mysql -->

        <dependency>

            <groupId>mysql</groupId>

            <artifactId>mysql-connector-java</artifactId>

            <version>5.1.35</version>

            <scope>runtime</scope>

        </dependency>

        <!-- spring boot 配置 -->

        <dependency>

            <groupId>org.springframework.boot</groupId>

            <artifactId>spring-boot-starter-web</artifactId>

        </dependency>

        <dependency>

            <groupId>org.springframework.boot</groupId>

            <artifactId>spring-boot-starter-thymeleaf</artifactId>

        </dependency>

        <dependency>

            <groupId>org.springframework.boot</groupId>

            <artifactId>spring-boot-starter-test</artifactId>

            <scope>test</scope>

        </dependency>

        <dependency>

            <groupId>org.mybatis.spring.boot</groupId>

            <artifactId>mybatis-spring-boot-starter</artifactId>

            <version>1.2.0</version>

        </dependency>

    </dependencies>
工程搭建
搭建springboot第一件事就是使用配置application.properties。整合mybatis的时候需要配置jdbc的信息,这里还用了阿里的连接池Druid.下面是详细的配置信息:
server.port=80

#spring.datasource.type=com.alibaba.druid.pool.DruidDataSource

spring.datasource.driverClassName=com.mysql.jdbc.Driver

spring.datasource.url=jdbc:mysql://localhost:3306/bootmybatis?useSSL=false&useUnicode=true&characterEncoding=utf-8&autoReconnect=true

#用户名

spring.datasource.username=root

#密码

spring.datasource.password=123456

spring.datasource.initialSize=20

spring.datasource.minIdle=10

spring.datasource.maxActive=100

# 输出mybatis日志 sql语句方便调试

logging.level.com.dao=DEBUG
下图是工程结构图:
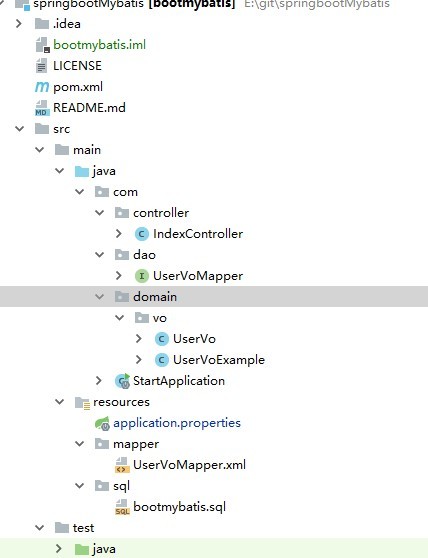
这里的UserVoMapper,UserVo,UserVoExample,都是使用的逆向工程生成的
启动类代码:
package com;

import com.alibaba.druid.pool.DruidDataSource;

import org.apache.ibatis.session.SqlSessionFactory;

import org.mybatis.spring.SqlSessionFactoryBean;

import org.mybatis.spring.annotation.MapperScan;

import org.springframework.boot.Banner;

import org.springframework.boot.SpringApplication;

import org.springframework.boot.autoconfigure.EnableAutoConfiguration;

import org.springframework.boot.autoconfigure.SpringBootApplication;

import org.springframework.boot.context.properties.ConfigurationProperties;

import org.springframework.context.annotation.Bean;

import org.springframework.context.annotation.ComponentScan;

import org.springframework.core.io.support.PathMatchingResourcePatternResolver;

import javax.sql.DataSource;

@SpringBootApplication

@ComponentScan

@EnableAutoConfiguration

@MapperScan("com.dao")

public class StartApplication {

    public static void main(String[] args) throws Exception {

        SpringApplication app = new SpringApplication(StartApplication.class);

        app.setBannerMode(Banner.Mode.OFF);

        app.run(args);

    }

    // datasource注入

    @Bean

    @ConfigurationProperties(prefix = "spring.datasource")

    public DataSource dataSource() {

        return new DruidDataSource();

    }

    //mybatis SQLSession注入

    @Bean

    public SqlSessionFactory sqlSessionFactoryBean() throws Exception {

        SqlSessionFactoryBean sqlSessionFactoryBean = new SqlSessionFactoryBean();

        sqlSessionFactoryBean.setDataSource(dataSource());

        PathMatchingResourcePatternResolver resolver = new PathMatchingResourcePatternResolver();

        // 这里设置mybatis xml文件的地址

        sqlSessionFactoryBean.setMapperLocations(resolver.getResources("classpath:/mapper/*.xml"));

        return sqlSessionFactoryBean.getObject();

    }

}
测试
在IndexController代码如下:
package com.controller;

import com.dao.UserVoMapper;

import com.domain.vo.UserVo;

import org.springframework.beans.factory.annotation.Autowired;

import org.springframework.stereotype.Controller;

import org.springframework.web.bind.annotation.GetMapping;

import org.springframework.web.bind.annotation.ResponseBody;

@Controller

public class IndexController {

    @Autowired

    UserVoMapper userDao;

    @GetMapping(value = "")

    @ResponseBody

    public UserVo index(){

        UserVo userVo = new UserVo();

        userVo.setUsername("SELECTIVE");

        userVo.setPassword("123456");

        userVo.setAddress("北京");

        userDao.insertSelective(userVo);

        userVo = userDao.selectByPrimaryKey(1);

        return userVo;

    }

}
启动startApplication,在浏览器中输入http://127.0.0.1,即可查看到结果。
如果有不明白的可以去git上查看源码,传送门
喜欢的话,给个star
spring boot开发笔记——mybatis的更多相关文章
- Spring Boot学习笔记——Spring Boot与MyBatis的集成(项目示例)
1.准备数据库环境 # 创建数据库 CREATE DATABASE IF NOT EXISTS zifeiydb DEFAULT CHARSET utf8 COLLATE utf8_general_c ...
- Spring Boot学习笔记2——基本使用之最佳实践[z]
前言 在上一篇文章Spring Boot 学习笔记1——初体验之3分钟启动你的Web应用已经对Spring Boot的基本体系与基本使用进行了学习,本文主要目的是更加进一步的来说明对于Spring B ...
- spring boot 2使用Mybatis多表关联查询
模拟业务关系:一个用户user有对应的一个公司company,每个用户有多个账户account. spring boot 2的环境搭建见上文:spring boot 2整合mybatis 一.mysq ...
- spring boot 2整合mybatis
mybatis-spring-boot-starter主要有两种解决方案,一种是使用注解,一种是使用XML. 参考这篇文章动手跑了一个例子,稍微不同之处,原文是spring boot,这里改成了spr ...
- Spring Boot:整合MyBatis框架
综合概述 MyBatis 是一款优秀的持久层框架,它支持定制化 SQL.存储过程以及高级映射.MyBatis 避免了几乎所有的 JDBC 代码和手动设置参数以及获取结果集.MyBatis 可以使用简单 ...
- Spring Boot:实现MyBatis动态数据源
综合概述 在很多具体应用场景中,我们需要用到动态数据源的情况,比如多租户的场景,系统登录时需要根据用户信息切换到用户对应的数据库.又比如业务A要访问A数据库,业务B要访问B数据库等,都可以使用动态数据 ...
- Spring Boot:实现MyBatis动态创建表
综合概述 在有些应用场景中,我们会有需要动态创建和操作表的需求.比如因为单表数据存储量太大而采取分表存储的情况,又或者是按日期生成日志表存储系统日志等等.这个时候就需要我们动态的生成和操作数据库表了. ...
- spring boot 开发环境搭建(Eclipse)
Spring Boot 集成教程 Spring Boot 介绍 Spring Boot 开发环境搭建(Eclipse) Spring Boot Hello World (restful接口)例子 sp ...
- Spring Boot 学习笔记(六) 整合 RESTful 参数传递
Spring Boot 学习笔记 源码地址 Spring Boot 学习笔记(一) hello world Spring Boot 学习笔记(二) 整合 log4j2 Spring Boot 学习笔记 ...
随机推荐
- LNMP 支持 ThinkPHP 的 pathinfo 模式
注意使用LNMP 1.4版 1.修改php.ini 启用pathinfo /usr/local/php/etc/php.ini cgi.fix_pathinfo = 0 值改为1 2.修改/usr/l ...
- Java并发辅助类的使用
目录 1.概述 2.CountdownLatch 2-1.构造方法 2-2.重要方法 2-3.使用示例 3.CyclicBarrier 3-1.构造方法 3-2.使用示例 4.Semaphore 4- ...
- VideoView 监听视频格式不支持时的错误。
视频播放格式不支持的处理https://www.cnblogs.com/ygj0930/p/7737209.html 不处理的情况下,默认会有弹框提示:不支持该视频格式. mVideoView.set ...
- 绑定checkedComboBox
using System; namespace CommonLib{ /// <summary> /// CommonCode 的摘要说明. /// </summary> [S ...
- python argparse(参数解析)模块学习(二)
转载自:http://www.cnblogs.com/fireflow/p/4841389.html(我去..没转载功能,ctrl + c 和 ctrl + v 得来的,格式有点问题,可去原版看看) ...
- hdoj4734(数位dp优化)
题目链接:https://vjudge.net/problem/HDU-4734 题意:定义一个十进制数AnAn-1...A1的value为An*2n-1+...+A1*20,T组样例(<=1e ...
- Aspose.word
http://my.oschina.net/dancefires/blog/217858
- python + Jquery,抓取西东网上的Java教程资源网址
#!/usr/bin/env python # -*- coding: utf-8 -*- # @Date : 2018-06-15 14:01:45 # @Author : Chenjun (320 ...
- VMware虚拟机配置端口转发(端口映射),实现远程访问【转】
前言本文所写的远程为各个电脑在同一个网段内 本文主要详细介绍如何远程访问虚拟机里面的项目! 机器:虚拟机(装在电脑1里).电脑1(宿主机).电脑2.电脑3.电脑4.电脑n... 操作步骤: step1 ...
- java基础 ---- 练习for循环
----- 使用for循环打印图形 //打印矩形 public class Print { public static void main(String[] args) { for(int i=1 ...