winfrom图片放大器
废话不多说,直接上图看效果,左上角是原图片大小,右边是局部放大的效果
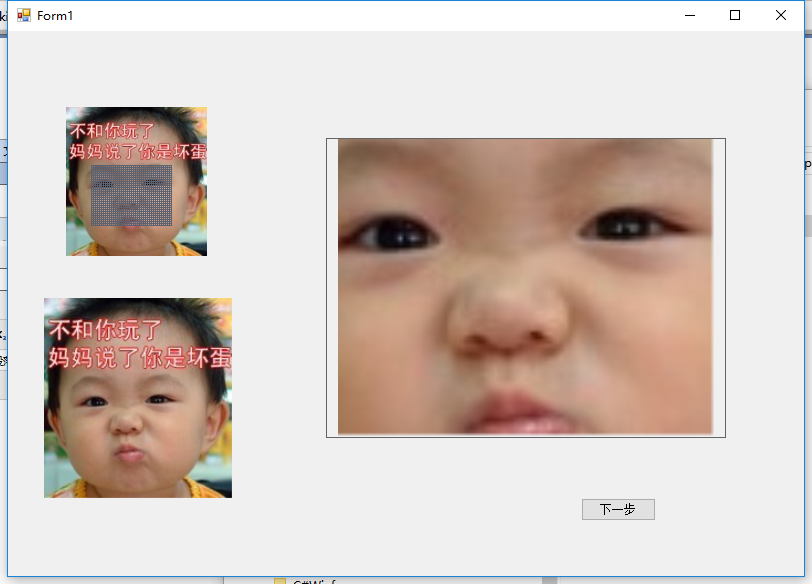
主要代码贴在下面,picBox是原图控件名,picBox_Show是放大控件名
private void picBox_Paint(object sender, PaintEventArgs e)
{
if (isMove == true)
{
Graphics g = e.Graphics;
/*画长方形*/
int _x = movedPoint_X - rect_W / 2;
int _y = movedPoint_Y - rect_H / 2;
_x = _x < 0 ? 0 : _x;
_y = _y < 0 ? 0 : _y;
_x = _x >= picBox.Width - rect_W ? picBox.Width - rect_W - 3 : _x; //减3px的目的就是为了让长方形的边框不会刚好被picBox的边框挡住了
_y = _y >= picBox.Height - rect_H ? picBox.Height - rect_H - 3 : _y;
Rectangle rect = new Rectangle(_x, _y, rect_W, rect_H);
g.DrawRectangle(pen, rect);
// g.FillRectangle(brush, rect);
///*填充网格*/
int x1, x2, y1, y2;
x1 = x2 = _x;
y1 = y2 = _y;
x2 += rect_W;
for (int i = 1; i < rowGridCount; i++)
{
y1 += gridSize;
y2 += gridSize;
g.DrawLine(pen, x1, y1, x2, y2);
}
x1 = x2 = _x;
y1 = y2 = _y;
y2 += rect_H;
for (int j = 1; j < columnGridCount; j++)
{
x1 += gridSize;
x2 += gridSize;
g.DrawLine(pen, x1, y1, x2, y2);
}
/*裁剪图片*/
if (picBox_Show.Image != null)
{
picBox_Show.Image.Dispose();
}
Bitmap bmp = (Bitmap)picBox.Image;
//缩放比例
double rate_W = Convert.ToDouble(bmp.Width) / picBox.Width;
double rate_H = Convert.ToDouble(bmp.Height) / picBox.Height;
Bitmap bmp2 = bmp.Clone(new Rectangle(Convert.ToInt32(rate_W * _x), Convert.ToInt32(rate_H * _y), Convert.ToInt32(rate_W * rect_W), Convert.ToInt32(rate_H * rect_H)), picBox.Image.PixelFormat);
picBox_Show.Image = bmp2;
picBox_Show.SizeMode = PictureBoxSizeMode.Zoom;
picBox_Show.Visible = true;
isMove = false;
}
}
//Paint事件中处理逻辑:当鼠标移动在图片的某个位置时,我们需要绘个长方形区域,同时显示局部放大图片(picBox_Show)。当执行picBox.Refresh()方法时将触发该事件。
private void picBox_MouseMove(object sender, MouseEventArgs e)
{
picBox.Focus(); //否则滚轮事件无效
isMove = true;
movedPoint_X = e.X;
movedPoint_Y = e.Y;
picBox.Refresh();
}
//鼠标移开后,局部显示图片(picBox_Show)隐藏,picBox绘制的长方形也要去掉,最简单的就是调用Refresh()方法了。
void picBox_Show_MouseWheel(object sender, MouseEventArgs e)
{
double scale = 1;
if (picBox_Show.Height > 0)
{
scale = (double)picBox_Show.Width / (double)picBox_Show.Height;
}
picBox_Show.Width += (int)(e.Delta * scale);
picBox_Show.Height += e.Delta;
}
bool isMove = false;
//鼠标移动后点的坐标
int movedPoint_X, movedPoint_Y;
//画笔颜色
Pen pen = new Pen(Color.FromArgb(91, 98, 114));
HatchBrush brush = new HatchBrush(HatchStyle.Cross, Color.FromArgb(91, 98, 114), Color.Empty); //使用阴影画笔画网格
//选取区域的大小
const int rect_W = 80;
const int rect_H = 60;
//网格边长:5px 一格
const int gridSize = 2;
//网格的行、列数
int rowGridCount = rect_H / gridSize;
int columnGridCount = rect_W / gridSize;
private void picBox_MouseLeave(object sender, EventArgs e)
{
picBox_Show.Visible = false;
picBox.Refresh();
picBox_Show.Width = 400;
picBox_Show.Height = 300;
}
winfrom图片放大器的更多相关文章
- 写了一个兼容IE9的图片放大器(基于vue)
photoloupe 图片放大器 第一次写vue插件,本人比较喜欢用简单易懂的写法,不喜勿喷. 本插件支持IE9及以上版本,已经过验证. 本插件可根据需要设置放大倍数,最小支持1倍,支持小数 下载地址 ...
- jquery插件——图片放大器
用到了JQzoom插件,可以使图片实现放大效果
- jquery图片放大器插件
将鼠标移动到一张图片上来的时候,放大该图片的某些细节. <html> <head> <script src="../js/jquery-1.6.js" ...
- winfrom 图片等比例压缩
效果图: 核心代码: /// <summary> /// 等比例缩放图片 /// </summary> /// <param name="bitmap" ...
- js 实现的页面图片放大器以及 event中的诸多 x
背景: 淘宝.天猫等电商网站浏览图片时可以查看大图的功能: 思路: 思路很简单,两张图片,一张较小渲染在页面上,一张较大是细节图,随鼠标事件调整它的 left & top; 需要的知识点: o ...
- javascript实现 京东淘宝等商城的商品图片大图预览功能(图片放大器)
在京东和淘宝等购买东西的时候,我们会经常预览左侧商品展示图片,把鼠标放到原图,右侧就会有个大图显示出细节.本文将带领大家写一个这样简单的功能! 一.实现原理 当鼠标移入某一图片内部时,图片上部会出 ...
- JS-商品图片放大器
//给mask添加事件,让其随着鼠标移动 superMask.onmousemove=function(){ var left=event.offsetX-175/2; left=left>0? ...
- JS - 图片放大器
下载地址:http://www.lanrentuku.com/js/tupian-1170.html
- winfrom 图片裁剪 圆形头像
效果 核心代码 public Region DrawingCircle(Rectangle r) { GraphicsPath gp = new GraphicsPath(); gp.AddEllip ...
随机推荐
- urllib和requests库
目录 1. Python3 使用urllib库请求网络 1.1 基于urllib库的GET请求 1.2 使用User-Agent伪装后请求网站 1.3 基于urllib库的POST请求,并用Cooki ...
- 数据库MySQL 之 索引原理与慢查询优化
数据库MySQL 之 索引原理与慢查询优化 浏览目录 索引介绍方法类型 聚合索引辅助索引 测试索引 正确使用索引 组合索引 注意事项 查询计划 慢查询日志 大数据量分页优化 一.索引介绍方法类型 1. ...
- No goals have been specified for this build. You must specify a valid lifecycle phase or a goal in the format <plugin-prefix>:<goal> or <plugin-group-id>:<plugin-artifact-id>[:<plugin-version>]:<goal
No goals have been specified for this build. You must specify a valid lifecycle phase or a goal in t ...
- sqlserver 误删数据库恢复
本文为转载 原文:https://blog.csdn.net/xwnxwn/article/details/53537841 由于长时间从事企业应用系统开发,前往用户现场升级.调试系统是比较常做的事情 ...
- idea 设置编译的编码方式
Settings->Build,Execution,Deployment->Compiler->Java Compiler,右边的详情列表中,Javac Options有设置参数的地 ...
- java.lang.SuppressWarnings的注解简介
简介:java.lang.SuppressWarnings是J2SE 5.0中标准的Annotation之一.可以标注在类.字段.方法.参数.构造方法,以及局部变量上.作用:告诉编译器忽略指定的警告, ...
- springboot xml声明式事务管理方案
在开发过程中springboot提供的常见的事务解决方案是使用注解方式实现. 使用注解 在启动类上添加注解 @EnableTransactionManagement 在需要事务控制的方法添加@Tran ...
- vue +bootstrap 写的小例子
最近vue挺火,最近也不是特别忙,就学习了下. vue和angular非常像都是MVVM.道理都是想通的,就是语法的差异 我觉得vue和angular区别: 1.vue更轻,更便捷,适用于移动开发 2 ...
- w7 目录
第17章 期中架构体系介绍 期中架构环境准备 01-期中架构内容简介 02-期中架构大酒楼详解 03-期中架构使用到的软件简介 04-期中架构运维角度观察与使用的软件 05-重头开始创建一台新的虚拟机 ...
- s4-9 二层设备
二层(数据链路层)设备有哪些? 网卡 网桥 交换机 NIC 网卡 Nework Interface Card 为主机提供介质的访问. MAC地址烧在网卡的 ROM中 NIC 网 ...