S5700的Eth-Trunk端口汇聚(trunk实验)
S5700的Eth-Trunk端口汇聚
链路汇聚和端口汇聚,就是端口聚合,交换机的堆叠是堆叠和端口聚合无关。
端口聚合概念:(包括二层端口聚合和三层端口聚合)
1.端口聚合IEEE标准是将最多16条链路聚合成一个逻辑的链路。其中只有8条可以使用,
其余8条作为备份。
2.做聚合的端口配置,物理介质性质(双工模式,接口带宽等等)必须一样
3.端口聚合可以提高带宽,但是不是物理上的提高,而是基于负载均衡的提高
4.做端口聚合的端口只能以2的倍数个链路做聚合,即只能2、4、6、8条链路做聚合,
不能是奇数链路做聚合
Eth-Trunk简单端口汇聚:(本地负载均衡)
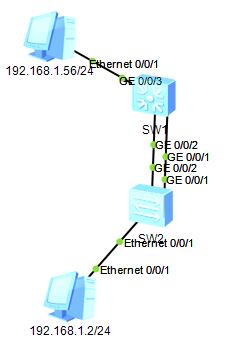
SW1:
[SW1]interface Eth-Trunk 1 #建立汇聚端口1
[SW1-Eth-Trunk1]port link-type access #更改端口为访问端口,如果下面是两台交换机,则需要更改为port link-type trunk模式。
[SW1-Eth-Trunk1]mode manual load-balance #添加手动本地负载模式
[SW1-Eth-Trunk1]quit
[SW1]interface GigabitEthernet 0/0/1
[SW1-GigabitEthernet0/0/1]eth-trunk1 #将端口0/0/1加入eth-trunk1
[SW1]interface GigabitEthernet 0/0/2
[SW1-GigabitEthernet0/0/2]eth-trunk1 #将端口0/0/2加入eth-trunk1
[SW1]interface vlan 1
[SW1-Vlanif1]ip address 192.168.1.254255.255.255.0
[SW1-Vlanif1]quit
SW2:
[SW2]interface vlan 1
[SW2-Vlanif1]ip add
[SW2-Vlanif1]ip address 192.168.1.1255.255.255.0
[SW2-Vlanif1]quit
通过抓包验证时如果断开GigabitEthernet 0/0/1接口下连线的情况下,会自动切换到GigabitEthernet 0/0/2端口下进行通信。
删除端口下trunk的正确方法:
(因为端口默认是在vlan1的,如果删除了全部,端口就没有默认vlan1的配置了,需要重新加回来,才可以继续下一步的删除。)
[SWH1]interfaceGigabitEthernet 0/0/2
[SWH1-GigabitEthernet0/0/2]undoport trunk allow-pass vlan all
[SWH1-GigabitEthernet0/0/2]porttrunk allow-pass vlan 1
[SWH1-GigabitEthernet0/0/2]undoport link-type
[SWH1-GigabitEthernet0/0/2]quit
Eth-Trunk不同或者相同的vlan间互通:
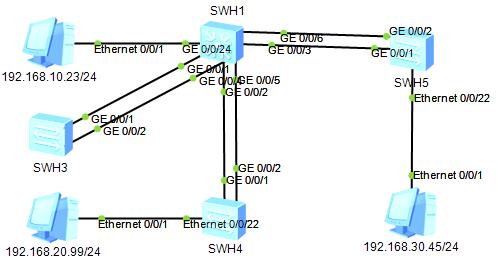
准备:
192.168.10.23/24
192.168.20.99/24
192.168.30.45/24 Gateway:192.168.X.1/24
这三台电脑都为测试使用,其实直接用交换进行ping也可以进行测试,纯属个人习惯。
VLAN: 10 20 30
Vlanif10:192.168.10.254/24
Vlanif20:192.168.20.254/24
Vlanif30:192.168.30.254/24
配置:
SWH1:
[SWH1]vlan batch 10 20 30
[SWH1]interface vlan 10
[SWH1-Vlanif10]ip address192.168.10.254 24
[SWH1-Vlanif10]ip address 192.168.20.254 24
[SWH1-Vlanif10]ip address 192.168.30.254 24
[SWH1-Vlanif10]quit
[SWH1]interface Eth-Trunk 1
[SWH1-Eth-Trunk1]port link-type trunk
[SWH1-Eth-Trunk1]port trunk allow-pass vlanall
[SWH1-Eth-Trunk1]mode manual load-balance
[SWH1-Eth-Trunk1]trunkport GigabitEthernet 0/0/1
[SWH1-Eth-Trunk1]trunkport GigabitEthernet 0/0/4
[SWH1]interface vlan 20
[SWH1-Vlanif20]ip address 192.168.20.254 24
[SWH1]interface Eth-Trunk 2
[SWH1-Eth-Trunk2]port link-type trunk
[SWH1-Eth-Trunk2]port trunk allow-pass vlanall
[SWH1-Eth-Trunk2]mode manual load-balance
[SWH1-Eth-Trunk2]trunkport GigabitEthernet 0/0/2
[SWH1-Eth-Trunk2]trunkport GigabitEthernet 0/0/5
[SWH1]interface vlan 30
[SWH1-Vlanif30]ip address 192.168.30.254 24
[SWH1]interface Eth-Trunk 3
[SWH1-Eth-Trunk3]port link-type trunk
[SWH1-Eth-Trunk3]port trunk allow-pass vlanall
[SWH1-Eth-Trunk3]mode manual load-balance
[SWH1-Eth-Trunk3]trunkport GigabitEthernet 0/0/3
[SWH1-Eth-Trunk3]trunkport GigabitEthernet 0/0/6
[SWH1]interface GigabitEthernet 0/0/24
[SWH1-GigabitEthernet0/0/24]port link-type access
[SWH1-GigabitEthernet0/0/24]port default vlan 10
[SWH1-GigabitEthernet0/0/24]quit
SWH4:
[SWH4]vlan batch 10 20 30
[SWH4]interface Ethernet 0/0/22
[SWH4-Ethernet0/0/22]port link-type access
[SWH4-Ethernet0/0/22]port default vlan 20
[SWH4-Ethernet0/0/22]quit
[SWH4]interface vlan 20
[SWH4-Vlanif20]ip address192.168.20.1 255.255.255.0
[SWH4-Vlanif20]quit
[SWH4]interface Eth-Trunk 2
[SWH4-Eth-Trunk2]trunkport GigabitEthernet0/0/1
[SWH4-Eth-Trunk2]trunkport GigabitEthernet0/0/2
[SWH4-Eth-Trunk2]port link-type trunk
[SWH4-Eth-Trunk2]port trunk allow-pass vlanall
[SWH4-Eth-Trunk2]mode manual load-balance
[SWH4-Eth-Trunk2]quit
[SWH4]iproute-static 192.168.10.0 24 192.168.20.254
[SWH4]iproute-static 192.168.30.0 24 192.168.20.254
SWH5:
跟SWH4的配置是一样的,就是最后的静态路由改变了。
[SWH5]vlan batch 10 20 30
[SWH5]interface Eth-Trunk 3
[SWH5-Eth-Trunk3]trunkport GigabitEthernet0/0/1
[SWH5-Eth-Trunk3]trunkport GigabitEthernet0/0/2
[SWH5-Eth-Trunk3]port link-type trunk
[SWH5-Eth-Trunk3]port trunk allow-pass vlanall
[SWH5-Eth-Trunk3]mode manual load-balance
[SWH5-Eth-Trunk3]quit
[SWH5]interface vlan 30
[SWH5-Vlanif30]ip address 192.168.30.1 255.255.255.0
[SWH5-Vlanif30]quit
[SWH5]ip route-static192.168.10.0 24 192.168.30.254
[SWH5]ip route-static 192.168.20.0 24192.168.30.254
SWH3:
跟SWH4的配置是一样的,就是最后的静态路由改变了。
[SWH3]vlan batch 10 20 30
[SWH3]interface Eth-Trunk 1
[SWH3-Eth-Trunk1]trunkport GigabitEthernet0/0/1
[SWH3-Eth-Trunk1]trunkport GigabitEthernet0/0/2
[SWH3-Eth-Trunk1]port link-type trunk
[SWH3-Eth-Trunk1]port trunk allow-pass vlanall
[SWH3-Eth-Trunk1]mode manual load-balance
[SWH3-Eth-Trunk1]quit
[SWH3]interface vlan 10
[SWH3-Vlanif10]ip address 192.168.10.1 255.255.255.0
[SWH5-Vlanif10]quit
[SWH3]ip route-static192.168.30.0 24 192.168.10.254
[SWH3]ip route-static 192.168.20.0 24192.168.10.254
检测都可以ping通,且抓包可以实现自动切换。
注意:在本地配置Eth-Trunk的时候,在对端也要进行Eth-Trunk的配置,且加上路由就可以实现不同网段间的互通。
S5700的Eth-Trunk端口汇聚(trunk实验)的更多相关文章
- Huawei-R&S-网络工程师实验笔记20190609-VLAN划分综合(Access和Trunk端口)
>Huawei-R&S-网络工程师实验笔记20190609-VLAN划分综合(Access和Trunk端口) >>实验开始,先上拓扑图参考: >>>实验目标 ...
- 交换机Trunk端口配置
本文为转发,简单明了,我喜欢. Trunk端口的配置步骤如下: 一 组网需求: 1.SwitchA与SwitchB用trunk互连,相同VLAN的PC之间可以互访,不同VLAN的PC之间禁止互访: 2 ...
- 在eNSP上配置VLAN的Trunk端口
1.实验内容:在不同交换机下不同部门的员工能够互相通信,需要配置交换机之间的链路,跨交换机实现VLAN间通信 2.实验拓扑图 3.实验配置 按照实验编址表编辑配置所有PC机的IP地址 编址表如下图: ...
- trunk端口配置错误导致环路
端口下 switchport mode trunk spannning-tree portfast 上述两个命令同时执行将导致环路
- 华为交换机trunk端口更改access提示:Error: Please renew the default configurations.
现象: 华为交换机接口由原来 trunk 接口更改 access 提示 Error: Please renew the default configurations. 解决方法: 在交换机视图模式下, ...
- H3C配置Trunk端口
- 华为 S5700 交换机 批量修改端口方法
常常在配置交换机端口的时候需要将多个端口设置为相同的配置,当时各端口逐一去配置不仅慢,而且容易出错,这个时候就需要对端口进行批量设置,不仅快捷,而且避免了反复输出容易出错的情况.不同系列.不同版本交换 ...
- 华为交换机S5700系列配置镜像端口(M:N)
配置本地端口镜像组网图(M:N) 组网需求 如图所示,某公司研发一部.研发二部和市场部通过Switch与外部Internet通信,监控设备Server1.Server2与Switch直连. 现在希望将 ...
- 华为交换机S5700系列配置镜像端口(1:1)
配置本地镜像口(1:1) 组网需求 如图一所示,某公司行政部通过Switch与外部Internet通信,监控设备Server与Switch直连. 现在希望通过Server对行政部访问Internet的 ...
随机推荐
- Java NIO系列教程(三) Buffer
Java NIO中的Buffer用于和NIO通道进行交互.如你所知,数据是从通道读入缓冲区,从缓冲区写入到通道中的.交互图如下: 缓冲区本质上是一块可以写入数据,然后可以从中读取数据的内存.这块内存被 ...
- ObjectOutputStream
public class Test { public static void main(String[] args) throws Exception { //writeObject(); readO ...
- docker-compose部署elk+apm
1.安装docker 参考我的另外的一篇博客:https://www.cnblogs.com/cuishuai/p/9485939.html 2.安装docker-compose # yum -y i ...
- nginx 代理之修改header 的HOST,实现代理转代理
现有一个需求,需要从nginx跳转到k8s的traefik代理上,从而实现服务的访问,用于测试.直接修改proxy_set_header的HOST,修改为traefuk代理的域名,proxy_pass ...
- 开源方案搭建可离线的精美矢量切片地图服务-6.Mapbox之.pbf字体库
项目成果展示(所有项目文件都在阿里云的共享云虚拟主机上,访问地图可以会有点慢,请多多包涵). 01:中国地图:http://test.sharegis.cn/mapbox/html/3china.ht ...
- es6学习笔记11--Proxy和Reflect
Proxy概述 Proxy用于修改某些操作的默认行为,等同于在语言层面做出修改,所以属于一种“元编程”(meta programming),即对编程语言进行编程. Proxy可以理解成,在目标对象之前 ...
- 中小型研发团队架构实践六:如何用好消息队列RabbitMQ?
一.写在前面 使用过分布式中间件的人都知道,程序员使用起来并不复杂,常用的客户端 API 就那么几个,比我们日常编写程序时用到的 API 要少得多.但是分布式中间件在中小研发团队中使用得并不多,为什么 ...
- AssemblyInfo.cs 详解
前言 ? .net工程(包括Web和WinForm)的Properties文件夹下自动生成一个名为AssemblyInfo.cs的文件,一般情况下我们很少直接改动该文件.但我们实际上通过另一个形式操作 ...
- #if defined 和 #if ! defined 的用法
背景:MFC初学,头文件中有#if !defined(AFX_HELLOMFC_H__706D36F5_2F1B_40AC_8BE9_0BD6A1D7BBDE__INCLUDED_)#define A ...
- 【Linux】 源码安装make命令详解,避免踩坑
正常的编译安装/卸载: 源码的安装一般由3个步骤组成:配置(configure).编译(make).安装(make install). configure文件是一个可执行的脚本文件,它有很多选项, ...